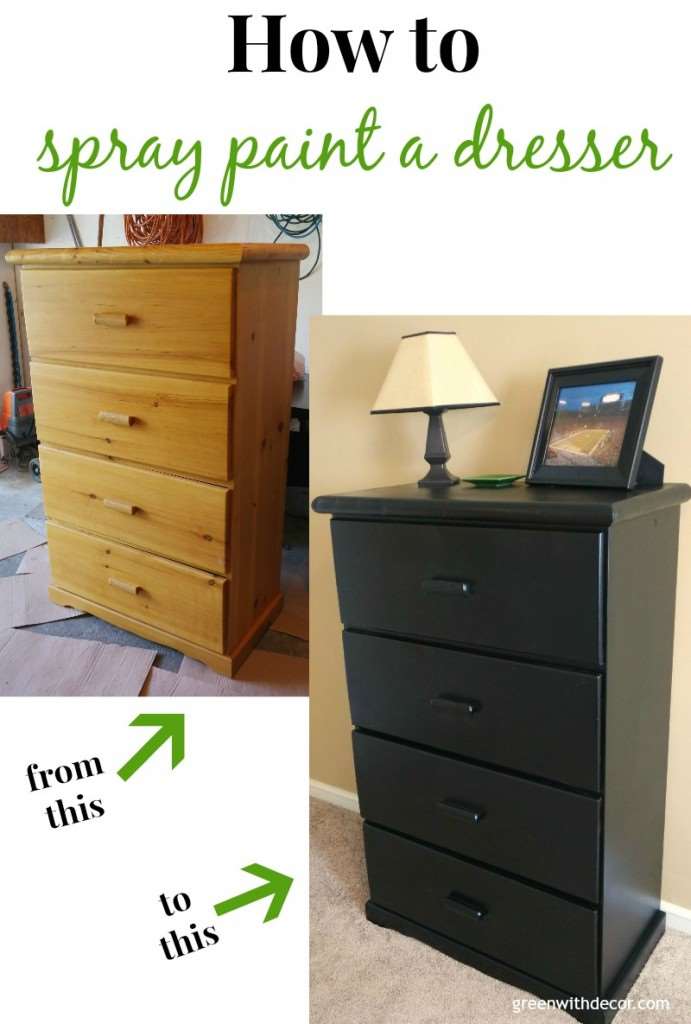
Spray painting a dresser is one of those DIY projects that can change the look of a whole room. A plain or old dresser can become a stylish piece with just a few cans of spray paint and some time.
Many people try this project, but not everyone gets a smooth, durable finish. Success depends on good preparation, the right tools, and careful steps. You don’t have to be a professional to get a great result, but it’s important to understand the whole process before you begin.
This guide will walk you through every detail of how to spray paint a dresser. You’ll learn about choosing the right paint, preparing your space, dealing with different dresser materials, avoiding common problems, and caring for your finished piece. Whether this is your first time or you’ve tried before, you’ll find practical advice and tips you won’t get in most quick tutorials.
By the end, you’ll be ready to transform your dresser with confidence.
Why Spray Paint A Dresser?
Many people wonder why they should use spray paint instead of a brush or roller. Spray painting gives a very smooth, even look, which is hard to achieve with a brush. There are no brush marks, and you can cover curves, edges, and details with less effort. Another advantage is speed—spray paint dries faster and covers large surfaces quickly.
Spray painting is also flexible. You can choose from many colors and finishes, from matte to high-gloss. Some spray paints even include a primer or protective topcoat, saving extra steps. For dressers with carvings or unusual shapes, spray paint is often the only way to get a clean look.
One thing beginners miss is that spray paint is not just for cosmetic updates. It can also protect the wood or material underneath from moisture and wear. When done right, your dresser will last longer and stay looking new.
Tools And Materials Needed
Before you start, gather everything you need. Missing a tool in the middle of the project can lead to mistakes. Here’s a list of essentials for spray painting a dresser:
- Spray paint (enough cans for full coverage; usually 2–4 for an average dresser)
- Primer (if your spray paint does not include it)
- Topcoat or sealant (for extra durability)
- Sandpaper (medium and fine grits, usually 120 and 220)
- Screwdriver (for removing hardware)
- Drop cloths or old sheets (to protect your floor)
- Painter’s tape
- Masking film or plastic (for large areas)
- Cleaning cloths
- Mild detergent (for cleaning)
- Protective gear (mask, gloves, goggles)
- Tack cloth
- Putty or wood filler (for repairing damage)
- Putty knife
Some dressers may need special supplies, like deglosser for glossy finishes or liquid sandpaper for laminate surfaces. Most items can be found at hardware stores.
Example Table: Basic Supply Comparison
Here’s how some key supplies compare in price and use:
| Item | Average Cost | Why It’s Important |
|---|---|---|
| Primer Spray | $6–$10/can | Bonds paint to surface, covers stains |
| Sandpaper Pack | $4–$8 | Creates smooth base, helps paint stick |
| Protective Mask | $2–$5 | Blocks harmful paint fumes |
Having all your tools ready means you won’t rush or skip steps, which often leads to poor results.

Credit: www.youtube.com
Picking The Right Spray Paint
Not all spray paints are the same. The paint you choose will affect how your dresser looks, feels, and lasts. Here’s how to decide:
Paint Type
- Enamel: Durable and glossy. Good for wood, metal, and MDF.
- Acrylic: Dries fast, less odor. Not as tough as enamel.
- Chalk spray paint: Matte finish, easy to distress for vintage style.
- Specialty paints: For plastics, laminates, or unique effects.
Finish
- Matte: No shine, hides flaws.
- Satin: Soft sheen, easy to clean.
- Gloss: Shiny, modern look but shows surface flaws.
- Metallic/Pearl: For creative touches.
Color
Pick a color that fits your room. If unsure, classic colors like white, gray, navy, or black work in most spaces. Test a small area first if possible.
Coverage
Check the label for coverage per can, usually in square feet. Most dressers need 2–3 cans for solid color. Buy extra if you plan to do several coats.
Primer And Topcoat
Some spray paints have primer built-in. If not, use a separate primer for better results, especially on bare wood or laminate. A topcoat adds scratch resistance and shine.
Vocs And Odor
Some paints have strong smells or release VOCs (chemicals that can be unhealthy). Look for low-VOC or odorless options if you’ll paint indoors.
Prepping The Space
Spray paint can be messy. Tiny droplets travel farther than you think. Set up your workspace so you don’t ruin floors or nearby furniture.
- Choose a well-ventilated area. Outdoors is best, but a garage with the door open works too. If you must paint inside, open windows and use fans to move air out.
- Cover floors and walls. Use drop cloths, old sheets, or plastic sheeting. Secure with tape so they don’t move.
- Remove items nearby. Move anything you don’t want painted.
- Set up a paint station. Place the dresser on blocks or bricks so you can reach the bottom edges. This also keeps it off the ground if paint drips.
- Have a spot for drying. Paint needs time to cure between coats. Make sure there’s a safe area where dust, pets, or kids can’t touch the drying dresser.
Preparing The Dresser
Preparation is the secret to a great finish. Skipping these steps leads to chipping, peeling, or uneven color.
Remove Hardware And Drawers
Use a screwdriver to take off all handles, knobs, and hinges. Remove the drawers completely. Set hardware aside in labeled bags so nothing gets lost. If you want to paint the hardware, now is the time to clean and prep it.
Clean Thoroughly
Wipe down the entire dresser with a damp cloth and mild detergent. Remove all dust, grease, and old polish. Even small amounts of oil can make paint bubble or not stick. Let the dresser dry fully.
Repair And Fill Damage
Look for dents, scratches, or holes. Fill these with wood filler and smooth with a putty knife. Let it dry, then sand smooth. This extra step makes the finished dresser look new.
Sanding
Sanding is critical. Even new dressers have a factory finish that paint won’t stick to. Use medium-grit sandpaper (120) for the first pass. Sand all surfaces lightly—just enough to remove shine, not deep into the wood.
Follow with fine-grit sandpaper (220) for a smooth surface. Always sand in the direction of the wood grain. Wipe with a tack cloth to remove all dust. Skipping this step is a common beginner mistake.
Dealing With Laminates Or Glossy Surfaces
Many cheap or modern dressers are covered with laminate or a high-gloss finish. Paint will not stick well unless you:
- Sand the surface until it feels dull, not shiny
- Use a bonding primer made for slick surfaces
Some use liquid sandpaper (deglosser) for these materials. Follow the label instructions.
Masking Off Areas
Use painter’s tape to cover any parts you don’t want painted, like drawer slides or glass inserts. Press tape edges firmly to prevent leaks.
Priming The Dresser
Primer helps paint stick and makes colors look even. If your paint includes primer, you can skip this step—but for best results, use a dedicated primer, especially for:
- Raw wood
- Laminate surfaces
- Stained or dark dressers
- Dressers with repairs
Shake the primer can well. Hold it about 10–12 inches from the surface. Spray in light, even strokes, moving side to side. Overlap each pass slightly. It’s better to do two thin coats than one thick coat to avoid drips.
Let the primer dry as directed (usually 30–60 minutes). Lightly sand with fine sandpaper between coats for a glass-smooth finish. Wipe away dust before moving to paint.
Spray Painting: Step-by-step
Here’s the heart of the project. Move slowly and patiently—rushing leads to mistakes that are hard to fix.
1. Shake The Paint Can
Vigorously shake for at least one minute after the mixing ball rattles. This ensures color and finish are even.
2. Test Spray
Spray onto cardboard or scrap wood first. Make sure the nozzle works smoothly and the color is right.
3. Hold The Can Correctly
Keep the spray can about 10–12 inches from the dresser surface. Too close leads to drips; too far gives a rough, dusty finish.
4. Spray In Thin, Even Coats
Move the can in steady side-to-side motions. Overlap each pass by about 30%. Start spraying just off the edge, then move across the surface, and stop after you pass the other edge. This prevents paint build-up at the ends.
Let each coat dry according to the label (usually 15–30 minutes). Plan on at least 2–3 coats for full, even color. More coats may be needed for light colors over dark wood or if covering heavy stains.
5. Watch For Drips And Runs
If you see a drip, wait until it dries, then sand it smooth. Repaint that spot with a thin coat. Don’t try to fix wet drips—they’ll smear and look worse.
6. Rotate Drawers And Dresser
Spray all sides, including edges and corners. For drawers, paint the fronts first, let dry, then rotate to paint the sides and top edges.
7. Sand Between Coats
For an ultra-smooth finish, lightly sand with fine sandpaper between coats. Wipe clean after sanding.
Example Table: Spray Painting Mistakes Vs. Solutions
Here’s how to handle common problems:
| Mistake | How to Fix |
|---|---|
| Drips or runs | Let dry, sand lightly, repaint with thin coat |
| Rough finish | Sand between coats, spray closer or slower |
| Paint not sticking | Check for missed cleaning, add bonding primer |
Applying A Protective Topcoat
A topcoat or clear sealer protects your dresser from scratches and water rings. This is important if the dresser will be used a lot or in a child’s room.
- Choose satin, matte, or glossy topcoat to match your paint finish.
- Spray in light coats just like paint.
- Let each coat dry fully (check the label; often 1–2 hours).
- Two coats are better than one for durability.
A good topcoat also makes cleaning easier. Painted surfaces without a topcoat can scratch or stain easily.
Reassembling The Dresser
Once the final coat is dry—wait at least 24–48 hours for full curing—remove all painter’s tape. Reinstall drawers and hardware. If you painted the hardware, let it dry separately before attaching.
Check all moving parts. Sometimes paint builds up on edges or inside drawer openings. If drawers stick, gently sand painted edges.
Caring For Your Painted Dresser
With the right care, your dresser will look great for years. Here’s how to keep the finish strong and vibrant:
- Wait a few days before heavy use. Spray paint can feel dry to the touch quickly but takes longer to fully harden.
- Clean with a damp, soft cloth. Avoid harsh chemicals.
- Add felt pads under decorations to avoid scratches.
- Fix chips or scratches right away—lightly sand and touch up with matching spray paint.
- Keep out of direct sunlight if possible. Some colors fade over time.
Real-world Examples And Ideas
Spray painting a dresser opens up creative options. Here are a few ideas:
- Ombre effect: Use shades of one color from light at the top to dark at the bottom.
- Two-tone: Paint the frame one color, the drawers another.
- Stencil designs: Spray a base color, then use a stencil for patterns.
- Metallic accents: Add gold or silver to handles or edges.
Many people find that after their first dresser, they want to try tables, chairs, or even kitchen cabinets. The skills are the same.
Common Mistakes And How To Avoid Them
- Skipping sanding: Paint peels off shiny surfaces.
- Painting in humid or cold weather: This causes paint to dry slowly or unevenly. Ideal temperature is 50–90°F.
- Holding the can too close: Leads to drips.
- Too much paint at once: Thick coats trap moisture and cause wrinkles.
- Not letting paint cure: Moving or using the dresser too soon can ruin the finish.
Credit: greenwithdecor.com
Frequently Missed Details
Two details beginners often overlook:
- Paint the back and inside edges: Even though these areas are less visible, a quick coat makes the whole dresser look more finished and prevents moisture damage.
- Label and organize hardware: If you mix up drawer slides or handles, reassembly can be frustrating. Take photos before removing parts for easy reference.
Environmental And Safety Tips
Spray paint contains chemicals that can be harmful if used carelessly.
- Always wear a mask and gloves.
- Work in a place with good airflow.
- Dispose of empty cans according to local rules—they can be hazardous waste.
- Keep pets and children away from the paint area.
For more on paint safety, check the EPA’s Safer Choice program.

Credit: www.320sycamoreblog.com
Cost And Time Estimate
Most DIYers spend less than $50–$80 on supplies, depending on the size and number of cans needed. The whole project, including drying time, takes 2–3 days (actual working time is about 4–6 hours).
Example Table: Spray Painting Vs. Other Methods
Compare spray painting to brush or roller painting:
| Method | Finish | Time Needed | Skill Level |
|---|---|---|---|
| Spray paint | Very smooth, even | Faster application, longer dry time | Beginner to intermediate |
| Brush | Brush marks, less even | Slower, more coats | Beginner |
| Roller | Semi-smooth, some texture | Moderate speed | Beginner |
When Not To Spray Paint
Spray painting is not the best choice for every dresser. Avoid spray paint if:
- The dresser is antique or valuable—paint can lower its value.
- You’re painting indoors with poor ventilation.
- The weather is very humid, cold, or windy if working outside.
- The dresser has deep cracks or loose joints—repair first.
Frequently Asked Questions
How Long Should I Wait Before Using My Spray Painted Dresser?
Wait at least 24–48 hours after the last coat before reassembling and using the dresser. Full hardness (cure) may take up to a week. Avoid placing heavy items or decorations on top until then.
Can I Spray Paint Over A Previously Painted Or Varnished Dresser?
Yes, but preparation is key. Clean and sand the old finish to remove gloss and help the new paint stick. Use a bonding primer if the old surface is shiny or slippery.
Is Spray Paint Safe For Children’s Furniture?
Most modern spray paints are safe once fully cured, but always check the label for non-toxic or low-VOC options. Never paint inside with children or pets nearby, and allow extra curing time for safety.
How Do I Avoid Spray Paint Fumes Indoors?
If you must paint inside, open windows, use fans to blow air out, and wear a mask. Choose low-odor, low-VOC spray paints. Cover everything nearby and keep doors closed to the rest of your home.
Can I Use Spray Paint On A Laminate Dresser?
Yes, but you must sand the surface to remove gloss and use a primer designed for laminate. This helps the paint stick and prevents peeling.
Spray painting a dresser is a rewarding project that can save money and give you a unique piece. With good preparation, patience, and these tips, you’ll achieve a finish that rivals store-bought furniture. Enjoy your new creation!