Sanding uneven surfaces is one of those essential skills that separates a rough DIY project from a truly professional finish. Whether you’re restoring old furniture, prepping walls for painting, or smoothing a concrete floor, understanding how to sand uneven surfaces can make all the difference. Many people think sanding is just about rubbing sandpaper until things look better. But the truth is, technique, tools, and patience play a huge role in your results. If you want to avoid wavy finishes, wasted effort, or even damaging your workpiece, this guide will walk you through every important detail.
You’ll learn about the best tools for the job, how to choose the right sandpaper, and the step-by-step process for different materials. Along the way, you’ll also discover tips that even some experienced DIYers miss, like the importance of lighting and why dust control matters more than you might think.
Why Uneven Surfaces Need Special Sanding
Sanding a flat board is straightforward. But when you face uneven surfaces—like old paint drips, warped wood, or bumpy drywall—the challenge increases. Regular sanding methods can actually make things worse, leaving high spots, gouges, or uneven color. These issues are common in home repairs, auto bodywork, and even art projects.
Uneven surfaces often have:
- High spots and low spots
- Old finish or paint patches
- Filler or putty areas
- Natural wood grain changes
Each of these needs careful handling to avoid damaging the workpiece or creating more work.
Understanding Surface Types
Not all uneven surfaces are the same. The material you’re sanding changes your approach. Here’s a breakdown of the most common types you’ll encounter.
Wood
Wood can be uneven due to warping, knots, or poor prior sanding. Restoring old furniture or prepping new boards often means leveling out these imperfections. The trick is to remove the high spots without digging into the softer areas.
Drywall
Walls often have spackle patches, tape seams, or roller marks. If you sand too aggressively, you risk tearing the paper or exposing joints. Gentle, broad sanding is key.
Metal
Car bodies, tools, or metal furniture often have weld beads, rust spots, or filler. Sanding metal requires more pressure and different abrasives.
Concrete
Floors, patios, or countertops can be rough due to trowel marks or poured concrete edges. Sanding concrete is slow and requires tough, heavy-duty tools.

Credit: www.youtube.com
Essential Tools For Sanding Uneven Surfaces
Choosing the right tools saves time and reduces mistakes. Here’s a look at your main options and when to use them.
| Tool | Best For | Pros | Cons |
|---|---|---|---|
| Hand Sanding Block | Small areas, detail work | Control, low cost | Slow, tiring for large jobs |
| Orbital Sander | Flat wood, drywall patches | Even finish, fast | Can miss corners, not for deep unevenness |
| Belt Sander | Large, flat surfaces | Very fast, removes a lot | Can gouge, heavy |
| Detail Sander | Tight corners, edges | Precise, light | Slow for big surfaces |
| Rotary/Angle Grinder | Metal, concrete | Heavy-duty, versatile | Can over-sand, noisy |
Non-obvious insight: Many people use only one sander for all jobs, but combining tools (e.g., starting with a belt sander, finishing with an orbital) gives much better results.
Selecting The Right Sandpaper Grit
Sandpaper grit is measured by numbers—the lower the number, the rougher the paper. For uneven surfaces, you usually start coarse, then move to finer grits for smoothing.
| Grit Number | Use Case | Notes |
|---|---|---|
| 40–60 | Heavy removal (paint, rust, high spots) | Can scratch soft materials |
| 80–120 | General smoothing | Most wood and drywall work |
| 150–180 | Pre-finishing | Removes scratches from coarser grits |
| 220+ | Final finish, between coats | Very fine, for polishing |
Practical tip: Start with the coarsest grit needed to flatten the surface, but always finish with at least two finer grits to erase scratches.
Credit: arayofsunlight.com
Preparing The Surface
Good results start before you even pick up sandpaper. Preparation makes sanding faster and less messy.
- Clean the area – Remove dust, grease, and loose paint. For wood, use a dry cloth. For walls, a damp sponge works.
- Mark high spots – Use a pencil and a straightedge to highlight uneven areas. This helps you focus on problem spots.
- Protect surroundings – Tape off areas you don’t want to sand, and lay drop cloths to catch dust.
- Check for nails or screws – Remove or drive in fasteners. Hitting metal with a sander can ruin your tool and the surface.
Step-by-step Process For Sanding Uneven Surfaces
The approach changes a bit depending on the material, but these steps work for most projects.
1. Identify High And Low Areas
Use a straightedge or level across the surface. Mark where it rocks (high) or gaps (low). On walls, shine a light at a low angle—shadows show bumps and valleys.
2. Start With Coarse Grit
Attach a 40–60 grit sandpaper to your tool. For wood or drywall, use a sanding block or orbital sander. For concrete or metal, a grinder with a coarse disc works best.
- Sand in the direction of the grain (wood) or in a circular motion (metal/concrete).
- Apply even pressure—don’t press too hard, as it can create new gouges.
Beginner insight: Many people try to flatten the whole surface at once. Focus only on the high spots at first—once they’re level with the lows, then sand the entire area.
3. Check Your Progress Often
Every few minutes, stop sanding and wipe away dust. Recheck with your straightedge or light. This prevents over-sanding and helps you catch mistakes early.
4. Move To Medium Grit
Switch to 80–120 grit. Now sand the whole area, not just the problem spots. This blends the newly flattened zones into the rest of the surface.
- Sand with lighter pressure.
- Overlap your strokes to avoid missing spots.
5. Finish With Fine Grit
For a really smooth result, finish with 150–220 grit. This step removes scratches from earlier sanding and preps the surface for painting, staining, or sealing.
- Wipe down the surface between grits to remove particles.
- On wood, always finish sanding along the grain to avoid swirl marks.
Pro tip: On walls, use a sanding pole for large areas. It speeds up the job and helps keep pressure even.
6. Clean Thoroughly
Dust left on the surface can ruin your finish. Use a vacuum, microfiber cloth, or tack cloth to remove all dust before applying paint or stain.
Sanding Techniques For Different Materials
Wood
- Always sand with the grain.
- For large boards, use a belt sander to flatten high spots, then switch to an orbital sander.
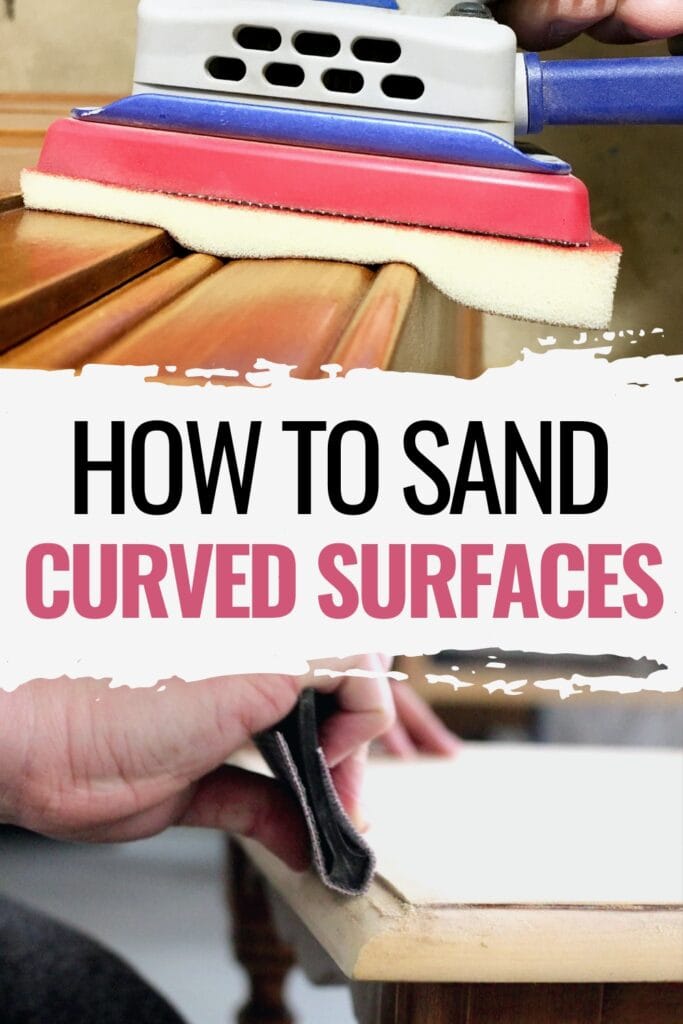
- On curves or edges, use a flexible sanding sponge.
Common mistake: Skipping grits. Going from very coarse to fine leaves deep scratches that show up under stain.
Drywall
- Use a wide sanding block or pole to avoid creating dips.
- Feather edges of patches to blend into the wall.
- Avoid sanding too much—if you hit the drywall paper, you’ll need to repair it.
Metal
- Use a grinder or sanding discs for heavy rust or welds.
- Switch to finer grits to polish.
- For car bodies, always finish by hand to avoid uneven paint.
Concrete
- Rent a floor sander or use a diamond grinder for big jobs.
- Always wear a mask—concrete dust is harmful.
- Wet the surface slightly to reduce dust, but avoid soaking.
Non-obvious insight: For outdoor concrete, finish with a stiff broom to add texture and prevent slipping.
Managing Dust And Staying Safe
Sanding creates a lot of fine particles. These can harm your lungs, ruin finishes, and make a mess.
- Wear a dust mask or respirator, especially on drywall and concrete.
- Use tools with dust collection or connect to a shop vac.
- Work in a well-ventilated area.
- Wear safety glasses to protect your eyes from flying debris.
Pro tip: For home projects, dampen the surface slightly before sanding. This reduces dust by up to 50%.
Fixing Common Problems
Even with care, you might run into issues. Here’s how to solve the most frequent problems.
- Gouges or dips: Fill with matching filler (wood, drywall, or concrete), let dry, and re-sand gently.
- Uneven color: Sand again with a finer grit, clean thoroughly, and reapply finish.
- Persistent high spots: Double-check with your straightedge; sometimes the surface underneath is warped. In these cases, removing too much material may not help—consider using a leveling compound (for floors/walls) or replacing the damaged area.
When To Use Power Tools Vs. Hand Sanding
Power tools save time, but hand sanding is sometimes better for control and detail.
| Situation | Best Tool | Why |
|---|---|---|
| Large, flat surfaces | Belt or orbital sander | Speed and evenness |
| Tight corners/edges | Detail sander or sanding sponge | Precision |
| Delicate work (antiques, guitars) | Hand sanding block | Avoids over-sanding |
| Heavy removal (paint, rust, concrete) | Angle grinder or power sander | Strength |
:max_bytes(150000):strip_icc()/Matching204-762ae862df894c5a9cec361029890f87.jpg)
Credit: www.woodmagazine.com
Tips For A Flawless Finish
- Work in good light – Raking light (from the side) shows every flaw.
- Don’t rush – Sanding too quickly leads to mistakes.
- Always clean between grits – Dust acts like coarse grit and can scratch the surface.
- Replace worn sandpaper – Dull paper polishes instead of cuts, causing unevenness.
- Use both hands – Even pressure prevents dips and waves.
Advanced Techniques For Difficult Surfaces
Using Guides Or “sanding Blocks” For Leveling
For wood tabletops or floors, attach sandpaper to a long, flat block of wood. This spreads out your pressure and levels the whole surface, not just the high spots.
Wet Sanding
For auto bodywork or finishing fine furniture, wet sanding with waterproof paper gives a glass-smooth finish and almost no dust. Always use clean water and change it often.
Feathering Edges
When repairing patches (like drywall), “feather” the edges by sanding lightly farther out. This creates a smooth transition you can’t see after painting.
Leveling Compounds
If sanding alone can’t fix deep low spots (especially on concrete or subfloors), use a self-leveling compound. Pour it on, let it dry, then sand lightly for a perfect base.
Mistakes To Avoid
- Sanding only in one spot: This causes dips. Move the sander across the whole area.
- Skipping grit sizes: Always move up in steps (e.g., 60 → 100 → 150), not big jumps.
- Not cleaning dust: Paint or stain won’t stick to a dusty surface.
- Using the wrong tool: Don’t use a belt sander on curves or small details—it’s too aggressive.
- Over-sanding edges: These become rounded and look unprofessional.
How To Know When You’re Done
It’s tempting to keep sanding “just in case,” but this can wear away too much material. Here’s how to tell if you’re finished:
- The surface feels smooth and even to your touch.
- Raking light shows no high or low spots.
- Color and texture look uniform across the whole area.
- A damp cloth glides without catching.
Insight: Using both your eyes and hands is the best test—sometimes you’ll feel rough spots you can’t see.
Real-world Examples
Restoring An Old Table
An old table had paint drips and worn spots. After cleaning and marking the uneven areas, a belt sander with 60 grit removed the drips. Switching to 120 grit on an orbital sander blended the surface, and finishing with 220 grit by hand gave a perfect base for new stain.
Fixing Bumpy Drywall
After patching a wall, the joint compound left a visible ridge. Using a sanding pole with 100 grit, the ridge was feathered out 12 inches past the patch. After cleaning, the repair was invisible under paint.
Smoothing A Concrete Floor
A garage floor had trowel marks and high spots. A rented floor grinder with diamond pads leveled it quickly. After vacuuming and damp-mopping, the surface was ready for epoxy paint.
Environmental And Health Considerations
Sanding releases fine particles into the air. Many old paints contain lead (especially before 1978), which is hazardous. Always test old surfaces before sanding, especially in homes built before 1980.
- Use a HEPA vacuum for cleanup.
- Wear a certified respirator for lead or large drywall jobs.
- Dispose of sanding dust properly—never pour down drains.
For more about safe sanding practices, the CDC NIOSH guide is a trusted resource.
Frequently Asked Questions
How Do I Avoid Making Dips When Sanding Uneven Surfaces?
Use a wide sanding block and keep it flat. Move in overlapping strokes across the whole area, not just the high spot. Check your work often with a straightedge and good lighting.
What Is The Best Grit To Start With On A Very Rough Surface?
Begin with 40–60 grit for major leveling. But don’t stay on this grit too long—once the surface is mostly flat, switch to 80 or 120 grit to avoid deep scratches.
Can I Use An Orbital Sander On Curved Or Detailed Surfaces?
Orbital sanders are best for flat areas. For curves or details, use a sanding sponge or hand sanding. Detail sanders can help in tight spots.
How Do I Keep Dust Under Control While Sanding?
Use sanders with dust collection ports connected to a shop vac, and wear a dust mask. Clean up often, and if possible, wet the surface lightly to reduce airborne particles.
Is It Safe To Sand Old Painted Surfaces?
Be cautious—old paint can contain lead. Test before sanding (especially if the building is from before 1980). If lead is present, follow special safety procedures or hire a professional.
Sanding uneven surfaces can turn a rough, flawed piece into something beautiful and ready for finishing. With the right tools, sandpaper, and a patient approach, you can tackle wood, walls, metal, or concrete with confidence. Remember, the secret to a flawless finish is not just hard work, but smart technique and attention to detail.
Take your time, check your progress often, and always prioritize safety—and you’ll be proud of the results you create.