Rental homes often come with linoleum flooring that may look dated, worn, or simply not match your style. Many renters feel stuck with their floors, worried that any change might upset the landlord or risk their security deposit. But there’s good news: covering linoleum can transform your space, protect the original floor, and keep your landlord happy if you do it right. With modern temporary solutions, you don’t have to live with floors you dislike—there are renter-friendly ways to improve them without permanent changes.
This guide will show you how to cover linoleum flooring in a rental, step by step. You’ll learn which options are best, how to prepare your floor, what materials to use, and how to avoid common mistakes. Whether you want a quick refresh or a full makeover, you’ll find practical advice that fits your budget and skill level.
Let’s turn that tired linoleum into a floor you’re proud to walk on.
Why Cover Linoleum Flooring In A Rental?
There are several reasons renters want to cover linoleum, and understanding them helps you choose the right solution.
Aesthetic improvement is the most common motivation. Linoleum in rentals is often old, yellowed, or patterned in ways that don’t suit modern tastes. Covering it can instantly update your home’s look.
Comfort is another factor. Some linoleum floors are cold, hard, or slippery. A new layer can add warmth, cushioning, or grip, making your home more pleasant.
Protecting the original floor is important if you want your security deposit back. Coverings can prevent stains, scratches, and other damage.
Finally, personalization is key. Your home should reflect your style, even if you’re renting. Temporary flooring options let you express yourself without permanent changes.
What To Check Before You Start
Before you buy or install anything, check these points:
- Landlord’s Rules: Review your lease agreement. Some landlords allow temporary flooring, while others do not. Always ask for permission in writing if unsure.
- Condition of Linoleum: The existing floor should be clean, dry, and level. Major cracks, bumps, or moisture problems need fixing first, or your new floor might not lay flat.
- Height Allowance: Adding a new layer can raise the floor. Check door clearances, appliances, and baseboards. Even a small increase might block a door from swinging.
- Returnability: Make sure your solution is truly removable. Some adhesives can leave residue or damage, which could cause problems at move-out.
- Budget and Timeline: Some coverings are cheap and fast; others require more investment and time. Know your limits before you start.
A common mistake is to rush into buying materials without planning. Take time to measure, research, and get approval—this saves headaches later.
Best Temporary Flooring Options For Covering Linoleum
Let’s look at the most popular, effective ways to cover linoleum in a rental. Each method has unique benefits and drawbacks. Choose one that fits your needs, skill level, and budget.
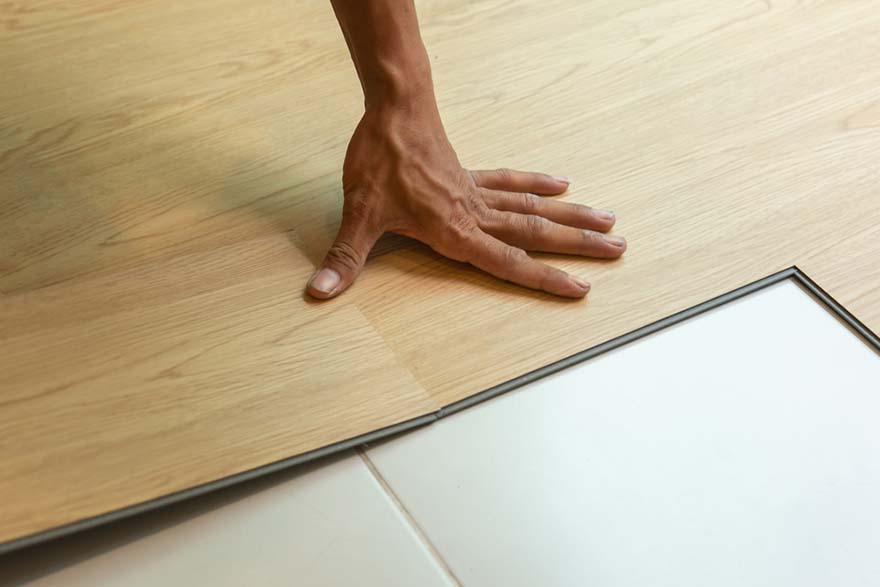
1. Peel And Stick Vinyl Tiles
Peel and stick vinyl tiles are a top choice for renters. They’re designed for easy installation—just remove the backing and press onto the floor. Modern versions come in styles that mimic wood, stone, or ceramic.
Pros:
- Easy to install and cut to size
- Wide variety of designs
- Affordable (usually $1–$3 per square foot)
- Removable with gentle heat (hair dryer) at move-out
Cons:
- May leave sticky residue if left down for years
- Not ideal for high-moisture areas like bathrooms
Tip: Choose tiles labeled “removable” or “renter-friendly.” Test a corner before doing the whole floor.
2. Interlocking Floor Mats
Interlocking foam or rubber mats snap together like puzzle pieces. They’re popular for playrooms, home gyms, or kitchens where comfort matters.
Pros:
- Very soft and comfortable underfoot
- No glue or tape needed—completely floating
- Simple to remove or replace damaged pieces
Cons:
- Not as stylish as other options
- Can shift or separate if not installed wall-to-wall
Tip: Buy mats with beveled edges for a finished look.
3. Loose Lay Vinyl Planks
Loose lay vinyl planks look like wood but don’t require adhesive. They’re heavy enough to stay in place on their own. Only the edges might need double-sided tape.
Pros:
- Realistic wood or stone look
- Waterproof and durable
- Easy to remove without damage
Cons:
- Higher cost ($3–$5 per square foot)
- Need a very smooth subfloor for best results
Tip: Place a rug pad or underlayment first for extra grip.
4. Temporary Carpet Tiles
Carpet tiles are squares of carpet with a peel-and-stick or floating design. They’re good for bedrooms or living rooms where warmth matters.
Pros:
- Soft and cozy feel
- Easy to replace stained tiles
- Wide color selection
Cons:
- May not stick well on uneven linoleum
- Not suitable for kitchens or bathrooms
Tip: Use a non-slip rug pad under carpet tiles for better hold.
5. Area Rugs And Runners
Sometimes, the simplest solution is best. Area rugs or runners can cover large sections of linoleum without installation.
Pros:
- No installation required
- Huge variety of patterns, colors, and sizes
- Easy to clean or swap out
Cons:
- Doesn’t cover edges or seams
- Rugs can slip unless anchored with pads
Tip: Overlap large rugs for full coverage in open spaces.
6. Removable Floor Decals
Floor decals are large, decorative stickers made for flooring. They come in patterns like tile, stone, or abstract art.
Pros:
- Unique, bold designs
- Quick to install and remove
- Great for small areas or accents
Cons:
- Can peel up in high-traffic spots
- Best for low-moisture rooms
Tip: Clean the floor well before applying for best adhesion.
7. Laminate Flooring (floating)
Some newer laminate floors are designed to “float” over the existing surface. They click together and don’t need glue or nails.
Pros:
- Looks like hardwood for less money
- Durable and scratch-resistant
- Can be taken up and reused
Cons:
- Higher cost ($2–$6 per square foot)
- Adds more height than other options
Tip: Check for moisture under the linoleum before installing—laminate doesn’t like water.
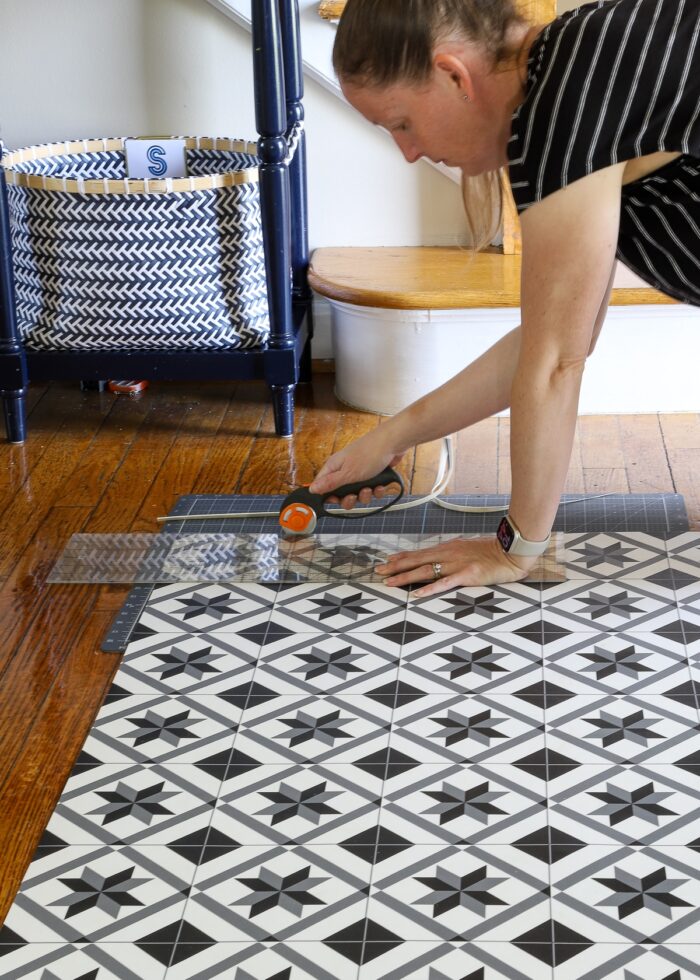
8. Sheet Vinyl (loose Lay)
Loose lay sheet vinyl comes in rolls and is cut to fit your space. It’s placed directly over linoleum and only the edges are sometimes taped.
Pros:
- Seamless look over large areas
- Water-resistant and easy to clean
- Affordable for big rooms
Cons:
- Heavy and awkward to handle alone
- Needs precise cutting around corners
Tip: Use double-sided tape only at the edges to keep it renter-friendly.
9. Temporary Wood-look Flooring
Some brands make engineered wood planks that float over existing floors. They snap together and are easy to remove.
Pros:
- Upscale appearance
- Reusable in a new home
- No damage to linoleum
Cons:
- Expensive (often $4–$8 per square foot)
- Needs careful measuring
Tip: Borrow a saw for clean cuts at the walls.
10. Cork Tiles Or Planks
Cork flooring is soft, natural, and eco-friendly. Some cork tiles are designed for floating installation without glue.
Pros:
- Comfortable and quiet underfoot
- Good insulation
- Sustainable material
Cons:
- Prone to dents or scratches
- Not waterproof
Tip: Seal cork with a removable polyurethane layer for extra protection.
Comparison Of Temporary Flooring Options
To help you choose, here’s a side-by-side look at the main features of the most popular methods:
| Option | Ease of Installation | Removability | Cost (per sq ft) | Best For |
|---|---|---|---|---|
| Peel & Stick Tiles | Easy | Good | $1–$3 | Kitchens, hallways |
| Interlocking Mats | Very easy | Excellent | $2–$4 | Playrooms, gyms |
| Loose Lay Vinyl | Moderate | Excellent | $3–$5 | Living rooms |
| Carpet Tiles | Easy | Good | $2–$4 | Bedrooms |
| Area Rugs | Very easy | Excellent | $0.50–$4 | Any room |
| Laminate Flooring | Moderate | Excellent | $2–$6 | Dining rooms |
Preparing Your Linoleum Floor
Preparation is key for a smooth, long-lasting result. Skipping these steps is a common beginner mistake.
- Clean the surface: Sweep and mop the linoleum thoroughly. Remove all dust, grease, and debris. Sticky floors prevent new coverings from sticking or laying flat.
- Repair damage: Fill cracks or holes with patching compound. Sand rough areas smooth.
- Dry completely: Moisture under the new layer can cause warping or mold. Let the floor dry overnight after cleaning.
- Test for level: Use a long straightedge or level to check for dips or bumps. If you find uneven spots, use a floor-leveling compound.
- Remove baseboards (optional): For a neater finish, gently remove baseboards before installing new flooring. Save them for reinstallation when you move out.
Pro tip: Always test a small section of your chosen covering before doing the whole room. This helps you avoid surprises.
Step-by-step Guide: Installing Temporary Flooring Over Linoleum
While each method is slightly different, here’s a general process you can adapt for most renter-friendly flooring:
Step 1: Measure Your Space
Measure length and width of the room (in feet). Multiply to get total square feet. Add 10% for mistakes and trimming.
Example: For a 10×12 room: 10 x 12 = 120 sq ft. Add 12 sq ft (10%) for a total of 132 sq ft.
Tip: Write measurements down and bring them when shopping.
Step 2: Choose Your Materials
Pick the best flooring for your room and budget. Buy extra for mistakes, especially if patterns need matching.
Don’t forget: Purchase any tools, underlayment, or tape needed for installation.
Step 3: Prepare The Linoleum
Clean, repair, and dry the floor as described above. This step is not optional!
Step 4: Lay Out The First Row
Start along the longest, straightest wall. For peel-and-stick tiles, lay out tiles without removing backing to plan the pattern.
For planks or mats, click or fit pieces together before final placement.
Step 5: Install Flooring
- For peel-and-stick tiles: Peel backing, press firmly, and smooth air bubbles.
- For interlocking mats: Connect pieces, pressing seams tight.
- For loose lay vinyl: Roll out, trim edges with a utility knife, and tape only at walls if needed.
- For laminate or wood planks: Click together, using spacers at walls for expansion.
Pro tip: Change direction or stagger seams for a more natural look.
Step 6: Trim And Finish Edges
Use a sharp utility knife for tiles and vinyl, or a saw for planks. Cover gaps with baseboards, transition strips, or quarter-round molding.
Step 7: Clean Up And Inspect
Vacuum or wipe the new surface. Check for loose spots, gaps, or bubbles. Fix immediately for best results.

Credit: www.youtube.com
Comparing Costs And Effort
Here’s a breakdown of estimated costs, time, and difficulty for popular options:
| Type | DIY Skill Needed | Estimated Cost (10×12 ft room) | Time Required |
|---|---|---|---|
| Peel & Stick Tiles | Beginner | $132–$396 | 2–4 hours |
| Interlocking Mats | Beginner | $240–$480 | 1–2 hours |
| Loose Lay Vinyl | Intermediate | $396–$660 | 3–5 hours |
| Laminate Flooring | Intermediate | $264–$792 | 4–6 hours |
| Area Rugs | Beginner | $60–$480 | 30 minutes |
Note: Prices are based on average US retail rates as of 2024.
Mistakes To Avoid When Covering Linoleum In A Rental
Many renters make errors that cost time, money, or their deposit. Here’s how to avoid them:
- Skipping landlord approval: Always get written permission if your lease is unclear.
- Using permanent adhesives: Some tapes or glues can stain or rip linoleum. Use only removable products.
- Not leveling the floor: Bumps or holes under the new layer will show and cause wear.
- Ignoring moisture: Water under new flooring leads to mold and odor.
- Underestimating height: New layers can block doors or appliances—measure carefully!
- Not saving scraps: Keep leftover tiles or planks for repairs.
- Rushing installation: Plan, measure, and go slowly for best results.
Non-obvious insight: If your rental has radiant heating under the floor, not all coverings are suitable—check product labels or ask the manufacturer.
Another tip: Always keep photos and receipts. If your landlord questions changes, you can prove what was installed and how it was removed.
Credit: www.thewcsupply.com
How To Remove Temporary Flooring When Moving Out
When it’s time to leave your rental, removing your covering properly is as important as installation.
- Lift gently: For floating floors or mats, pull up from a corner and roll or stack pieces.
- Warm up adhesives: For peel-and-stick tiles, use a hair dryer to soften glue before peeling.
- Clean residue: Remove any sticky spots with mild adhesive remover safe for linoleum.
- Check for damage: Patch any nicks or scratches to the original linoleum.
- Restore baseboards: Reinstall any trim you removed.
By following these steps, you leave the rental as you found it—and protect your deposit.
Advanced Tips For A Professional Look
If you want your covered floor to look truly built-in, try these advanced ideas:
- Use matching transition strips at doorways for a seamless look.
- Add quarter-round molding to cover small gaps at the wall.
- Paint baseboards after reinstalling for a fresh finish.
- Layer a foam underlayment under floating floors for soundproofing and comfort.
- Cut tiles or planks with a sharp blade for clean, factory-like edges.
Non-obvious insight: Some high-end peel-and-stick tiles have groutable edges. A small bead of removable caulk between tiles creates a real tile look—without permanent grout.
Credit: thehomesihavemade.com
When To Avoid Covering Linoleum
Not every situation is right for a temporary floor:
- If linoleum is soft, sticky, or flaking, new layers won’t hold up.
- If the floor has ongoing water leaks, solve that first—covering will trap moisture.
- If your landlord strictly prohibits changes, don’t risk your lease.
In these cases, stick to area rugs or request repairs from your landlord.
Sources For Renter-friendly Flooring
You can find temporary flooring at:
- Big box hardware stores (Home Depot, Lowe’s)
- Flooring specialty shops
- Online retailers (Amazon, Wayfair)
- Local carpet and rug outlets
Pro tip: Always check reviews and return policies before buying online.
For more about flooring options and trends, see this Home Depot guide.
Frequently Asked Questions
How Do I Know If My Landlord Will Allow Temporary Flooring?
Check your lease agreement for clauses about alterations. If it’s not clear, ask your landlord directly and get permission in writing. Many landlords allow non-permanent changes if you agree to return the floor to its original state.
Will Temporary Flooring Damage The Linoleum Underneath?
Most renter-friendly floors are safe, but some adhesives can leave residue or discoloration, especially if left down for years. Always use products labeled “removable” and test in a small area first. Lift gently and clean any residue before moving out.
What’s The Easiest Way To Cover Linoleum In A Kitchen?
Peel-and-stick vinyl tiles are the most popular kitchen choice because they resist spills and are easy to cut around cabinets. For ultra-fast results, large area rugs or runners can also work, but may not cover all seams.
How Do I Keep Area Rugs From Slipping On Linoleum?
Use a non-slip rug pad designed for smooth floors. These pads grip both the rug and the linoleum, preventing slips and bunching. Some pads are also moisture-resistant for kitchens or entryways.
Can I Use Floating Laminate Or Vinyl Planks In A Bathroom?
It’s possible, but not all products are suitable for wet areas. Look for planks labeled “waterproof” and always seal edges near tubs, toilets, and sinks with removable caulk. Never use wood-based laminate in damp bathrooms.
Transforming your rental with temporary flooring is not only possible, it’s easier than you might think. With the right preparation, materials, and landlord approval, you can cover old linoleum and enjoy a space that truly feels like home—without risking your deposit or breaking your lease.