Cleaning hardware on old furniture can feel both exciting and a little scary. Maybe you’ve found an antique dresser at a flea market, or inherited a vintage cabinet. Over time, hardware like handles, knobs, hinges, and locks collects dirt, rust, and layers of old paint.
If you want your old furniture to look beautiful again, cleaning the hardware is essential. But the process requires care—using the wrong method can damage delicate metals or remove the charming patina that gives your piece its character. In this guide, you’ll discover practical ways to clean different types of hardware, the best products to use, and expert techniques that save time and prevent costly mistakes.
Whether you’re new to furniture restoration or have some experience, you’ll learn how to bring out the best in your furniture’s details, protect its value, and enjoy the results for years.
Understanding Old Furniture Hardware
Before you start scrubbing, it’s important to know what you’re working with. Hardware on old furniture can be made from a variety of metals and finishes, each needing a slightly different cleaning approach.
- Brass: Often used for drawer pulls and decorative plates, it can develop a greenish layer called “verdigris.”
- Copper: Recognizable by its reddish-brown color, it tarnishes with time.
- Iron or Steel: Common in hinges and locks, these can rust if exposed to moisture.
- Bronze: Similar in color to brass but heavier and less yellow.
- Plated Metals: Some hardware is only coated with a thin layer of brass, nickel, or chrome over a cheaper metal.
- Painted Hardware: Sometimes, hardware is painted over, hiding the original finish.
Non-obvious insight: Many beginners don’t realize that what looks like solid brass may only be brass-plated. Using harsh abrasives can strip off the plating, exposing a dull base metal underneath.
Practical tip: Test with a magnet—solid brass and bronze are not magnetic, while steel or iron will attract a magnet. This helps you choose the right cleaning method.
Tools And Supplies You Need
Gathering the correct tools makes the cleaning process easier and safer for both you and your furniture. Here’s a list of what you might need:
- Soft and medium-bristle toothbrushes
- Lint-free cloths or microfiber towels
- Small plastic containers or bowls
- Old towels or rags to protect surfaces
- Mild dish soap
- Baking soda
- White vinegar
- Lemon juice
- Olive oil
- Fine-grade steel wool (#0000)
- Brass or metal polish (look for ammonia-free options)
- Rubber gloves
- Cotton swabs
- Toothpicks or wooden skewers
- Masking tape (for labeling)
- Small screwdrivers
Expert guidance: Avoid using wire brushes or rough sandpaper unless you’re dealing with thick rust on hardware you know is solid metal.
Data point: According to the Smithsonian Museum Conservation Institute, using gentle cleaning methods preserves up to 40% more of the original surface detail compared to aggressive techniques.
Removing Hardware Safely
Taking off hardware from old furniture isn’t always straightforward. Screws may be stuck, stripped, or painted over. Here’s how to remove hardware safely without causing damage.
- Document Placement: Photograph each piece before removal. Many types look similar but only fit in one way.
- Label Parts: Use masking tape to label each piece and keep screws with their matching hardware.
- Loosen Screws Gently: If a screw won’t budge, try a drop of penetrating oil and wait 10 minutes. Use the correct screwdriver size to avoid stripping.
- Handle Paint Carefully: If hardware is painted over, use a utility knife to gently score around it. This prevents paint from chipping the wood as you remove the hardware.
- Store Small Parts: Place all pieces in a container so nothing gets lost.
Non-obvious insight: Sometimes, hardware was installed before the furniture was assembled, making removal impossible without damaging the piece. In these cases, clean hardware in place using careful masking and patience.
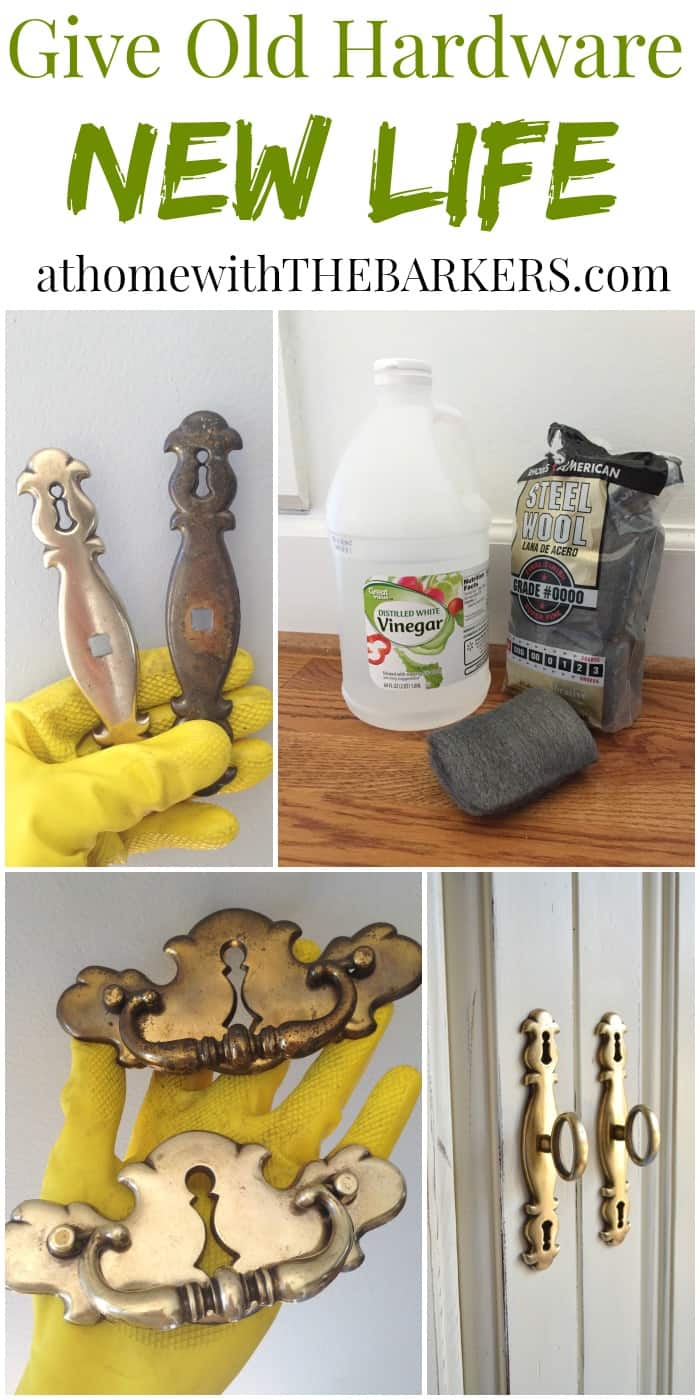
Cleaning Brass Hardware
Brass is popular for its warm color and durability, but it tarnishes and collects grime. Here’s how to restore its shine:
Step 1: Soak And Clean Off Dirt
Fill a bowl with warm water and add a few drops of mild dish soap. Place the hardware in the solution and let it soak for 10-15 minutes. Use a soft toothbrush to scrub away dirt, focusing on crevices.
Step 2: Remove Tarnish
If the hardware is solid brass (magnet doesn’t stick), you can use a homemade cleaner:
- Make a paste with equal parts baking soda and lemon juice.
- Rub the paste onto the hardware using a cloth or your fingers.
- Let it sit for 5-10 minutes, then scrub gently with a toothbrush.
- Rinse with warm water and dry thoroughly.
For stubborn tarnish, try a brass polish. Apply following the manufacturer’s instructions, then buff with a clean cloth.
Step 3: Rinse And Dry
Always rinse hardware after cleaning to remove any cleaner residue. Dry fully to prevent water spots.
Caution: Never use ammonia or harsh acids on brass-plated hardware—the thin coating can be damaged quickly.
Practical tip: If you want to preserve the patina, clean gently and don’t try to make the hardware look brand new.
Cleaning Iron And Steel Hardware
Iron and steel hardware is strong but can rust, especially in humid environments. Here’s how to clean and protect it.
Step 1: Remove Loose Rust
Use fine-grade steel wool (#0000) or a soft wire brush to gently scrub away loose rust. Don’t use too much force—press lightly and work in one direction.
Step 2: Soak For Deep Cleaning
For stubborn rust, soak the hardware in a solution of 1 part white vinegar to 2 parts water for 1-2 hours. Vinegar dissolves rust but can also remove the finish if left too long.
Step 3: Rinse And Dry Completely
After soaking, scrub again with steel wool, then rinse in clean water. Dry immediately with a towel and let the hardware air dry completely. Any moisture left can cause new rust.
Step 4: Protect From Future Rust
Wipe the hardware with a little olive oil or a light machine oil. This creates a barrier against moisture.
Data point: Research from the National Park Service suggests that lightly oiled iron hardware is 60% less likely to develop new rust within the first year.
Non-obvious insight: If the hardware is painted black, it may be “Japanned” (a type of lacquer). Avoid soaking these pieces—clean with a damp cloth only.
Cleaning Bronze, Copper, And Other Metals
Less common, but equally beautiful, bronze and copper need their own approach.
- Bronze: Clean with mild soap and water. If you want to remove tarnish, use lemon juice and baking soda, but test on a small area first.
- Copper: Use a paste of salt, flour, and vinegar. Apply, let sit, then rinse and dry.
Tip: Many older bronze and copper pieces have protective wax or lacquer. If you notice a cloudy or uneven finish after cleaning, reapply a microcrystalline wax (sold in art supply stores).

Credit: www.youtube.com
Dealing With Painted Or Lacquered Hardware
Sometimes, hardware is covered with paint or a clear lacquer finish. If you want to reveal the original metal, you’ll need to remove these coatings carefully.
For Painted Hardware
- Place hardware in an old pot with enough water to cover it.
- Add a few tablespoons of baking soda.
- Simmer gently for 15-20 minutes (never boil).
- Remove with tongs and scrub with a toothbrush—the paint should peel off.
For Lacquered Hardware
- Use acetone or nail polish remover on a cloth to gently wipe the lacquer.
- Rinse and dry immediately.
- Polish as needed.
Warning: Always work in a well-ventilated area and wear gloves when using solvents.
Non-obvious insight: Painted hardware often hides beautiful original finishes. Removing paint can reveal details and craftsmanship not visible for decades.
Cleaning Hardware Without Removing It
Sometimes, you can’t take hardware off the furniture. Maybe screws are too tight, or you’re worried about damaging the wood. Here’s how to clean in place:
- Use masking tape to protect the surrounding wood.
- Clean with a cotton swab dipped in mild soap and water.
- For stubborn tarnish, apply cleaning paste with a cotton swab, let sit, then wipe off carefully.
- Dry fully to avoid moisture damage to the wood.
Expert tip: Slip a piece of thin plastic or cardboard under the hardware if possible. This gives extra protection to the wood surface.
When To Polish—and When Not To
Polishing makes hardware shine, but sometimes it’s better to preserve the patina. Antique collectors often prefer the natural aged look, which adds value and history.
- Polish if: Hardware is heavily tarnished, dirty, or you want a bright appearance.
- Don’t polish if: The hardware has an attractive, even patina or if you’re concerned about resale value.
Data point: According to a study by the Antiques Trade Gazette, 70% of collectors prefer hardware with original patina over polished pieces.
Practical tip: Test polish on a hidden spot first. If the look is too bright, you can always let a new patina develop naturally over time.
Comparing Cleaning Methods For Different Metals
Here’s a comparison of the most common cleaning methods for brass, iron, and copper hardware.
| Metal Type | Best Cleaner | Soaking Time | Special Precautions |
|---|---|---|---|
| Brass | Lemon juice & baking soda | 5-10 minutes | Avoid abrasives on plated brass |
| Iron/Steel | Vinegar solution | 1-2 hours | Dry immediately to prevent rust |
| Copper | Flour, salt & vinegar paste | 10-15 minutes | Test on small area first |
Common Mistakes And How To Avoid Them
Even with the best intentions, people make errors that can ruin old hardware. Here’s what to watch out for:
- Using harsh abrasives: Steel brushes or coarse sandpaper can scratch and remove details.
- Soaking too long: Leaving hardware in vinegar or water for hours can weaken or discolor the metal.
- Mixing up parts: Not labeling screws and plates can lead to confusion when reassembling.
- Skipping a test spot: Always test any cleaner or polish on an inconspicuous area first.
- Polishing plated hardware: Aggressive polishing can remove thin decorative coatings.
Non-obvious insight: Sometimes, dirt and tarnish actually help protect hardware from further corrosion. Removing all patina isn’t always the best idea.
How To Reassemble Hardware Correctly
Once your hardware is clean and dry, it’s time to put everything back. Here are steps to make sure the job is done right:
- Match labels and photos: Use your pre-removal photos and labels to place hardware in the correct spot.
- Hand-tighten screws: Start each screw by hand to avoid cross-threading. Only use a screwdriver for the final tightening.
- Check alignment: Make sure handles and hinges are straight before tightening all the way.
- Lubricate moving parts: For locks and hinges, a tiny drop of machine oil can keep things moving smoothly.
- Wipe fingerprints: Before finishing, wipe hardware with a soft cloth to remove any fingerprints or smudges.
Practical tip: If screws have become loose over the years, insert a sliver of wood toothpick into the hole before reinstalling the screw. This gives extra grip.
Preserving And Protecting Cleaned Hardware
After all your hard work, you want the results to last. Here’s how to keep hardware looking good for years:
- Wax or oil: Apply a thin coat of microcrystalline wax or light oil to help prevent tarnish and rust.
- Regular dusting: Wipe hardware with a dry cloth every few weeks.
- Humidity control: Keep furniture away from damp areas to prevent new corrosion.
- Avoid harsh cleaners: Don’t use ammonia-based sprays or bleach on or near hardware.
- Quick touch-ups: For small spots of tarnish, use a cotton swab with a little polish instead of removing the hardware again.
Expert tip: If you live in a coastal area with salty air, consider waxing hardware twice a year for extra protection.
Cleaning Special Types Of Hardware
Some hardware pieces are unique or rare, needing extra care:
- Porcelain or glass knobs: Clean with mild soap and water. Avoid soaking metal bases.
- Decorative backplates: Use a soft brush and polish only if necessary.
- Intricate cast iron: Use a toothpick or wooden skewer to remove dirt from detailed patterns.
Non-obvious insight: Many Victorian and Art Deco pieces have tiny parts or springs. Take extra care not to lose or bend these during cleaning.

Credit: www.youtube.com
Useful Products For Hardware Cleaning
Many people want to know which commercial products are safe and effective. Here are some recommended options:
- Brasso: A classic brass polish, but use lightly and rinse well.
- Bar Keepers Friend: Works on many metals, but test first on plated hardware.
- Nevr-Dull: A wadding polish good for brass, copper, and chrome.
- Howard Feed-N-Wax: For final protection, especially on wood around hardware.
Expert tip: For eco-friendly cleaning, lemon juice and baking soda are often just as effective as store-bought products.
Comparing Diy Vs. Commercial Cleaners
Which is better—DIY or store-bought? Here’s a quick comparison to help you decide:
| Cleaner Type | Pros | Cons | Best For |
|---|---|---|---|
| DIY (Lemon, baking soda, vinegar) | Safe, cheap, always on hand | May require more effort | Brass, copper, light tarnish |
| Commercial polish | Fast, effective, strong | Can be harsh, expensive | Stubborn tarnish, heavy grime |
When To Call A Professional
There are times when DIY isn’t enough. Consider professional help if:
- Hardware is rare, valuable, or historically significant
- Pieces are severely corroded or broken
- You want to plate or re-plate hardware (restore lost finish)
- Cleaning involves hazardous chemicals or lead-based paints
A conservator can restore hardware without harming its value or beauty. For high-value antiques, this is the safest route.
Real-world Example: Restoring An Antique Dresser
Let’s look at a real case. You find a 1920s oak dresser with brass drawer pulls, covered in layers of paint and tarnish.
- Remove hardware: Photograph and label each pull.
- Paint removal: Simmer hardware in baking soda water, scrub off paint.
- Tarnish cleaning: Apply lemon juice and baking soda paste, let sit, then scrub gently.
- Rinse, dry, and polish: Buff with a brass polish for extra shine.
- Protect: Apply a thin coat of wax before reinstalling.
The result: The dresser’s original charm returns, with hardware that sparkles without looking too new.
Non-obvious insight: Many old dressers have mismatched hardware, replaced over time. Cleaning reveals differences, helping you decide whether to keep the story or find matching replacements.
Maintenance: Keeping Hardware Clean
After restoration, regular care keeps hardware looking its best.
- Dust weekly with a soft cloth.
- Polish lightly every few months if needed.
- Check for new rust or tarnish, especially after humid weather.
- Avoid harsh sprays or wet cleaning on surrounding wood.
- Re-wax or re-oil every 6-12 months.
Practical tip: A little maintenance saves hours of work later. Set a reminder for seasonal touch-ups.
Environmental And Safety Considerations
When cleaning old hardware, think about your safety and the environment:
- Dispose of old paint chips safely, especially if the furniture is pre-1978 (may contain lead).
- Use gloves when handling chemicals.
- Work in a well-ventilated space.
- Avoid pouring cleaners down the drain—use a designated container for disposal.
For more on safe antique restoration, visit the EPA’s official guidelines.
Most Common Questions About Cleaning Old Hardware
Frequently Asked Questions
How Do I Know If My Hardware Is Brass Or Just Brass-plated?
Use a magnet—solid brass is not magnetic, while steel underneath brass plating will attract a magnet. You can also scratch a hidden spot; if it’s yellow all the way through, it’s solid brass.
Can I Use Vinegar To Clean All Types Of Metal Hardware?
No. Vinegar works well for iron, steel, and copper, but it can damage aluminum, plated metals, or delicate finishes. Always test on a small, hidden area before soaking hardware in vinegar.
What Should I Do If Hardware Is Stuck And Won’t Come Off?
Apply a drop of penetrating oil to the screw or bolt, wait 10-15 minutes, and try again. If it’s still stuck, gently tap the screwdriver with a hammer or use a rubber band for extra grip. Don’t force it—if it won’t move, clean hardware in place.
Is It Safe To Use Commercial Metal Polish On Antique Hardware?
Most metal polishes are safe for solid metals, but can damage plated or lacquered pieces. Read the label and always test on a small area first. Avoid ammonia-based products on antiques.
How Can I Protect Cleaned Hardware From Tarnishing Again?
Apply a thin coat of microcrystalline wax or a light oil after cleaning. Keep hardware dry, dust regularly, and avoid touching it with bare hands, as oils from skin can speed up tarnishing.
Restoring hardware on old furniture isn’t just about making things look good—it’s about preserving history and craftsmanship. With the right tools, gentle techniques, and a little patience, you can reveal the beauty hiding in every handle, hinge, and keyhole. By understanding the materials, using smart cleaning methods, and avoiding common mistakes, you’ll keep your furniture’s hardware shining for years, adding value and pride to every piece you restore.
Credit: athomewiththebarkers.com