Pumping water from a storage tank to your house may look simple, but there are many things you need to get right. If you pick the wrong pump, use the wrong pipes, or ignore important safety steps, you could face low water pressure, wasted energy, or even damaged equipment.
Whether you live in a city with unreliable water supply or a rural area where storage tanks are common, understanding how to move water from your tank to your tap is a practical skill.
This article will guide you step by step through the full process. You will learn which tools and parts you need, how to install them, and how to keep your system working well for years. Along the way, you’ll see tips that even experienced homeowners sometimes forget—like how to prevent airlocks, how to prime a pump, and what to do if your water is full of sand.
You’ll also get honest advice on common mistakes to avoid, and see real examples of what works in different homes. By the end, you will feel confident to set up or troubleshoot a water pumping system that matches your needs.
Understanding Your Water System
Before you start pumping water, you need to know what kind of system you have and what you want to achieve. Every house is different. Some have one large storage tank outside, while others use underground tanks or rooftop tanks.
The way you move water depends on where your tank is, how high your home is, and how much water you need each day.
The key parts of your water system are:
- Storage tank: The place where your water sits before being pumped.
- Pump: The machine that pushes water from the tank into your house.
- Pipes: The tubes that carry water to faucets, showers, and appliances.
- Valves and fittings: The connectors that join pipes and control water flow.
- Electrical supply: Power for the pump (usually from your main electricity).
Knowing how these parts work together will help you plan your system. If your house is on a hill or has two or three floors, you need more pump power than a small, single-story home. If your water comes from a rainwater tank, you may need filters to keep out dirt and debris.
Example
Imagine a house with a 1000-gallon storage tank in the backyard. The tank sits lower than the kitchen and bathroom, so water cannot flow by gravity. You want to use the stored water for all daily needs: drinking, bathing, washing clothes. In this case, you need a pump that can lift water from the tank and push it with enough force (pressure) to reach every room.
Choosing The Right Pump
Getting the right pump is the most important step. The pump determines how fast water moves and how much pressure you get at the tap. There are many types of pumps, but most homes use one of three kinds: centrifugal pumps, submersible pumps, or booster pumps.
Types Of Pumps
- Centrifugal pumps: These sit outside the tank and “suck” water through a pipe. They are good for tanks at ground level or below the pump.
- Submersible pumps: These go inside the tank, under the water. They are quiet and good for deep tanks.
- Booster pumps: These increase pressure when water is already flowing but not strong enough. They are often used for rooftop tanks.
What To Consider When Choosing
When picking a pump, check these factors:
- Flow rate: How much water the pump can move, usually in gallons per minute (GPM) or liters per minute (LPM).
- Head: How high the pump can lift water, measured in feet or meters.
- Power: How much electricity the pump uses, shown in horsepower (HP) or kilowatts (kW).
- Pump material: Stainless steel lasts longer than plastic, especially if water is dirty.
- Noise level: Some pumps are much quieter than others.
- Self-priming feature: Useful if the pump is above the water level.
Sizing Your Pump
To get the right size, think about:
- How many taps or showers will run at the same time?
- How far is the tank from the house?
- How high does the water need to go (for multi-story homes)?
Here’s a simple example. If you have a two-story house and want to run two showers and a kitchen tap at once, you may need a pump with at least 20 GPM flow and a head of 100 feet.
Comparing Pump Types
Below is a quick comparison to help you see the differences.
| Pump Type | Best for | Main Advantages | Main Drawbacks |
|---|---|---|---|
| Centrifugal | Above-ground tanks | Easy to install, affordable | Noisy, can lose prime |
| Submersible | Underground or deep tanks | Quiet, energy efficient | Harder to access for repair |
| Booster | Rooftop tanks, low pressure | Good for adding pressure | Not for lifting water from deep tanks |
Non-obvious Insight
Many people buy a pump that is too powerful, thinking “bigger is better. ” But an oversized pump can waste energy and even damage pipes and valves. It’s better to match the pump size to your real needs.

Credit: diy.stackexchange.com
Gathering Tools And Materials
Before you start installing, make sure you have all the tools and parts. It can be frustrating to stop halfway because you’re missing a connector or a piece of pipe. Here’s what you’ll likely need:
- Pump (chosen for your setup)
- Pipes (usually PVC or CPVC for water, with correct diameter)
- Inlet and outlet fittings (to connect pump and pipes)
- Foot valve or non-return valve (prevents water from flowing back into the tank)
- Pressure switch (to turn pump on and off automatically)
- Pressure tank (helps maintain steady pressure)
- Check valve (extra protection from backflow)
- Pipe sealant or Teflon tape (for leak-proof joints)
- Ball valves or gate valves (to control flow and shut off water for maintenance)
- Electrical wiring and switches (for pump power)
- Water filter (optional, protects pump from sand or dirt)
- Pipe clips and brackets (to secure pipes to walls or ground)
- Drill, screwdriver, wrench, pliers
Hidden Detail
If your tank sits outside in cold weather, using insulated pipes will prevent freezing and broken lines. This is a common mistake in areas with winter temperatures.
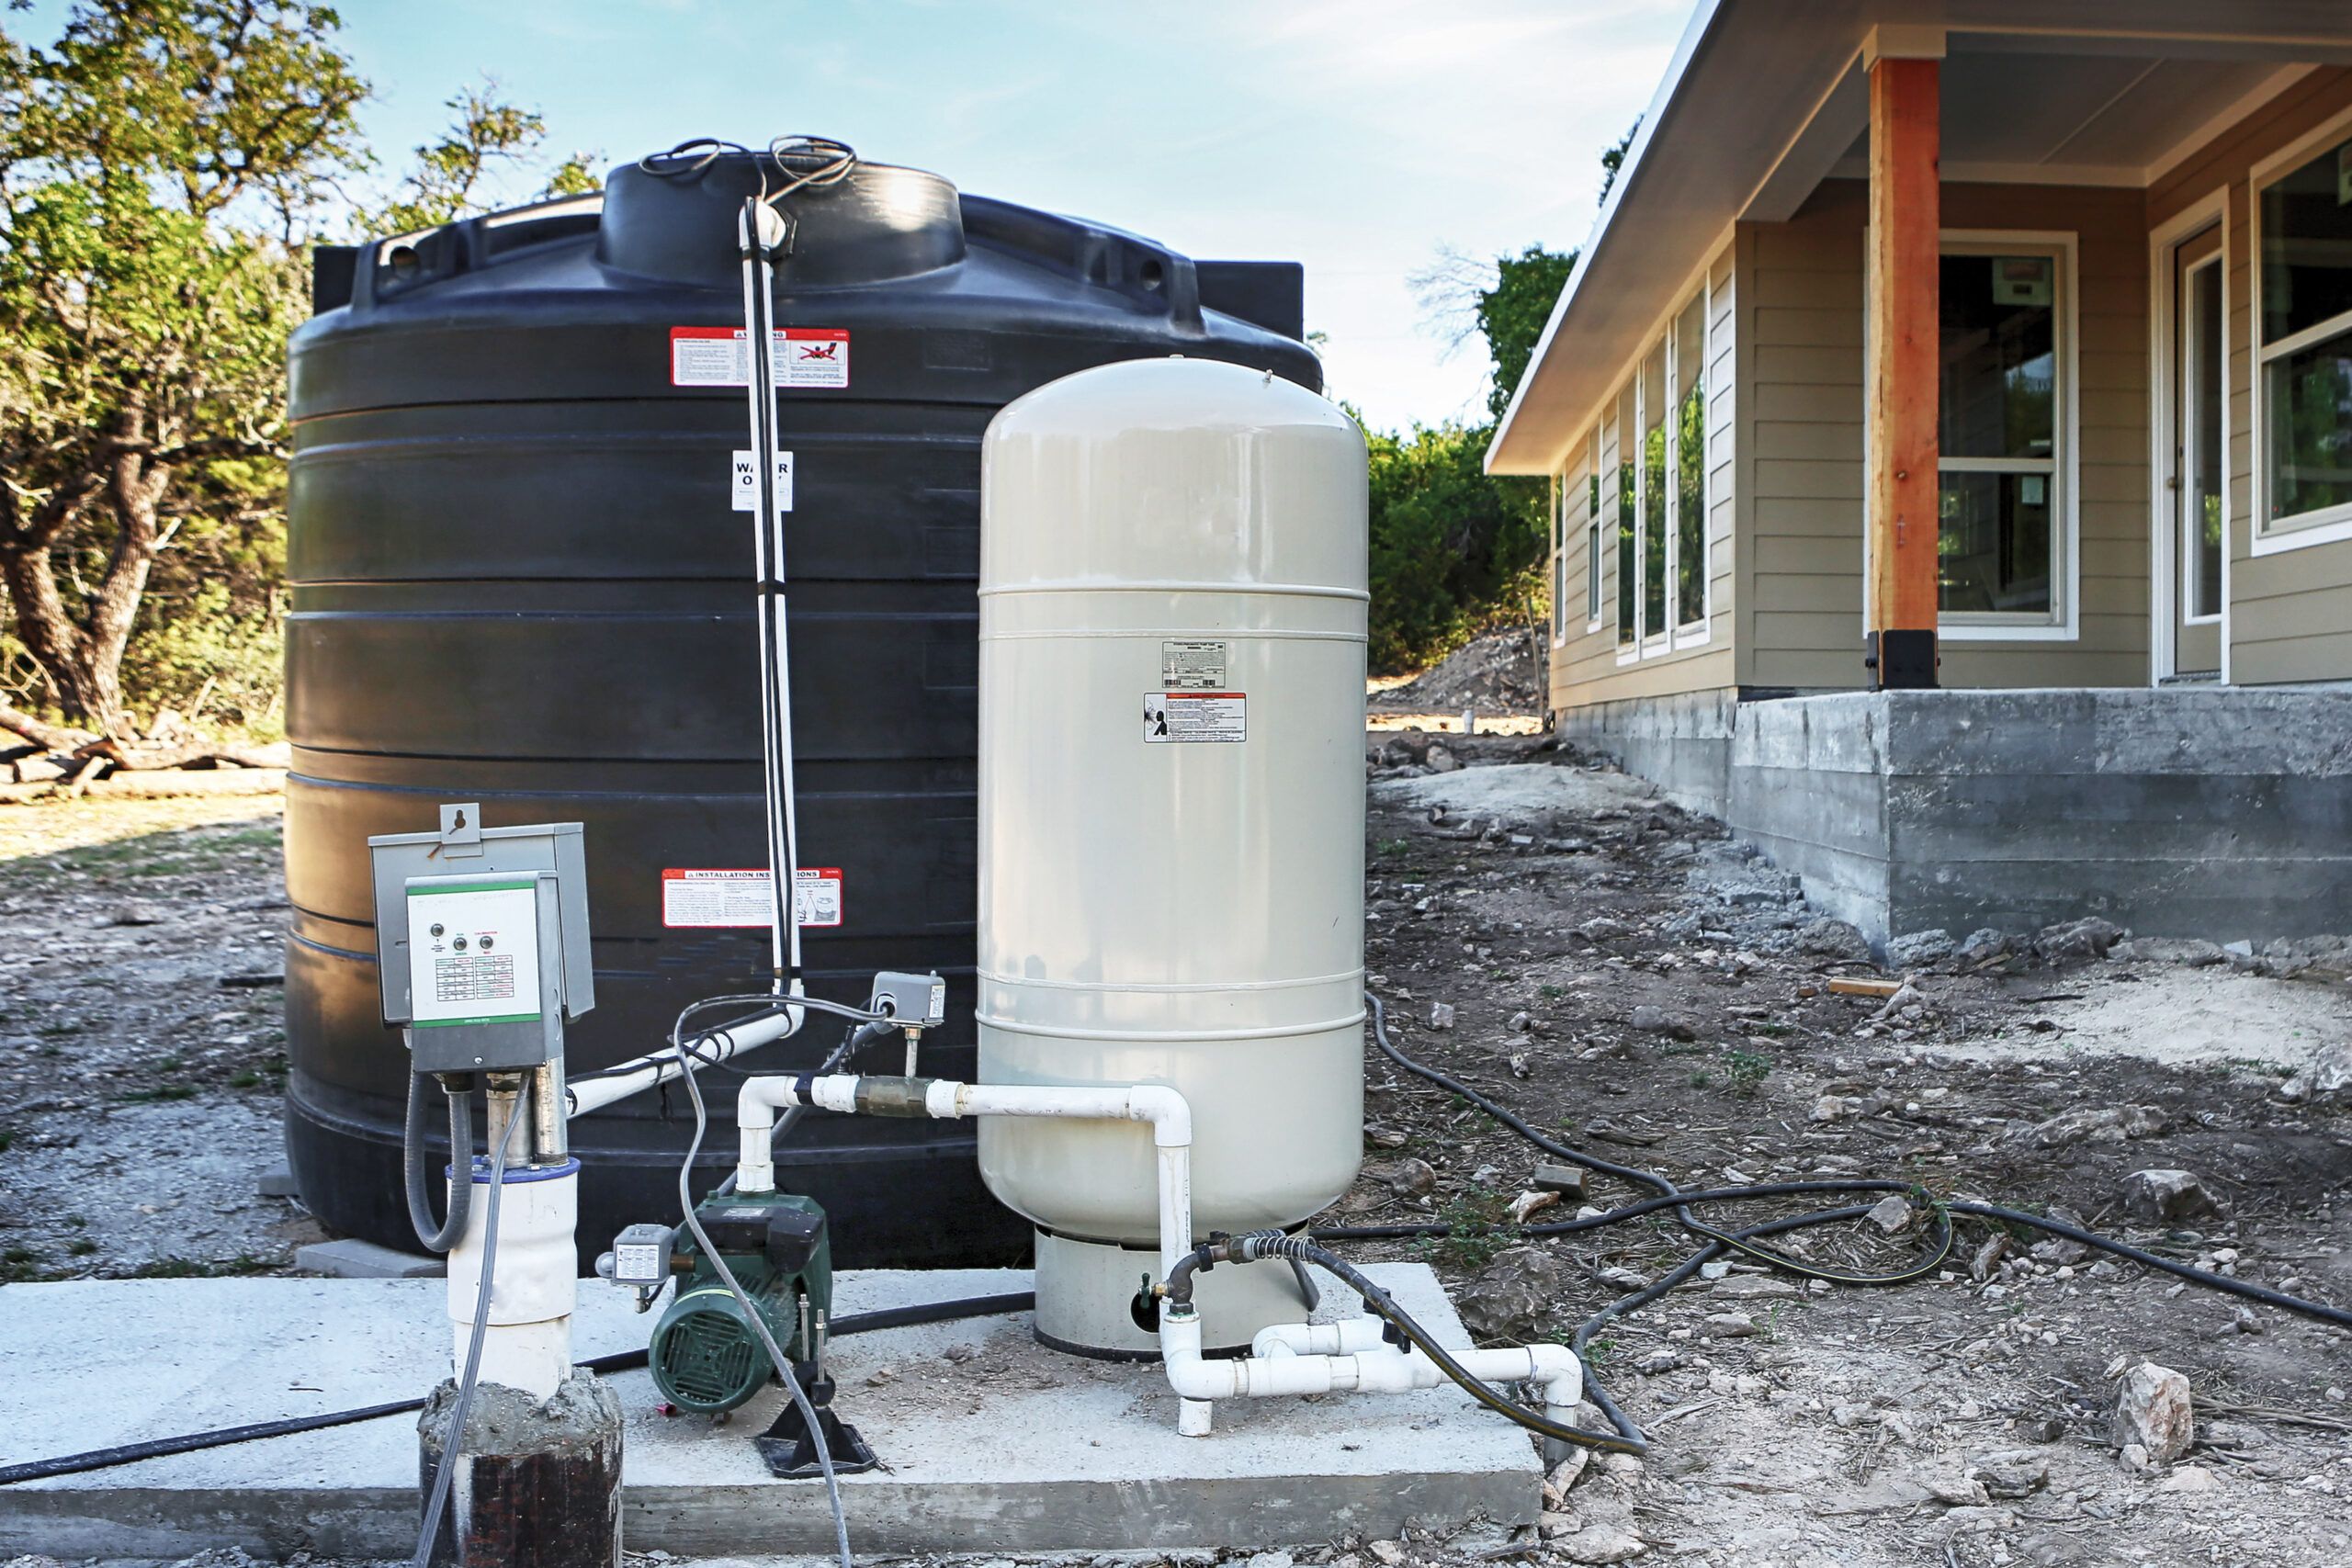
Planning The Installation
A little planning saves a lot of trouble later. Map out the best route for pipes between the tank and your house. Avoid sharp bends, which can slow water and add pressure loss. Place the pump somewhere dry, safe, and easy to reach for repairs.
Make sure there’s enough space around the pump for airflow and cooling.
Think about where you want to control the pump. Some people put the switch near the tank; others use an automatic system that starts when a tap opens.
Example Layout
- Tank outlet → Foot valve → Suction pipe → Pump inlet
- Pump outlet → Pressure switch/tank → Delivery pipe → House inlet
- Ball valves before and after pump for easy service

Credit: diy.stackexchange.com
Step-by-step Guide To Pumping Water From Tank To House
Now, let’s break down the process into clear steps. These steps cover the most common setup: pumping from a ground-level or underground tank into a house.
1. Prepare The Tank Outlet
Start by making sure your tank has a water-tight outlet at the bottom or side. This is where water will leave the tank. If your tank does not have one, you may need to drill a hole and fit a bulkhead connector.
- Clean the outlet area.
- Install the bulkhead fitting with rubber gaskets to prevent leaks.
- Attach a short pipe (suction pipe) to the outlet.
2. Install The Foot Valve
A foot valve goes at the very end of the suction pipe, inside the tank. It stops water from flowing backward when the pump is off and helps the pump stay “primed” (full of water).
- Lower the pipe with the valve into the tank, making sure the valve sits just above the bottom to avoid sucking up mud.
- Secure the pipe so it does not move.
3. Connect The Suction Pipe To The Pump
The suction pipe carries water from the tank to the pump. Use the shortest, straightest route possible.
- Use pipe sealant or Teflon tape on all threads.
- Tighten connections, but do not over-tighten (to avoid cracks).
- Make sure all joints are leak-free.
4. Place And Secure The Pump
Set the pump on a solid, level base near the tank. If it’s a centrifugal pump, keep it close to the tank for best performance.
- Bolt the pump down if possible to reduce vibration.
- Make sure the pump is protected from rain, but still has good airflow.
5. Connect The Delivery Pipe
The delivery pipe carries water from the pump into your house.
- Use the correct pipe size—too small, and you lose pressure.
- Run the pipe to your home’s main water inlet or to a pressure tank if used.
- Add a ball valve after the pump so you can shut off water for repairs.
6. Install Non-return Or Check Valve
A check valve goes after the pump on the delivery side. This adds extra protection, making sure water cannot flow backward from the house into the pump or tank.
7. Add Pressure Switch And Tank (if Needed)
A pressure switch senses when water pressure drops (like when you open a tap) and turns the pump on. When pressure is high (taps closed), it shuts the pump off.
- Connect the pressure switch to the delivery pipe.
- If you have a pressure tank, install it close to the switch. This tank stores water under pressure, so the pump does not start every time you open a tap.
8. Connect Electrical Wiring
Your pump needs power. This step is critical—if you are unsure, hire a licensed electrician.
- Use wires of the correct size for the pump’s power needs.
- Install a dedicated switch or circuit breaker.
- Make sure all connections are dry and safe from water.
- Ground the pump to prevent electric shock.
9. Prime The Pump
Before starting, fill the pump with water (called “priming”). If the pump runs dry, it can overheat and break.
- Open the priming plug on the pump.
- Pour clean water in until the pump and suction pipe are full.
- Close the plug tightly.
10. Test The System
Turn on the power and open a tap inside the house.
- Check for leaks at every connection.
- Listen for smooth, steady pump operation.
- Watch for good water flow at faucets.
If water does not flow, turn off the pump and check for airlocks or leaks in the suction pipe.
Common Problems And How To Fix Them
Even the best systems can have issues. Here’s how to handle the most frequent ones.
Airlocks In Pipes
Sometimes, air gets trapped in the suction pipe. The pump can’t “grab” the water, and you hear a dry whirring sound.
- Make sure all joints are tight and the foot valve is working.
- Re-prime the pump if needed.
- Slope the suction pipe slightly upward from the tank to the pump.
Low Pressure At Taps
If water comes out slowly, check:
- Pump size: Is it big enough?
- Pipe size: Too small pipes lose pressure.
- Filters: Clogged filters slow water.
- Leaks: Even a small leak reduces pressure.
Pump Runs Continuously
If the pump never shuts off:
- Pressure switch may be set too high or is broken.
- There could be a leak in the delivery pipe or house plumbing.
- The foot valve or check valve might be leaking.
Noisy Pump
A noisy pump often means:
- Air in the system.
- Pump is not fixed firmly to the base.
- Bearings inside pump are wearing out.
Water Full Of Sand Or Dirt
If you see dirty water:
- The suction pipe may be too close to the bottom of the tank.
- No filter is installed.
- Tank needs cleaning.
Example Problem And Solution
A family installed a submersible pump but noticed the pump kept turning on and off quickly. The issue was a faulty pressure switch that was not calibrated to the home’s needs. Adjusting the pressure range solved the problem and prevented pump damage.
Tips For Efficient Water Pumping
Saving energy and water is important. Here are ways to get better results from your system.
- Use the right pump size: Oversized pumps waste power.
- Install a pressure tank: Reduces how often the pump starts and stops, saving electricity.
- Keep pipes short and straight: Fewer bends mean less pressure loss.
- Clean filters regularly: Dirty filters make the pump work harder.
- Insulate pipes in cold areas: Prevents freezing and pipe bursts.
- Check for leaks often: Small leaks add up to big water loss.
- Service the pump annually: Oil moving parts, check wiring, replace worn seals.
Non-obvious Insight
If your area has frequent power cuts, consider a small backup water tank above your bathroom. Fill it during power-on times. Gravity will give you basic water even if the pump can’t work.
Safety Precautions
Working with water and electricity can be dangerous. Always follow safety rules:
- Turn off the power before touching the pump.
- Never run a pump without water inside.
- Install a ground-fault circuit interrupter (GFCI) for outdoor pumps.
- Do not let children play near the pump or tank.
- Label the pump switch clearly so guests or family can find it.
Maintenance For Long Life
A well-maintained pump can last 10 years or more. Here’s a schedule to keep things working:
- Monthly: Check for leaks, listen for odd sounds, clean filters.
- Every 6 months: Tighten pipe connections, check for rust or corrosion.
- Yearly: Service the pump (oil motor, replace worn parts), clean the tank, test pressure switch.
If you hear grinding noises or see water leaking, repair right away. Waiting often makes problems worse.
Cost Factors And Saving Money
Installing a water pumping system is an investment. Here’s what affects the cost:
- Pump price: Ranges from $100 for a small pump to $600+ for large, high-pressure types.
- Pipes and fittings: $50–$200, depending on length and material.
- Electrical work: $75–$200 if hiring an electrician.
- Pressure tank and switches: $50–$250.
- Installation labor: $200–$500 if you hire a plumber.
To save money:
- Do simple parts yourself, like mounting the pump or running pipes.
- Buy pumps with good warranties.
- Compare energy use—efficient pumps cost more upfront but save money over time.
Data Table: Sample Costs For A Home Pump System
| Item | Low-End Cost | High-End Cost |
|---|---|---|
| Pump | $100 | $600 |
| Pipes & Fittings | $50 | $200 |
| Electrical | $75 | $200 |
| Pressure Tank/Switch | $50 | $250 |
| Labor | $200 | $500 |
Upgrading And Automation
Modern homes often use automatic systems to save effort and water. Here are two popular upgrades:
Automatic Pump Controllers
These devices sense when a tank is full or empty and switch the pump on or off automatically. They can also protect against dry running (when the pump runs without water).
- Saves energy and avoids pump damage.
- Adds convenience—no need to watch the tank level.
Smart Home Integration
Some systems connect to your home Wi-Fi. You can check water levels or turn the pump on/off from your phone. These are more expensive but useful for busy people.
Environmental Considerations
Pumping water uses electricity, which means higher bills and carbon footprint. To reduce impact:
- Use solar-powered pumps if possible.
- Fix leaks quickly.
- Choose high-efficiency pumps.
If you use rainwater tanks, always filter water before drinking. For full safety, see the guidelines from the Centers for Disease Control and Prevention (CDC).
Credit: www.stephanedeneve.com
Troubleshooting Quick Reference
Here’s a summary table for fast problem-solving.
| Problem | Likely Cause | Quick Fix |
|---|---|---|
| No water flow | Airlock, loose suction pipe | Re-prime pump, tighten joints |
| Low pressure | Small pipes, clogged filter | Check pipe size, clean filter |
| Pump noisy | Air in system, worn bearings | Bleed air, service pump |
| Pump won’t start | No power, faulty switch | Check wiring, replace switch |
| Dirty water | Poor filter, dirty tank | Install filter, clean tank |
Frequently Asked Questions
How Do I Choose The Right Pump Size For My House?
Estimate your peak water use—how many taps, showers, or appliances you might use at once. Check the pump’s flow rate (GPM or LPM) and head (how high it can push water). For a two-bathroom house, a pump with 15–20 GPM flow and 80–100 feet head is often enough.
Ask a pump dealer to confirm for your exact needs.
Is It Safe To Install The Pump And Wiring Myself?
You can install the pipes and pump if you are handy, but electrical wiring should be done by a licensed electrician. Water and electricity are a dangerous mix. Always use a GFCI breaker for outdoor pumps, and make sure everything is properly grounded.
What Is “priming” A Pump, And Why Is It Important?
Priming means filling the pump and suction pipe with water before starting. If there’s air inside, the pump cannot pull water and may overheat. Always prime a centrifugal pump before use. Submersible pumps do not need priming because they are already under water.
My Pump Keeps Turning On And Off Rapidly. What Should I Do?
This is often called “short cycling. ” It usually means your pressure tank is too small, the pressure switch is set wrong, or there is air in the tank. Check the tank’s air pressure and adjust the switch settings. If unsure, call a plumber for help.
How Can I Make My Water Pumping System More Energy Efficient?
Use the smallest pump that meets your needs, install a pressure tank, and keep pipes as short and straight as possible. Clean filters regularly. Consider a solar-powered pump if you live in a sunny area.
Pumping water from a storage tank to your house is a smart way to control your water supply, but it takes planning and care. Choose the right pump, use quality pipes and fittings, and always follow safety steps. With regular maintenance, your system can deliver reliable water for many years—saving you money, stress, and wasted water.
Whether you’re upgrading an old setup or building new, following these guidelines will help you enjoy strong, clean water flow all through your home.