Attaching rattan to wood can transform simple furniture into beautiful, stylish pieces with a natural touch. Whether you want to repair a chair, design a new cabinet, or add decorative panels, the combination of rattan and wood brings a warm, timeless look to any space. Many people start with excitement but face confusion about choosing the right materials, tools, and methods. Mistakes like weak bonds, loose edges, or messy finishes are common. This guide is designed to help you avoid those problems, giving you everything you need to know for success. You’ll learn not just how to attach rattan, but also how to choose the best type, prepare your wood, and finish the project for lasting results. Let’s dive in and make sure your next rattan project looks professional, feels sturdy, and lasts for years.
Understanding Rattan And Wood Pairings
Rattan is a type of vine that grows in tropical regions. When dried and processed, it becomes strong, lightweight, and flexible. These qualities make it perfect for weaving and attaching to wood frames. However, not all rattan is the same, and not all wood types pair well with it.
Types Of Rattan Used In Furniture
- Cane: Thin strips peeled from the outer part of the rattan stem. Used for weaving patterns and chair seats.
- Reed: Thicker, softer, and comes from the inner core. Common for basket weaving and accents.
- Rattan Peel: Thin, flexible strips, often used to wrap joints or create decorative trims.
- Full Round Rattan: Whole stems, used structurally or for a bold look.
Each type behaves differently when attached to wood. Cane and peel are the most popular for panels and surfaces because they are flexible and easy to glue or staple.
Wood Choices For Rattan Work
- Hardwood (oak, maple, teak): Durable and holds fasteners well.
- Softwood (pine, fir): Easier to cut but may not grip as tightly.
- Plywood: Flat, stable, and ideal for panels but edges need sealing.
- MDF: Smooth, but may not hold screws or nails as strongly.
Choose wood that is smooth, dry, and free of oil or wax to ensure the best bond.
Why The Right Pairing Matters
If you attach thick rattan to a soft wood, it might loosen over time. Using cane on a rough, oily surface can cause peeling. Always match the rattan thickness and type to the wood’s strength and texture for a project that looks good and lasts.
Essential Tools And Materials
Before starting, gather everything you’ll need. The right tools make the job smoother and the results more professional.
Tools
- Measuring tape
- Pencil
- Sharp scissors or shears (for rattan)
- Utility knife
- Staple gun (with fine staples)
- Small hammer
- Drill (for pilot holes if using nails or screws)
- Rubber mallet (optional, for gentle tapping)
- Clamps (for holding rattan in place while glue dries)
- Fine sandpaper (220 grit or higher)
- Paintbrush (for glue application)
- Clean cloths
Materials
- Rattan (cane, peel, reed, or sheet, depending on your project)
- Wood (chosen based on your project needs)
- Wood glue or contact cement (strong bonding agent)
- Finishing nails or brads (for extra hold, optional)
- Staples (if using a staple gun)
- Wood finish or sealant (for protection and appearance)
- Masking tape (to mark positions or hold in place)
Safety Gear
- Protective gloves (especially when cutting rattan)
- Safety glasses (when stapling or nailing)
A beginner’s mistake is underestimating the importance of sharp scissors or blades. Dull tools will split or crush rattan, making the final look messy.
Credit: www.wickerworks.com.au
Preparing The Wood Surface
Good preparation is the secret to a strong, long-lasting attachment. Rushing this step can lead to weak bonds or visible flaws.
Clean And Smooth
- Wipe the wood: Remove all dust, dirt, and grease with a damp cloth. Let it dry completely.
- Sand the surface: Use fine sandpaper to smooth rough areas. Pay extra attention to edges and corners where rattan will attach.
- Check for damage: Look for cracks, holes, or unevenness. Fill with wood filler if needed and sand smooth.
- Remove residue: Wipe again with a dry cloth to remove sanding dust.
Mark Your Attachment Area
- Use a pencil and measuring tape to outline exactly where you want to attach the rattan.
- If creating a pattern or panel, mark the center and work outward for even placement.
Test Fit
Place the rattan on the wood before gluing or fastening. Adjust for fit and trim any excess. This step helps avoid surprises later.
Pro Tip: If using rattan cane or peel, soak it in warm water for 10-20 minutes before attaching. This makes it more flexible and less likely to crack.
Methods For Attaching Rattan To Wood
There are several ways to attach rattan, depending on the type of project, the thickness of the material, and the strength needed. The three most common methods are gluing, stapling, and nailing. Some projects use a combination for extra durability.
1. Gluing
Gluing is the most common method for flat rattan panels, cane sheets, or thin rattan strips.
How To Glue Rattan To Wood
- Choose the right glue: Use wood glue for most projects. For non-porous finishes or flexible areas, contact cement works better.
- Apply glue evenly: Use a paintbrush for thin, even coats. Cover both the wood and the rattan back for best results.
- Press firmly: Lay the rattan on the wood, starting from one edge. Press and smooth as you go to remove air bubbles.
- Clamp or weight: Use clamps or heavy books to hold the rattan in place while the glue dries (usually 2-4 hours).
- Clean excess glue: Wipe away any squeeze-out with a damp cloth before it dries.
Key Insight: Don’t use too much glue—this can seep through the rattan and leave visible marks.
2. Stapling
Stapling is fast and secure, perfect for chair seats, panels, or when you want a hidden attachment along the edges.
How To Staple Rattan To Wood
- Choose fine staples: Use ¼” to ½” staples for cane or peel. Thicker rattan may need longer staples.
- Start at the center: Fix the middle of one edge first, then the opposite side, pulling the rattan tight as you go.
- Work outward: Staple every 1-2 inches, keeping the rattan smooth and taut.
- Fold corners neatly: Trim excess and fold neatly for a clean look.
Hidden Trick: Place a strip of masking tape over the staple line before finishing. This helps hide staples and keeps the look tidy.
3. Nailing Or Bradding
Small finishing nails or brads offer a traditional look and strong hold, often used for decorative strips or thick rattan.
How To Nail Rattan To Wood
- Pre-drill holes: For thick rattan, drill small pilot holes to prevent splitting.
- Use short nails: ¾” to 1” finishing nails are usually enough.
- Tap gently: Use a small hammer or rubber mallet to avoid denting the rattan.
- Countersink nails: Hide the heads slightly below the surface and fill with matching filler if desired.
Practical Example: For a cabinet door, attach a rattan panel with glue and reinforce the edges with small brads for extra strength.
4. Combining Methods
For high-stress areas, use glue plus staples or nails. This double method is common in chair seats, where people put weight on the rattan.
Attachment Method Comparison
Here’s a quick look at the pros and cons of each method:
| Method | Best For | Strength | Appearance | Skill Level |
|---|---|---|---|---|
| Glue | Flat panels, cane sheets | Medium-High | Invisible if neat | Beginner-Friendly |
| Staples | Edges, quick attachment | High | Visible (unless covered) | Easy |
| Nails/Brads | Thick rattan, decorative strips | Very High | Visible heads | Intermediate |
Expert Tip: Always test your chosen method on a scrap piece first. Rattan and wood can react differently depending on moisture and finish.
Step-by-step Project Examples
Seeing the process in action helps you avoid mistakes. Here are two common projects—attaching rattan to a flat panel, and wrapping rattan around a wooden frame.
Example 1: Adding A Rattan Panel To A Wood Door
- Cut the rattan sheet to fit the door panel, allowing ½” extra on all sides.
- Soak the rattan (if using cane) in warm water for 10 minutes.
- Prepare the wood surface (clean, sand, wipe).
- Mark the position with pencil lines.
- Apply wood glue to both surfaces. Spread evenly.
- Place the rattan on the door, aligning edges.
- Smooth out air bubbles with a clean cloth.
- Clamp or weight the panel for 2-4 hours.
- Trim excess with a sharp utility knife.
- Seal the edges with a thin bead of glue or a decorative wooden trim.
Example 2: Wrapping Rattan Peel Around A Chair Leg
- Cut strips of rattan peel to the right length.
- Soak strips in water to make them flexible.
- Apply a thin layer of glue along the leg.
- Wrap the rattan tightly, overlapping each turn by ⅛”.
- Secure the ends with a small staple or finishing nail.
- Wipe away excess glue immediately.
- Let dry overnight before using the chair.
Beginner’s Missed Detail: Always wrap rattan in the direction that feels smooth to the touch. The opposite direction can cause peeling.
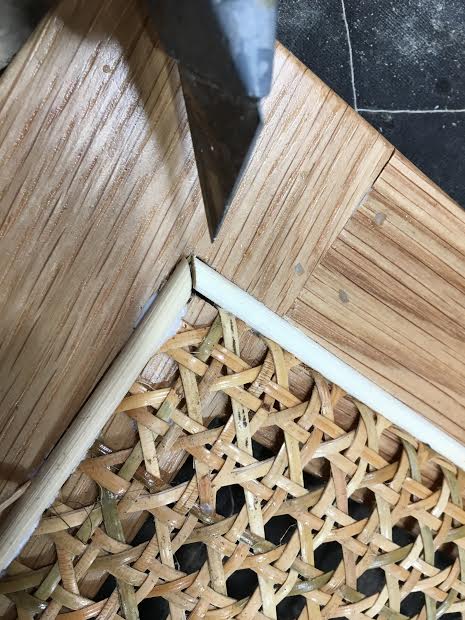
Dealing With Corners, Curves, And Edges
Most furniture is not just flat surfaces. Corners and curves can be tricky, but a few techniques make them easier.
Corners
- Soak and bend: Wet the rattan to make it flexible.
- Cut slits: For sharp corners, cut small slits at the edge to allow the material to fold without bunching.
- Use glue and clamps: Hold the rattan in place until dry.
Curves
- Heat helps: Use a hairdryer or soak for longer to soften rattan for gentle curves.
- Work slowly: Attach in small sections, pressing firmly as you go.
- Trim carefully: Use sharp scissors to cut away overlaps.
Edges
- Hide staples or nails: Cover with rattan peel or a thin wooden trim for a professional look.
- Seal ends: Dab a little glue to stop fraying.
Advanced Tip: For complex shapes, make a paper template first. This saves rattan and helps plan the cuts.
Finishing Touches: Sanding, Sealing, And Coloring
After you attach the rattan, finishing makes the piece look polished and helps it last.
Sanding
- Light touch: Sand only the wood and exposed rattan edges with fine sandpaper.
- Never sand woven cane: It will fray and weaken.
Sealing
- Clear sealant: Use a clear water-based varnish or polyurethane to protect both rattan and wood.
- Avoid thick coats: Several thin coats are better than one heavy layer.
- Let dry fully: Follow the sealant’s instructions for drying time.
Coloring
- Stain before attaching: If you want a darker look, stain the wood and rattan before assembly.
- Test first: Some rattan types absorb stain unevenly.
Maintenance Tips
- Keep dry: Rattan can mold if it stays wet.
- Dust regularly: Use a soft brush or vacuum with a brush attachment.
- Repair quickly: Fix loose spots with a little glue before they become big problems.
Common Mistakes And How To Avoid Them
Understanding what goes wrong helps you get it right the first time. Here are mistakes beginners often make:
- Not soaking rattan: Dry rattan cracks or splits when bent. Always soak or heat for flexibility.
- Skipping surface prep: Dust, oil, or rough spots weaken the bond.
- Too much glue: Excess glue seeps through and stains rattan.
- Ignoring drying time: Using the item too soon can shift or loosen the rattan.
- Poor staple placement: Staples too far apart or at the edge can cause lifting.
- Not sealing edges: Unsealed rattan ends fray and unravel over time.
- Not testing first: Every wood and rattan combination reacts a bit differently.
Insider Insight: Check your climate. High humidity can loosen glue over time—choose water-resistant glue in damp areas.

Credit: www.youtube.com
Rattan Maintenance After Attachment
Once you’ve attached rattan to wood, keeping it in good condition will help your project last for years.
Cleaning
- Wipe with a damp cloth: Avoid soaking.
- Brush out dust: Use a soft toothbrush for woven patterns.
Preventing Damage
- Keep out of direct sunlight: Rattan can fade and dry out.
- Avoid heavy loads: Don’t stand on rattan panels—they are decorative, not structural.
Quick Repairs
- Re-glue loose spots: Use a toothpick to apply glue under lifted edges.
- Replace broken strips: Cut out damaged pieces and weave in new ones.
Where To Use Rattan-wood Combinations
Attaching rattan to wood is popular in many types of furniture and decor:
- Cabinet doors: Add lightness and style to kitchens or living rooms.
- Chair seats and backs: Classic in mid-century and tropical designs.
- Room dividers: Lightweight and easy to move.
- Drawer fronts: Adds texture and interest.
- Wall panels: Bring warmth to modern spaces.
Fun Fact: The rise in rattan furniture sales in the US grew by over 15% from 2020 to 2023, showing a big comeback in home design trends.
Cost And Time Estimates
Knowing what to expect helps you plan better. Here’s a realistic estimate for a small project, like adding a rattan panel to a cabinet door:
| Item | Estimated Cost | Time Needed |
|---|---|---|
| Rattan Sheet (2×3 ft) | $15 – $30 | — |
| Wood Panel | $10 – $25 | — |
| Glue | $5 – $10 | — |
| Finishing Supplies | $5 – $15 | — |
| Tools (if needed) | $0 – $30 | — |
| Prep & Attachment | — | 1-2 hours |
| Drying & Finishing | — | 4-8 hours |
Total Cost: $35-$110 (depending on what you already have)
Total Time: 1-2 hours hands-on, plus drying time
When To Call A Professional
Most home projects with rattan and wood are DIY-friendly. However, you might want a pro if:
- The design is very complex (intricate curves, custom patterns)
- The furniture is antique or valuable
- You want a factory-perfect finish
Insider Advice: Even if you hire someone, knowing these basics will help you discuss your needs and check their quality.

Credit: leisuretouchrattan.com
Sustainability And Environmental Impact
Rattan grows quickly and is harvested with less environmental damage than many woods. Pairing it with sustainably sourced wood creates eco-friendly furniture. Look for rattan certified by groups like the Forest Stewardship Council (FSC).
Non-Obvious Insight: Some cheaper rattan is bleached or chemically treated. Always ask about sourcing and processing if sustainability matters to you.
For more on rattan’s environmental benefits, check out the Wikipedia Rattan page.
Frequently Asked Questions
How Long Does It Take For Glued Rattan To Dry?
Most wood glues dry in 2-4 hours, but full strength is reached after 24 hours. Contact cement bonds instantly but should cure for several hours. Always check the instructions on your glue for exact drying times.
Can I Stain Rattan To Match My Wood?
Yes, but results vary. Test the stain on a scrap piece first. Some rattan types absorb stain unevenly or turn a different color than wood. For best results, use gel stains or water-based dyes.
What Is The Best Glue For Attaching Rattan To Wood?
Wood glue works for most projects. For areas with lots of movement or moisture, contact cement or a flexible adhesive is better. Avoid hot glue, as it does not create a strong, lasting bond.
How Do I Prevent Rattan From Unraveling At The Edges?
Seal the ends with a dab of glue right after cutting. For extra protection, cover edges with rattan peel or a thin wooden trim. This keeps the weave tight and looking neat.
Is It Possible To Repair Damaged Rattan Once Attached?
Yes. Lifted or broken rattan can be re-glued or replaced. Cut out the damaged area, soak and fit a new piece, then glue and secure as before. Quick repairs prevent bigger problems later.
Attaching rattan to wood is both a craft and a skill. With the right tools, methods, and a bit of patience, you can create pieces that are beautiful, strong, and unique. Whether you’re updating old furniture or starting a new DIY project, following these steps gives you the confidence and knowledge for great results.