Installing wood flooring on a ceiling is a bold way to change any room. It brings a warm, natural look overhead, making a space feel unique and inviting. While most people think of wood flooring for their actual floors, using it on the ceiling creates a dramatic effect—sometimes called a wood plank ceiling or “faux wood beam” look.
This project can be done by experienced DIYers or professionals, but it’s important to understand each step clearly before starting. Many homeowners miss small details that can make a big difference in the final result. Here, you’ll find everything you need to know, from planning and materials to installation and finishing, with practical tips you won’t find in quick guides.
Why Install Wood Flooring On A Ceiling?
A wood ceiling is much more than just a design statement. It can:
- Add warmth: Wood tones soften a room’s feel, making it cozier.
- Hide imperfections: Cover old, cracked, or uneven ceilings without messy repairs.
- Improve acoustics: Wood helps absorb and diffuse sound, reducing echoes.
- Increase property value: Unique ceiling features attract buyers and can boost your home’s appeal.
Many upscale restaurants, hotels, and homes use wood on ceilings to create an upscale, natural vibe. It’s a project that requires planning and skill, but the payoff can be huge.
Planning Your Wood Ceiling Project
Installing wood flooring overhead is not as simple as nailing boards up. Careful planning prevents problems later.
Assessing Your Ceiling Structure
Not every ceiling can support the weight of wood planks. First, find out:
- Is it a joist ceiling (exposed beams), drywall, or drop ceiling?
- Are there signs of sagging, cracks, or water damage?
- Can the ceiling safely hold the wood’s weight?
If you’re unsure, consult a contractor or structural engineer, especially for older homes.
Measuring And Calculating Materials
Measure the length and width of your ceiling. Multiply to get square footage. Add 10-15% extra for cuts, mistakes, and matching wood grains.
For example, for a 12×14 ft room:
- 12 × 14 = 168 sq ft
- Add 10%: 168 × 1.10 = 184.8 (round up to 185 sq ft)
Always buy a bit more than you think you need.
Choosing Wood Type And Finish
Not all wood is equal for ceilings. Consider:
- Solid hardwood: Durable, beautiful, but heavy and more expensive.
- Engineered wood: Lighter, stable, less likely to warp.
- Laminate flooring: Cheaper, easier to install, but can look less natural.
- Reclaimed wood: Eco-friendly, gives a rustic look.
Think about finish: pre-finished wood saves time, while unfinished lets you stain or seal the exact shade you want.
Tools And Supplies Checklist
You’ll need:
- Stud finder
- Measuring tape
- Miter saw or circular saw
- Nail gun or hammer and finishing nails
- Construction adhesive
- Level
- Chalk line
- Safety gear (gloves, goggles, mask)
- Wood filler
- Ladder or scaffolding
- Wood planks (plus underlayment if needed)
A few extra items can save time, like a laser level for straight lines or a pneumatic nailer for faster installation.
Preparing The Room And Ceiling
Preparation is key for a professional look and safe installation.
Clear The Space
Remove all furniture, decor, and light fixtures. Cover floors with drop cloths. Make sure you have room for ladders and tools.
Inspect And Repair The Ceiling
Check for:
- Water stains: Fix leaks before covering up.
- Sagging or cracks: Address any structural problems first.
- Electrical: Move or add wiring for lights, fans, or speakers before installation.
Mark Ceiling Joists
Use a stud finder to locate joists. Snap chalk lines along them. You’ll nail or screw planks into these for a solid hold. Marking ahead of time prevents missed nails and loose boards.
Acclimate The Wood
Wood expands and contracts with temperature and humidity. Stack planks in the room for 48–72 hours before installation. This step is often skipped but prevents gaps, buckling, or warping later.
Choosing The Right Wood Flooring For Ceilings
The best wood for your ceiling depends on style, budget, and room conditions.
Solid Vs. Engineered Wood
Solid hardwood offers a classic look but is heavy and may be harder to install overhead. Engineered wood is lighter, resists warping, and is easier for beginners.
Wood Species
Popular choices include:
- Pine: Affordable, soft, easy to cut, but dents easily.
- Oak: Strong, classic grain, holds up well.
- Maple: Smooth grain, light color, very durable.
- Walnut: Rich, dark, luxurious, but pricier.
For high-humidity rooms (like bathrooms), engineered wood or laminate is safer.
Plank Size And Profile
Wide planks make small rooms feel bigger, while narrow planks suit traditional styles. Tongue-and-groove edges lock together for a seamless look and are easier to install overhead.
Finishes
Pre-finished planks are factory-sealed—less mess, faster install. Unfinished planks let you pick stain and sheen but require more work. Matte finishes hide dust and fingerprints better than gloss.
Sustainability
If eco-friendliness matters, look for wood certified by the Forest Stewardship Council (FSC) or reclaimed sources.
Here’s a quick comparison of popular wood types for ceilings:
| Wood Type | Cost per sq ft | Appearance | Pros | Cons |
|---|---|---|---|---|
| Pine | $2–$4 | Light, knotty | Cheap, easy to cut | Soft, dents easily |
| Oak | $4–$8 | Medium, classic grain | Durable, timeless look | Heavier, pricier |
| Engineered Wood | $3–$7 | Varies | Lighter, stable | May look less natural |
| Laminate | $1–$3 | Varies | Budget-friendly | Not real wood |
| Reclaimed Wood | $5–$15 | Rustic, unique | Eco-friendly, character | Irregular sizes |
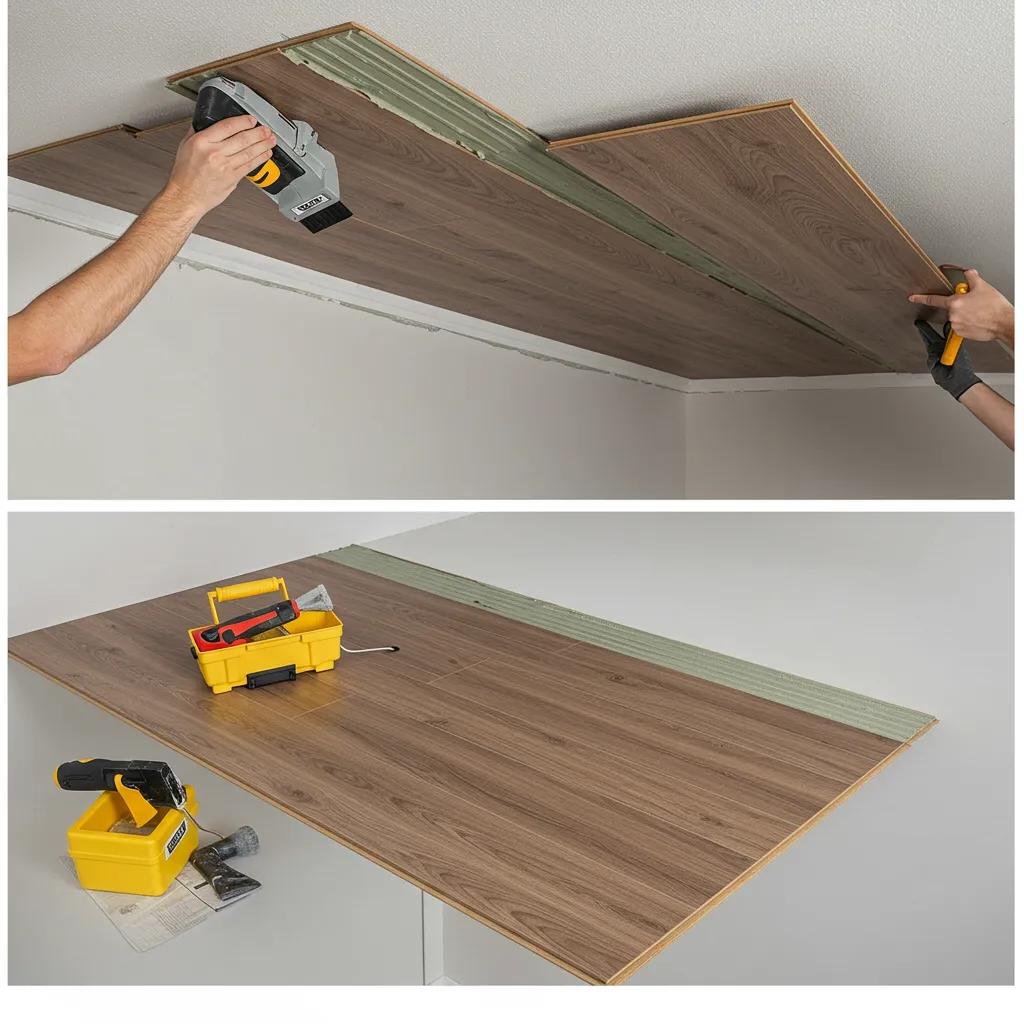
Step-by-step Installation Guide
This is where most people need the clearest advice. Installing wood flooring on a ceiling is more challenging than on a floor due to gravity and working overhead. Take your time and check each step.
1. Plan Your Layout
Decide which direction to run the planks. Most people run them parallel to the longest wall, but perpendicular to ceiling joists provides better support. Mark a starting line at one edge with a chalk line for a straight first row.
2. Locate And Mark Joists
Find all the joists and mark them on the walls. You’ll want your nails or screws to go into these for a secure hold.
3. Prepare Planks
If you need to cut planks to fit, do so before you start. Mix planks from several boxes to vary color and grain—this avoids large patches of the same tone.
4. Apply Adhesive (optional But Recommended)
Apply a bead of construction adhesive to the back of each plank. This step helps hold planks in place while you nail and reduces squeaks.
5. Install The First Row
Hold the first plank against your chalk line, groove side facing the wall. Use a nail gun or finishing nails to attach it to the joists every 12–16 inches. Countersink the nails slightly so you can fill them later.
6. Continue Laying Planks
Stagger the end joints from row to row by at least 8 inches. This looks better and gives more strength. Press each tongue into the groove of the previous row before nailing.
7. Cut Around Obstacles
For lights, vents, or beams, measure and mark cutouts on the planks. Use a jigsaw for curves or notches. Always cut slightly smaller, then sand to fit—gaps look worse overhead.
8. Finish Edges
At the last row, you may need to rip planks lengthwise to fit. Use a table saw for straight cuts. If there are gaps at the edges, cover them later with matching trim or molding.
9. Fill Nail Holes And Gaps
Use wood filler that matches your planks. Fill all nail holes and any visible gaps. Let dry, then sand lightly for a smooth finish.
10. Touch Up And Clean
If using unfinished wood, stain and seal as desired. Wipe the ceiling with a damp cloth to remove dust. Reinstall light fixtures and vents.
Here’s a quick summary of the installation process:
| Step | Action | Tip |
|---|---|---|
| 1 | Mark layout and joists | Double-check for straightness |
| 2 | Prepare planks and tools | Mix boxes for color variety |
| 3 | Apply adhesive and start row | Use a partner for long planks |
| 4 | Continue rows, stagger joints | Keep lines tight for best look |
| 5 | Cut for obstacles and finish edges | Go slow for tricky cuts |
| 6 | Fill, touch up, and clean | Inspect from all angles |
Common Mistakes And How To Avoid Them
Many first-timers make small errors that lead to big regrets.
Not Acclimating Wood
Skipping this step is one of the biggest causes of buckling or gaps. Always let wood sit in the room for at least 2 days.
Missing Joists
Nailing into drywall alone leads to loose planks and safety issues. Always secure into ceiling joists.
Overusing Nails Or Skipping Adhesive
Too many nails can split wood; too few mean planks may sag. Adhesive helps but should not be the only support.
Poor Layout Planning
Crooked first rows or gaps at the end are hard to fix. Take extra time to measure and mark before starting.
Ignoring Room Conditions
Don’t install solid wood in high-humidity rooms unless you are certain it’s suitable. Engineered or laminate wood is a safer choice for bathrooms or basements.
Rushing The Finish
Filling holes, sanding, and sealing are not optional if you want a professional look. Don’t skip the details.
Credit: storiesflooring.co.uk
Advanced Tips For A Stunning Wood Ceiling
Sometimes, small touches make a big difference.
Add Faux Beams Or Borders
Install wider planks or beams at edges or across the ceiling for a coffered look. This adds depth and interest.
Use Contrasting Colors
Mix wood stains for a two-tone effect. Lighter boards in the center and darker at the edges can make a room feel larger.
Integrate Lighting
Recessed lighting works well with wood ceilings. Plan wiring before installation. You can also add LED strips along beams for a modern touch.
Soundproofing
For home theaters or noisy spaces, add a thin soundproofing underlayment before installing planks. This reduces noise transfer and echo.
Hidden Access Panels
If you need to reach wiring or pipes above, create a removable panel with matching wood for easy access.
Maintenance And Cleaning
Wood ceilings are easy to care for, but they do need some attention.
- Dust regularly with a microfiber mop or cloth.
- For sticky spots, use a damp cloth—avoid soaking the wood.
- Check for loose planks or nails yearly.
- In humid climates, monitor for signs of swelling or mold.
If you used a clear sealer, reapply every few years to keep wood looking fresh.

Credit: www.youtube.com
Cost Breakdown: What To Expect
Wood ceiling prices vary based on wood type, room size, and DIY vs. pro install.
Diy Vs. Professional Install
- DIY costs: $2–$8 per sq ft (materials only)
- Pro install: $5–$15 per sq ft (includes labor)
So, a 200 sq ft room could range from $400 (DIY pine) to $3,000 (pro-installed walnut).
Hidden Costs
- Extra tools (nail gun, ladder rental): $100–$300
- Trim and finish materials: $1–$2 per sq ft
- Electrical changes: $100–$500 (if moving or adding fixtures)
Don’t forget to budget for waste (10–15%) and repairs if your ceiling needs prep.
Here’s a quick cost comparison:
| Type | Materials (per sq ft) | Install (per sq ft) | Total (200 sq ft) |
|---|---|---|---|
| Pine, DIY | $2 | $0 | $400 |
| Oak, Pro | $6 | $6 | $2,400 |
| Engineered, DIY | $4 | $0 | $800 |
| Reclaimed, Pro | $10 | $8 | $3,600 |
Safety Tips
Working overhead with power tools comes with risks.
- Always use a sturdy ladder or scaffolding—not a chair or table.
- Wear safety glasses and a dust mask when cutting or nailing wood.
- Get a helper for long or heavy planks.
- Shut off power at the breaker when working near wiring.
- Don’t rush. Fatigue leads to accidents, especially overhead.
When To Call A Professional
Some projects are best left to experts:
- Large rooms or ceilings higher than 10 feet
- Sagging or weak ceiling structures
- Complicated layouts with many obstacles
- Integrating HVAC or advanced lighting
A pro can finish faster, handle tricky cuts, and guarantee a safe, level install. For most standard rooms, a patient DIYer can do a great job, but know your limits.
Two Key Insights Most Beginners Miss
- Acclimation is Non-Negotiable: Many skip this because they’re eager to start, but it’s the main reason for future ceiling problems.
- Plank Direction Affects Perception: Running planks the “long way” of the room makes spaces feel bigger, while the “short way” can make a room feel cozier but smaller. Always plan based on the effect you want, not just ease of installation.

Credit: www.reddit.com
Where To Learn More
If you want to see step-by-step visuals or compare wood types, you can explore additional resources at the Houzz wood ceilings guide.
Frequently Asked Questions
How Heavy Is A Wood Ceiling, And Will My Structure Support It?
A typical wood plank ceiling adds about 2–3 pounds per square foot. Most modern joist ceilings can support this, but always check for sagging or damage first. For old or questionable framing, get a pro’s opinion.
Can I Install Wood Flooring On A Popcorn Or Textured Ceiling?
Yes, but you should scrape off heavy texture or flatten high spots first. Uneven surfaces make the planks hard to attach and can cause gaps.
Is It Safe To Use Reclaimed Wood On Ceilings?
Reclaimed wood is safe if it’s clean and dry. Check for nails, insect damage, or rot before installing. Some woods may need sealing if they were exposed to chemicals.
Can I Install Wood Planks Over Drop Ceilings Or Tiles?
Directly attaching wood to drop ceiling grids is not recommended—they’re not strong enough. Remove tiles, reinforce the grid, or attach furring strips to joists, then install the wood.
What’s The Best Way To Clean And Maintain A Wood Ceiling?
Dust regularly. For sticky spots, use a damp cloth and mild cleaner—avoid harsh chemicals. Check yearly for loose planks or finish wear, and re-seal as needed.
Installing wood flooring on your ceiling transforms any room, creating warmth and style. With careful planning, the right materials, and attention to detail, you can achieve a beautiful result that lasts for years. This project is challenging but rewarding, and even small choices—like wood type and layout—can have a big impact.
Take your time, follow these steps, and enjoy your new wood ceiling.