
When you walk into a room and see a chewed door frame, it’s hard not to feel frustrated. Maybe your dog was anxious, your cat needed to scratch, or a young child got creative with a toy. No matter how it happened, a damaged frame looks bad and can make your home feel less welcoming.
But the good news is, you can fix it yourself—even if you’re not a professional carpenter. You just need the right plan, some patience, and a few tools.
This guide will walk you through every step to repair a chewed door frame. You’ll learn how to assess the damage, choose materials, fix everything from small bite marks to large chunks, and finish the repair so it looks as good as new.
Even if you’ve never done home repairs before, you’ll find clear instructions, practical tips, and solutions to common problems. By the end, you’ll know how to handle almost any kind of chewed frame—saving time, money, and stress.
Understanding Door Frame Damage
Before you start, it’s important to know what you’re dealing with. Not all chewed door frames are the same. Some have surface scratches, while others are missing big pieces of wood. The repair process depends on the type and depth of the damage.
Types Of Damage
- Surface scratches and gouges: The most common. These don’t go deep and are mostly cosmetic.
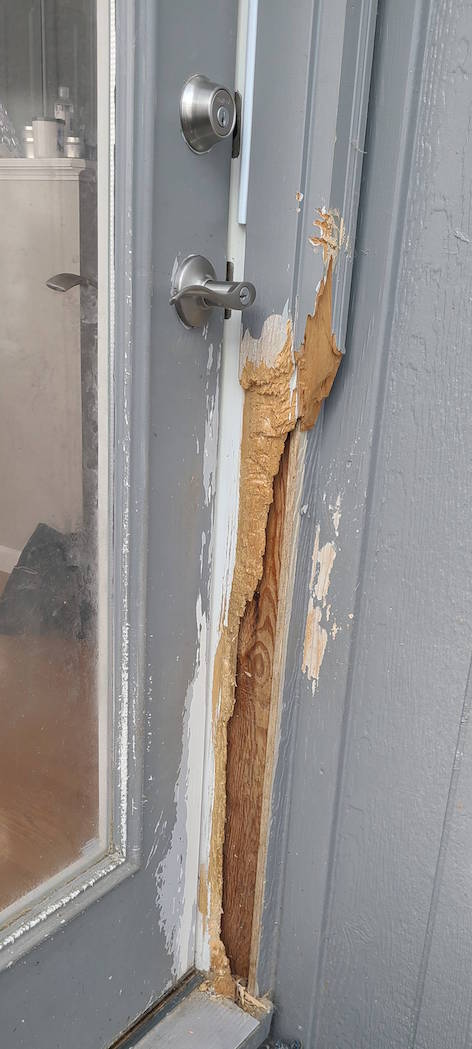
- Deep bites and missing wood: If your pet chewed off big chunks, you’ll need to fill or replace those areas.
- Splintered or cracked frames: Sometimes, the frame splits or cracks along the wood grain.
- Damaged molding or trim: The thin, decorative edge might be chewed off instead of the main frame.
Why Damage Matters
- Light damage often needs just wood filler and sanding.
- Heavy damage may require new wood or a full frame replacement.
- Location is key: If the latch or hinges are affected, repairs need to be stronger.
Understanding the type and location of damage helps you choose the right method and tools.
Tools And Materials You’ll Need
Having the right equipment makes the job smoother and safer. Here’s what you should prepare:
Essential Tools
- Putty knife or scraper
- Sandpaper (medium and fine grit)
- Utility knife
- Hammer
- Screwdriver
- Clamps (for holding pieces in place)
- Saw (hand saw or power saw, for severe damage)
- Paintbrush
Materials
- Wood filler or epoxy wood repair compound
- Primer and paint (to match your frame)
- Painter’s tape
- Wood glue
- Replacement wood (for large missing sections)
- Finishing nails (for trim repair)
- Protective gloves and eye protection
For most repairs, you won’t need everything on this list. But having them nearby saves time and avoids extra trips to the store.
Comparing Repair Materials
Here’s how the most common fillers stack up:
| Material | Best For | Dry Time | Durability | Paintable |
|---|---|---|---|---|
| Wood Filler | Small to medium scratches | 30 min – 2 hours | Good | Yes |
| Epoxy Wood Repair | Deep gouges, missing chunks | 2 – 24 hours | Excellent | Yes |
| Wood Putty | Surface imperfections | 20 – 60 min | Fair | Yes |
| Replacement Wood | Large damaged sections | Varies | Excellent | Yes |
Non-obvious insight: Epoxy repairs are often stronger than the original wood, which is helpful for pets that might chew again.
Safety First: Protect Yourself And Your Home
Before you start, put safety first. Small steps help you avoid injuries and messes:
- Wear gloves when handling fillers and epoxy.
- Use eye protection when sanding or cutting.
- Open windows for ventilation if you’re using strong-smelling products.
- Cover the floor with a drop cloth or old sheet to catch debris and drips.
Many beginners forget to use painter’s tape around the repair area. This prevents damage to surrounding paint and gives cleaner results. It’s a small step with a big impact.
Step-by-step Repair Guide
Now let’s fix the chewed door frame. The process changes based on the damage, so follow the steps that match your situation.
1. Assess And Prepare The Area
Start by examining the frame closely. Look for:
- How deep the bites go
- If wood is missing or just scratched
- Damage to nearby trim or the wall
Remove loose wood with a utility knife or scraper. Brush away dust and dirt. If the area is greasy (sometimes pet saliva leaves residue), wipe with a damp cloth and let dry completely.
Tip: Take a photo before you start. This helps you track progress and match paint later.
2. Repairing Light Damage: Surface Scratches And Gouges
If the frame has shallow marks, use wood filler.
Step-by-step:
- Clean the area so no dust or loose pieces remain.
- Apply wood filler with a putty knife. Press firmly so it fills the scratches.
- Smooth out the filler, removing extra.
- Let it dry fully (check the label for times).
- Sand the area with medium, then fine grit sandpaper until smooth and level.
- Dust off the surface before painting.
Pro tip: For a perfect finish, apply two thin layers of filler rather than one thick layer.
3. Fixing Deep Bites And Missing Wood
If your pet chewed off chunks, use an epoxy wood repair compound or cut and fit a replacement piece.
Using Epoxy Wood Repair
- Mix the two parts (resin and hardener) as instructed.
- Fill the damaged area, shaping it with a putty knife. Build up slightly higher than the surface.
- Let it cure (dry and harden) fully—usually overnight.
- Sand the patch smooth and flush with the frame.
- Prime and paint to match.
Epoxy is very strong and can be carved, drilled, or sanded like real wood.
Replacing Missing Wood
For very large areas:
- Cut away jagged or splintered wood with a saw to create a flat surface.
- Measure and cut a piece of matching wood (buy trim at a hardware store).
- Dry fit the new piece to check size.
- Glue in place with wood glue. Clamp or tape until dry.
- Nail if needed for extra strength.
- Fill gaps with wood filler, then sand smooth.
- Prime and paint.
Most beginners make the mistake of skipping the dry fit. Always check before gluing.
4. Repairing Damaged Molding Or Trim
If only the thin trim is chewed, remove it and replace with new molding:
- Pry off the damaged molding carefully with a screwdriver or pry bar.
- Measure the length needed.
- Cut a new piece to size.
- Nail or glue the new molding in place.
- Caulk gaps, if any, and paint to match.
Pro tip: Bring a piece of your old molding to the store for an exact match.
5. Filling Cracks And Splinters
Sometimes, chewing causes cracks or splits in the frame.
- Widen the crack slightly with a utility knife for better filler grip.
- Inject wood glue deep into the crack.
- Clamp the area until the glue dries (usually a few hours).
- Fill surface gaps with wood filler, then sand.
- Prime and paint.
This method restores both strength and appearance.
How To Paint And Finish The Repaired Area
A well-fixed frame still stands out if the paint doesn’t match. Follow these steps for a seamless look.
Choosing The Right Paint
- Match the sheen (gloss, semi-gloss, matte) to your frame.
- Take a small, painted chip to the hardware store for color matching.
- Use a good primer before painting, especially over filler or epoxy.
Painting Steps
- Tape off the wall and door to avoid splatters.
- Prime the patch and let it dry.
- Apply paint with a brush in thin, even coats.
- Let dry between coats (usually 1-2 hours).
- Remove tape before the last coat fully dries for a sharp edge.
If the frame is stained wood, use wood stain and clear sealer instead of paint.
Non-obvious insight: Most people rush the paint step, but waiting for full drying gives a much better finish.
Preventing Future Damage
Once you’ve fixed your chewed door frame, you want it to stay that way. Here’s how to stop pets or children from repeating the damage.
For Pets
- Pet deterrent sprays: These taste bad but are safe for wood.
- Provide chew toys: Give your pet something better to chew.
- Exercise and training: Bored pets chew more often.
- Barriers: Use baby gates or close doors when you can’t supervise.
For Children
- Teach boundaries: Explain why chewing or hitting frames is not okay.
- Safe toys: Give alternatives for biting or banging.
- Foam covers: Temporary protection for teething toddlers.
For All Situations
- Regular checks: Inspect frames monthly for new damage.
- Repair early: Small problems are easier to fix than big ones.
Common Mistakes And How To Avoid Them
Even experienced DIYers make errors. Here are mistakes to watch for:
- Skipping prep: Not cleaning or sanding leads to poor results.
- Using wrong filler: Lightweight spackle won’t hold in deep areas.
- Painting too soon: Trapped moisture can cause bubbles or peeling.
- Not matching materials: Using the wrong wood or paint stands out.
- Ignoring underlying problems: Pets may chew due to stress or boredom.
Example: One homeowner fixed the frame three times before realizing her dog was anxious when left alone. Addressing the root cause stopped the chewing.
Comparing Diy Repair Vs. Hiring A Professional
Some repairs are simple, but others may need expert help. Here’s how the two approaches compare:
| Factor | DIY Repair | Professional Repair |
|---|---|---|
| Cost | $20-$75 (materials only) | $100-$400 (labor + materials) |
| Time Needed | 2-6 hours | 1-2 hours (for pro) |
| Skill Level | Beginner to intermediate | Expert |
| Result Quality | Good with care | Excellent, nearly invisible |
| Tools Needed | Basic homeowner tools | Professional equipment |
Insight: For visible, high-traffic areas (like the front door), consider hiring a pro if you want a perfect look. But for most interior frames, DIY is more than enough.
Special Cases: Painted Vs. Stained Wood Frames
Not all door frames are the same. Painted and stained wood need different approaches for the best finish.
Painted Frames
- Easier to hide repairs with filler and paint.
- Color match is the biggest challenge.
- Use primer to prevent stains from showing.
Stained Wood Frames
- Harder to hide patches, especially if the wood grain doesn’t match.
- Use wood repair epoxy, then stain to blend.
- Sometimes, replacing the section is better than patching.
Pro tip: Use a wood graining tool for epoxy patches to mimic the look of real wood before staining.
Repairing Metal Or Vinyl-clad Door Frames
Some door frames are covered with metal or vinyl instead of wood. These need a different approach:
- For metal frames: Use auto body filler (like Bondo) instead of wood filler. Sand smooth and repaint with metal paint.
- For vinyl frames: Small holes can be filled with vinyl patch kits. Large damage may require replacing the cover strip.
Caution: If you’re unsure what your frame is made of, check the manufacturer’s label or ask at a hardware store.
Credit: diy.stackexchange.com
Troubleshooting: When Repairs Don’t Go As Planned
Sometimes, things don’t work perfectly the first time. Here’s how to handle common problems:
- Filler won’t stick: Make sure the area is clean and dust-free.
- Patch feels soft after drying: You may not have mixed the epoxy correctly. Scrape it out and try again.
- Paint looks uneven: Sand again and add another thin coat.
- Visible lines or color mismatch: Feather the paint out beyond the repair and blend carefully.
If all else fails, you can sand down your work and start over. Patience pays off.
How Long Does A Repair Take?
Most chewed door frame repairs take between 2 and 6 hours from start to finish, but much of this is waiting for filler or paint to dry. For deep damage (using epoxy), expect to wait overnight before sanding and painting.
- Simple scratches: 2-3 hours
- Deep gouges: 4-6 hours (or overnight for full curing)
- Trim replacement: 3-4 hours
Plan on doing the repair over two days if you want the best results.
Credit: www.reddit.com
Cost Breakdown: Diy Repair
Wondering what you’ll spend? Here’s a typical cost summary:
- Wood filler: $8–$15
- Epoxy repair kit: $12–$25
- Sandpaper: $5
- Primer and paint: $10–$25
- Wood trim: $6–$15 (per piece)
- Miscellaneous (gloves, tape): $5–$10
Total: $20–$75 depending on materials needed and damage size.
This is much less than hiring a professional, which can cost several hundred dollars for one frame.
When To Replace The Whole Door Frame
In rare cases, the damage is too severe to repair. You may need to replace the entire frame if:
- More than half the frame is missing or rotten
- The frame is structurally weak and won’t hold hinges or a latch
- Repeated repairs haven’t worked
Replacing a frame is a bigger job but can be done by skilled DIYers with the right tools. Most homeowners call a pro for this.

Credit: imgur.com
Real-life Example: A Dog-chewed Frame Repair
Let’s look at a real example. Sarah’s Labrador chewed the lower corner of her back door frame. The damage was deep—about three inches of wood missing.
Her steps:
- She cleaned out the chewed area with a utility knife.
- Used painter’s tape to protect the floor.
- Mixed and applied epoxy wood repair, building up in layers.
- Let it cure overnight.
- Sanded smooth and primed.
- Painted to match the rest of the frame.
The repair cost her $30 in materials and took a day, but the frame looked brand new. Most guests never noticed the fix.
Frequently Asked Questions
How Can I Stop My Dog From Chewing The Door Frame Again?
Try using a pet deterrent spray on the repaired area and give your dog more chew toys. Increase exercise and playtime, and consider crate training if chewing happens when you’re away.
What If My Repair Doesn’t Match The Rest Of The Door Frame?
If the color or texture stands out, lightly sand the area and repaint using thin, blended coats. For stained wood, use a matching stain and blend carefully. Sometimes, using a wood graining tool helps.
Can I Use Regular Wall Spackle Or Joint Compound For Wood Repairs?
No, wall spackle is too soft for door frames and may crack or crumble. Always use wood filler, epoxy wood repair, or a recommended product for wood surfaces.
How Long Should I Wait Before Painting Over Wood Filler Or Epoxy?
Wait until the filler or epoxy is completely dry and hard. This can be 30 minutes for filler or up to 24 hours for epoxy. Sand smooth before priming and painting for best results.
Should I Hire A Professional Or Do It Myself?
If the damage is small and you’re comfortable with basic tools, DIY repair is usually enough. For large, visible, or structural damage, or if you want a flawless finish, consider hiring a professional.
For more on materials and techniques, you can visit the Family Handyman’s guide for step-by-step visuals and advanced tips.
Repairing a chewed door frame takes time and care, but with the right approach, you can make it look like nothing ever happened. Whether you’re patching a few scratches or rebuilding a corner, patience and attention to detail are your best tools.
Soon, your door frame will look as good as new—and you’ll have the skills to handle any future surprises.