What does a simmer look like? If you’ve ever stood in your kitchen, squinting at a pot of soup and wondering if you’ve got the heat just right, you’re not alone. Simmering is a basic cooking technique, but the details often confuse even experienced home cooks. Is it a few lazy bubbles, or a rolling wave? Does it mean turning the knob to “low” or something else entirely? Getting it right matters: simmering can mean the difference between tender meat and a tough stew, creamy sauces or burned ones, and full flavor or watery blandness.
Understanding simmering isn’t only about following recipes. It’s about learning to control heat, recognize visual cues, and know why simmering works. By the end of this article, you’ll not only recognize a simmer at a glance, but also use it to improve everything from sauces to grains to braises.
Let’s dive in and make simmering simple, visual, and foolproof.
Simmering Defined: What It Really Means
When a recipe says “simmer,” it expects a very specific action. Simmering is not boiling or poaching; it’s a controlled, gentle cooking method that maintains a temperature just below boiling—usually between 185°F and 205°F (85°C to 96°C). At this heat, food cooks gently, flavors develop slowly, and proteins stay tender.
Unlike boiling, which can cause food to break apart or toughen, simmering is about control. It’s the sweet spot for many dishes—stews, stocks, sauces, grains, and even eggs. If you want consistent texture and full flavor, you need to master the simmer.
Visual Signs: What Does Simmer Look Like?
The most reliable way to identify a simmer is through visual cues. Here’s what you should look for:
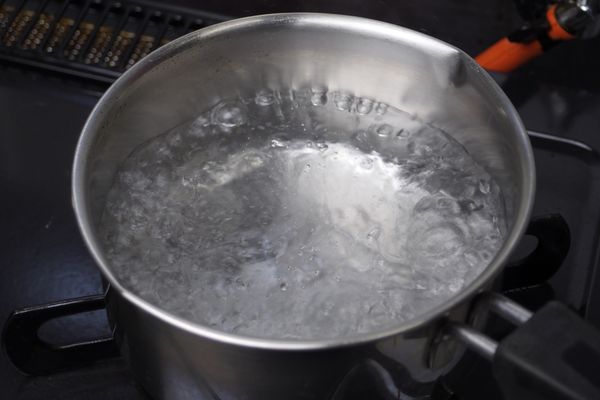
- Small Bubbles: At a simmer, you’ll see tiny bubbles rising slowly and steadily from the bottom and sides of the pot, not all over the surface.
- Gentle Movement: The liquid will move slightly but won’t break into a rolling wave. The surface may shiver or tremble but stays mostly calm.
- Steam: Light steam will drift from the pot, but it won’t be heavy or forceful like boiling.
- No Splashing: There’s no vigorous splashing or movement that you see with a boil.
Let’s compare simmer versus boil and poach for clarity.
| Technique | Temperature Range | Bubble Size/Activity | Typical Uses |
|---|---|---|---|
| Simmer | 185–205°F (85–96°C) | Small, steady bubbles; gentle movement | Soups, stews, braises, grains |
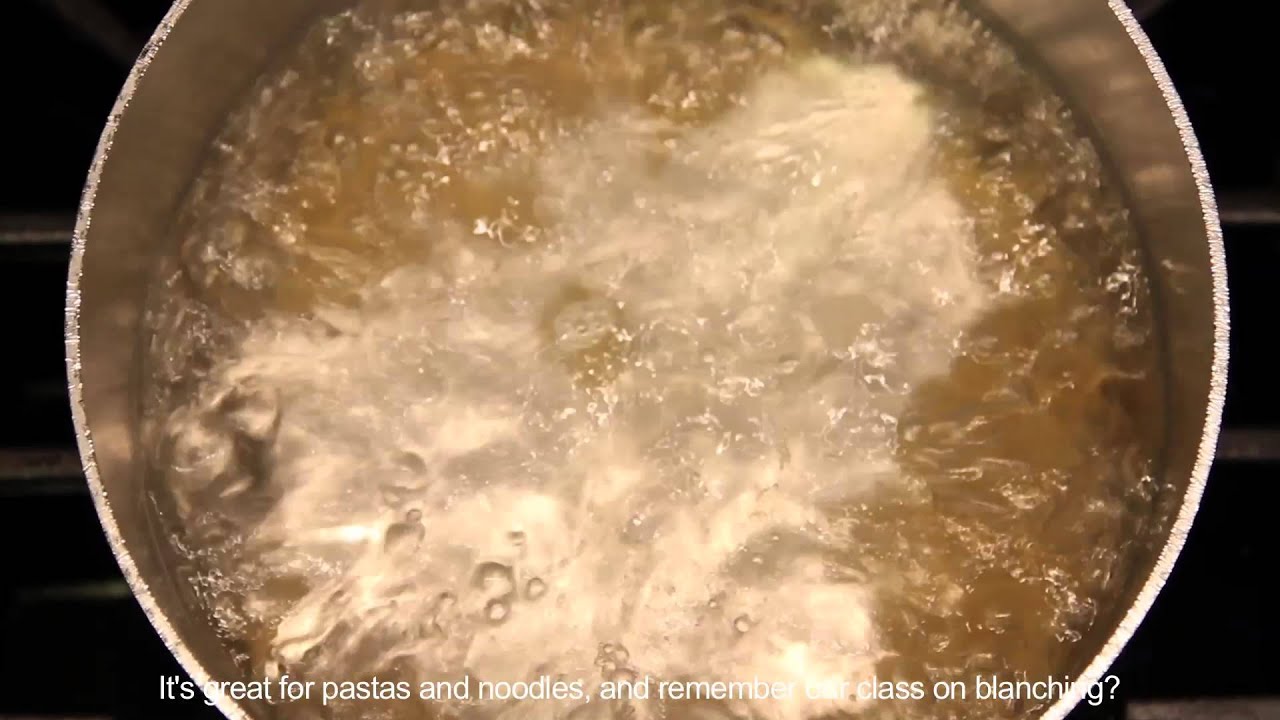
| Boil | 212°F (100°C) | Rapid, large bubbles; vigorous movement | Pasta, blanching, sterilizing |
| Poach | 160–180°F (71–82°C) | Few or no bubbles; barely moving | Eggs, delicate fish, fruits |
Understanding these differences saves you from overcooked grains, rubbery meat, and split sauces.
Why Simmering Matters In Cooking
Simmering is not just about temperature. It’s a tool that delivers texture, flavor, and safety in your food:
- Texture: Gentle heat breaks down tough cuts of meat or fibrous vegetables without making them mushy or dry.
- Flavor: Prolonged simmering allows flavors to blend and deepen (think of a slow-cooked chili).
- Clarity: Stocks and broths stay clear when simmered, not boiled. Boiling can make them cloudy.
- Safety: Holding foods just below boiling for a long time can pasteurize or reduce pathogens without destroying nutrients.
There’s also a practical side: simmering is energy efficient. You don’t need your stove on full blast, saving gas or electricity.
Steps To Achieve And Maintain A Simmer
Getting a perfect simmer is less about your stove’s numbers and more about observation and adjustment. Here’s how to do it:
1. Heat Gradually
Start with medium or medium-high heat to bring your liquid close to boiling. Watch carefully—once you see bubbles forming, reduce the heat immediately.
2. Adjust Down
Turn the heat to low or medium-low. Wait 30 seconds, then observe. If bubbles continue to rise slowly and the surface shivers, you’re at a simmer.
3. Fine-tune As Needed
If you see rapid bubbling or splashing, the heat is too high—lower it. If the liquid is still, increase the heat slightly.
4. Use A Lid Strategically
A lid retains heat, so you may need to reduce the heat further to maintain a simmer. For thick stews or tomato sauces, leave the lid slightly ajar to let steam escape and prevent overboiling.
5. Trust Visual Cues, Not Just Numbers
Every stove and pot is different. Use your eyes more than your heat dial. Over time, you’ll recognize a simmer instantly.
Simmering On Different Cooktops
The type of cooktop you use can affect how you reach and maintain a simmer. Here’s how different stoves behave:
Gas Stoves
Gas gives instant response. When you lower the flame, the heat drops quickly, making fine adjustments easy. Watch the flame size: a small, even blue flame is best for simmering.
Electric Stoves
Electric burners heat and cool more slowly. Anticipate changes—if you need to lower the heat, do it before you reach a boil. You may need to move the pot off the burner briefly if the liquid overheats.
Induction Cooktops
Induction offers fast, precise changes. Use lower settings, and adjust in small increments. Induction can sometimes create hot spots, so stir occasionally.
Portable Hot Plates
These often have less control and can run hotter than expected. Use a heat diffuser (a metal plate between burner and pot) for better control.
How Simmering Looks In Different Pots And Pans
Your choice of pot or pan changes the look and speed of a simmer:
- Wide, shallow pans allow water to evaporate quickly. Simmering here means a larger surface area with smaller bubbles spread out.
- Tall, narrow pots concentrate heat at the base, so bubbles may appear only at the sides or bottom. Watch for gentle movement, not just surface bubbles.
- Heavy-bottomed pots (like cast iron or stainless steel) distribute heat more evenly, making it easier to maintain a consistent simmer.
- Thin pots can create hot spots, leading to uneven simmering and possible scorching.
For most simmering tasks—soups, stews, grains—a heavy-bottomed pot with a lid is ideal.

Credit: www.youtube.com
Simmering In Common Dishes: What To Expect
How does simmering look in real dishes? Here are common scenarios:
Soups And Stews
You’ll see a few bubbles breaking the surface every second or two. The liquid gently shifts, and the surface trembles. Ingredients float but do not tumble or break apart.
Sauces
Tomato sauce or curry will produce small, lazy bubbles around the edge, with a slight shimmer on top. Stir occasionally to prevent sticking.
Rice And Grains
After bringing to a boil, cover and reduce heat to a bare simmer. Bubbles should be minimal, with a gentle “plopping” sound under the lid.
Braised Meats
The cooking liquid should barely move. If the top layer vibrates but doesn’t roll, you’re simmering. This slow process tenderizes tough cuts without drying out.
Eggs
For poached eggs, you want even fewer bubbles—just a lazy shimmer. For hard-boiled eggs, a very gentle simmer prevents cracking and green yolks.
Common Mistakes With Simmering
Many cooks struggle with simmering. Here are mistakes to avoid:
- Confusing simmer with boil: A rapid boil can toughen meat, break delicate ingredients, and cloud broths.
- Ignoring visual cues: Relying only on heat settings leads to overcooked or undercooked food.
- Using thin pans: These cause uneven heating and burnt spots.
- Covering tightly when not needed: This can increase the temperature and turn a simmer into a boil.
- Not adjusting for altitude: Water boils at lower temperatures in high-altitude areas, so a simmer may look calmer.
Non-obvious tip: Simmering in a nonstick or enameled pot can look less active than in stainless steel due to less agitation at the surface.
How To Test If You’re Simmering
If you’re unsure, use these simple tests:
- Thermometer Test: Dip a kitchen thermometer into the liquid. Simmer is 185–205°F (85–96°C).
- Bubble Count: Observe the edges—if 1–2 small bubbles break through every second, you’re in the simmer zone.
- Ladle Test: Dip a spoon in and listen. You should hear a soft, steady bubbling, not a rolling boil.
These methods are especially helpful for beginners, giving you confidence as you learn.
Table: Simmering Foods And Their Ideal Simmer
Here’s how simmering looks for different foods, plus why it matters:
| Food | Simmer Appearance | Why Simmer? |
|---|---|---|
| Beef Stew | Small bubbles, gentle movement | Tenderizes meat, blends flavors |
| Rice | Occasional bubbles, almost still | Prevents sticking, even cooking |
| Tomato Sauce | Tiny bubbles at edges, slight shimmer | Thickens without burning |
| Broth/Stock | Few bubbles, clear liquid | Keeps broth clear, extracts flavor |
| Eggs (poached) | Barely moving, no bubbles | Keeps whites tender, yolks runny |
| Chicken | Gentle bubbles, slight movement | Cooks evenly, stays juicy |
Credit: www.youtube.com
How Simmering Changes Over Time
Simmering isn’t static. As food cooks, the look and feel of a simmer can change:
- Early Simmer: More bubbles as heat is distributed and ingredients are cold.
- Mid-Cooking: Fewer bubbles as ingredients release moisture and temperature stabilizes.
- Late Simmer: Bubbles may get smaller, and surface movement lessens as the liquid thickens (especially in sauces or stews).
Stir occasionally to prevent sticking, especially for thick mixtures.
Simmering Vs. Other Gentle Cooking Methods
Simmering is often confused with poaching and blanching. Here’s a quick comparison:
| Method | Temperature | Typical Look | Main Purpose |
|---|---|---|---|
| Simmer | 185–205°F | Small, steady bubbles | Slow cooking, flavor development |
| Poach | 160–180°F | Almost no movement | Cook delicate foods gently |
| Blanch | 212°F (boil) | Rapid bubbling | Quick cook before shocking in cold water |
Recognizing these differences helps you follow recipes correctly and adjust on the fly.
Practical Tips For Perfect Simmering
Here’s how to make simmering easy and reliable every time:
- Use a clear lid: This lets you watch the bubbles without lifting the lid and losing heat.
- Stir occasionally: Prevents sticking, especially for thick or starchy foods.
- Adjust the heat as ingredients change: Add cold meat or veggies? The simmer may pause—wait for it to return before lowering heat further.
- Don’t crowd the pot: Too many ingredients can lower the temperature and stop the simmer.
- Be patient: Simmering is about slow development; rushing leads to uneven cooking.
Non-obvious insight: Some recipes benefit from starting at a boil, then reducing to a simmer. This quickly brings food up to safe temperatures before gentle cooking.
The Science Behind Simmering
Why does a simmer work so well? At just below boiling, water molecules have enough energy to escape as vapor, but not enough for violent bubbles. Proteins, starches, and connective tissues break down slowly and evenly. This is why stew meat turns fork-tender, and sauces thicken without burning.
Simmering also lets impurities (like foam in stock) rise slowly, so you can skim them off for a clearer, cleaner flavor.
Simmering At High Altitude
Altitude changes how water behaves. At higher elevations, water boils at a lower temperature (for example, 196°F/91°C at 5,000 feet). This means a “simmer” may look calmer and take longer to cook food thoroughly. Use visual cues and a thermometer when possible, and adjust cooking times as needed.
When To Use Simmering—and When Not To
Simmering is perfect for:
- Soups and stews: For tender meat and full flavor.
- Stocks and broths: For clarity and gentle extraction.
- Grains and legumes: For even, non-mushy texture.
- Sauces: To thicken without scorching.
Avoid simmering for:
- Pasta: Needs a rolling boil to prevent sticking.
- Vegetables for blanching: Needs high heat for quick cooking and color.
- Deep frying: Requires much higher temperatures.
How Simmering Impacts Flavor
Slow simmering develops deeper, richer flavors because ingredients have time to release their essence. For example, onions caramelize slightly, spices infuse, and meats break down. This is why restaurant stews often taste better—they’re simmered for hours.
A beginner’s mistake: Adding salt too early can concentrate flavors too much during long simmering. Taste and adjust seasoning near the end.
Simmering And Food Safety
Simmering is generally safe, as holding food above 165°F (74°C) destroys most harmful bacteria. However, large cuts of meat or dense dishes require enough time at simmering temperature to be safe. Always check the thickest part for doneness.
For canning or preserving, boiling is necessary—simmering alone may not be enough to prevent spoilage.
Simmering With Modern Appliances
Today’s kitchens may use:
- Slow cookers: Hold at a low simmer for hours, but check for even heating.
- Pressure cookers: Use high pressure and temperature above boiling, not true simmering.
- Instant Pots: Have “simmer” or “slow cook” functions—watch the bubble activity to adjust settings.
Each appliance has its quirks, so observe the liquid and adjust as needed.
Expert Tricks For Better Simmering
- Use a heat diffuser: A metal plate between burner and pot smooths out hot spots on gas or electric stoves.
- Partial lid coverage: Balances evaporation and heat retention—especially for thick sauces.
- Stagger ingredient addition: Add tougher ingredients (like root vegetables) earlier, and delicate ones later.
- Degrease as you go: Skim off fat for a lighter, clearer result.
- Taste frequently: Flavors can change over a long simmer; adjust salt, acid, and spice as needed.
Visual Simmer Guide For Beginners
If you’re new to cooking, here’s a quick checklist:
- See small, steady bubbles rising? That’s a simmer.
- Surface moves gently, not wildly? Good.
- No splashing or rolling? Perfect.
- Adjust heat up or down as needed.
Practice with water first—it’s easier to see bubbles and learn how your stove works.
For more about cooking techniques and their visual cues, you can check Culinary Schools for a helpful glossary.
Frequently Asked Questions
What Is The Difference Between Simmering And Boiling?
Simmering uses gentle heat, producing small bubbles and mild movement, while boiling is much hotter, with rapid, large bubbles and vigorous activity. Simmering is best for slow, even cooking and flavor development; boiling is used for quick cooking like pasta.
How Do I Keep My Stew At A Simmer Without Boiling?
Bring the stew close to a boil, then lower the heat until you see only small, steady bubbles. Adjust the heat as needed, and use a heavy pot with a partially covered lid for better control.
Can I Simmer With The Lid On Or Off?
It depends on the recipe. Use a lid to retain heat and moisture, but leave it slightly ajar if you want to reduce or thicken the liquid. Watch the bubbles to avoid turning a simmer into a boil.
Why Does My Sauce Burn On Simmer?
Burning can happen if the heat is too high, or if the pot is thin and creates hot spots. Stir thick sauces often, use a heavy-bottomed pot, and keep the simmer gentle—just a few bubbles at the edges.
Does Simmering Destroy Nutrients?
Simmering preserves more nutrients than boiling, especially for vegetables. It uses lower heat, so fewer vitamins are lost to the cooking water or steam. For best results, don’t overcook, and use cooking liquid in your final dish.
Simmering may seem simple, but learning to recognize and control it will raise your cooking game. Practice, observation, and these tips will turn the mystery of “what does simmer look like” into a skill you’ll use every day.
Credit: www.albertlee.biz