Storing framed pictures in a storage unit might seem easy, but doing it the right way is not as simple as stacking boxes. Whether you want to protect family photos, artwork, or valuable prints, your approach will decide if they stay safe or end up damaged.
Many people make small mistakes that lead to broken glass, warped frames, or faded images. With the right steps, you can keep your framed pictures in excellent condition, even if they stay in storage for years.
If you’re moving, downsizing, or just making more space at home, you need a plan for your pictures. Frames are fragile, and pictures can be sensitive to heat, humidity, and pressure. Learning how to store them properly can save you money, stress, and the heartbreak of losing memories.
This guide covers everything you need to know—from choosing the right packing materials to organizing your storage unit for easy access.
Let’s explore the practical details of storing framed pictures safely and confidently.
Why Proper Storage Matters For Framed Pictures
Framed pictures hold more than just images—they carry memories, family history, and sometimes significant value. Poor storage can lead to serious problems:
- Broken glass from impacts or pressure
- Warped frames from humidity or temperature changes
- Stuck or faded images due to poor materials or sunlight
- Mold or mildew from trapped moisture
A 2022 survey by the American Institute for Conservation found that over 65% of art and photo damage in private homes happens during moves or storage. Most of this damage is preventable with good planning.
Even if your pictures aren’t worth a fortune, the emotional cost of damage is often much higher than the dollar value. Taking time to store them correctly protects your memories for future generations.
Choosing The Right Storage Unit
Not all storage units are created equal. Your choice can make a huge difference in how well your pictures survive.
Climate-controlled Vs. Standard Units
Framed pictures are sensitive to heat, cold, and moisture. Climate-controlled units keep temperature and humidity steady, usually between 55°F and 80°F. This helps prevent warping, mold, and fading.
In contrast, standard units may get very hot in summer and cold in winter. Fluctuations can crack glass, warp frames, or cause prints to stick to the glass.
Here’s a quick comparison:
| Feature | Climate-Controlled | Standard |
|---|---|---|
| Temperature | Consistent (55-80°F) | Varies with weather |
| Humidity | Controlled (30-50%) | Uncontrolled |
| Cost | Higher | Lower |
| Protection | Excellent | Basic |
Insight: Many people try to save money by picking a standard unit. But the extra cost of climate control is often less than the price of repairing or replacing damaged photos and frames.
Location And Unit Size
Choose a storage facility close to home if you need regular access. For pictures, ground floor units are best to avoid carrying fragile items up stairs or elevators.
For size, estimate the number of framed pictures and allow extra space for airflow. Never pick a unit so small that you have to stack frames tightly.
Tip: Visit the unit before moving anything in. Check for leaks, musty smells, and signs of pests.
Credit: www.youtube.com
Gathering Packing Materials
Packing framed pictures needs more than just boxes. Using the right materials makes a big difference in preventing scratches, cracks, and stains.
Essential Packing Supplies
- Sturdy moving boxes (flat or mirror/picture boxes are best)
- Acid-free paper or glassine sheets
- Bubble wrap
- Packing tape
- Corner protectors
- Foam sheets or cardboard
- Markers and labels
- Furniture blankets or moving pads
Non-obvious insight: Many beginners use newspaper for wrapping, but the ink can transfer to photos and mats. Always choose acid-free paper or glassine for direct contact.
Where To Buy Supplies
Most moving supply stores and big box retailers carry these items. Picture boxes and corner protectors are often available online or at specialty art shops. Some storage facilities sell packing kits for artwork and mirrors.
Tip: Ask at local frame shops—they sometimes have extra packing materials or advice on what works best for different frame types.
Cleaning And Preparing Framed Pictures
Before packing, take time to clean and inspect each picture. Storing dirty or damaged frames can make problems worse.
Cleaning Steps
- Wash your hands or wear cotton gloves to prevent fingerprints.
- Dust the frame gently with a soft cloth or brush. Avoid wet cleaners.
- Check the glass for smudges. Use a microfiber cloth and a small amount of glass cleaner (sprayed on the cloth, not directly on the glass).
- Inspect the backing for loose corners, bugs, or mold. If you see mold, treat it before packing or consult a professional.
Minor Repairs
Fix any loose corners, hanging wires, or cracked glass before storage. Small issues can become big problems over time.
Example: A small crack in glass can spread if the picture is bumped or exposed to temperature changes. Repair or replace cracked glass before packing.
Extra tip: Take photos of your pictures before packing. This helps with insurance claims or re-hanging them later.
Packing Framed Pictures Step-by-step
Proper packing is the most important part of safe storage. Each step protects against specific risks like scratches, pressure, or breakage.
Step 1: Wrap The Frame
- Place the picture face down on a clean, flat surface.
- Cover the front with acid-free paper or glassine to protect the image.
- Add corner protectors to all four corners.
- Wrap the entire frame in bubble wrap (bubbles out), securing with tape.
Step 2: Add Extra Protection
- For fragile or valuable pieces, add a layer of foam sheets or cardboard on both sides.
- Tape the padding so it doesn’t shift inside the box.
Step 3: Choose The Right Box
- Use a flat picture/mirror box that matches the frame’s size.
- For smaller pictures, use smaller boxes. Never put more than two or three frames in one box.
- If you must pack multiple frames together, place a sheet of foam or cardboard between each one.
Step 4: Seal And Label
- Tape the box securely on all sides.
- Label the box with “FRAGILE – PICTURES” and mark which side is up.
- Add a description or room name if you’ll need to find the picture later.
Common mistake: Overpacking boxes makes them heavy and increases the risk of breakage. Keep boxes light enough to lift easily.
Step 5: Inventory
- Make a list of every framed picture, including a brief description and condition.
- Store a copy of this list on your phone and with your storage unit records.
Example of a simple inventory:
| Picture Name | Frame Size | Condition | Box Number |
|---|---|---|---|
| Family Portrait 2020 | 16×20 in | Excellent | Box 1 |
| Graduation Photo | 11×14 in | Good (small scratch) | Box 2 |
Loading Pictures Into The Storage Unit
How you place your boxes and frames inside the unit is just as important as packing them.
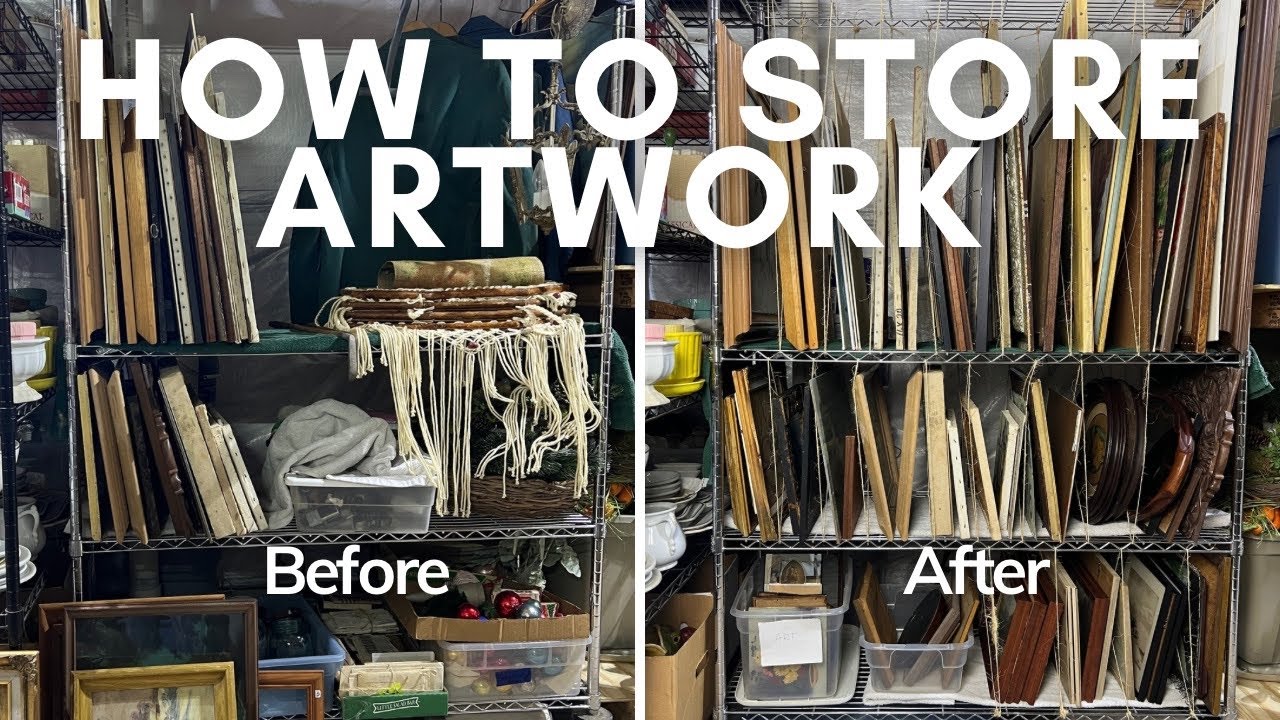
Upright Vs. Flat
Always store framed pictures upright, like books on a shelf. This reduces pressure on the glass and keeps frames from warping.
Laying pictures flat can cause heavy objects to be placed on top, leading to cracks or broken frames.
Spacing And Airflow
Leave at least two inches of space between boxes or individual frames. Good airflow prevents moisture buildup and mold.
Pro insight: Place small blocks of wood or foam under the bottom row of boxes. This keeps them off the floor and away from any water leaks.
Placement In The Unit
- Keep framed pictures at the back or sides, away from the main walkway.
- Don’t put heavy boxes on top of picture boxes.
- Use furniture blankets to pad between boxes or against walls.
Example: If storing furniture too, place it first, then position framed pictures along the sides or on top with blankets for padding.
Protecting Against Common Storage Risks
Even the best-packed pictures can be at risk from climate, pests, or accidents. Here’s how to reduce those risks.
Humidity And Temperature
Humidity above 50% can lead to mold or mildew. If you must use a standard unit, add silica gel packs to each box for extra moisture control.
Check the storage unit’s climate at different times of year. If you notice condensation or musty smells, consider moving your items to a climate-controlled space.
Pests
Rodents and insects are attracted to cardboard and glue. To reduce risk:
- Use plastic bins instead of cardboard boxes when possible.
- Place pest deterrents (like cedar blocks or lavender sachets) near your boxes.
- Avoid storing food or scented items in the same unit.
Fact: According to the National Pest Management Association, over 21% of storage units experience pest issues each year.
Security
Choose a facility with good lighting, cameras, and security gates. Use a high-quality lock on your unit.
For valuable art or pictures, consider adding extra insurance.
Insurance
Standard homeowner’s insurance may not cover items in off-site storage. Ask your provider or the storage facility about coverage options.
Non-obvious insight: Take photos of your packed boxes and the inside of your unit. Store digital copies in the cloud for proof if you ever need to file a claim.
Organizing For Easy Access
Proper organization makes it easier to find and retrieve your pictures, even years later.
Labeling
Use clear, large labels on all sides of each box. Include:
- “FRAGILE”
- Direction arrows (“This End Up”)
- Short description of contents
- Your name and contact number (especially if sharing a unit)
Arranging Inside The Unit
- Place less-used items at the back.
- Keep an aisle down the center for easy access.
- Stack boxes no more than three high, with heavier items on the bottom.
Pro tip: Draw a simple map of your unit layout. This helps if you need to direct someone else to retrieve items.
Routine Checkups
Visit your unit every few months. Check for:
- Signs of dampness or pests
- Boxes that have shifted or collapsed
- Any unusual odors
If you notice problems, address them quickly to avoid long-term damage.
Special Considerations For Valuable Or Antique Pictures
If your pictures are especially valuable or old, take extra precautions.
Custom Crating
For high-value artwork, consider custom wooden crates with foam inserts. Many art movers offer this service.
Professional Packing
Consult with a professional art handler or conservator for advice on packing and storing items worth thousands of dollars.
Avoid Long-term Storage
Even in the best units, long-term storage can be risky. Arrange for regular inspections or rotate pictures back into your home when possible.
Example: Museums rotate artwork in and out of storage to avoid long-term exposure to any one environment.
Mistakes To Avoid When Storing Framed Pictures
Many mistakes happen because people rush or try to save money. Avoid these common errors:
- Using newspaper for wrapping (can stain photos)
- Stacking frames flat (leads to cracked glass)
- Skipping climate control (risk of warping/mold)
- Not using corner protectors (damaged corners are hard to fix)
- Overfilling boxes (increases pressure and breakage)
- Ignoring insurance (no recourse if something goes wrong)
- Storing directly on the floor (water damage risk)
- Leaving frames unlabelled (hard to find later)
- Not cleaning before packing (dirt can become permanent)
- Storing with food or scented items (attracts pests)
Non-obvious insight: Always check with your storage facility about their rules for storing artwork or framed items. Some have special requirements or recommendations.
Credit: bluebirdstorage.ca
Sample Storage Plan For 15 Framed Pictures
To see how all these steps come together, here’s an example plan for storing a typical collection:
- Clean and inspect each picture.
- List each picture, size, and condition in a spreadsheet.
- Wrap each frame in acid-free paper and bubble wrap.
- Add corner protectors and foam sheets for larger pieces.
- Pack in flat picture boxes, no more than two per box.
- Place silica gel packs inside each box.
- Label boxes with “FRAGILE – PICTURES,” contents, and your contact info.
- Stack boxes upright on foam blocks inside a climate-controlled unit.
- Add furniture blankets between boxes for extra padding.
- Keep an inventory and layout map for easy retrieval.
This plan works for most households and can be adjusted if you have more or fewer pictures.
When And How To Unpack
When you’re ready to take your pictures out of storage:
- Check the boxes for signs of damage before opening.
- Move boxes to a clean, flat area with plenty of space.
- Open boxes carefully, checking for moisture or pests.
- Remove bubble wrap and paper slowly to avoid pulling on frames or glass.
- Inspect each picture for new damage and clean as needed.
- Let pictures adjust to room temperature before rehanging, especially if moved from a cold unit.
Pro tip: If you notice any new damage, document it with photos and contact your insurance provider if covered.

Credit: www.lightwork.org
Additional Resources
For more detailed advice on art and photo storage, visit the Smithsonian Museum Conservation Institute.
Frequently Asked Questions
How Do I Prevent Mold On Framed Pictures In Storage?
Keep your pictures in a climate-controlled unit with humidity below 50%. Use silica gel packs in each box, and avoid plastic wrap that traps moisture. Check your unit every few months for musty smells.
Is It Safe To Store Pictures In A Garage Or Basement?
Garages and basements usually have high humidity and temperature swings. This can lead to warping, mold, and damage. For valuable pictures, always choose a climate-controlled storage unit instead.
Can I Stack Framed Pictures On Top Of Each Other?
Never stack unboxed frames directly. Always pack frames upright in boxes with padding between them. If boxes must be stacked, keep stacks low (no more than three high) and place heavier boxes at the bottom.
What Should I Do If A Picture Gets Damaged In Storage?
First, document the damage with photos. Clean off any dirt or mold (wear gloves), and contact a professional conservator for valuable items. Check your insurance to see if repairs or replacement are covered.
Do I Need Special Insurance For Pictures In Storage?
Most homeowner’s policies do not cover off-site storage without an extra rider. Check with your agent or storage facility for details on coverage and consider adding insurance for valuable or irreplaceable items.
Storing framed pictures safely in a storage unit is about more than just packing boxes. It’s a process that combines the right materials, smart organization, and a little ongoing care. By following these steps, you can keep your memories and artwork safe for years to come—no matter how long they stay in storage.