A swivel faucet is a common fixture in kitchens and bathrooms around the world. It allows you to direct water flow exactly where you need it, making cleaning, washing, and filling large containers much easier. Over time, though, the swivel action can become stiff, squeaky, or even stuck.
This is usually due to a lack of lubrication or the buildup of debris inside the faucet. Many people ignore these early signs, risking more serious damage or expensive repairs down the line. Lubricating your swivel faucet is a simple task that can extend its life, improve performance, and even save money.
In this guide, you’ll find everything you need to know about how to lubricate a swivel faucet. Whether you’re a homeowner, a renter, or just someone who likes to do things yourself, this article will walk you through the process step by step. You’ll learn what tools and lubricants to use, how to disassemble your faucet safely, and how to put everything back together correctly. We’ll also cover common problems, mistakes to avoid, and tips for keeping your faucet working smoothly for years. Even if you have no plumbing experience, you’ll feel confident after reading this guide.
Why Lubricating A Swivel Faucet Matters
A swivel faucet does a lot of work every day. Each time you move the spout from side to side, internal parts rub against each other. Without proper lubrication, friction increases. This leads to:
- Stiff or jerky movement
- Squeaking or grinding noises
- Faster wear and tear
- Leaking around the base
Ignoring these signs can cause permanent damage. Sometimes, the faucet can even break completely, forcing you to buy a new one. Regular lubrication keeps everything moving smoothly and helps prevent leaks. It’s a bit like oiling the chain on a bicycle or lubricating a car door hinge.
A few minutes of maintenance can add years to your faucet’s life.
Many people miss that lubricating also helps maintain the faucet’s water-tight seals. If the seals dry out, they can crack, causing leaks. Lubrication keeps these parts flexible and working as they should.
Tools And Materials Needed
Before you start, gather all the tools and materials you’ll need. Having everything ready will save time and make the process smoother. Here’s a list of essentials:
- Adjustable wrench: For loosening nuts and bolts.
- Screwdrivers (Phillips and flathead): For removing screws.
- Allen wrench: Some faucets use hex screws for the handle.
- Soft cloth or rag: For cleaning and protecting surfaces.
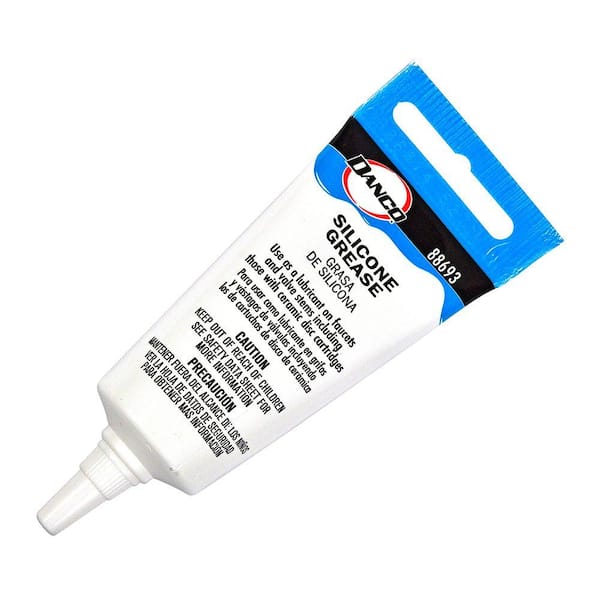
- Plumber’s grease (silicone-based): For lubrication.
- Non-abrasive sponge: To clean parts gently.
- Small bowl or tray: To hold screws and small parts.
- Old toothbrush: For cleaning hard-to-reach spots.
- White vinegar: For removing mineral deposits (optional).
- Teflon tape: For re-sealing threads if needed (optional).
- Bucket or towel: To catch any water drips.
The most important item is a silicone-based plumber’s grease. Do not use petroleum jelly or general-purpose oils, as these can damage faucet seals and rubber parts. Silicone grease is safe for drinking water and won’t break down over time.
Table: Common Tools And Their Uses
| Tool | Purpose |
|---|---|
| Adjustable Wrench | Loosening faucet nuts |
| Screwdriver | Removing handle screws |
| Allen Wrench | Unfastening hex screws |
| Plumber’s Grease | Lubricating internal parts |
| Soft Cloth | Cleaning surfaces |
Identifying Your Swivel Faucet Type
Not all swivel faucets are the same. The way you lubricate them depends on their design. The two main types are:
- Single-handle swivel faucets: One handle controls both hot and cold water.
- Double-handle swivel faucets: Separate handles for hot and cold water.
There are also pull-out and pull-down swivel faucets, which have a hose attached to the spout. While these types can be lubricated, their mechanisms are a bit more complex. For most kitchens and bathrooms, you’ll find either single- or double-handle models.
Before starting, look for your faucet’s brand and model number. This information is usually on the base or under the sink. If you’re not sure, a quick search with a photo can help. Knowing your faucet type helps you find diagrams or manuals online if you need extra help.
Preparing To Lubricate The Faucet
Preparation is key for a smooth job. Rushing can lead to lost parts or even water damage. Here’s what you should do:
- Clear the area around your sink. Remove dishes, soap, and anything else that might get in the way.
- Turn off the water supply. There are usually two valves under the sink—one for hot and one for cold. Turn both clockwise until they stop. If you skip this, you risk water spraying everywhere!
- Open the faucet to release any pressure and drain leftover water.
- Plug the drain with a stopper or rag. This prevents small screws or parts from falling down the drain.
- Lay out your tools within reach.
Many beginners forget to plug the drain, and it’s a common mistake. Losing a tiny screw down the sink can turn a quick job into a frustrating experience.

Credit: www.fontanashowers.com
Step-by-step Guide To Lubricating A Swivel Faucet
Now, you’re ready to start. The steps below will work for most standard swivel faucets. If your faucet looks very different, check the manufacturer’s instructions.
1. Remove The Faucet Handle
Most handles are held in place by a small screw. This can be on the back, underneath a decorative cap, or even hidden under a logo.
- Use a screwdriver or Allen wrench to remove the screw.
- Gently pull the handle straight off. If it’s stuck, wiggle it a little, but don’t force it.
If there’s a cap covering the screw, use a flathead screwdriver to pop it off. Be careful not to scratch the finish.
2. Take Off The Swivel Spout
With the handle removed, you’ll see a dome-shaped cover or a retaining nut. This holds the spout in place.
- Unscrew the cover or nut with your hand or an adjustable wrench.
- Lift the spout straight up. If it’s tight, gently twist it back and forth while pulling.
Under the spout, you’ll usually find O-rings or rubber seals. These are the parts that need lubrication.
3. Inspect And Clean All Parts
Now is the best time to check for damage or buildup.
- Look for cracked O-rings, worn washers, or mineral deposits.
- Use a soft cloth or old toothbrush to clean away any dirt or grime.
- If you see white or green buildup (hard water deposits), soak the part in white vinegar for 10–15 minutes, then rinse and dry.
If any O-ring or washer looks damaged, replace it. Most hardware stores sell faucet repair kits with the right sizes.
4. Apply Plumber’s Grease
This is the most important step.
- Squeeze a small amount of plumber’s grease onto your finger.
- Rub a thin, even layer over each O-ring, washer, and any moving part.
- Don’t use too much—just enough to make the surface slippery, not sticky.
Lubricate the inside of the spout where it meets the O-rings. This will help the faucet swivel smoothly.
5. Reassemble The Faucet
- Carefully slide the spout back onto the base, making sure it lines up correctly.
- Screw the retaining nut or cover back on hand-tight.
- Push the handle back onto the stem and secure it with the screw.
- If you removed a decorative cap, snap it back in place.
Take your time. If anything feels too tight or doesn’t fit, double-check the order of parts.
6. Test For Smooth Operation
- Turn the water supply valves back on slowly.
- Open the faucet and move the spout from side to side.
- It should swivel easily, with no noise or resistance.
- Check for leaks around the base. If you see water, tighten the retaining nut a little more.
If the faucet is still stiff, you may have missed a spot or need to replace the O-rings.
Special Tips For Different Faucet Brands
Some brands have unique designs. Here are a few examples:
- Moen: Uses a cartridge system. Make sure the cartridge is clean before lubricating.
- Delta: Many models have a ball assembly. Lubricate the ball and seals.
- Kohler: Spouts may have extra washers. Check diagrams online if unsure.
If you can’t figure out how to remove a part, look up a video or user manual for your exact model. Family Handyman is a good resource for diagrams and photos.
Credit: www.homedepot.com
Choosing The Right Lubricant
Not all lubricants are safe for faucet use. Some can damage seals or even contaminate your drinking water. Always use silicone-based plumber’s grease. Here’s why:
- Silicone grease won’t wash away with water.
- It’s safe for all rubber and plastic parts.
- It won’t harm drinking water.
Avoid petroleum jelly, WD-40, or cooking oils. These products can dry out rubber, cause leaks, and shorten the life of your faucet.
Table: Common Lubricants And Their Safety
| Lubricant | Safe for Faucets? | Notes |
|---|---|---|
| Silicone Grease | Yes | Best choice, long-lasting |
| Petroleum Jelly | No | Damages rubber, not water-safe |
| WD-40 | No | Can degrade seals, not for drinking water |
| General Oil | No | Attracts dirt, short-term only |
How Often Should You Lubricate?
For most homes, lubricating a swivel faucet once a year is enough. If your water is hard (contains a lot of minerals), or if you use the faucet heavily, consider doing it every 6 months. Signs that it’s time to lubricate include:
- The spout feels tight or hard to move.
- You hear squeaking or grinding.
- Water leaks from the base when you move the spout.
If you just replaced the O-rings or repaired a leak, always lubricate as part of the process.
Troubleshooting Common Problems
Sometimes, lubrication alone won’t fix your faucet. Here are some common problems and solutions:
The Spout Is Still Hard To Move
- Possible causes: O-rings are worn out, too much mineral buildup, or parts are installed incorrectly.
- Solution: Check and replace O-rings if needed, clean again, or review assembly order.
Water Leaks After Lubrication
- Possible causes: O-rings are damaged or out of place, or the retaining nut is not tight enough.
- Solution: Disassemble, check O-rings, and reassemble carefully.
Handle Is Loose
- Possible causes: The screw holding the handle is not tight.
- Solution: Tighten the handle screw with a screwdriver or Allen wrench.
Faucet Makes Noise
- Possible causes: Lack of lubricant, debris inside, or worn parts.
- Solution: Clean and lubricate all moving parts, replace worn items.
Many people forget to check the retaining nut for tightness. Even a small gap can cause leaks or wobble.
Preventive Maintenance Tips
Regular care will keep your faucet working well and help you avoid bigger problems. Here are some tips:
- Clean the faucet base every week to prevent dirt buildup.
- Check for leaks monthly, especially around the spout base.
- Use only gentle cleaners—harsh chemicals can damage finishes and seals.
- Don’t force the spout if it feels tight. Lubricate first.
- Replace O-rings every 2–3 years, or whenever you notice wear.
People often overlook the value of gentle cleaning. Even small scratches on the finish can lead to corrosion or leaks over time.
Comparing Faucet Swivel Mechanisms
Different faucet brands and models use different mechanisms. Here’s a quick look at how they compare:
| Mechanism Type | Typical Location | Ease of Lubrication |
|---|---|---|
| O-Ring and Washer | Most standard faucets | Easy |
| Ball Assembly | Some Delta models | Moderate |
| Cartridge | Moen, modern faucets | Moderate |
| Ceramic Disk | High-end faucets | Requires care |
Most kitchen and bathroom faucets use O-rings and washers. These are simple to access and lubricate. Ball assemblies and cartridges may need extra steps but follow similar principles.
Safety And Environmental Considerations
When working with plumbing, safety is important. Here are some things to remember:
- Always turn off the water before starting work.
- Use gloves if you have sensitive skin or are working with cleaning chemicals.
- Dispose of old O-rings and used lubricant properly.
- Do not flush debris down the sink, as this can clog pipes.
Environmental tip: Choose biodegradable cleaners when removing hard water deposits. Avoid harsh chemicals that can harm your plumbing or local water supply.
When To Call A Professional
Most people can lubricate a swivel faucet with basic tools. However, you should call a plumber if:
- The faucet leaks even after new O-rings and lubrication.
- The spout is stuck and won’t come off.
- You see corrosion or cracks in the faucet body.
- The job feels overwhelming or you have an expensive designer faucet.
A professional can prevent accidental damage and ensure the repair is done right. For complex faucets, it’s often cheaper to let an expert handle it than to risk breaking a rare part.
Real-world Examples
Let’s look at two situations:
Kitchen Faucet
Sarah noticed her kitchen faucet was hard to move. She gathered her tools, turned off the water, and followed the steps above. She found the O-rings were dry but not damaged. After cleaning and applying plumber’s grease, her faucet felt like new.
She saved money and learned a new skill.
Bathroom Faucet
John’s bathroom faucet squeaked every time he moved it. He skipped lubrication for years, and eventually, the spout started leaking. When he opened it, he found cracked O-rings and mineral deposits. After replacing the O-rings, cleaning the parts with vinegar, and lubricating everything, the leak stopped, and the noise disappeared.
These examples show that regular maintenance really does make a difference.
Credit: www.homedepot.com
Frequently Asked Questions
How Do I Know If My Faucet Needs Lubrication?
If your swivel faucet feels stiff, makes noise, or leaks at the base when you move it, it’s a sign that lubrication is needed. If you notice these issues, don’t wait—lubricate as soon as possible to prevent more serious problems.
Can I Use Wd-40 Or Petroleum Jelly Instead Of Plumber’s Grease?
No. WD-40 and petroleum jelly are not safe for faucet parts. They can damage rubber seals and are not approved for drinking water systems. Always use silicone-based plumber’s grease for faucet maintenance.
How Do I Find The Right O-ring Size For My Faucet?
The easiest way is to take the old O-ring to a hardware store and match it. Most stores have a sizing guide. You can also look up your faucet model online to find the correct part number. Choosing the right size ensures a good seal and smooth movement.
Is It Safe To Lubricate A Pull-out Or Pull-down Faucet?
Yes, but these faucets have more parts and may be harder to reassemble. Follow the same steps, but pay close attention to how the hose and spout fit together. If you’re unsure, check the manufacturer’s instructions or ask a professional for help.
How Long Does It Take To Lubricate A Swivel Faucet?
For most people, the job takes 30–45 minutes from start to finish. If you have experience or a simple faucet, it can take less time. Allow extra time if you need to clean parts or replace O-rings.
Proper care of your swivel faucet is simple but makes a big difference. Regular lubrication keeps your faucet working smoothly, prevents leaks, and saves money on repairs. Don’t wait for problems to get worse—spend a little time now and enjoy hassle-free use for years to come.