Keeping your Stanley Cup clean is not just about appearance—it’s about health and taste, too. Whether you use your Stanley Cup daily for coffee, water, or smoothies, proper washing matters. Many people think a quick rinse is enough, but that can leave behind bacteria, odors, and stains.
Even if your Stanley Cup looks clean, invisible residue can build up inside. If you want your favorite tumbler to last for years, learning the right way to wash it is essential.
This guide covers everything you need to know about washing a Stanley Cup. You’ll learn which tools and cleaners are safe, step-by-step washing techniques, tips for removing stubborn smells, and even how to handle dishwasher use. We’ll also cover how to clean every part, from the lid and straw to the silicone gaskets.
By the end, you’ll know how to keep your Stanley Cup fresh, safe, and ready for any drink.
Why Cleaning Your Stanley Cup Matters
Many people love Stanley Cups for their durability and ability to keep drinks hot or cold for hours. But with frequent use, residue from drinks and bacteria can collect in hard-to-see places. This can lead to:
- Unpleasant odors that linger even after rinsing.
- Mold growth inside the lid or straw.
- Weaker insulation if grime builds up in the threads or seals.
- Altered taste, especially with coffee or flavored drinks.
A clean Stanley Cup not only tastes better but also helps prevent illness. Even water bottles can grow bacteria if not washed regularly. Studies have found that reusable bottles can harbor up to 313,000 colony-forming units of bacteria per square centimeter—more than a typical pet bowl or kitchen sink. Consistent, thorough cleaning keeps your Stanley Cup safe and extends its lifespan.
Understanding Your Stanley Cup’s Materials
Before you wash, it’s useful to know what your Stanley Cup is made of. Most models use:
- Stainless steel for the body, which resists rust and stains.
- Plastic lids (BPA-free), which may have silicone gaskets.
- Reusable plastic or stainless steel straws.
These materials are durable, but not all cleaning methods suit each part. For example, harsh cleaners can damage seals, and not all Stanley Cup lids are dishwasher safe. Always check your model’s care instructions, usually printed on the packaging or available on the Stanley website.
What You Need To Clean A Stanley Cup
Washing a Stanley Cup is simple when you have the right tools. Here’s what works best:
- Mild dish soap: Tough on grime, gentle on materials.
- Bottle brush: Reaches inside the cup easily.
- Straw brush: Cleans inside reusable straws.
- Soft sponge or cloth: For outside and lid cleaning.
- White vinegar or baking soda: For odors and deep cleaning.
- Toothpick or cotton swab: Gets into crevices, threads, or under gaskets.
- Warm water: Helps break down residue.
Avoid using bleach, abrasive scrubbers, or scented detergents. These can damage your Stanley Cup or leave a taste behind.
Step-by-step: How To Wash A Stanley Cup By Hand
Hand washing is the safest way to keep your Stanley Cup clean and in top condition. Follow these steps for a thorough clean:
1. Disassemble Everything
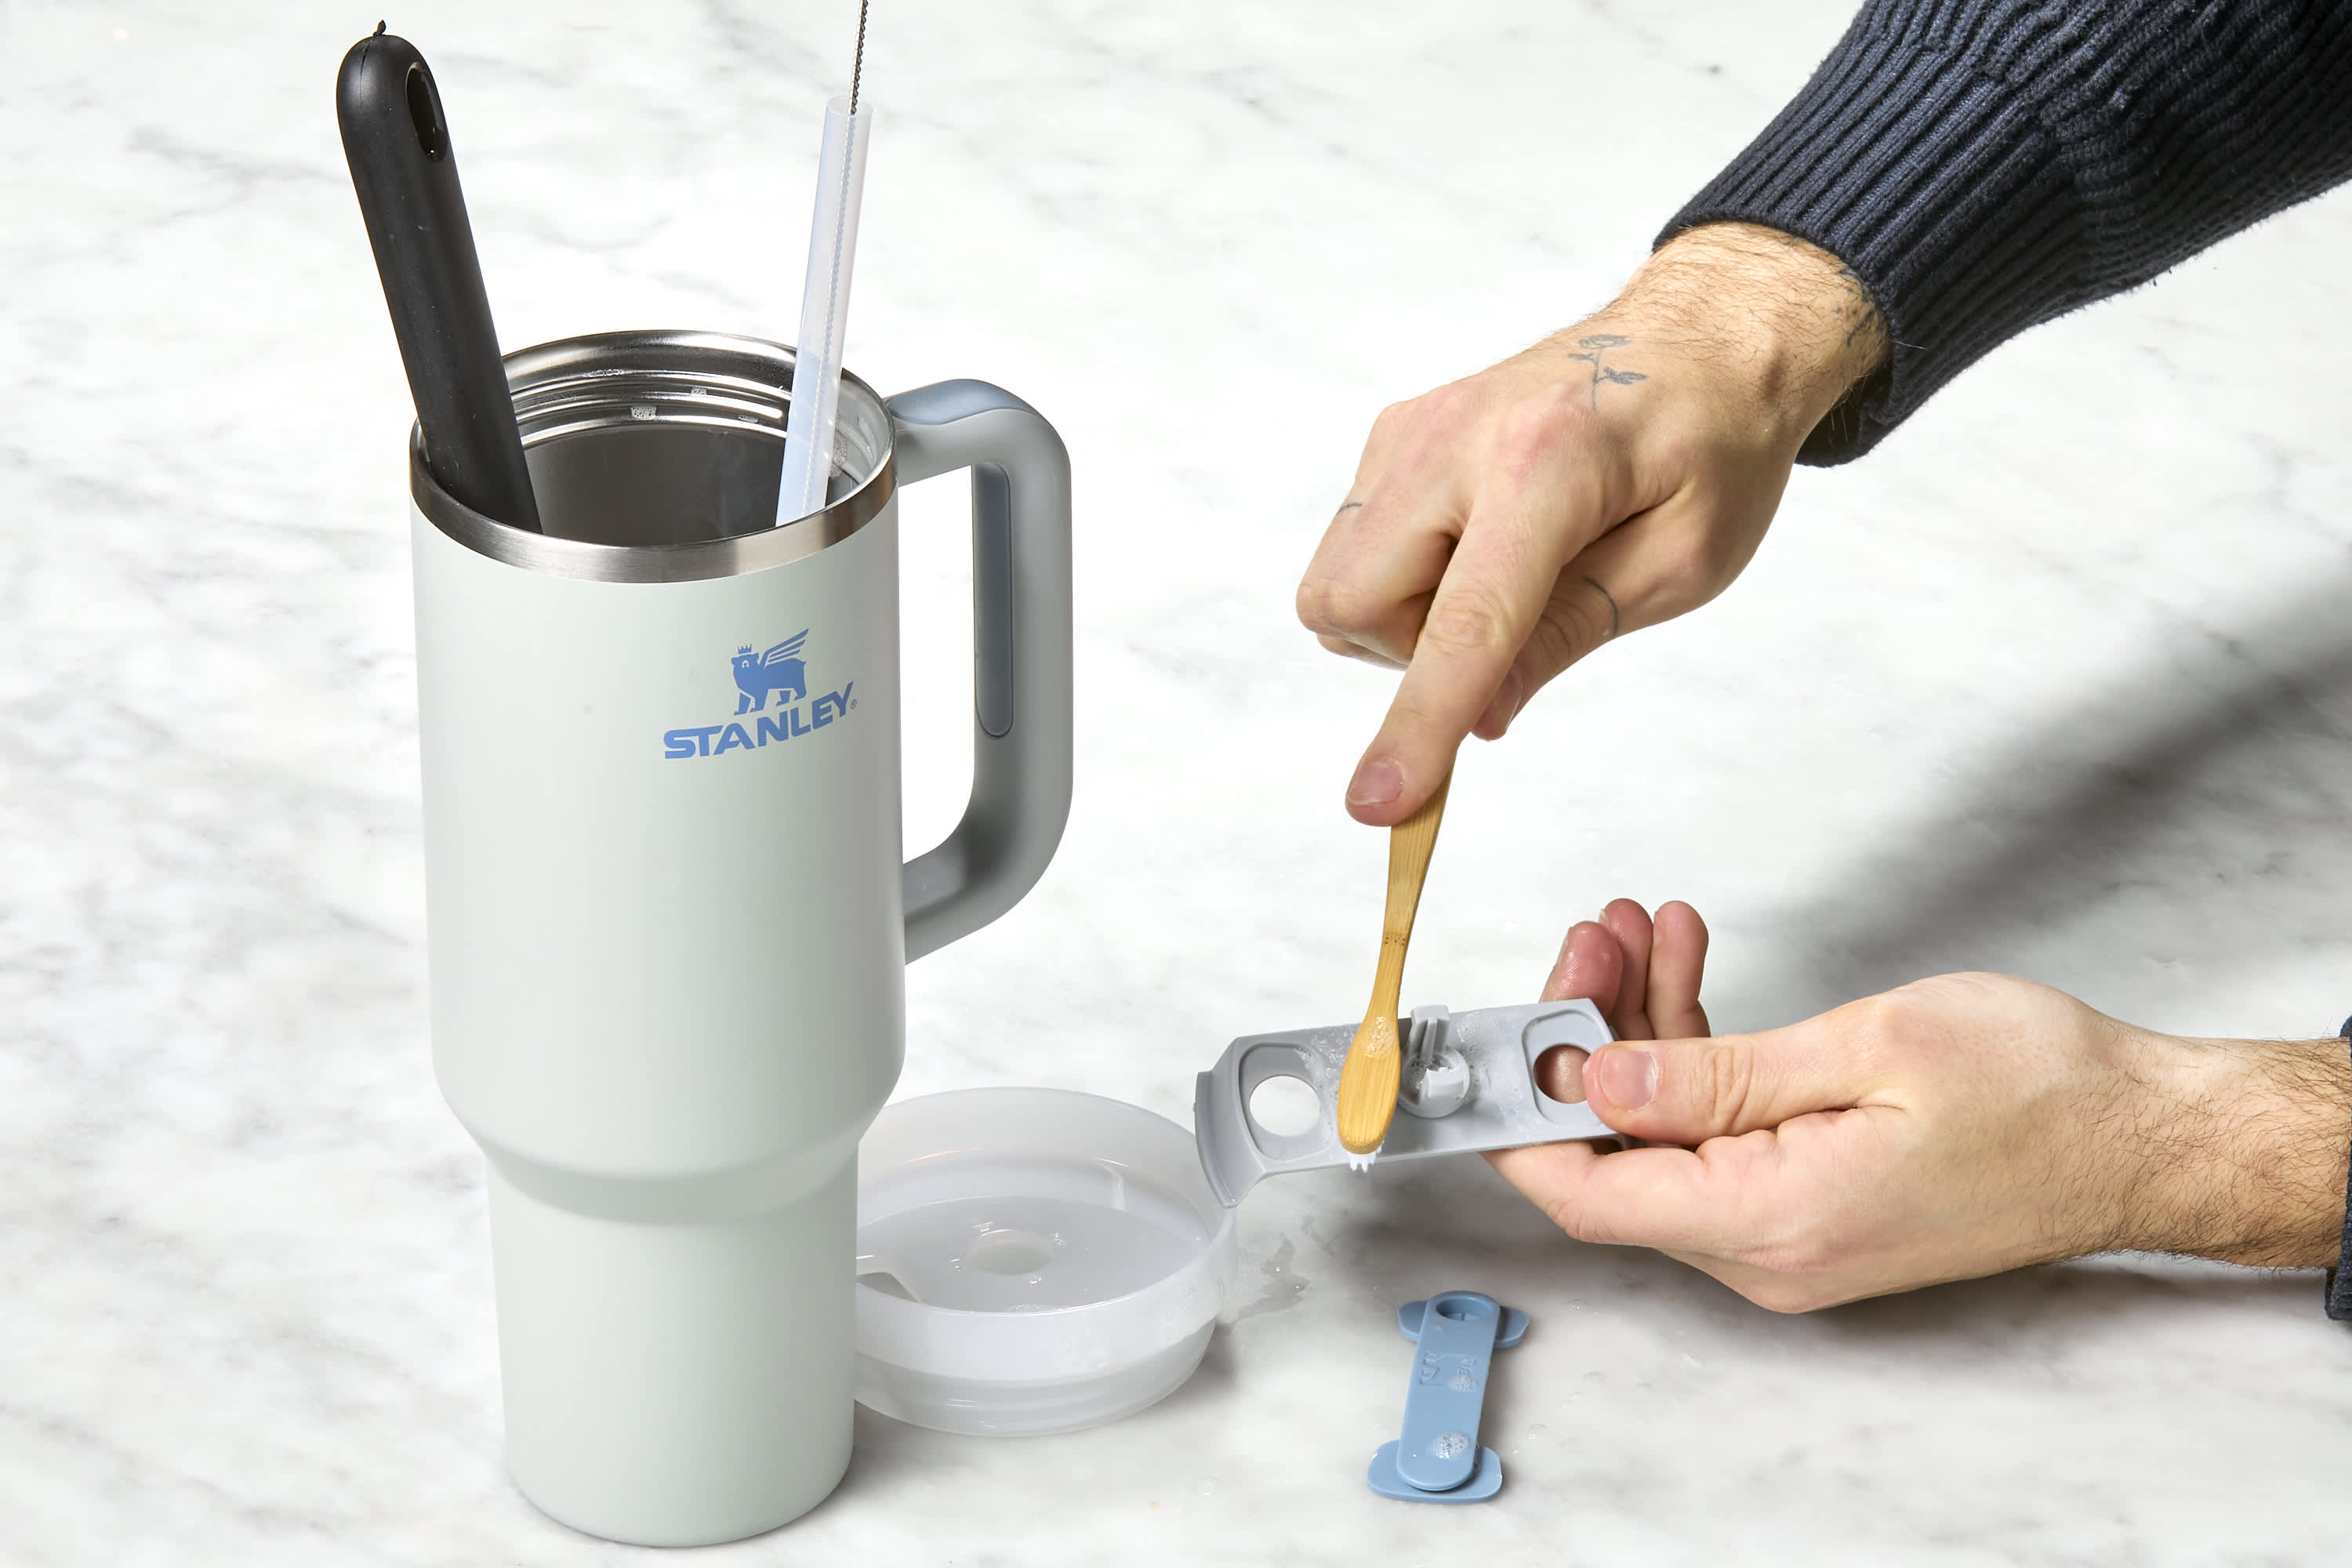
Start by taking apart your Stanley Cup completely. Remove the lid, straw, and any gaskets or seals. Most lids have a removable silicone gasket that helps prevent leaks—don’t skip this part. If you’re unsure how to remove parts, check the user manual.
2. Rinse Immediately After Use
Rinse your Stanley Cup with warm water as soon as you finish your drink. This prevents residue from drying and sticking. Even if you can’t wash right away, a quick rinse helps.
3. Wash The Cup Body
Add a small amount of mild dish soap to your bottle brush or sponge. Scrub the inside of the cup, focusing on the bottom and corners where grime collects. Rinse thoroughly with warm water.
Tip: For stubborn stains (like coffee or tea), let the inside soak with soapy water for 15-20 minutes before scrubbing.
4. Clean The Lid
Lids can trap bacteria and odor, especially in crevices. Use a soft sponge and soapy water to scrub all surfaces. Pay special attention to threads and any moving parts. Use a toothpick or cotton swab to reach small gaps.
5. Wash The Straw
If your Stanley Cup has a straw, use a straw brush. Add a drop of soap, push the brush through the straw, rinse with hot water, and repeat if needed. Don’t forget the mouthpiece end.
6. Scrub Gaskets And Seals
Remove the silicone gasket from the lid. Wash it separately with soapy water and a sponge or brush. Check for any trapped debris. Rinse well and let it air dry.
7. Rinse Everything Thoroughly
Soap residue can affect the taste of drinks. Rinse every part of your Stanley Cup with plenty of warm water.
8. Dry Completely
Let all parts air dry on a clean towel. Avoid reassembling until everything is fully dry—especially the silicone gasket. This prevents mold and keeps your Stanley Cup fresh.
How To Clean A Stanley Cup In The Dishwasher
Many Stanley Cups are labeled as “dishwasher safe,” but some parts may not be. Here’s how to use your dishwasher safely:
- Check your model’s dishwasher-safe label. Most stainless steel bodies can go on the top rack. Some lids and straws are only safe for the top rack.
- Remove all gaskets and small parts. These can fall through or get damaged in the dishwasher.
- Place the cup upside down on the top rack. This helps water reach the inside.
- Avoid high-heat drying settings, as these can warp plastic lids or seals.
Dishwashers are convenient for regular cleaning, but hand washing is still best for a deep clean or for removing tough stains and odors.
Deep Cleaning: Removing Odors And Stains
Even with regular washing, you may notice lingering smells or discoloration. Here’s how to tackle them:
Baking Soda Paste
Make a paste with baking soda and water. Spread it on the inside of your Stanley Cup and let it sit for 30 minutes. Scrub with a bottle brush and rinse well. Baking soda neutralizes odors and lifts stains.
Vinegar Soak
Fill your Stanley Cup halfway with white vinegar, then add hot water. Let it soak for an hour, or overnight for strong odors. Rinse several times to remove the vinegar smell.
Lemon Juice Trick
Squeeze fresh lemon juice into your cup, add water, and let it sit for 1-2 hours. Lemon naturally breaks down stains and leaves a fresh scent.
Dealing With Mold
If you spot black spots or suspect mold (usually in the lid or gasket), soak the parts in a mixture of 1 part white vinegar to 3 parts water for 30 minutes. Scrub all surfaces and rinse thoroughly.

Credit: www.wikihow.com
Cleaning The Lid, Straw, And Gasket: Details Matter
Some parts of your Stanley Cup need extra attention:
Lid
- Remove all movable pieces.
- Use a brush or toothpick for grooves and threads.
- If the lid has a slider or spout, open and clean both sides.
Straw
- Use a straw brush every time.
- If stained, soak in vinegar or baking soda solution.
- Dry upright to avoid water pooling inside.
Silicone Gasket
- Remove and wash after every few uses.
- Gaskets can hide mold—inspect regularly.
- Replace if cracked or smells persist.
How Often Should You Wash Your Stanley Cup?
Frequency depends on what you drink:
- Water only: Rinse after each use, deep clean every 2-3 days.
- Coffee, tea, or flavored drinks: Wash thoroughly after every use.
- Milk or smoothies: Wash immediately to prevent sour smells and bacteria.
For daily users, a quick wash each evening and a deep clean once a week keeps your Stanley Cup in top condition.
Common Cleaning Mistakes To Avoid
Even careful owners sometimes make mistakes that harm their Stanley Cup. Here’s what to watch out for:
- Using bleach or harsh chemicals: These damage stainless steel and may leave unsafe residues.
- Forgetting to dry all parts: Moisture trapped in the gasket or lid can lead to mold.
- Not removing the gasket: Most odor and mold problems start here.
- Dishwasher on high heat: Can warp plastic or damage seals.
- Reassembling while wet: Encourages bacteria growth.
Troubleshooting: Persistent Odors, Stains, And Leaks
Odors That Won’t Go Away
If smells persist after cleaning, try soaking all parts overnight in a vinegar and water solution, then air drying for 24 hours. Sometimes, the smell is trapped in the gasket—replace it if needed.
Tough Stains
For stubborn coffee or tea stains, sprinkle baking soda directly on a damp brush, then scrub. Let the paste sit for an hour before rinsing.
Leaks After Cleaning
If your Stanley Cup starts leaking, check that the gasket is seated properly and the lid is fully tightened. Inspect for cracks or wear. If the gasket is missing or damaged, order a replacement from the Stanley website.
Credit: www.thekitchn.com
Can You Clean A Stanley Cup With Just Water?
Rinsing with water helps, but it’s not enough for complete cleaning. Soap breaks down oils and residue that water alone can’t remove. For best results, use soap every time, and deep clean with baking soda or vinegar weekly.
What About Cleaning Tablets Or Powder?
Some brands sell bottle cleaning tablets. These can be convenient but aren’t necessary if you wash regularly. If you use them, follow the instructions and rinse thoroughly. Avoid tablets with strong scents—they can linger.
:max_bytes(150000):strip_icc()/ar-stanley-cup-lid-4x3-575083793ba64f2594052a64b355b3e4.jpg)
Credit: www.allrecipes.com
Comparing Cleaning Methods For Stanley Cups
To help you decide which method fits your lifestyle, here’s a comparison:
| Method | Pros | Cons | Best For |
|---|---|---|---|
| Hand Washing | Thorough, gentle, reaches all parts | Takes more time | All drinks, deep cleaning |
| Dishwasher | Convenient, less effort | May miss crevices, risk to plastic parts | Water-only use, busy schedules |
| Baking Soda/Vinegar Soak | Removes odors, natural | Requires soaking time | Stains, persistent smells |
| Cleaning Tablets | Easy, fast | Can be costly, scent residue | Travel, occasional use |
When To Replace Parts Or The Entire Stanley Cup
Stanley Cups are designed to last, but some parts wear out faster:
- Silicone gaskets: Replace every 6–12 months or if you see cracks or smell mold.
- Straws: Replace if they crack, stain, or get cloudy.
- Lids: If the lid won’t seal, leaks, or is warped, replace it.
- Cup body: If you see dents that affect the seal, or inside rust (rare), consider a new cup.
Stanley sells replacement parts on their official website. Regular checks help you catch problems early.
Tips For Keeping Your Stanley Cup Clean Longer
- Rinse immediately after every use. Don’t let drinks dry inside.
- Store with lid off to let air circulate and prevent odors.
- Deep clean weekly with baking soda or vinegar.
- Inspect gaskets and straws for mold or buildup.
- Avoid leaving dairy or sugary drinks overnight.
These habits keep your Stanley Cup fresh with less effort.
Stanley Cup Cleaning Myths
Let’s clear up some common myths:
- “Stainless steel doesn’t need much cleaning.”
Even stainless steel can grow bacteria and trap odors.
- “Dishwasher always cleans better.”
Dishwashers may miss hidden crevices, especially in the lid.
- “Vinegar or baking soda alone kills all germs.”
They help, but soap is still needed for a true clean.
How Stanley Cup Care Compares To Other Tumblers
Is cleaning a Stanley Cup really different from other brands? Here’s how it compares:
| Feature | Stanley Cup | Other Tumblers |
|---|---|---|
| Material | High-quality stainless steel, BPA-free plastics | Varies; some use lower-grade metals or plastics |
| Gasket Design | Removable, easy to clean | Some have fixed gaskets, harder to clean |
| Dishwasher Safe | Most models (body and some lids) | Not always; check manufacturer |
| Replacement Parts | Easy to order from official site | May be hard to find |
Stanley Cups usually make cleaning easier, but regular care is still key.
The Environmental Impact Of Proper Cleaning
Washing your Stanley Cup well means you’re less likely to throw it away early. This reduces waste and the need for single-use bottles. If you switch from using disposable cups to a Stanley Cup, you could save up to 365 single-use cups per year. Careful cleaning also means you need fewer replacements, further reducing your environmental footprint.
How To Store Your Stanley Cup After Washing
- Always let your Stanley Cup dry completely before storing.
- Store with the lid off or loosely placed, so air can flow.
- If you’ll store it for a long time, keep it open and in a dry place.
This prevents musty smells and keeps your cup ready for your next adventure.
Real-world Example: A Week In The Life Of A Stanley Cup
Imagine you use your Stanley Cup every day for coffee in the morning and water all afternoon. Here’s how to keep it clean:
- Morning: Rinse right after finishing coffee, even if you can’t wash immediately.
- Lunch: Wash with soap and a bottle brush before switching to water.
- Evening: At the end of the day, remove the lid and gasket, wash all parts, and let them air dry.
- Weekend: Deep clean with baking soda to remove any lingering stains.
This routine keeps your Stanley Cup fresh, even with heavy use.
Product Recommendations: Brushes And Cleaners
You don’t need fancy tools, but these can help:
- OXO Good Grips Water Bottle Brush: Flexible, fits most tumblers.
- Bottle Bright Cleaning Tablets: Good for deep cleaning.
- Stanley replacement gaskets: Direct from the Stanley website.
Always check that brushes fit your Stanley Cup’s size.
How To Clean Stanley Cup Accessories
If you use Stanley Cup accessories, like handle grips, sleeves, or carrying straps, wash them too. Most silicone or plastic accessories can be washed with soap and water. Fabric sleeves should be hand-washed and air-dried.
Traveling With A Stanley Cup: Cleaning On The Go
On the road? Keep these tips in mind:
- Bring a small bottle of dish soap and a portable bottle brush.
- Rinse your cup as soon as you finish your drink.
- If you can’t wash immediately, store used parts in a zip-top bag until you can clean.
Traveling doesn’t mean you have to compromise cleanliness.
What To Do If Your Stanley Cup Develops Rust
Stanley Cups are designed to resist rust, but if you see orange spots:
- Scrub gently with baking soda and water.
- Rinse well and dry completely.
- If rust persists inside, contact Stanley customer service for advice.
Don’t use steel wool or abrasive cleaners—they can scratch and worsen rust.
Safe Cleaning For Kids’ Stanley Cups
Children’s Stanley Cups need extra care:
- Wash after every use, especially if used for milk or juice.
- Use a straw brush and inspect for mold.
- Teach kids to store their cup with the lid off.
Kids’ cups often have more crevices—check all parts each time.
Where To Get Help Or Replacement Parts
If you lose a gasket or your lid won’t seal, you can find help on the official Stanley website. They offer replacement parts and care tips. For more about Stanley Cup materials, check the Stanley Wikipedia page.
Frequently Asked Questions
How Often Should I Deep Clean My Stanley Cup?
For daily users, deep cleaning once a week is enough. If you use your cup only for water, every two weeks may be fine. If you drink coffee, tea, or smoothies, do a deep clean after each use to prevent odors and stains.
Can I Put My Stanley Cup In The Dishwasher Every Day?
Most Stanley Cup bodies are dishwasher safe on the top rack, but check your model’s instructions. Lids, gaskets, and straws may last longer if you hand wash them. Avoid high-heat settings to prevent warping.
What Should I Do If My Stanley Cup Smells Bad Even After Washing?
Try soaking all parts in a mixture of vinegar and water overnight, then rinse and air dry. If the smell remains, check and replace the silicone gasket, as odors often hide there.
Are Cleaning Tablets Safe For Stanley Cups?
Most cleaning tablets are safe if used as directed and rinsed well. Avoid tablets with added scents or bleach. Stick with reputable brands and check that your Stanley Cup’s materials are compatible.
Can I Use Bleach Or Strong Chemicals To Clean My Stanley Cup?
No, avoid bleach and harsh chemicals. They can damage the stainless steel and leave dangerous residues. Stick to mild dish soap, baking soda, and vinegar for safe, effective cleaning.
Keeping your Stanley Cup clean takes a little effort but pays off in taste, health, and long life for your favorite drinkware. With the right habits, you’ll enjoy fresh-tasting drinks every time—no matter where life takes you.