
Installing tongue and groove flooring on concrete can completely change the look and feel of a room. This type of flooring is popular for its tight seams, classic appearance, and solid underfoot feel. But laying tongue and groove planks over concrete isn’t as simple as nailing them down over wood.
Concrete is hard, often damp, and can cause wood to warp if not prepared properly. If you want your new floor to last for years, you need to follow a careful process from start to finish.
Many people make mistakes when installing tongue and groove flooring on concrete. Some forget about the importance of moisture barriers, while others skip leveling the subfloor. Both can lead to expensive repairs. This guide will walk you through every step, from checking the moisture in your concrete to putting down the final plank.
You’ll learn what tools you need, what problems to watch for, and the best methods for a professional result—even if you’re a beginner.
Whether you’re a homeowner planning a DIY project or a contractor looking for a refresher, this article gives you a full, detailed roadmap. We’ll also share practical tips, time-saving advice, and answers to common questions. Let’s get started on creating a beautiful, long-lasting tongue and groove floor over concrete.
Understanding Tongue And Groove Flooring
Tongue and groove flooring is made with special edges on each board. One side has a thin, extended part—the tongue—while the other has a matching slot—the groove. When you push the tongue into the groove of the next board, they lock together tightly. This design creates a flat, stable surface with almost invisible seams.
There are several materials used for tongue and groove flooring:
- Solid hardwood: Thick, durable, but sensitive to moisture.
- Engineered wood: Thinner layers of real wood over plywood; more stable.
- Laminate: Fiberboard core with a photo layer; very stable but can’t be refinished.
For concrete subfloors, engineered wood is often the best choice. It handles moisture and temperature changes better than solid wood. Still, any type can work if you follow the right steps.
Planning Your Project
Good planning makes installation smoother and helps avoid surprises. Here’s what you need to consider before you start.
Measure Your Room
First, measure the room carefully. Use a tape measure to find the length and width. Multiply these numbers to get the square footage. Always add 10% extra for cuts and mistakes.
For example, if your room is 12 feet by 15 feet:
12 × 15 = 180 sq ft.
Add 10%: 180 + 18 = 198 sq ft.
Buy enough flooring for at least 198 sq ft.
Choose The Right Flooring
Not all tongue and groove planks are made for use over concrete. Check the manufacturer’s instructions. Look for:
- Engineered wood that’s labeled “suitable for below-grade” or “for concrete.”
- Moisture resistance ratings.
- Warranty details.
Gather Your Tools And Materials
You’ll need several tools for this project. Some are basic, others are specialized.
Basic tools:
- Tape measure
- Pencil and chalk line
- Utility knife
- Hammer and rubber mallet
- Pry bar
- Carpenter’s square
- Safety glasses and gloves
Specialized tools:
- Flooring installation kit (pull bar, tapping block, spacers)
- Moisture meter
- Circular saw or miter saw
- Drill and masonry bit (for concrete anchors, if needed)
- Caulking gun (for adhesive)
Materials:
- Tongue and groove flooring
- Underlayment (foam or felt)
- Polyethylene vapor barrier (6 mil or thicker)
- Floor adhesive (if floating or glue-down method)
- Transition strips and baseboards
Pro tip: Renting a power saw or flooring nailer can save time and improve your results.

Credit: www.youtube.com
Preparing The Concrete Subfloor
Concrete is very different from wood. It’s hard, doesn’t absorb moisture well, and can move slightly with temperature. Preparing the concrete subfloor is the most important step for a long-lasting floor.
Clean The Surface
Sweep and vacuum the floor to remove all dust, dirt, and debris. Even tiny stones can make the flooring uneven or damage the planks.
Check For Level
Place a long straightedge or level on the floor. Move it across the surface. If you see gaps over 1/8 inch in six feet, you’ll need to fix these low spots.
- Fill dips with self-leveling compound.
- Grind down high spots with a concrete grinder.
- Let any repair materials dry fully before continuing.
Test For Moisture
Concrete can hold water for years. If you install wood flooring over wet concrete, the wood will swell, warp, or develop mold.
How to test:
- Use a moisture meter designed for concrete.
- Or, tape a 2-foot-square piece of plastic to the floor (all edges sealed). Leave it for 24-48 hours. If you see water droplets on the plastic or dark spots on the concrete, moisture is present.
Acceptable moisture levels:
- For most engineered wood: Below 4% moisture content.
- For solid wood: Below 2.5%.
If your floor is too wet, delay installation. Improve ventilation, use a dehumidifier, or treat with a concrete sealer.
Install A Vapor Barrier
Even if your concrete seems dry, always install a polyethylene vapor barrier. This is a thick plastic sheet (6 mil or more) that blocks moisture from rising up into the wood.
- Roll out the sheets, overlapping edges by at least 8 inches.
- Seal seams with waterproof tape.
- Run the plastic up the wall by 2 inches, then trim after flooring is installed.
Common mistake: Skipping the vapor barrier because the room feels dry. Moisture can rise from below at any time, so never skip this step.
Choosing Your Installation Method
There are three main ways to install tongue and groove flooring on concrete:
- Floating floor: The boards connect to each other, but not to the subfloor.
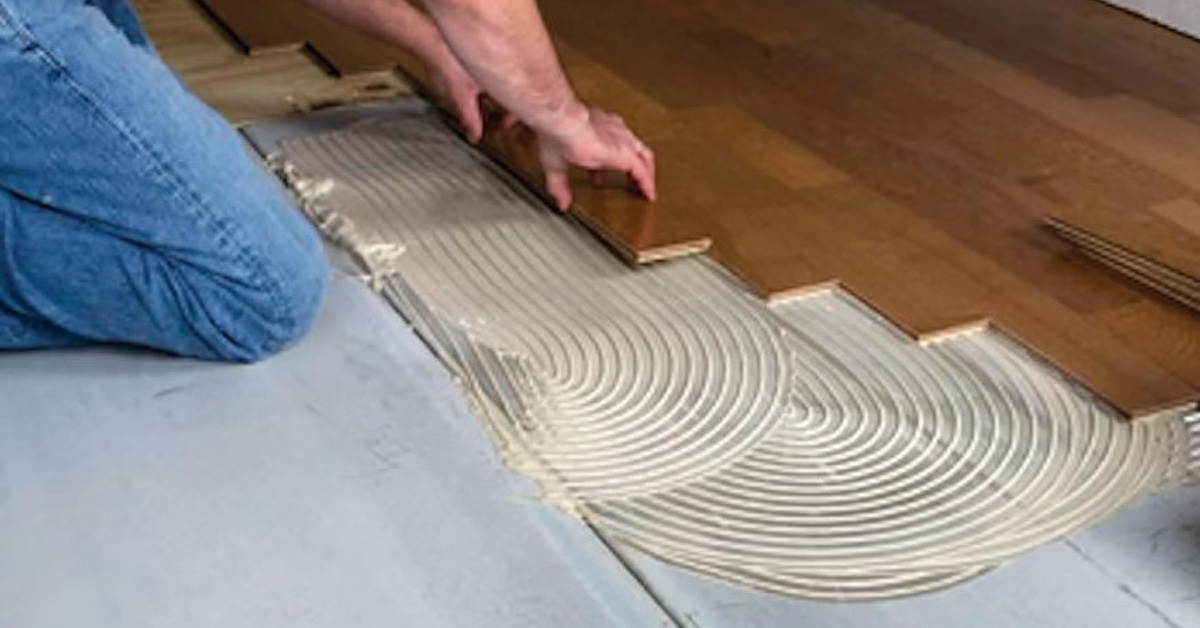
- Glue-down: The boards are glued directly to the concrete.
- Nail-down: Not recommended for concrete, unless you first add a plywood subfloor.
Floating Floor
This is the most popular method for concrete. It’s easier and less messy than glue-down. The boards “float” above the underlayment and are held together by their tongues and grooves.
Pros:
- Easy for DIYers.
- Can remove and replace planks if needed.
- Less mess.
Cons:
- May feel a bit hollow underfoot compared to glued floors.
Glue-down
With this method, you spread special adhesive over the concrete and press the planks into the glue.
Pros:
- Feels more solid.
- Less movement underfoot.
Cons:
- More difficult to remove or repair boards.
- Can be messy.
- Not all adhesives work with all flooring types.
Nail-down
You can’t nail directly into concrete. Some professionals add a plywood subfloor first, then nail the boards to that. This is rarely done in homes because it raises the floor height and is expensive.
Pro tip: For most home projects, a floating floor is the best balance of performance and ease.

Credit: www.woodcraft.com
Installing Underlayment
Underlayment adds a soft layer between the concrete and your flooring. It helps with sound, comfort, and small imperfections.
- Use foam or felt underlayment made for wood floors.
- Roll out the underlayment over the vapor barrier (or use a combined product if rated for concrete).
- Lay pieces side by side, edges butted—not overlapping.
- Tape seams according to product instructions.
Important: Some underlayments have built-in vapor barriers. Check the packaging to avoid double barriers, which can trap moisture.
Installing The First Row
Getting the first row right is critical for the whole project.
- Acclimate the Flooring
- Bring the boxes of flooring into the room at least 48 hours before installation.
- Stack them flat, with space around each box for air to move.
- This helps the wood adjust to your room’s temperature and humidity.
- Plan Your Layout
- Decide which direction to lay the planks. Most people run them parallel to the longest wall or toward windows.
- Use a chalk line to mark a straight reference line.
- Leave an Expansion Gap
- Wood expands and contracts with changes in temperature and humidity.
- Use spacers to leave a 1/4-inch gap between the flooring and all walls, pipes, or columns.
- Lay the First Row
- Place the tongue side facing the wall.
- Cut off the tongue on the first row so it fits flush with the wall.
- Connect the planks end to end.
- Make sure the row is perfectly straight.
Non-obvious tip: Start with the wall that is most visible or the longest, as any small mistakes are less noticeable in hidden areas.
Credit: www.sustainablelumberco.com
Installing The Remaining Rows
With the first row in place, the rest goes more quickly—but still requires care.
Stagger The Joints
Never line up the end seams of planks in consecutive rows. Staggering joints makes the floor stronger and looks better.
- Offset the seams by at least 6 inches.
- Use the leftover piece from the last cut of one row to start the next, if it’s long enough.
Fit The Planks
- Insert the tongue of each new board into the groove of the previous row at a slight angle.
- Use a tapping block and mallet to gently snug the boards together.
- Tap the ends together using a pull bar if space is tight.
Cutting Around Obstacles
You’ll need to cut planks to fit around door frames, pipes, or corners.
- Measure carefully.
- Use a jigsaw or coping saw for odd shapes.
- Always wear safety glasses when cutting.
Pro tip: Undercut door jambs with a handsaw so the flooring can slide underneath for a clean look.
Dealing With Transitions And Edges
Most rooms have doorways, thresholds, or open edges leading to other types of flooring. Use transition strips for a professional finish.
- Reducer strip: For transitions to a lower floor (like tile or vinyl).
- T-molding: For even transitions (like hallway to bedroom).
- End cap: For finishing against sliding doors or fireplaces.
Install transitions according to the manufacturer’s instructions, usually after the flooring is laid but before baseboards.
Securing The Last Row
The last row often needs to be trimmed to fit. Use a circular saw to rip the boards to the correct width, remembering the 1/4-inch expansion gap.
- Use a pull bar to snug the last pieces in place.
- Remove all spacers around the room.
- Inspect the floor for gaps or loose planks.
Non-obvious insight: If the last row is less than 2 inches wide, consider trimming the first row slightly and re-laying. Very narrow pieces are more likely to come loose or look awkward.
Installing Baseboards And Molding
With the floor in place, finish the edges for a clean look.
- Reinstall baseboards, nailing them to the wall (not the floor).
- Add quarter-round molding if needed to cover the expansion gap.
- Caulk and paint for a finished appearance.
Tip: Don’t attach baseboards or moldings to the flooring. This lets the floor move as it expands and contracts.
Cleaning Up And Checking Your Work
A thorough cleanup is important.
- Vacuum and sweep up all dust and debris.
- Wipe down the floor with a damp (not wet) cloth.
- Check all seams and edges for tightness.
- Walk the floor to listen for squeaks or shifting boards.
If you find any problems—like a loose plank or visible gap—fix them before moving in furniture.
Comparing Flooring Types For Concrete Subfloors
Understanding the strengths and weaknesses of each type of tongue and groove flooring helps you make a smart choice. Here’s a side-by-side comparison:
| Flooring Type | Moisture Resistance | Durability | Refinishing | Cost (per sq ft) |
|---|---|---|---|---|
| Engineered Wood | Good | High | 1-2 times | $4 – $8 |
| Solid Hardwood | Poor | Very High | 3+ times | $6 – $12 |
| Laminate | Excellent | Medium | No | $2 – $4 |
Engineered wood is often the best pick for concrete, balancing moisture resistance, durability, and cost.
Common Mistakes To Avoid
Many DIYers run into problems when installing tongue and groove flooring on concrete. Here’s how to avoid the most frequent issues:
- Skipping the Moisture Test: Even new concrete can be damp. Always test and use a vapor barrier.
- No Expansion Gap: Without space to expand, the floor will buckle as it grows.
- Poor Subfloor Prep: Uneven concrete leads to bouncy or noisy floors.
- Using Wrong Adhesive: Not all glue works with all flooring. Check manufacturer recommendations.
- Double Vapor Barrier: Layering two barriers can trap moisture and cause mold.
- Not Acclimating Wood: Flooring must adjust to room conditions to prevent gaps or warping.
How Long Does Installation Take?
Installation time depends on room size, complexity, and your experience. Here’s a rough estimate:
| Room Size | DIY Time Estimate | Pro Installer |
|---|---|---|
| 100 sq ft (small bedroom) | 6-8 hours | 3-4 hours |
| 200 sq ft (living room) | 10-14 hours | 6-8 hours |
| 400+ sq ft (large area) | 2-3 days | 1-1.5 days |
Pro tip: Add extra time for rooms with lots of corners or obstacles.
Maintaining Your New Floor
Once your tongue and groove flooring is installed, the work isn’t over. Regular care will keep it looking beautiful.
- Sweep or vacuum often to remove dirt and grit.
- Wipe up spills right away to prevent water damage.
- Use furniture pads to avoid scratches.
- Avoid wet mopping; use a damp cloth or special cleaner for wood.
- Check humidity: Keep indoor humidity between 35-55% to prevent gaps or swelling.
Non-obvious insight: Invest in a hygrometer to monitor room humidity, especially in basements or climates with big seasonal changes.
When To Hire A Professional
DIY can save money, but some situations call for a pro:
- Large rooms with complex layouts.
- Floors with major height differences or cracks.
- Older homes where moisture is a big problem.
- If you lack the tools or time.
A professional installer will have experience, the right tools, and can offer a warranty.
Troubleshooting Common Problems
Even with careful work, issues can come up. Here’s how to fix some common problems:
Gaps Between Planks
- Cause: Room is too dry, or planks not fully connected.
- Solution: Increase humidity, or tap boards together with a block and mallet.
Buckling Or Cupping
- Cause: No expansion gap, or high moisture.
- Solution: Remove baseboards, trim flooring to add gap, and check vapor barrier.
Squeaky Floors
- Cause: Uneven subfloor, or loose planks.
- Solution: Add shims under loose spots if possible, or reinstall affected boards.
Peaking At Joints
- Cause: Planks forced together too tightly.
- Solution: Remove and reinstall, leaving proper spacing.
Tip: Fix small problems early to avoid bigger repairs later.
Environmental Impact And Sustainability
More homeowners are thinking about the environment when choosing flooring. Some options are better for the planet:
- Engineered wood uses less hardwood than solid planks.
- Many products are FSC certified, meaning the wood comes from responsible forests.
- Some underlayments are made from recycled materials.
Laminate and vinyl use more plastic and chemicals. Look for low-VOC (volatile organic compound) adhesives for better indoor air quality.
Cost Breakdown
It’s smart to understand where your money goes. Here’s a rough breakdown for a 200 sq ft room:
- Flooring material: $800 – $1,600
- Underlayment and vapor barrier: $100 – $200
- Tools (buy or rent): $75 – $200
- Adhesive (if glue-down): $50 – $150
- Baseboards and trims: $150 – $300
- Professional installation (if hired): $500 – $1,200
DIY can save you up to 40% of total costs but requires time and care.
For more on flooring costs, the Home Depot flooring cost guide gives good up-to-date price ranges.
Frequently Asked Questions
How Do I Know If My Concrete Floor Is Dry Enough For Wood Flooring?
Test with a concrete moisture meter or use the plastic sheet method. Most engineered wood needs less than 4% moisture content. If in doubt, wait longer or use a dehumidifier.
Can I Install Tongue And Groove Flooring Directly On Concrete Without Underlayment?
No, you need at least a vapor barrier to block moisture. Underlayment adds comfort and helps with sound. Skipping these layers can damage your floor.
What’s The Best Direction To Lay Tongue And Groove Planks?
Usually, lay them parallel to the longest wall or toward the main window. This looks best and makes the room appear larger. But you can choose based on your design preference.
Is It Okay To Install Solid Hardwood Flooring Over Concrete?
It’s possible, but engineered wood is much safer. Solid wood is very sensitive to moisture and can warp or buckle. If you use solid wood, you must add a plywood subfloor and take extra care with moisture barriers.
How Soon Can I Walk On My New Floor After Installation?
For floating floors, you can walk on them right away. For glue-down floors, wait at least 24 hours for the adhesive to cure before heavy use or moving in furniture.
Installing tongue and groove flooring on concrete takes careful planning, patience, and attention to detail. With the right steps, you’ll enjoy a beautiful, durable floor for years to come. Take your time, follow each stage, and don’t hesitate to call a pro if you run into trouble.
Your home—and your feet—will thank you.