Laying plank flooring can change the look and feel of any room, but the secret to a professional, long-lasting finish lies in how you stagger the planks. Staggering isn’t just about appearance—it’s essential for stability, strength, and even avoiding future problems like gapping or buckling.
Many DIYers underestimate this step, but a well-staggered floor is one of those details that separates an average job from a flawless one.
If you want your plank flooring—whether laminate, engineered wood, or solid hardwood—to look and perform its best, you need to understand the why and how of staggering. This guide walks you through the process, offering practical advice, common pitfalls, and tips for every stage.
With careful planning and the right technique, you’ll not only get a beautiful floor but one that stands up to daily life for years to come.
Why Staggering Plank Flooring Matters
The way you arrange your planks affects more than just looks. Staggering joints is essential for several reasons:
- Strength and Stability: If you line up the end joints in adjacent rows, you create weak points. Staggering spreads the pressure across the floor, making it less likely to shift or break under weight.
- Prevents Gaps and Buckling: Floors move with humidity and temperature changes. Staggered joints help the floor expand and contract evenly, reducing the risk of unsightly gaps or planks popping up.
- Better Appearance: A random or patterned stagger avoids a “grid” effect, making the floor look more natural and less like a patchwork.
- Reduces Waste: With a good stagger pattern, you can use more of the off-cuts from each row, which means less material wasted and more efficient use of your investment.
Not staggering properly is the single most common mistake beginners make. The pattern of your stagger influences how your floor handles traffic, furniture, and even minor spills.
Types Of Plank Flooring That Need Staggering
Staggering isn’t only for one kind of plank flooring—it’s important for almost all:
- Laminate Flooring: Made of compressed fiberboard with a photo layer, these planks are prone to movement if not staggered.
- Engineered Hardwood: With a layered construction, engineered wood also needs staggered seams for stability.
- Solid Hardwood: Even solid wood can cup or shift if seams line up.
- Luxury Vinyl Plank (LVP/LVT): These resilient floors flex, so proper staggering prevents weak spots.
Some click-together or snap-lock floors will actually specify minimum stagger lengths in their instructions, often between 6 and 12 inches, to maintain the warranty.

Credit: www.discountflooringdepot.co.uk
Tools And Materials Needed
Before you start, gather everything you’ll need. Having the right tools makes the job smoother and helps you achieve a clean, professional finish.
Essential Tools:
- Tape measure
- Pencil and straightedge
- Tapping block and pull bar (for tight seams)
- Rubber mallet
- Spacers (for expansion gaps)
- Utility knife or saw (miter saw for wood, fine-tooth saw for laminate/vinyl)
- Square or angle tool
- Safety gear (knee pads, glasses, ear protection)
Materials:
- Plank flooring (with at least 10% extra for cuts and waste)
- Underlayment (if required)
- Moisture barrier (for concrete subfloors)
- Floor adhesive (if using glue-down method)
- Transition strips or moldings
Pro tip: Always buy extra planks—mistakes, bad cuts, and future repairs are almost inevitable.
Preparing The Subfloor And Layout
A flawless floor starts with careful preparation. Skipping these steps can lead to problems that even the best staggering can’t fix.
Subfloor Preparation
- Clean and Dry: Sweep or vacuum thoroughly. The subfloor must be dry, as moisture can cause warping or mold.
- Level Surface: Use a long straightedge to check for dips or bumps. Any height difference over 1/8 inch in 6 feet should be fixed with a leveling compound or by sanding high spots.
- Check for Squeaks: If you’re installing over wood, walk the floor and screw down any loose boards.
- Install Underlayment: Most floating floors need a thin foam or cork underlayment for cushioning, noise reduction, and minor leveling.
Planning Your Layout
- Measure the Room: Calculate the width of the room in planks. If the last row will be less than 2 inches, trim the first row to balance both sides.
- Dry Lay a Few Rows: Without adhesive or locking them, arrange a few planks to see how the seams will look. This lets you preview your stagger before committing.
- Decide Your Stagger Pattern: Random, brick (half), or patterned—more on this below.
Insight: Beginners often forget to check for wall squareness. If your walls aren’t perfectly square, you may need to trim your first row at a slight angle so your stagger stays even throughout the room.
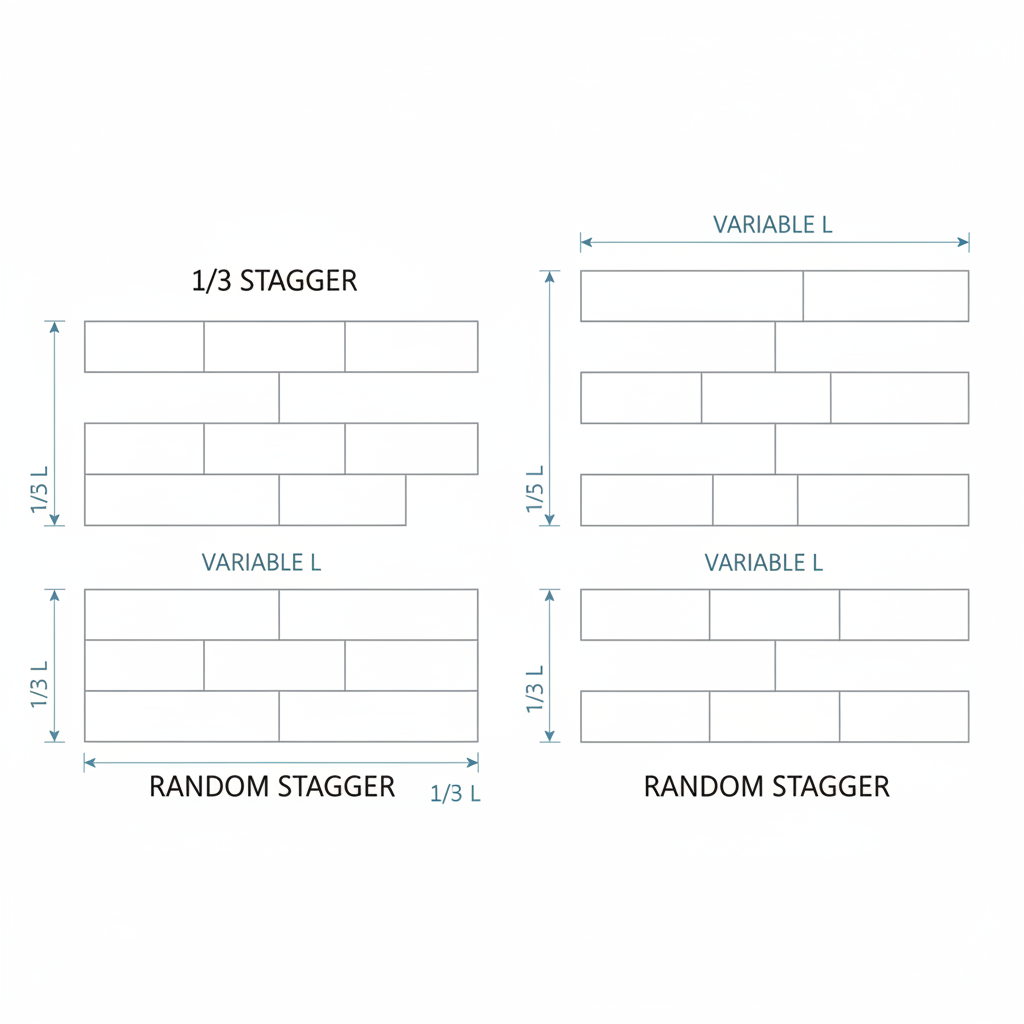
Staggering Patterns: Common Methods
There are several ways to stagger plank flooring. Your choice affects both the final look and how the floor holds up over time.
Random Stagger
The most natural appearance—this method mimics real wood floors. Each end joint is offset from the adjacent rows by a random amount, but never less than the manufacturer’s minimum (often 6–12 inches).
Advantages:
- Looks authentic
- Hides short planks or off-cuts well
Tip: Never have two joints closer than the manufacturer’s guideline. Too-short staggers create weak points.
Brick (half) Stagger
Each row starts with a plank cut exactly half the length of the previous row, creating a brick-like pattern.
Advantages:
- Consistent, easy to plan
- Works well in modern or formal settings
Drawback: Some manufacturers actually advise against a perfect half-brick pattern for long planks, as it can lead to a repeating pattern that highlights minor flaws.
Patterned Or Stepped Stagger
You start with a long plank, then a medium, then a short, and repeat the sequence. For example: 48″, 32″, 16″, then back to 48″.
Advantages:
- Easy to remember
- Ensures no seams are too close
Drawback: Can look artificial if the same pattern repeats often.
The “h” Pattern (what To Avoid)
Avoid aligning seams in every other row—this creates an “H” effect, which is not only weak but visually distracting.
How To Stagger Plank Flooring: Step-by-step
Now, let’s dive into the actual process. Follow these steps to stagger your plank flooring like a pro.
1. Plan The First Three Rows
Start by laying out your first three rows before locking anything in place. This gives you a chance to adjust lengths and avoid short pieces at the ends or seams too close together.
- Row 1: Use a full-length plank.
- Row 2: Cut the first plank so the end joint is at least 8–12 inches from the first row’s joint.
- Row 3: Start with a different length, but again, ensure minimum stagger.
Insight: The first three rows set the pattern for the rest of the floor. If you get these right, the rest will flow naturally.
2. Cutting Planks For Stagger
Measure and cut your starting plank for each row so the seams don’t line up. Use a miter saw for wood or a fine-tooth handsaw for laminate/vinyl. Always measure twice before cutting.
Pro tip: Use leftover off-cuts from the end of one row to start the next, as long as they meet the minimum stagger distance.
3. Install And Lock Each Row
Fit each plank tongue into the groove of the previous row, using your tapping block and mallet to ensure a snug fit. Place spacers at the walls to maintain an expansion gap.
- Check each joint: Make sure seams are tight; gaps can weaken the floor.
- Stagger as you go: Double-check that end joints never fall too close to each other.
4. Dealing With Doorways And Obstacles
When you reach a doorway or fixed object, you’ll often have to cut planks to fit. Try to maintain your stagger pattern as much as possible—never let a short piece fall at the entrance or in a high-traffic area.
5. Continue Across The Room
Repeat the process, always starting each new row with a different length plank, and checking the stagger as you go. Use off-cuts efficiently, but discard any piece that’s too short or damaged.
6. Finishing The Last Row
Measure the width needed for the last row, subtracting the expansion gap. Rip the planks to size, and install with the groove facing the wall. You may need a pull bar to fit these final pieces tightly.
Key Insight: Many DIYers rush the last row and end up with a skinny strip that’s hard to install and not structurally sound. Plan your layout from the start to avoid this.
Data Comparison: Minimum Stagger Requirements
Different manufacturers and flooring types have different rules for how far apart end joints must be. Here’s a quick reference:
| Flooring Type | Typical Min. Stagger | Reason |
|---|---|---|
| Laminate | 8–12 inches | Prevents weak seams |
| Engineered Hardwood | 6–10 inches | Maintains stability |
| LVP/LVT | 6–12 inches | Reduces flex and gaps |
| Solid Hardwood | Varies, typically 8–10 inches | Handles wood expansion |
Always check your product instructions—ignoring manufacturer recommendations can void your warranty.
How To Avoid Common Staggering Mistakes
Even experienced installers can make errors. Here are some frequent mistakes and how to avoid them:
- Short Staggers: Placing end joints too close, creating weak points. Solution: Always measure the minimum distance and plan ahead.
- Repeating Patterns: Accidentally making a visible “H” or stair-step effect. Solution: Vary your starting plank length every few rows.
- Wasted Material: Not using off-cuts efficiently. Solution: Plan the next row using leftover pieces, as long as they’re long enough.
- Ignoring Expansion Gaps: Forgetting to leave space at walls. Solution: Use spacers around all edges.
- Not Checking Seams: Gaps between planks can collect dirt and let water in. Solution: Tap each plank snugly into place before moving on.
Advanced Tips For A Professional-looking Stagger
If you want your floor to look as good as a showroom, try these advanced tips:
- Mix Planks from Multiple Boxes: Planks can have slight color or pattern differences. Mixing boxes ensures a more natural look.
- Avoid Clustering Short Pieces: Don’t group multiple short planks together; spread them out for better appearance and strength.
- Use a Chalk Line: Snap a line for your first row to keep everything straight, especially in large rooms.
- Check Lighting: Look at your stagger pattern under different lighting—shadows can highlight repeats or seams you didn’t notice.
- Mark Your Minimum Stagger: On your tape measure or straightedge, mark the minimum allowed stagger. This quick reference helps keep things on track.
How Staggering Affects Floor Performance
A good stagger pattern does more than just look nice. It actually extends the life of your floor:
- Even Distribution of Weight: Staggered seams spread the stress from furniture and foot traffic, preventing single planks from carrying too much load.
- Reduces Squeaks: Staggering helps keep the floor tight, so you’ll hear fewer squeaks over time.
- Handles Seasonal Changes: Floors expand and contract with humidity. Staggered seams flex more evenly, reducing the chance of planks buckling.
According to the National Wood Flooring Association, poor staggering is a leading cause of floor failure and warranty claims.
Visual Guide: Good Vs. Bad Stagger Patterns
To see the difference, compare these patterns:
| Pattern | Description | Result |
|---|---|---|
| Random | Seams spaced irregularly (8–12 inches apart) | Natural, strong, less visible joints |
| H-Pattern | Seams line up every other row | Weak points, visible grid effect |
| Brick | Seams exactly half plank length apart | Uniform, but can show repeating pattern |
Aim for the random or thoughtfully varied brick pattern for best results.
Using Off-cuts For Staggering
One of the hidden benefits of good staggering is less waste. When you reach the end of a row, you’ll often have a piece left over. If it’s longer than the minimum allowed, use it to start the next row.
This not only saves material but ensures your staggered joints stay strong and random.
Smart tip: Keep a “minimum cut” pile. If a leftover piece is too short, set it aside for use in closets or small spaces, not in main walkways.
Special Cases: Angled And Irregular Rooms
Not every room is a perfect rectangle. Here’s how to handle tricky layouts:
- Angled Walls: Measure and cut the first row to match the angle. Use a protractor or angle finder for accuracy.
- Irregular Rooms: Break the room into zones, each with its own starting row. Stagger patterns should continue across the visual line, even if you have to trim more at one side.
- Nooks/Closets: Carry the main room’s stagger pattern into these areas for a seamless look.
Advanced tip: For tricky shapes, dry-lay planks before cutting. This lets you see the pattern and make changes before committing.
How Plank Size Impacts Staggering
Longer and wider planks can both simplify and complicate staggering. Here’s how plank size changes your approach:
- Long Planks (48″ or more): Easier to make long staggers, but repeating patterns are more obvious. Plan extra cuts.
- Short Planks (under 36″): More joints to stagger, so careful planning needed to avoid clusters.
- Wide Planks: Joints are more visible, so keep staggers even more random for a natural look.
For rooms over 20 feet long, consider an expansion joint (a small gap covered by a T-molding) to prevent buckling.
Credit: www.bynewmaterials.com
Maintenance And Repairs: The Long-term Value Of Good Staggering
A well-staggered floor is easier to maintain and repair. If you ever need to replace a plank, a random stagger pattern makes it easier to remove and replace just one board without affecting a whole row.
Poorly staggered floors often require several planks to be removed to fix a problem, increasing both cost and effort.
Real-world Example: Staggering In A 12×15 Foot Room
Let’s apply everything to a typical 12 by 15-foot living room:
- Room is 12 feet wide; planks are 6 inches wide and 48 inches long.
- First row: Start with a full plank.
- Second row: Cut 16 inches off the first plank, so the seam is 16 inches away from the first row.
- Third row: Cut 32 inches off, creating a new offset.
- Continue: Each new row starts with either a full plank or a leftover, as long as it’s longer than 12 inches.
- Ends: Use off-cuts at the start of new rows, unless they’re too short.
This approach gives a random, visually pleasing stagger with no weak points.
When To Call A Professional
While DIY installation is possible, there are times when hiring a pro makes sense:
- Large or complex rooms
- Expensive material where mistakes are costly
- Subfloors that need major leveling or repair
- Time constraints
A professional installer will have the experience to create the perfect stagger and handle obstacles you might miss.
For more technical standards, see the National Wood Flooring Association.
Frequently Asked Questions
What Is The Minimum Distance Between End Joints When Staggering Plank Flooring?
Most manufacturers recommend a minimum of 6 to 12 inches between end joints in adjacent rows. Always check your specific flooring instructions, as ignoring this can void your warranty and weaken your floor.
Can I Use Leftover Pieces To Start A New Row?
Yes, as long as the leftover piece is longer than the minimum allowed (usually 6–12 inches). Using off-cuts efficiently reduces waste and helps keep your stagger pattern strong.
Is It Ok To Do A Perfect Brick (half-plank) Pattern When Staggering?
While a brick pattern is easy to plan, some manufacturers advise against it for long planks. This is because it creates a repeating pattern that can highlight flaws and weaken the floor. A random stagger is usually better.
What Happens If I Don’t Stagger Plank Flooring Properly?
Failing to stagger can lead to weak seams, gapping, buckling, or even the floor coming apart under normal use. It also creates an artificial, grid-like appearance that most people find unattractive.
Should I Stagger Luxury Vinyl Plank (lvp) The Same Way As Laminate Or Hardwood?
Yes, the basic principles are the same for LVP, laminate, and hardwood. Always follow the product’s instructions, but a random stagger of 6–12 inches is safe for most modern plank floors.
Staggering plank flooring is a skill that pays off for years. Done well, it gives you a stable, beautiful floor that stands up to daily life—and looks great doing it. With careful planning, attention to detail, and the tips above, even a first-time DIYer can achieve professional results.

Credit: www.reddit.com