Sewing a crib skirt is one of those rewarding projects that adds a special touch to a baby’s nursery. It’s more than just decoration—crib skirts can hide storage under the crib, keep dust away, and make the crib look cozy and stylish.
Many parents spend hours searching for the perfect design, but with a little sewing knowledge, you can create a custom crib skirt that matches your nursery perfectly. Even if you are new to sewing, this project can be a great way to learn new skills and build confidence.
This guide will walk you through every step of sewing a crib skirt, from choosing the right materials to adding the final stitches. Along the way, you’ll learn practical tips, avoid common mistakes, and discover small details that make a big difference.
Whether you want a simple straight skirt or a ruffled one, you’ll find clear advice to help you succeed. Let’s explore how to sew a crib skirt that looks beautiful and lasts through your baby’s early years.
Understanding Crib Skirts
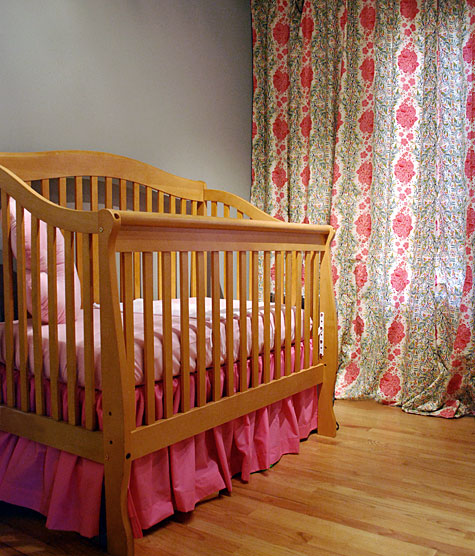
Before you start, it’s important to know what a crib skirt is and what purpose it serves. A crib skirt (sometimes called a dust ruffle) is a piece of fabric that hangs down from the mattress base of a crib, covering the space below. It’s usually decorative, but it can also help keep dust and pet hair out and hide items stored under the crib.
Crib skirts come in different styles:
- Tailored: Straight, flat panels for a clean look.
- Gathered or Ruffled: Fabric is gathered or pleated for a softer, fuller appearance.
- Layered: Two or more layers for extra detail and color.
Each style uses similar sewing techniques but may require different amounts of fabric and time. Most crib skirts have three panels (one long panel for the front, two shorter panels for the sides) and a deck piece that sits under the mattress.
Some designs skip the deck and simply tie or attach the panels to the crib frame.
Planning Your Crib Skirt
Success starts with good planning. Take time to make a few key decisions before you buy any fabric or thread.
Choose Your Style
Think about your nursery theme and how the crib skirt will look with your bedding. Tailored skirts are modern and neat, while ruffled skirts feel more classic and soft. If you like changing things up, a simple tailored skirt is easier to adjust or remake as your child grows.
Measure Your Crib
Not all cribs are the same size. Most cribs use a standard US mattress size (28 inches by 52 inches), but you should always measure your own crib before starting.
Measure these three things:
- Mattress length: From head to foot (usually about 52 inches).
- Mattress width: From side to side (usually about 28 inches).
- Drop length: From top of the mattress support to the floor. Most people like a drop between 12 and 16 inches.
Write these measurements down. They will guide you when you cut your fabric.
Decide On Fabric
The right fabric makes a big difference. For crib skirts, choose:
- Medium-weight cotton: Easy to sew and wash.
- Cotton blends: Durable and less likely to wrinkle.
- Linen or polyester blends: For a fancy look.
Avoid heavy fabrics (like denim) or very thin materials (like chiffon). Babies’ nurseries need materials that are easy to clean and safe.
If you want a ruffled skirt, buy extra fabric to allow for gathering.
Plan For Washing
Babies make messes! Pick a fabric that can be machine washed. Pre-wash and iron your fabric before sewing to avoid shrinking later.

Credit: www.gatherandflourish.com
Gathering Your Supplies
To sew a crib skirt, you’ll need some basic supplies. Here’s a helpful list:
- Fabric (amount depends on your crib size and skirt style)
- Thread (match your fabric color for best results)
- Sewing machine (any basic model works)
- Scissors or rotary cutter
- Measuring tape or ruler
- Pins or fabric clips
- Iron and ironing board
- Seam ripper (for fixing mistakes)
- Safety pins (for holding pieces in place)
Optional:
- Bias tape or hem tape for neat edges
- Velcro or ribbon ties if you plan to make a detachable skirt
Having all your tools ready saves time and reduces stress.
Calculating Fabric Needs
Many beginners buy too much or too little fabric. Use your crib measurements to calculate exactly how much you need.
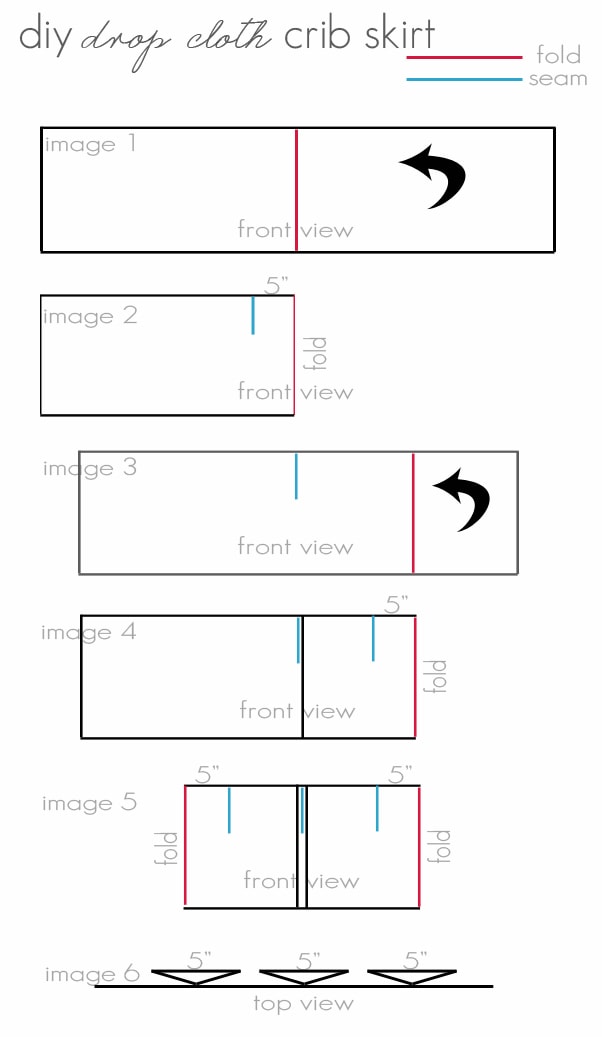
For A Tailored Crib Skirt
Let’s say your crib mattress is 28″ x 52″, and you want a 15″ drop.
- Front panel: 52″ wide x 15″ long (add 1″ for seam allowances = 53″ x 16″)
- Two side panels: 28″ wide x 15″ long each (add 1″ each = 29″ x 16″)
- Deck piece: 28″ x 52″ (fits under mattress, does not show—use cheap fabric or a bedsheet)
For a ruffled skirt, multiply the panel widths by 1. 5 to 2 times for gathering.
Most fabrics are 44-45″ wide. Arrange your pattern pieces to fit the least fabric waste.
Example Fabric Calculation
| Panel | Cut Size (inches) | Number Needed | Total Fabric (inches) |
|---|---|---|---|
| Front | 53 x 16 | 1 | 53 x 16 |
| Sides | 29 x 16 | 2 | 58 x 16 |
| Deck | 28 x 52 | 1 | 28 x 52 |
Add a few extra inches for mistakes or shrinkage.
Cutting Your Fabric
With your measurements ready and fabric pre-washed, it’s time to cut.
Steps For Cutting
- Iron your fabric to remove wrinkles.
- Mark your pieces using a ruler and fabric chalk or a washable pen.
- Cut carefully along the lines. Try to make straight, clean cuts for neat seams.
Cut the deck piece from a plain or leftover fabric if you want to save your pretty print for the panels.
Tip: Always double-check your measurements before cutting. It’s better to measure twice than to run out of fabric later.
Sewing The Panels
Now comes the fun part—sewing the panels that will hang down from your crib.
Preparing The Edges
Most crib skirts look best with finished edges. For a tailored skirt:
- Fold each edge of the panels over 1/2 inch, then fold again 1/2 inch. Iron to hold the fold.
- Pin in place.
- Sew a straight stitch close to the inner fold.
For a ruffled skirt, finish the side and bottom edges the same way, but leave the top edge raw for gathering.
Gathering For Ruffles
If you want a ruffled look, you’ll need to gather the top edges of your panels.
How to gather:
- Set your sewing machine to the longest straight stitch.
- Sew two parallel lines of stitches along the top edge (do not backstitch).
- Hold the bobbin threads and gently pull, sliding the fabric to create ruffles.
- Spread the gathers evenly until the panel matches the length of the crib (front or side).
Non-obvious insight: Use two rows of gathering stitches instead of one. This keeps your ruffles even and makes them less likely to break as you adjust the fabric.
Assembling The Crib Skirt
When your panels are hemmed and ready, it’s time to attach them to the deck piece.
Attaching Panels To The Deck
- Lay the deck piece flat, right side up.
- Place the front panel along one long edge, right sides together. Pin in place.
- Do the same for the two side panels, lining up their short edges with the short sides of the deck.
- Sew each panel to the deck, using a 1/2-inch seam allowance.
If you made ruffled panels, pin them so the ruffles are spread evenly before sewing.
Practical tip: Overlap the side and front panels slightly at the corners for a finished look.
Finishing The Corners
To keep the skirt hanging nicely, reinforce the corners where panels meet. You can sew a small diagonal stitch at each corner or use a zigzag stitch for extra strength.
Making A Detachable Crib Skirt
Some parents like to remove the crib skirt for washing or to adjust the drop as the mattress height changes. A detachable skirt uses Velcro or ties instead of a deck piece.
Steps For A Detachable Skirt
- Hem the top edge of each panel.
- Attach Velcro strips or sew ribbon ties to the top of the panels.
- Fasten the panels directly to the crib frame.
This method is helpful if your crib mattress support moves up and down as your baby grows.
Non-obvious insight: If your crib has a solid base, use adhesive Velcro on the base and sew the matching piece to your skirt panels. This keeps the skirt in place without slipping.
Adding Decorative Touches
A homemade crib skirt is your chance to add personality. Try these ideas:
- Add trim or piping along the bottom edge for color contrast.
- Use two fabrics for a layered look.
- Appliqué shapes like stars, animals, or initials.
Remember to keep decorations safe for babies—avoid beads, loose buttons, or anything that could be a choking hazard.
Pressing And Finishing
Once all sewing is complete, iron your crib skirt. Press seams flat for a crisp look. Trim any loose threads and check all hems for evenness.
Wash your finished skirt before using it in the crib. This removes any starch or markings and tests how it holds up in the laundry.
Credit: www.merrimentdesign.com
Installing The Crib Skirt
After washing and ironing, it’s time to put your crib skirt in place.
- Remove the crib mattress.
- Lay the skirt deck (or attach panels) on the mattress support.
- Adjust the panels so they hang evenly on all sides.
- Replace the mattress.
Stand back and admire your work! A well-made crib skirt gives the nursery a polished look and hides anything stored below.
Adjusting The Drop As Baby Grows
Many cribs have adjustable mattress heights. As your baby grows and you lower the mattress, you might want to adjust the drop of your skirt.
- For a deck-style skirt, shorten the panels by folding under the top edge and pinning or tacking in place.
- For a detachable skirt, simply refasten at a higher or lower point.
Pro tip: If you plan ahead, sew two sets of Velcro or ties at different heights so you can quickly adjust without resewing.
Common Mistakes And How To Avoid Them
Even experienced sewers make mistakes. Here are some common ones and how to fix or avoid them:
- Forgetting to pre-wash fabric: Skirts may shrink or twist after first wash.
- Cutting panels too short: Always double-check your measurements, especially the drop.
- Not matching thread and fabric color: Odd thread can show in seams and hems.
- Not securing gathers: Ruffles can come undone if not stitched in place well.
- Panels not hanging straight: Make sure your deck piece or attachment is flat and panels are the same length.
If you make a mistake, don’t panic. A seam ripper can fix most sewing errors.
Comparison: Tailored Vs. Ruffled Crib Skirt
Choosing between a tailored and a ruffled crib skirt depends on style, skill, and time. Here’s a quick comparison to help you decide:
| Feature | Tailored | Ruffled |
|---|---|---|
| Look | Modern, clean lines | Soft, traditional |
| Skill required | Beginner-friendly | Slightly advanced (gathering) |
| Fabric needed | Less | 1.5–2x more |
| Sewing time | Shorter | Longer |
| Adjustability | Easy to shorten | Harder to adjust |
Cleaning And Care
Crib skirts need regular cleaning to stay fresh. Most can be machine washed on a gentle cycle with mild detergent. Hang to dry or tumble dry low. Iron as needed.
Tip: If your skirt has special trim or is made from delicate fabric, check the care instructions for each material.
Creative Ideas For Leftover Fabric
If you have extra fabric after finishing your crib skirt, try these simple projects:
- Matching pillow covers: For a rocking chair or daybed in the nursery.
- Small toy bags: Store baby toys neatly.
- Bunting or wall art: Decorate the room with matching fabric shapes.
Using scraps for small projects adds a coordinated look to your nursery and reduces waste.
Safety Considerations
Safety is always first in a nursery. When sewing a crib skirt, remember:
- Make sure all seams are strong and won’t come apart.
- Avoid decorations that could come loose.
- Keep the skirt short enough so it does not drag on the floor where babies or pets could pull on it.
- Wash the skirt before use to remove any chemicals from fabric processing.
For more on nursery safety, visit the official Consumer Product Safety Commission.
Troubleshooting Guide
Sometimes things go wrong. Here’s a quick troubleshooting chart:
| Problem | Cause | Solution |
|---|---|---|
| Skirt is uneven | Panels cut or sewn at different lengths | Trim and re-hem to match |
| Panels shift or slip | Deck piece or Velcro not secure | Add more pins, Velcro, or use safety pins |
| Ruffles look messy | Gathers not evenly spread | Adjust gathers before sewing to deck |
| Fabric frays | Raw edges not finished | Zigzag stitch or use bias tape |
Credit: www.maisondepax.com
Frequently Asked Questions
How Much Fabric Do I Need For A Crib Skirt?
For a standard US crib (28″ x 52″), you’ll need about 2. 5 to 3 yards of fabric for a tailored skirt with a 15″ drop. Ruffled skirts may need up to 5 yards, depending on how full you want the ruffles.
Always add a little extra in case of mistakes.
Can I Sew A Crib Skirt Without A Sewing Machine?
Yes, you can sew a crib skirt by hand, but it will take much longer. Use small, tight stitches for strength. Some people use iron-on hem tape for no-sew edges, but sewing is more durable, especially after washing.
How Do I Adjust The Crib Skirt When I Lower The Mattress?
If your skirt is attached to a deck piece, fold the panels up and pin or tack them to shorten the drop. For skirts with Velcro or ties, simply move the attachment higher on the crib frame.
What Is The Best Fabric For A Crib Skirt?
Choose medium-weight cotton or cotton blends. These are easy to sew, washable, and durable. Avoid heavy or very light fabrics, which may not hang well or could be hard to clean.
Can I Make A Crib Skirt To Match Other Nursery Items?
Absolutely! Use leftover fabric to sew pillow covers, curtains, or small accessories. Matching fabric helps create a coordinated and stylish nursery. You can even add the same trim or appliqué to other items for a custom look.
Making a crib skirt is a practical and enjoyable project, even for beginner sewers. With careful planning and attention to detail, you’ll end up with a beautiful, safe, and functional addition to your nursery. Take your time, enjoy the process, and don’t be afraid to add your own creative touch.
The effort you put into sewing your own crib skirt will make the nursery feel even more special for you and your baby.