Setting up a dessert table can turn any event into a memorable experience. Whether it’s a birthday party, wedding, baby shower, or holiday gathering, the dessert table often becomes the highlight of the celebration. People are naturally drawn to sweet treats, but a great dessert table is more than just placing cakes and cookies on a surface.
It’s about creating a visual and sensory experience that delights guests and brings your party theme to life.
Many beginners think setting up a dessert table is simply arranging desserts in a row. However, details like table layout, color coordination, and the right balance of desserts make a big difference. As someone who has set up dozens of dessert tables for various events, I’ll guide you through each step, from planning and design to execution and troubleshooting.
By the end, you’ll know how to set up a dessert table that looks stunning, works smoothly, and leaves your guests talking long after the last bite.
Understanding The Purpose Of Your Dessert Table
Before you start buying sweets or searching for Pinterest inspiration, pause and ask: what is the purpose of your dessert table? Is it the main food attraction, a special treat station, or a photo-worthy display? Your answer will shape your decisions.
For example, at a kid’s birthday party, the dessert table is often the star. At weddings, it might complement a cake or serve as a late-night snack option. Understanding your event’s needs helps you choose the right desserts, the right amount, and the best way to arrange them.
Think about your guests too. Are there many children or mostly adults? Do you need options for people with allergies or special diets? Considering these factors early saves you stress later.
Deciding On A Theme And Color Scheme
A unified theme and color scheme will make your dessert table look intentional and beautiful. Even a simple table can look amazing with consistent colors and decorations.
How To Choose A Theme
Start by thinking about the occasion. Is it a romantic wedding, a bright baby shower, or a spooky Halloween party? Themes can be:
- Seasonal (spring, summer, winter, fall)
- Holiday (Christmas, Easter, Halloween)
- Personal (favorite colors, hobbies, characters)
- Elegant (vintage, rustic, modern, minimalist)
Once you pick a theme, choose 2-3 main colors. For example, a baby shower might use pastel blue, pink, and white. A fall party could use orange, gold, and brown.
Why Color Consistency Matters
Color ties everything together. It helps desserts, decorations, and even plates look like part of a single story. When colors clash or there are too many, the table can look messy. Sticking to a palette makes your setup look planned, even if your desserts are simple.

Credit: streetphotographersfoundation.com
Planning The Menu: What Desserts To Include
This step is both fun and important. Your menu decides the look, taste, and practicality of your dessert table. Here’s how to plan smartly:
Balancing Variety And Quantity
Aim for 5–8 different types of desserts. Too few can seem boring; too many can overwhelm guests and waste food. For most parties, plan for 2-3 pieces per guest. For example, with 30 guests, you’ll need 60–90 individual dessert pieces.
Mix Flavors And Textures
Offer a mix to please different tastes:
- Chocolate lovers: Brownies, chocolate mousse, truffles
- Fruit fans: Fruit tarts, lemon bars, berry parfaits
- Classic treats: Cookies, cupcakes, mini cheesecakes
- Crunchy and creamy: Macarons, meringues, panna cotta
Include Mini And Bite-size Desserts
Small desserts are easier for guests to eat and allow them to try more options. Mini cupcakes, bite-size brownies, and tiny tarts are popular for this reason.
Consider Dietary Needs
Include at least one gluten-free or dairy-free option if possible. Labeling these desserts helps guests make safe choices.
Sample Dessert Table Menu
Here’s an example menu for 40 guests:
- 40 mini cupcakes (various flavors)
- 30 brownie bites
- 30 fruit tartlets
- 25 lemon bars
- 40 chocolate-dipped strawberries
- 30 macarons (gluten-free)
- 30 vanilla meringue kisses
- 1 centerpiece cake (optional)
Desserts To Avoid
Some desserts don’t hold up well on a table, especially for long periods. Ice cream, whipped cream-heavy treats, or anything that melts fast can become messy. Choose desserts that can sit at room temperature for a few hours.
Choosing The Right Table And Location
The physical table is your canvas. Its size, shape, and placement matter more than most people realize.
Table Size And Shape
Choose a table that fits your space and guest count. For a small home party, a 4-foot table is usually enough. For larger events, use a 6- or 8-foot table, or even two tables side by side.
Rectangular tables are most common. Round tables can work for intimate gatherings. Make sure there’s enough room for guests to walk around and access all desserts easily.
Table Height
A standard table (around 30 inches high) is comfortable for most adults. If you expect many children, consider a slightly lower table or provide a step stool.
Location Tips
- Place the table in a spot with good lighting.
- Avoid direct sunlight, which can melt chocolate or icing.
- Make sure there’s space for people to gather but not block walkways.
Table Linens, Backdrops, And Decorative Basics
How you dress your table sets the tone for the whole dessert display. Even simple desserts look amazing with the right decorations.
Tablecloths And Runners
A tablecloth hides any imperfections and creates a clean base. Choose a color from your theme. Add a table runner for extra texture or contrast.
Backdrops
A backdrop draws attention and makes photos look better. Popular options include:
- Balloon garlands
- Streamers or fabric drapes
- Paper fans or flowers
- Personalized banners
Backdrops can be made at home or bought online. Make sure it’s stable and safe, especially outdoors.
Risers And Stands
Use cake stands, boxes, or even stacked books under the tablecloth to create different heights. This adds dimension and helps each dessert stand out.
Sample Decoration Plan
For a pink and gold baby shower:
- White tablecloth, pink sequin runner
- Gold cake stands, glass jars for candy
- Balloon arch in pink, white, and gold behind the table
- Paper flowers at the corners
Designing The Table Layout
Arranging desserts is like creating a small work of art. Good layout makes desserts easy to reach and visually appealing.
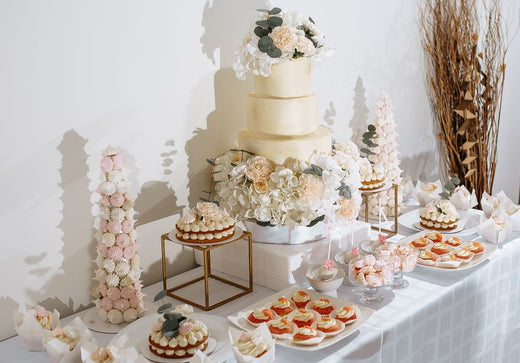
Focal Point
Every dessert table needs a focal point. This is usually the centerpiece cake or a large arrangement. Place it in the middle or at the back center of the table.
Symmetry And Balance
Try for symmetry, especially for formal events. Place matching trays or stands on either side of the centerpiece. For casual or rustic themes, a more relaxed, “scattered” look can work well.
Using Different Heights
Place taller items (cake, towers, large jars) at the back. Medium-height trays go in the middle. Flat items (cookies, bars) are at the front.
Here’s a visual comparison to help:
| Arrangement Style | Best For | Main Features |
|---|---|---|
| Symmetrical | Weddings, formal events | Even sides, matching stands, balanced look |
| Asymmetrical | Casual, rustic parties | Mixed heights, relaxed placement, creative feel |
Spacing And Flow
Leave space between platters so guests can see each dessert. Don’t crowd the table. If you run out of room, rotate new trays in as old ones empty.
Labeling Desserts
Use small cards to label each dessert. This helps guests know what they’re eating and is especially important for allergy-friendly items.
Choosing And Using Serving Pieces
The trays, stands, and dishes you use affect both looks and function.
Types Of Serving Pieces
- Cake stands: For cakes, pies, or to raise platters.
- Tiered trays: Save space and show off small desserts.
- Flat platters: For cookies, bars, and brownies.
- Jars or bowls: For candies, popcorn, or other small treats.
- Mini cups or shot glasses: For mousse, pudding, or parfaits.
Mixing Materials
Mix glass, ceramic, wood, and metal for an interesting look. For example, a wooden tray next to a gold cake stand adds texture.
Practical Tips
- Use sturdy stands for heavy desserts.
- Place heavier or messier items lower, where they’re less likely to fall.
- Use tongs, spoons, or mini forks for easy self-service.
Sample Serving Plan
For a dessert table of 7 items:
- Cake on a tall stand in the center
- Cupcakes on a tiered tray to the left
- Fruit tarts on a white ceramic platter to the right
- Candy in glass jars at both ends
- Cookies and brownies on flat trays at the front
- Meringues in mini bowls between platters
Adding Decorative Touches
Little details make a big difference. Here are some ways to make your dessert table stand out.
Edible Decorations
- Fresh flowers: Place on platters or around stands (use edible flowers for safety)
- Fruit slices: Lemon, lime, or berries add color
- Edible glitter or sprinkles: Makes desserts sparkle
Non-edible Decor
- Mini banners or flags: On cupcakes or cakes
- Confetti or sequins: Scattered on the table (keep away from food)
- Small figurines or toys: For themed parties (e.g., dinosaurs, princesses)
Lighting
String lights or small LED candles can make your table glow, especially for evening events.
Personal Touches
Add a framed photo, a custom sign, or a quote that matches the event. These touches make your dessert table unique and meaningful.
Credit: www.cvlinens.com
Managing Portion Sizes And Quantities
Getting the right amount is a common challenge. Too much, and you waste food. Too little, and guests feel disappointed.
How Much Dessert Per Guest?
A good rule is 2-3 pieces per person. If dessert is the main food, increase to 4-5 pieces. For a wedding with many other food options, 1-2 per person is often enough.
Here’s a handy reference:
| Event Type | Recommended Pieces Per Person | Notes |
|---|---|---|
| Children’s Party | 3–4 | Kids eat more sweets; have extras |
| Wedding Reception | 2–3 | Other desserts/cake likely available |
| Holiday Gathering | 2–3 | Depends on meal size |
| Bridal/Baby Shower | 3 | Light meal, focus on sweets |
Planning For Allergies And Special Diets
If you know guests have allergies, plan accordingly. Label desserts like “contains nuts” or “gluten-free. ” Avoid cross-contamination by using separate serving utensils.
Dealing With Leftovers
Have takeaway boxes or bags ready. Many guests will love to bring home extra treats.
Setting Up The Table: Step-by-step Guide
Now it’s time to put all your planning into action. Here’s a step-by-step guide:
- Prepare the space: Clean the table and area around it.
- Lay linens and backdrop: Set up your tablecloth, runner, and backdrop first.
- Arrange risers and stands: Place boxes, stands, and trays for different heights.
- Start with the centerpiece: Place the main cake or focal dessert.
- Add large platters: Put larger trays at the back or sides.
- Fill in with smaller items: Place smaller desserts and candies at the front.
- Add labels and utensils: Place cards, tongs, forks, or spoons where needed.
- Decorate with final touches: Add flowers, confetti, mini banners, or lights.
- Double-check for balance: Step back and look for empty spots or crowding.
- Keep extra desserts nearby: Refill trays as needed during the event.
Troubleshooting Common Dessert Table Problems
Even with planning, things can go wrong. Here’s how to handle common issues:
Desserts Melting Or Wilting
Keep desserts out of direct sun or heat. Use insulated trays for chocolate or cream desserts. If outside, set up under a tent or shade. For longer events, rotate fresh trays as needed.
Running Out Of Desserts
Keep backup trays in the fridge or kitchen. Refill as needed. If you’re worried about running out, serve desserts in waves instead of putting everything out at once.
Table Looks Empty Or Messy
If the table looks sparse, move platters closer together or add extra decorations. If it’s too crowded, remove a few trays and refill as guests eat.
Unlabeled Items Cause Confusion
Always label desserts, especially if they contain common allergens. Use clear, simple cards.
Guests Aren’t Eating Desserts
Place the dessert table in a visible spot. Announce when it’s open, or ask the DJ or host to invite guests. Sometimes people don’t notice the table or think it’s just for show.
Creative Themes And Unique Ideas
Once you’ve mastered the basics, try these creative ideas for truly memorable dessert tables:
Around The World Sweets
Feature desserts from different countries: French macarons, Italian cannoli, Japanese mochi, Mexican churros. Label each with a flag or country name.
Diy Dessert Station
Let guests build their own treats, like decorating cupcakes, making s’mores, or building ice cream sundaes (if you have the means to keep things cold).
Color Explosion
Choose one color and create a monochrome dessert table. Use colored candies, icing, and decorations for a bold look.
Healthy Dessert Table
Offer fruit skewers, yogurt parfaits, and low-sugar treats for health-focused events. Decorate with fresh herbs and edible flowers.
Retro Or Vintage
Use old-fashioned candy jars, lace doilies, and classic treats like rice crispy squares or jelly beans.

Credit: www.youtube.com
Budget-friendly Dessert Table Tips
Setting up a beautiful dessert table doesn’t need to be expensive. Here are some ways to save money while still impressing guests:
- Bake at home: Homemade cookies and bars are cheaper than store-bought.
- Use seasonal fruit: Fresh fruit is often cheaper and adds color.
- Repurpose decor: Use items you already own, like vases, trays, or baskets.
- Buy in bulk: Purchase candies or supplies in large quantities.
- DIY decorations: Make banners or paper flowers instead of buying them.
- Limit specialty desserts: Feature one or two fancy items, then fill in with simpler treats.
- Borrow serving pieces: Ask friends or family to lend cake stands or trays.
Real-world Example: A Successful Dessert Table
Let’s look at a real example from a recent bridal shower:
- Theme: Elegant garden party (green, white, gold)
- Desserts: Lemon cupcakes, green tea macarons, mini cheesecakes, vanilla meringues, white chocolate-dipped strawberries, pistachio cookies
- Decor: White tablecloth, gold runner, fresh eucalyptus branches, gold cake stands, glass jars with green and white candies
- Backdrop: DIY paper flower wall in white and green
- Serving pieces: Mix of ceramic, glass, and gold
- Budget: $200 (baked most items at home, borrowed stands)
- Guest count: 25
- Success tip: Labeled each dessert, had a separate gluten-free section, and refilled trays halfway through the party
Guests loved the look and the mix of flavors. No food was wasted, and the bride got beautiful photos with the dessert table as a backdrop.
Advanced Tips For Show-stopping Dessert Tables
If you want to go beyond the basics, try these expert strategies:
Use Odd Numbers
Arranging platters and stands in odd numbers (3, 5, 7) is more pleasing to the eye than even numbers.
Focus On One Showpiece
One “wow” dessert, like a tall cake or a macaron tower, can anchor your table and make everything else look special.
Add Interactive Elements
Live dessert stations (like a chocolate fountain or donut wall) attract attention and keep guests entertained.
Use Real Flowers And Greenery
A few sprigs of fresh herbs, eucalyptus, or roses can transform your table from nice to amazing.
Layer With Texture
Mix different fabrics (lace, burlap, sequins), serving materials, and dessert shapes for depth and interest.
Plan For Photos
Think about photo angles. Leave space in front for people to pose, and avoid tall backdrops that block faces.
Keep It Safe
If you use candles or string lights, make sure they’re safe and far from flammable materials or children’s reach.
Frequently Asked Questions
How Far In Advance Can I Set Up A Dessert Table?
For most events, you can set up the backdrop, linens, and stands a day ahead. Place desserts 1–2 hours before guests arrive to keep them fresh. If using perishable items, refrigerate and bring out just before the event.
What Are Some Unique Centerpiece Ideas For A Dessert Table?
Try a macaron tower, donut wall, croquembouche, or a tall floral arrangement. For themed parties, use a decorated cake or even a sculpted sugar piece as the centerpiece.
How Do I Transport Desserts To The Event Venue Safely?
Use sturdy boxes with non-slip mats or parchment between layers. For cakes, use a cake carrier. Pack delicate items like macarons or meringues in single layers. Always bring extra containers for leftovers.
Can I Include Store-bought Desserts On My Table?
Absolutely. Store-bought treats can save time and look great if you present them well. Arrange them on nice platters, add fresh fruit or edible flowers, and remove any packaging.
Where Can I Find Inspiration For Dessert Table Designs?
Check event blogs, Instagram, or Pinterest for ideas. For professional guidance, you can also visit Martha Stewart for creative and practical dessert table inspirations.
A well-designed dessert table is more than sweets—it’s an experience that delights your guests and brings your event to life. With thoughtful planning, a clear theme, and a few creative touches, you can set up a dessert table that looks stunning and works smoothly, no matter your budget or skill level. Remember: the best dessert tables reflect your personality and joy. Have fun with it, and let your creativity shine.