If you’ve ever worked with wood stains, you know how rewarding it is to see grain patterns come alive with color. But sometimes, things go wrong. Maybe you applied too much stain, or you forgot to wipe off the excess. Now the stain has dried, leaving behind sticky patches or a blotchy finish. This is a common problem for both beginners and experienced DIYers. The good news is: dried excess stain can be removed, and your project can still turn out beautiful. Let’s explore how to tackle this issue step by step, using safe and effective methods.
Why Removing Dried Excess Stain Matters
It’s tempting to ignore small mistakes, but dried excess stain should not be left on wood surfaces. It doesn’t cure like the wood below. Instead, it stays tacky, attracts dust, and can even peel off later. This means the final finish will not be smooth or durable. If you plan to add varnish or polyurethane, the excess stain can cause adhesion problems, leading to more trouble down the road. Fixing the issue early saves time and ensures your work looks professional.
How Dried Stain Happens
Understanding the cause helps prevent it in the future. Dried excess stain usually comes from applying too much product or not wiping off the surface promptly. Stain is designed to soak into the wood, not sit on top like paint.
When the excess sits on the surface, it dries into a sticky or shiny layer that doesn’t harden properly. Sometimes, humidity, temperature, or the type of wood can slow absorption, making it easy to miss spots that need wiping.
Safety First: Protect Yourself And Your Work
Before you start fixing the dried stain, get your workspace ready. Open windows for ventilation. Wear nitrile gloves to protect your hands from chemicals. Lay down drop cloths to catch drips, and keep a trash bag nearby for used rags. Some stain removers are flammable, so avoid sparks or open flames. If you use strong solvents, consider wearing a respirator. Safety is always more important than speed.
Essential Tools And Materials
Having the right tools makes the job easier and safer. Here’s what you’ll need:
- Clean rags (preferably lint-free)
- Mineral spirits or paint thinner
- Fine steel wool (#000 or #0000 grade)
- Plastic scraper (not metal, to avoid scratches)
- Soft-bristled brush
- Sandpaper (220–320 grit)
- Tack cloth
- Protective gloves
- Safety glasses
Optional items:
- Citrus-based stain remover for eco-friendly cleaning
- Respirator mask for strong fumes
- Painter’s tape to protect areas you don’t want to touch
Credit: www.homedepot.com
Step-by-step: Removing Dried Excess Stain
Every situation is a bit different, but these steps cover most cases. Always test methods on a small, hidden area first.
1. Assess The Situation
Start by looking closely at the stained surface. Is the excess stain tacky, glossy, or completely dry and hard? Tacky spots are easier to fix than fully cured, thick layers. Also, check the size of the problem. For small spots, you might not need aggressive methods.
2. Try Gentle Cleaning First
For slightly sticky or glossy patches, use a clean rag dampened with mineral spirits. Rub gently over the affected area. Often, this will soften and remove the thin layer of excess stain. Wipe with a dry rag immediately after to absorb loosened stain. If the problem is recent (within a few days), this approach often works with minimal damage to the wood or color.
3. Use Fine Steel Wool For Stubborn Areas
If mineral spirits alone aren’t enough, use fine steel wool. Wet the steel wool with mineral spirits and rub lightly in the direction of the wood grain. This helps lift the dried stain without scratching the wood. Avoid pressing too hard, especially on soft woods like pine. Wipe away residue with a clean rag.
4. Scrape Carefully As Needed
For thick, fully dried stain, a plastic scraper can remove surface build-up. Hold the scraper at a low angle and gently push along the grain. Never use metal tools, as they can gouge or scratch. After scraping, follow up with steel wool and mineral spirits to smooth the surface.
5. Sand For A Smooth Finish
If the stain is still uneven, use sandpaper (220–320 grit) to feather the edges. Sand lightly, always following the wood grain. This removes stubborn residue and blends the area with the rest of the piece. After sanding, use a tack cloth to pick up dust.
6. Clean And Inspect
After removing the excess, wipe the surface with a clean, dry rag or tack cloth. Check for missed spots or unevenness. If you see shiny areas, repeat the above steps as needed. Don’t rush—thoroughness now will save you trouble later.
7. Reapply Stain (if Needed)
Sometimes, removing excess stain also removes some color, leaving pale patches. If this happens, lightly reapply stain to blend in. Wipe off all excess within the time recommended by the manufacturer (usually 5–15 minutes). Allow the wood to dry thoroughly before adding a protective topcoat.
Comparing Methods For Removing Dried Stain
Different methods work better for different situations. Here’s a quick comparison:
| Method | Best For | Pros | Cons |
|---|---|---|---|
| Mineral Spirits & Rag | Fresh or tacky stain | Gentle, safe for most woods | May not work on cured stain |
| Fine Steel Wool & Mineral Spirits | Partially dried stain | Effective, minimal scratching | Can lighten color if overused |
| Plastic Scraper | Thick, fully dried stain | Removes build-up quickly | Risk of scratches if misused |
| Sandpaper | Stubborn or uneven residue | Smooths surface, blends color | Can remove too much color if not careful |
Common Mistakes And How To Avoid Them
Dealing with dried excess stain can be frustrating. Here are mistakes to watch for:
- Using too much force. Scrubbing too hard with steel wool or sandpaper can gouge the wood or remove too much stain.
- Skipping safety. Not wearing gloves or working in a poorly ventilated area exposes you to chemicals and fumes.
- Not testing first. Always try your method on a small hidden area before working on the main surface.
- Leaving residue. Failing to wipe away loosened stain can make the problem worse.
- Rushing the process. Give each step time, especially when waiting for solvents to soften the stain.
- Over-sanding. Sanding too much can create uneven color patches and require a complete refinish.
- Ignoring manufacturer’s instructions. Each stain product is a bit different. Check the label for guidance on removal and drying times.
Eco-friendly And Alternative Methods
Some people prefer less harsh chemicals. Here are greener ways to remove dried stain:
- Citrus-based cleaners: Products made from orange oil or other citrus extracts can soften dried stain without strong fumes. Apply with a rag and rub gently.
- Vinegar and water: For mild cases, a mix of vinegar and water can sometimes loosen the excess stain. It’s not as strong as mineral spirits but safer for sensitive users.
- Baking soda paste: Mix baking soda with a little water to form a paste. Rub gently on the area, then wipe clean.
These methods are less aggressive but may require more time and effort. Always test first, as they can sometimes lighten wood or affect color.
How Long Does The Process Take?
Time depends on the size of the problem and the method used. For a small area, removal can take 15–30 minutes. For larger or stubborn spots, it might take a few hours, including drying time. Patience is key for a quality result.
When To Start Over
Sometimes the excess stain is so thick and hard that spot removal won’t work. If you see large, glossy, or sticky patches across the whole surface, it may be better to strip and refinish. Here’s how you’ll know:
- The stain layer is thicker than a credit card
- The surface stays sticky for days after application
- Attempts to remove the excess only spread it around
In these cases, use a chemical paint/stain stripper (follow safety instructions closely) or sand the surface back to bare wood. Then, restain, making sure to wipe off all excess promptly.
Tips For Preventing Excess Stain In The Future
Prevention is the best fix. Here’s how to avoid this problem next time:
- Apply thin coats. Use a brush or clean cloth to apply stain sparingly.
- Set a timer. After applying, wait only as long as the product label suggests (often 5–15 minutes), then wipe off all excess.
- Wipe with the grain. Use a clean, dry rag to remove stain, always moving with the wood grain for a smooth look.
- Work in small sections. Staining large surfaces all at once makes it easy to miss spots. Divide your project into areas you can finish in 10–15 minutes.
- Check under good lighting. Bright light reveals shiny or wet spots that need wiping.
- Have clean rags ready. Swap out rags as they become saturated for best results.
The Science Of Wood Stain: Why It Matters
Wood stain works by soaking into open pores of the wood. Excess that sits on the surface can’t bond properly. That’s why manufacturers stress wiping off all extra stain. The right technique lets the grain show and helps your finish last for years.
A surprising fact: According to the American Hardwood Information Center, over 90% of wood stain failures are related to poor surface preparation or improper application, not product quality. This means technique is more important than the brand you choose.

Credit: cherrywoodfabrics.com
Real-world Example: Fixing A Blotchy Tabletop
Imagine you stained a dining table and forgot to wipe off one section. The next day, you notice it’s sticky and glossy. Here’s how you’d fix it:
- Dampen a rag with mineral spirits and rub the spot. If the stain softens, wipe away as much as possible.
- If residue remains, use fine steel wool with more mineral spirits, rubbing gently with the grain.
- Wipe dry. If the spot looks pale, lightly touch up with stain, then wipe off excess after 10 minutes.
- Let dry fully before applying a protective topcoat.
This method often restores the wood without starting over, saving time and material.
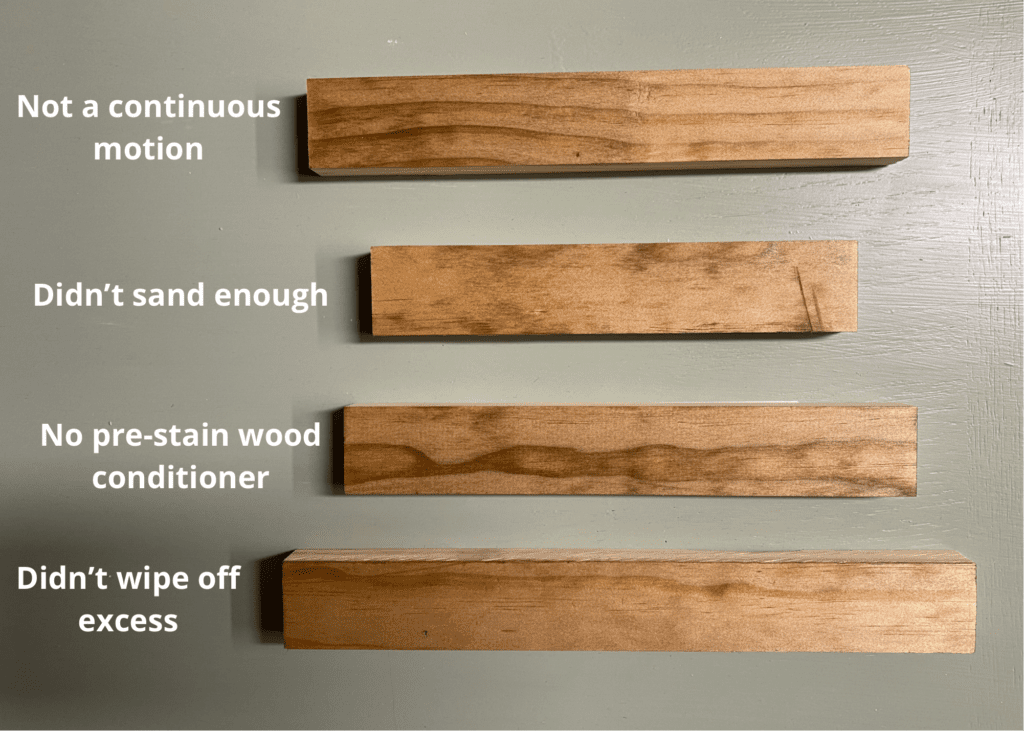
Case Study: Removing Excess Stain From Oak Vs. Pine
Different woods absorb stain differently. Oak, with its large pores, soaks up stain quickly, so excess is easier to remove. Pine is softer and blotchier, and excess stain often sits on the surface.
| Wood Type | Absorption Rate | Ease of Excess Removal | Special Tips |
|---|---|---|---|
| Oak | High | Easy | Wipe quickly, use less stain |
| Pine | Low/Uneven | Challenging | Use pre-stain conditioner |
Knowing your wood helps you plan removal and avoid problems.
Should You Use Chemical Strippers?
Chemical strippers are strong and can remove thick, dried layers of stain. They’re best for major mistakes or old finishes. Apply as directed, wait for the finish to bubble, then scrape off with a plastic scraper. Wear gloves and a mask, as fumes can be harsh.
Clean the wood with mineral spirits after stripping, then sand smooth before restaining.
Some strippers are methylene chloride-free, making them safer for home use. Always read labels and follow safety guidelines.
When To Call A Professional
Most dried excess stain can be fixed by a careful DIYer, but some situations need expert help:
- Antique or valuable furniture
- Large built-in surfaces (floors, stairs)
- Historical restoration projects
A professional has special tools and experience to save the wood without damaging it.
Cost: Diy Vs. Hiring A Pro
Fixing dried excess stain yourself usually costs less than $30 for materials (mineral spirits, rags, steel wool). Hiring a professional can range from $100 to $500, depending on the size of the project. DIY is budget-friendly, but don’t hesitate to call for help if you’re working on something valuable.
Frequently Asked Questions
What If The Dried Stain Feels Sticky After Removal?
If the surface remains sticky, it means some residue is still present. Go over the area again with mineral spirits and a clean rag. Allow to dry. If stickiness continues, try sanding lightly. Sticky surfaces should not be coated with a top finish until fully dry.
Can I Use Paint Thinner Instead Of Mineral Spirits?
Yes, but use it with care. Paint thinner is similar to mineral spirits and works for removing excess stain. However, it has a stronger odor and can be harsher on skin. Always wear gloves and ventilate your workspace.
Is It Safe To Use A Hair Dryer Or Heat Gun To Dry Wood Stain Faster?
It’s not recommended. Heat can cause stain to dry unevenly, making excess removal harder. High heat might also damage the wood or cause fire hazards with flammable solvents. Let stain dry naturally for best results.
Will Removing Dried Stain Change The Wood Color?
It can, especially if you use abrasive methods like steel wool or sandpaper. If color fades in spots, lightly reapply stain and wipe off excess to blend the area. Always test stain on a small area before doing touch-ups.
Where Can I Find More Information About Wood Finishing?
For deeper knowledge on wood stains and finishing, check resources like the Wood Stain article on Wikipedia. These guides provide technical details, safety advice, and advanced techniques.
Credit: www.thehandcraftedhaven.com
Bringing It All Together
Removing excess stain that has dried is a common challenge, but not an impossible one. With patience, the right tools, and careful technique, you can restore wood surfaces to their intended beauty. Always start gently and work your way up to stronger methods if needed. Safety, testing, and attention to detail make all the difference. Next time, thin coats and prompt wiping will help you avoid the problem entirely. Your woodwork—whether it’s a table, floor, or keepsake box—deserves a finish that’s as smooth and lasting as your effort.