Creating a checkerboard floor is a project that can completely transform a room. The sharp contrast and geometric design of checkerboard patterns bring a sense of energy, style, and vintage charm. Many people imagine a classic black-and-white tile floor in a retro diner or an elegant entryway.
But what if you could achieve this look with paint, even on wood or concrete? Painting a checkerboard floor is not just possible—it’s a highly rewarding DIY project.
This guide walks you through every step, from planning and prep to painting and maintenance. Whether you want a dramatic look or a subtle, modern pattern, you’ll find all the details here. Along the way, you’ll discover tips that save time, help you avoid common mistakes, and make your checkerboard floor look truly professional.
Why Choose A Painted Checkerboard Floor?
Checkerboard floors are timeless. They suit kitchens, foyers, bathrooms, studios, and even outdoor spaces. But why paint rather than install tiles?
Painting is less expensive and less permanent. You can paint over the design later if you change your mind. It also works on surfaces where installing tile is difficult or costly. You have complete control over color choices and square sizes, so you can match any interior style.
A painted checkerboard can look as crisp and bold as real tile if done correctly. Plus, it’s a project you can finish in a weekend with the right tools and patience.
Planning Your Checkerboard Floor
A successful checkerboard floor starts with a solid plan. Rushing into painting without careful measurement can lead to awkward layouts or mismatched squares.
Choosing The Right Room And Surface
Checkerboard patterns look best in rooms with open floor space. Kitchens, mudrooms, and entryways are popular. Avoid rooms with too many obstacles, as cutting the pattern around cabinets and fixtures is tricky.
Painted checkerboards work on concrete, hardwood, plywood, and even vinyl floors. The surface must be smooth and clean. Avoid painting over carpet, uneven tiles, or surfaces with heavy texture.
Selecting Colors
Classic checkerboards use black and white, but any two contrasting colors can work. Consider:
- Light and dark grays for a modern, subtle look
- Soft beige and cream for a vintage feel
- Bold colors (like navy and white) for dramatic impact
Test your color choices together before committing. Paint swatches on paper and place them side by side on the floor. Think about how the colors will look in different lighting and at different times of day.
Deciding Square Size
Square size affects the overall feel of the floor. Larger squares (12 to 18 inches) look more modern and are easier to paint. Smaller squares (6 to 8 inches) create a busier, vintage look.
Here’s a quick comparison of square sizes for a 10×12 foot room:
| Square Size | Number of Squares (approx.) | Visual Effect |
|---|---|---|
| 6 inches | ~400 | Busy, classic |
| 12 inches | ~100 | Balanced, modern |
| 18 inches | ~45 | Simple, dramatic |
Larger squares mean less taping and painting, but can look overwhelming in small rooms. Smaller squares give a more intricate effect but take more time.
Laying Out The Pattern
The pattern should run square to the main walls, not at an angle, unless you want a dramatic diamond effect. Use a tape measure and chalk line to find the exact center of the room. Laying out the pattern from the center ensures it is balanced and symmetrical.
Tools And Materials You’ll Need
Painting a checkerboard floor requires some essential tools and a few optional items that make the job easier. Gather everything before you start.
- Painter’s tape (high-quality, wide)
- Chalk line or straight edge
- Measuring tape and ruler
- Pencil or fine-tip marker
- Drop cloths to protect walls and furniture
- Sandpaper (medium and fine grit)
- Vacuum or broom
- Mop and bucket
- Paint roller and tray
- Angled brush for edges
- Quality floor paint (two colors)
- Primer (if painting wood or concrete)
- Clear sealer (for durability)
- Kneepads (optional but recommended)
- Utility knife or scissors (for tape)
- Level (helps keep lines straight)
A few non-obvious but helpful items include a laser level for ultra-straight lines and a notebook for tracking your measurements.
Preparing The Floor
Preparation is key for a long-lasting, professional finish. Don’t skip steps—paint will not stick well to dirty, oily, or rough surfaces.
Cleaning
Sweep or vacuum the floor thoroughly. Mop with a degreaser or mild detergent. Remove all dust, dirt, and grease. Let the floor dry completely before moving on.
Repairing Imperfections
Fill any cracks, holes, or dents with a suitable filler. Sand patched areas until they’re smooth. If you’re painting over old paint or stain, sand lightly to remove gloss. Vacuum again to remove sanding dust.
Priming
Priming helps paint stick better, especially on bare wood, concrete, or vinyl. Use a quality bonding primer and let it dry fully. Some primers need 24 hours to cure. Don’t rush this step.
If painting over previously painted surfaces in good condition, you may be able to skip priming, but it’s usually best to prime for maximum durability.
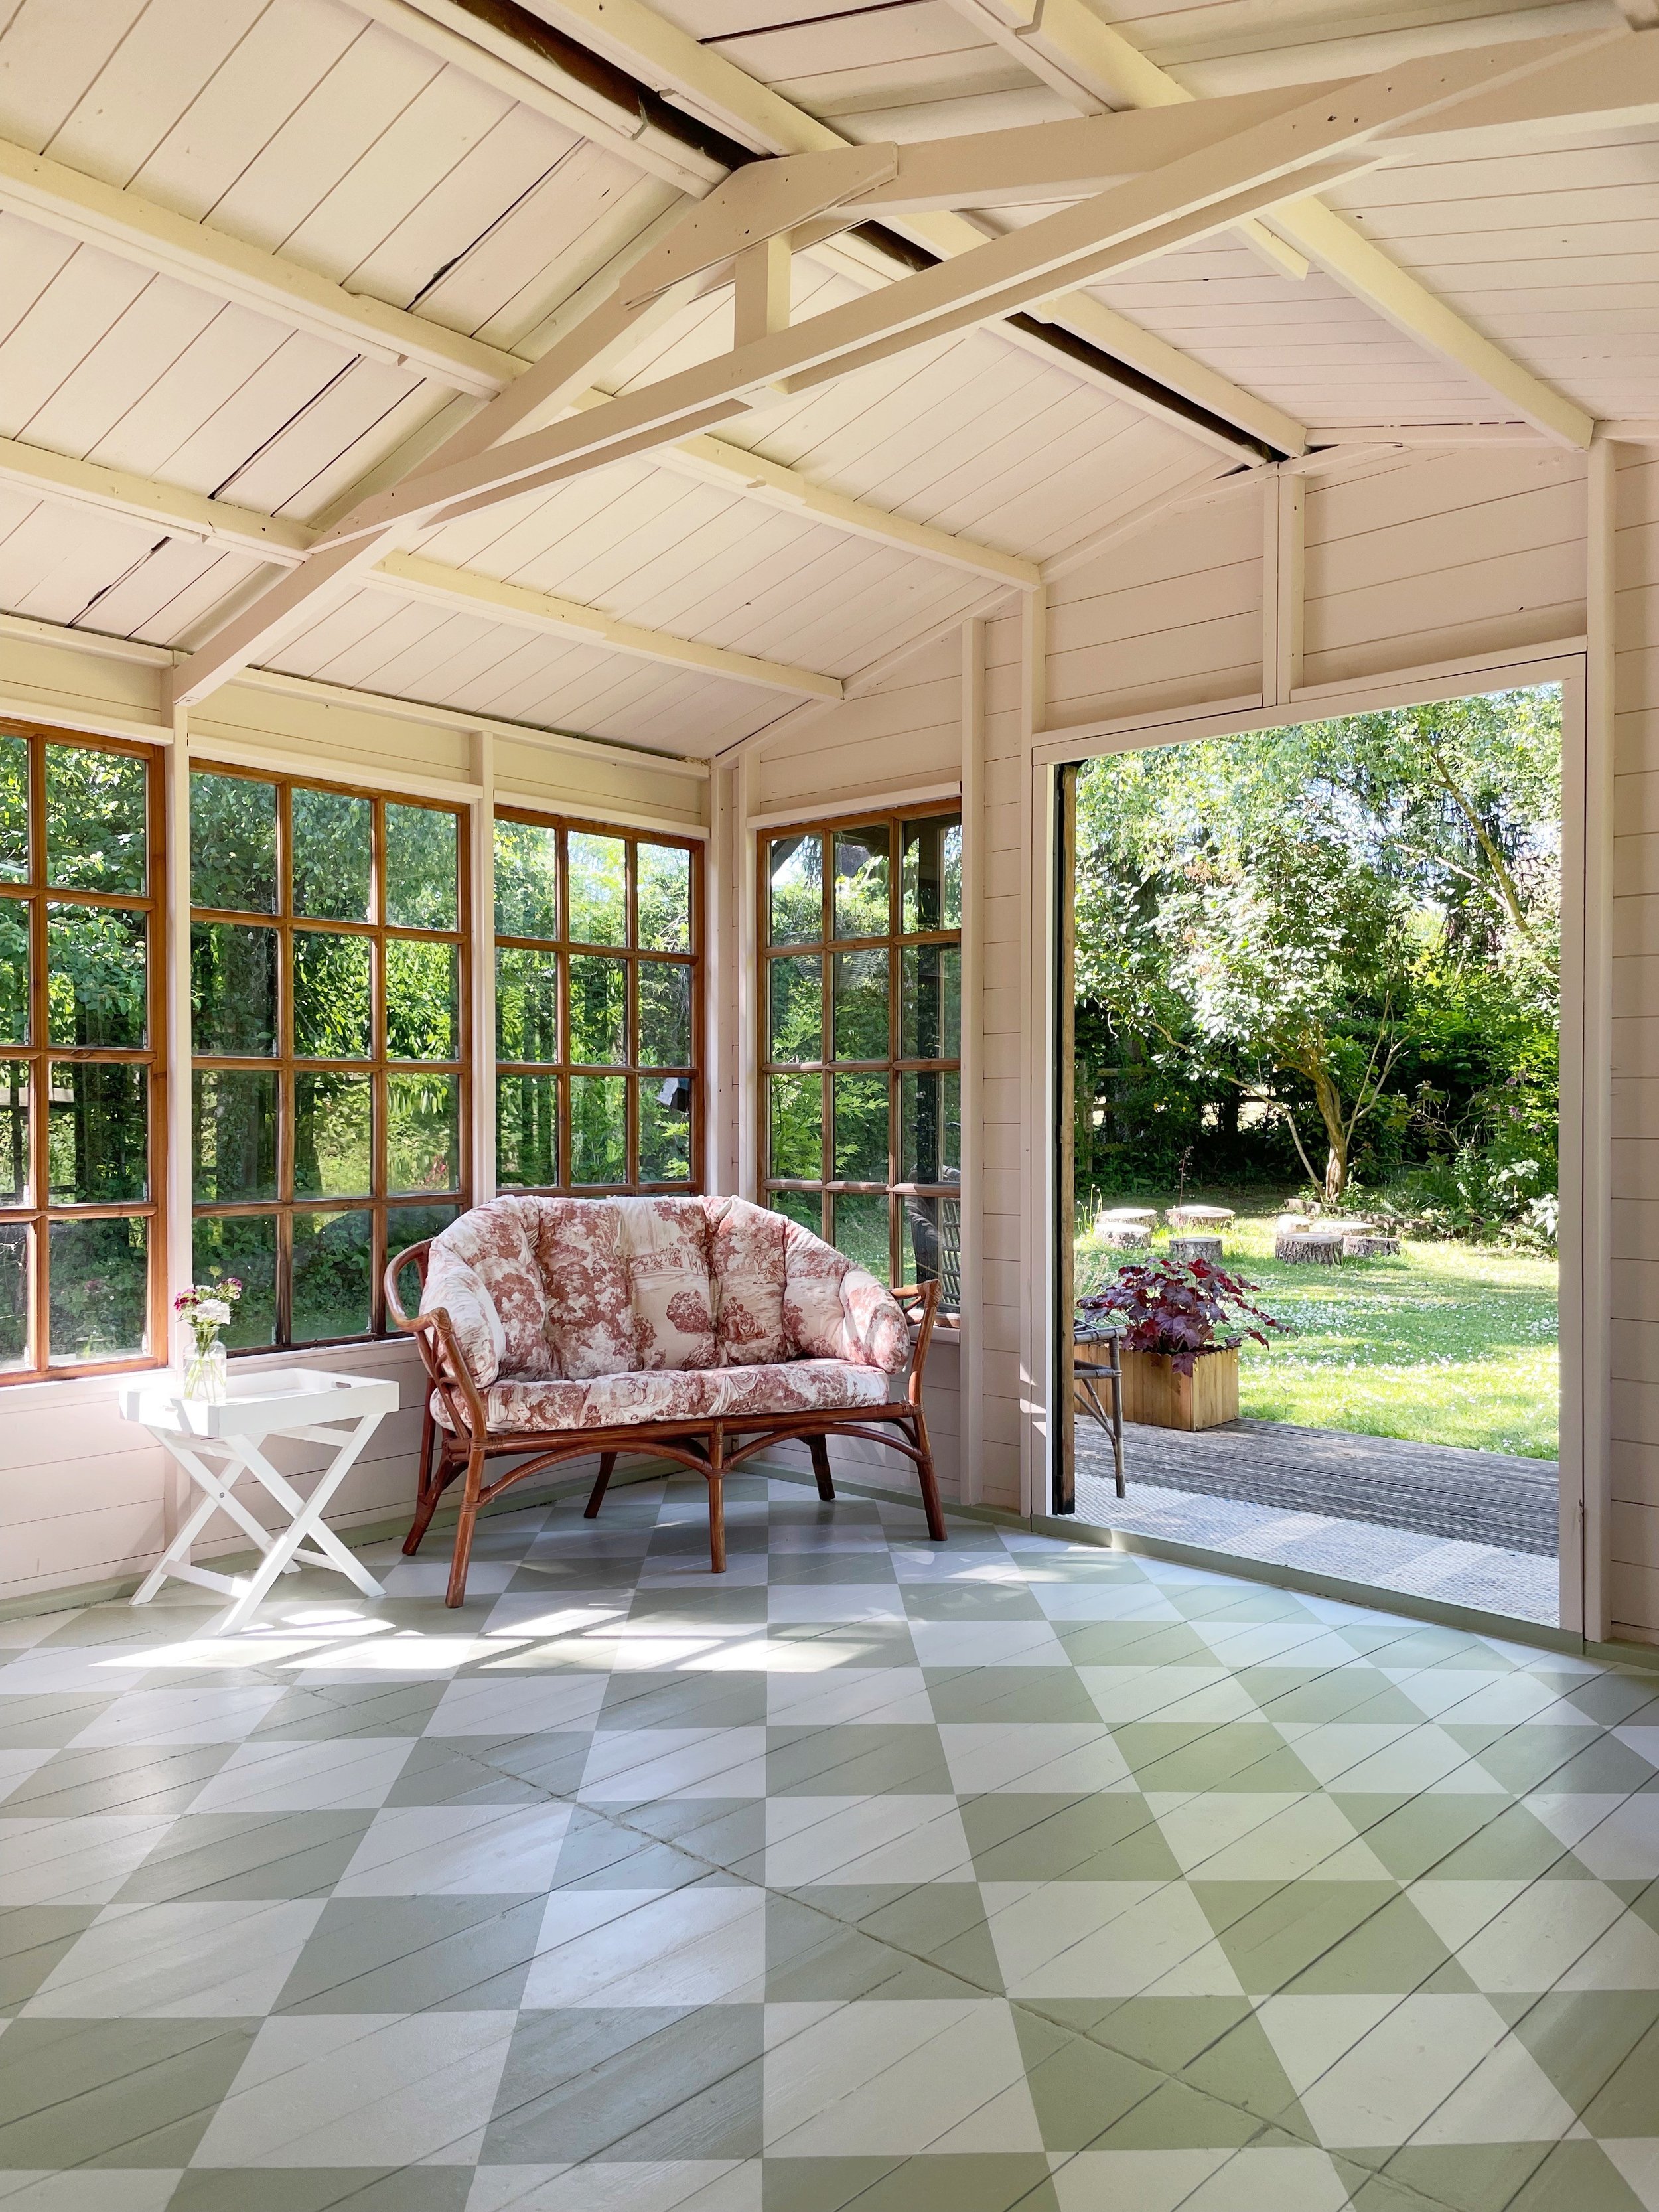
Credit: www.theottohouse.com
Mapping Out The Checkerboard Pattern
This step takes patience but makes painting much easier. A well-laid grid ensures straight, even squares and crisp lines.
Finding The Center
- Measure the length and width of the room.
- Mark the center point on each wall.
- Snap a chalk line from one center point to the opposite side, both lengthwise and widthwise. The intersection is your room’s center.
Marking The Grid
Decide your square size. Starting from the center, use a ruler and pencil to mark tick marks at regular intervals. Use a straight edge or chalk line to connect the marks, forming a grid of perfect squares.
If your room has obstacles (like built-in cabinets), start the grid from the most visible section and adjust the pattern at the edges.
Taping The Squares
Use painter’s tape to outline every other square. Press tape edges down firmly to prevent paint bleed. Double-check your taping before you start painting—the pattern should alternate like a chessboard.
Here’s a quick visual of the taping sequence for clarity:
| Step | Action | Result |
|---|---|---|
| 1 | Mark grid | Even squares drawn on floor |
| 2 | Tape alternate squares | Checkerboard mask ready for first color |
| 3 | Paint first color | First set of squares painted |
| 4 | Move tape to other squares | Mask for second color |
| 5 | Paint second color | Full checkerboard revealed |
A non-obvious tip: Label the squares you want to paint with the first color using a small piece of tape. This helps prevent mistakes, especially in large rooms.
Painting The First Set Of Squares
Now it’s time to bring your floor to life. Use the right technique for smooth, crisp results.
Painting Tips
- Start at the far end of the room and work toward the exit to avoid stepping on wet paint.
- Use a roller for large areas and an angled brush for corners and edges.
- Apply paint in thin, even coats. Thick coats can bleed under the tape.
- Let the first coat dry fully before applying a second if needed.
Don’t rush. Floor paint can take several hours to dry to the touch and up to 24 hours to cure fully.
Removing Tape
While the paint is still slightly tacky (not completely dry), carefully pull up the tape at a 45-degree angle. This helps create sharp lines and prevents peeling.
Let the painted squares dry completely before moving on. If you need to tape over freshly painted areas, allow at least 24 hours to prevent damage.
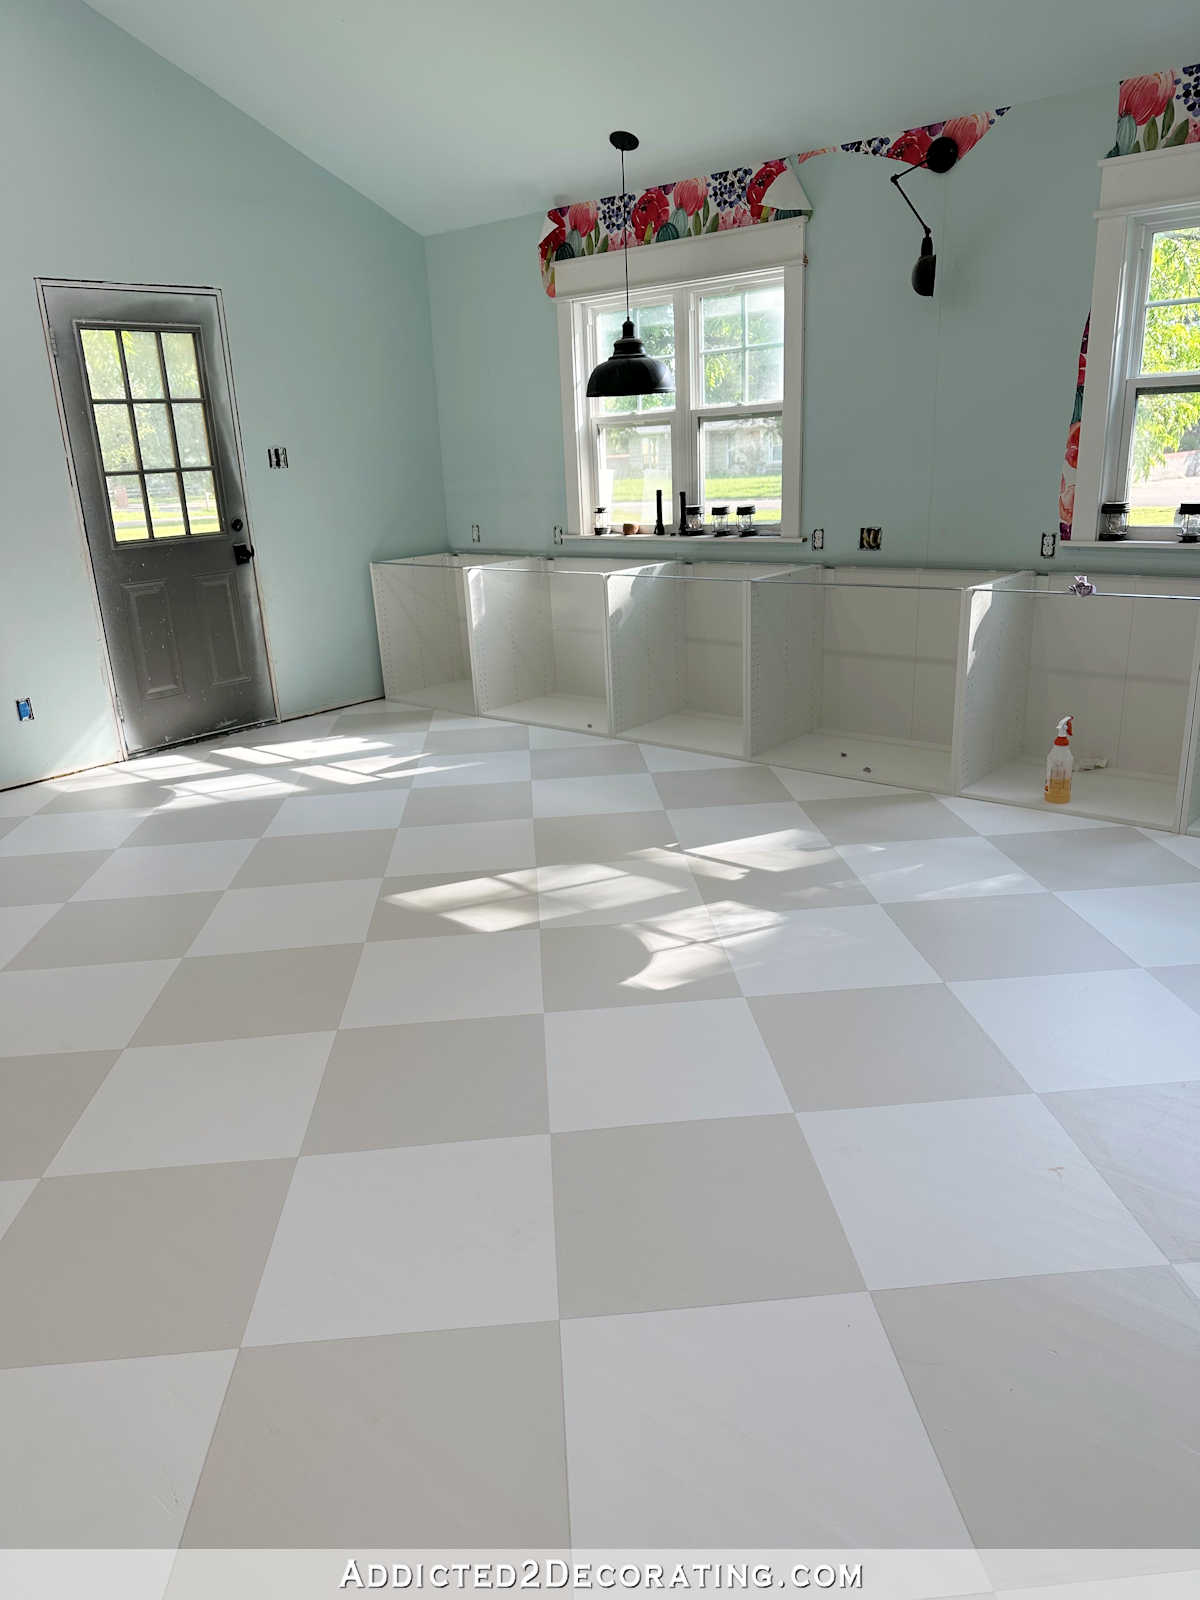
Credit: www.addicted2decorating.com
Painting The Second Set Of Squares
Once the first color is dry, you’ll tape over those squares to paint the remaining ones.
- Place painter’s tape along the edges of the painted squares, covering their borders precisely.
- Double-check that the tape is pressed down well to prevent seepage.
- Paint the second color using the same technique: Roller for large areas, brush for edges.
- Apply thin coats and allow full drying between coats.
Remove the tape while the second color is still slightly tacky. Step back and admire your crisp, perfect checkerboard pattern.
Sealing The Floor
Sealing is essential for durability, especially in high-traffic areas. A good sealer protects your paint from scratches, stains, and water.
Choose a clear polyurethane or water-based acrylic sealer rated for floors. Oil-based sealers are more durable but can yellow over time, especially on lighter colors.
- Apply the sealer with a clean roller or brush.
- Allow each coat to dry fully before applying the next (often 2-4 hours between coats).
- Two or three coats give the best protection.
- Avoid heavy traffic for at least 48 hours after sealing.
Non-obvious tip: Use a non-slip additive in your final coat if the floor may get wet, such as in kitchens or bathrooms.
Troubleshooting Common Issues
Even with careful planning, you might run into some problems. Here’s how to fix them:
Paint Bleeding Under Tape
If paint seeps under the tape, use a small artist’s brush to touch up edges after removing the tape. For future projects, try “sealing” the tape line by painting over it with a thin coat of the background color first, then applying the pattern color.
Uneven Squares
If your squares look uneven, check your measurements and grid layout before starting. Minor unevenness can be disguised by using a border around the room.
Peeling Or Chipping Paint
This usually means the surface wasn’t prepped properly. Sand and clean the floor before painting. Use a good primer and allow proper drying time. For small chips, touch up with a brush and reseal.
Color Fading
Use floor paint designed for high-traffic areas and a UV-resistant sealer if the floor gets sunlight. Avoid regular wall paint, which wears out quickly.
Creative Checkerboard Ideas
Checkerboard floors don’t have to be just black and white. Here are a few creative ideas:
- Monochrome checkerboard: Use two shades of the same color for a subtle, modern look.
- Diagonal pattern: Lay the squares at a 45-degree angle for extra drama.
- Pastel colors: Perfect for children’s rooms or vintage kitchens.
- Bordered checkerboard: Add a painted border around the pattern for a finished look.
- Ombre checkerboard: Use gradually changing shades for a unique effect.
Non-obvious insight: For a softer look, use matte or eggshell finish instead of high-gloss paint.
Maintaining Your Painted Checkerboard Floor
With proper care, a painted floor can last for years. Here’s how to keep it looking fresh:
- Sweep or vacuum regularly to prevent dirt and grit from scratching the surface.
- Clean spills quickly to avoid stains.
- Use a damp mop with a mild cleaner—avoid harsh chemicals or abrasives.
- Place felt pads under furniture legs.
- Touch up any chips or scratches with leftover paint, then reseal the spot.
Don’t drag heavy furniture across the floor. For high-traffic areas, consider adding an extra coat of sealer every few years.
Cost And Time Estimates
A painted checkerboard floor is budget-friendly compared to tile. Here’s a rough cost breakdown for a 10×12 foot room:
| Item | Estimated Cost (USD) |
|---|---|
| Floor Paint (2 colors, 1 gal. each) | $60–$90 |
| Primer | $20–$40 |
| Sealer | $30–$50 |
| Painter’s Tape | $10–$20 |
| Rollers, Brushes, Supplies | $20–$40 |
| Total | $140–$240 |
Time needed depends on drying times and room size:
- Preparation: 2–4 hours
- Laying out and taping: 2–3 hours
- Painting (2 colors, 2 coats each): 6–10 hours (including drying time between coats)
- Sealing: 2–4 hours (plus drying time)
Most people can finish the project over a weekend if they start early.
Safety And Environmental Tips
Painting can be messy and involves chemicals. Here’s how to stay safe:
- Wear gloves and work in a well-ventilated area.
- Open windows and use fans to disperse fumes.
- Wear a mask if using oil-based paints or sealers.
- Store leftover paint and chemicals safely, away from children and pets.
- Dispose of used tape, drop cloths, and empty cans according to local regulations.
Choose low-VOC or zero-VOC paints and sealers when possible for healthier indoor air.
When To Hire A Professional
If your floor has significant damage, is very uneven, or you want a highly intricate design, hiring a professional painter may be worth it. Pros can repair subfloors, use commercial-grade coatings, and ensure perfect lines. For most DIYers, though, a checkerboard floor is an achievable weekend project with stunning results.

Credit: thistlewoodfarms.com
Inspiring Examples And Real-life Results
Many people have transformed their homes with painted checkerboard floors. For example, an old farmhouse kitchen can look fresh and new with a cream-and-tan checkerboard. In small city apartments, a bold black-and-white pattern can make a tiny entryway look high-end.
You can find inspiration and practical tips on platforms like Pinterest, interior design blogs, and even on the official This Old House website.
Remember, the best checkerboard floor is the one you design yourself—choose colors and sizes that match your style.
Frequently Asked Questions
How Long Does A Painted Checkerboard Floor Last?
With proper prep and sealing, a painted checkerboard floor can last 5–7 years in moderate traffic areas. High-traffic spaces may need touch-ups or resealing every few years.
Can You Paint A Checkerboard Pattern Over Tile?
Yes, but the tiles must be clean, scuff-sanded, and primed with a tile-appropriate primer. Use floor paint for best adhesion. The pattern may not last as long as on wood or concrete, but regular sealing helps.
What Type Of Paint Should I Use?
Use a porch and floor enamel or a high-quality latex floor paint. These are designed to resist wear, stains, and water. Do not use regular wall paint; it will chip quickly.
How Do I Prevent Paint From Bleeding Under The Tape?
Make sure to use high-quality painter’s tape and press it down firmly. For extra crisp lines, “seal” the tape edge by painting a thin coat of the base color first, then applying the pattern color once dry.
Can I Paint A Checkerboard On An Outdoor Floor?
Yes! Use exterior-grade floor paint and a UV-resistant sealer. The process is the same, but be aware of weather and temperature during painting and drying.
Painting a checkerboard floor is a creative way to renew your space without a big investment. With careful planning and patience, you’ll achieve a look that’s unique, stylish, and truly your own.