If you walk into a room and see old, worn wood floors, you may think you need a full replacement. But the truth is, most old wood floors can be brought back to life with the right techniques. Whether you have a historic home with century-old planks or a mid-century house with scuffed boards, restoring wood floors can make a dramatic difference. The process is not just about sanding and sealing; it’s about understanding your floor, choosing the right methods, and using proper products. This guide will help you make your old wood floors look new again, step by step, with practical tips and expert advice.
Understanding Your Wood Floor
Before you start, take a close look at your floor. Identify the type of wood—is it oak, pine, maple, or something else? Each wood type reacts differently to cleaning agents and refinishing products. Old floors can be solid wood, engineered wood, or even parquet. Knowing your floor’s material helps you choose the safest cleaning and restoration methods.
Check the thickness of the boards, especially if your floor has been sanded before. If the wood is too thin, aggressive sanding might not be safe. Also, look for signs of deep damage, such as large gouges, water stains, or loose boards.
Some problems need repairs before cosmetic work.
A surprising fact: Many floors that look dull or dirty are only suffering from layers of old wax, cleaning residue, or surface scratches. These can often be fixed without heavy sanding.
Preparing The Room
Restoring wood floors is a messy process. Preparation will save time and keep your home clean. Start by removing all furniture, rugs, and decorations. If possible, take down curtains and cover vents to stop dust from spreading. Sweep or vacuum the floor thoroughly to remove dust and dirt.
Tape plastic sheeting over doorways to contain debris. Pay attention to baseboards—if you plan to sand the floor, you may want to remove the baseboards to avoid damaging them. Protect outlets, electrical cords, and nearby surfaces.
One beginner mistake is forgetting to check for loose boards or nails. Walk slowly across the floor and listen for squeaks. Hammer down any nails sticking up, and fix loose boards now to avoid bigger problems later.
Deep Cleaning Old Wood Floors
Many old wood floors look dull because of years of dirt and old polish. A deep cleaning can reveal much of the floor’s hidden beauty. Do not use too much water—wood and moisture are not friends.
- Vacuum or sweep: Remove all dust, sand, and debris. Pay attention to corners and under heaters.
- Choose the right cleaner: For sealed floors (urethane or polyurethane), use a pH-neutral wood floor cleaner. For waxed or oiled floors, use a product made for that finish.
- Mop with care: Use a slightly damp mop (never soaking wet). Microfiber mops are gentle and effective.
- Remove old wax: If your floor is waxed, you may need to strip off old layers. Use a wax remover and follow the instructions carefully.
- Dry quickly: Open windows or use fans to dry the floor. This prevents warping.
A practical tip: Sometimes sticky residue stays behind after cleaning. You can use a small amount of mineral spirits on a cloth for tough spots, but always test in an unseen area first.
Repairing Damage
Most old wood floors have some scratches, dents, or stains. Handling these before refinishing will make your results last longer and look better.
Fixing Scratches And Dents
- Surface scratches: Use a stain marker or blending pencil in a matching color. Rub gently and wipe away extra.
- Deeper scratches and gouges: Fill with wood filler that matches your floor color. Once dry, sand smooth with fine paper.
- Dents: Small dents can sometimes be lifted with a damp towel and a hot iron. The steam causes the wood to swell and rise.
Handling Stains
- Water stains: Light stains may disappear with gentle sanding. Dark stains can be harder; try rubbing with a mix of baking soda and water, or use a commercial wood bleach.
- Pet stains: These often penetrate deeply. Sanding may help, but some stains may need a replacement board.
Repairing Loose Boards And Squeaks
- Loose boards: Re-nail or screw boards into the joists below. Use finishing nails and tap them just below the surface.
- Squeaks: Sprinkle talcum powder into the cracks and work it in. For serious squeaks, you may need to screw the board down.

Credit: www.reddit.com
Light Sanding Vs. Full Sanding
Not all floors need heavy sanding. In fact, too much sanding can shorten the life of your wood floor. Decide what your floor needs:
- Buffing (screening): For minor wear, use a floor buffer with a fine screen to lightly abrade the surface. This prepares the floor for a new coat of finish without removing much wood.
- Hand sanding: For small areas or edges, use a sanding sponge or fine-grit paper.
- Full sanding: Needed only for deep scratches, heavy wear, or if you want to change the color. Use a drum sander for the main area and an edge sander for corners.
Here’s a quick comparison of methods:
| Method | Best For | Pros | Cons |
|---|---|---|---|
| Buffing | Light wear, surface dullness | Quick, keeps wood thickness, little dust | Does not remove deep damage |
| Hand Sanding | Small scratches, edges | Precise, easy for small spots | Time-consuming for large areas |
| Full Sanding | Deep scratches, stains | Removes all damage, resets floor | Messy, removes wood, needs skill |
A non-obvious insight: Many older floors have only a thin layer of wood left. In these cases, screening and recoating is safer than full sanding.
Filling Gaps And Cracks
Old wood floors often develop gaps over time as the wood expands and contracts. Some gaps are normal and add character, but wide cracks can collect dirt or cause drafts.
- Wood filler: For small gaps, use a flexible wood filler. Choose one that matches your floor’s color.
- Rope or jute: For very wide gaps, especially in rustic floors, you can press natural fiber rope into the gap and stain it to match.
- Do not overfill: Wood moves with humidity. Overfilling can cause cracking later.
A helpful tip: Fill gaps after the first sanding pass, so the filler bonds well and sands smooth with the floor.
Staining Or Refreshing Color
Sanding removes the old finish and exposes fresh wood. This is your chance to change the color or refresh the natural tone.
Choosing A Stain
- Oil-based stains: Deep, rich color, slow drying. Good for traditional looks.
- Water-based stains: Lighter color, dries fast, less odor. Good for modern styles.
- No stain: If you love the natural wood, you can skip staining and just seal the floor.
Always test the stain on a hidden spot or sample board first. Wood species affect stain color.
Applying Stain
- Vacuum and tack-cloth: Clean the floor completely—dust ruins finish.
- Apply with a rag or brush: Work in small areas, follow the wood grain.
- Wipe off extra: After a few minutes, wipe away extra stain to avoid blotches.
- Let dry: Follow product instructions for drying time.
A beginner mistake is leaving puddles or not wiping off the stain evenly. This causes dark spots.
Sealing And Finishing
The right finish protects your floor and makes it shine. There are several options, each with pros and cons.
| Finish Type | Appearance | Durability | Dry Time | Notes |
|---|---|---|---|---|
| Oil-based Polyurethane | Warm, amber glow | Very durable | 8-24 hours | Strong odor, slow to cure |
| Water-based Polyurethane | Clear, less yellowing | Durable | 2-4 hours | Fast dry, low odor |
| Hardwax Oil | Natural, matte | Medium | 4-8 hours | Needs re-application |
| Wax | Soft, classic | Low | 1-2 hours | For low-traffic areas |
Apply finish in thin coats, following the grain. Most floors need at least two to three coats. Sand lightly between coats with a fine screen for a smooth finish.
One useful tip: Use a synthetic applicator for water-based finishes and a natural bristle brush for oil-based products.
Polishing And Buffing
Once your finish is fully dry, polishing or buffing makes the floor look even newer. You can rent a floor buffer or use a hand-held polishing pad for small areas.
- Polishing: Use a wood floor polish to add gloss and fill tiny scratches. Do this only after the finish has cured (about a week for most polyurethanes).
- Buffing: A buffer evens out the shine and removes dust left in the final coat.
For waxed floors, buffing is essential to create the classic warm glow.
Maintaining The Like-new Look
After all your hard work, you want your wood floors to stay beautiful. Good maintenance is key.
- Use felt pads under furniture to prevent scratches.
- Sweep or vacuum regularly—grit can act like sandpaper.
- Clean spills fast to prevent stains or warping.
- Use rugs in high-traffic areas, but avoid rubber-backed mats (they can trap moisture).
- Re-coat with finish every few years before the floor gets dull.
A non-obvious insight: Avoid steam mops. High heat and moisture can damage the finish and cause wood to swell.
When To Call A Professional
Some floors are too damaged or delicate for DIY work. If you see signs of:
- Deep gouges across many boards
- Large, black water stains
- Major warping or cupping
- Very thin boards (less than 1/8 inch above the tongue)
…it’s time to talk to a flooring professional. They have the skills and tools to repair and refinish without making mistakes that could ruin the floor.
Eco-friendly And Safe Restoration
Many old wood floors have finishes that contain lead or other hazardous chemicals, especially in homes built before 1978. Always test for lead paint before sanding. Wear a dust mask, use proper ventilation, and keep children and pets away during restoration.
Modern water-based finishes are lower in VOCs (volatile organic compounds) and safer for indoor air quality. Look for products labeled low-VOC or GreenGuard certified.
Credit: mrsander.co.uk
Common Mistakes To Avoid
Even experienced DIYers can make mistakes. Here are some common errors and how to avoid them:
- Skipping prep steps: Not cleaning or fixing boards before sanding leads to poor results.
- Using too much water: Over-wetting wood causes swelling and finish failure.
- Uneven sanding: Stopping the sander or buffer in one place can leave dips.
- Not testing stain: Colors look different on each floor—always test first.
- Rushing finish coats: Not letting each coat dry fully can cause cloudiness or peeling.
Remember, patience is as important as skill when restoring old wood floors.
Cost And Time Estimates
Restoring old wood floors is cheaper than replacing them, but it still takes time and effort.
- DIY cost: $1–$3 per square foot (for cleaning, sanding, basic finish)
- Professional refinishing: $3–$7 per square foot
- Time needed: Plan for 2–5 days, including drying time between finish coats
If you need to replace boards or repair structural issues, costs will be higher.

Credit: www.youtube.com
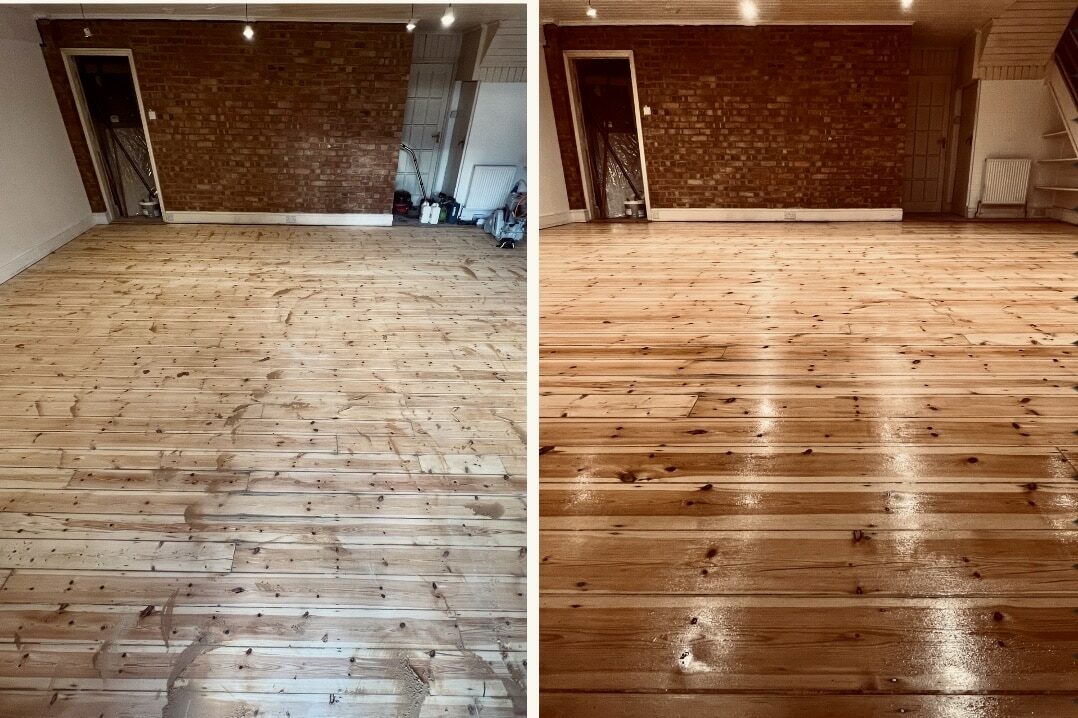
Real-life Example: Restoring A 1920s Oak Floor
Imagine you buy a house built in the 1920s. The oak floors are scratched, dull, and have some gaps. Here’s what a successful restoration might look like:
- Preparation: All furniture out, baseboards removed, vents taped.
- Deep cleaning: Years of grime and old wax removed with mineral spirits and gentle scrubbing.
- Minor repairs: Filler for scratches, talcum powder for squeaks, jute rope in wide gaps.
- Light sanding: Buffer used to freshen the surface without heavy wood removal.
- Staining: Medium-brown stain tested and applied for a classic look.
- Finishing: Two coats of water-based polyurethane for a fast, low-odor result.
- Buffing and polishing: Final buff brings out the shine.
- Maintenance plan: Felt pads and area rugs protect the surface.
The result: a floor that looks almost new but still keeps the character and history of the home.
Products And Tools You’ll Need
Here’s a list of useful products and tools for making old wood floors look new:
- Vacuum and broom
- Microfiber mop
- Wood floor cleaner
- Mineral spirits (for tough residue)
- Wood filler and color-matched stain markers
- Sandpaper (various grits)
- Floor buffer or sander
- Stain and finish (choose based on your floor)
- Applicators (brushes, pads)
- Tack cloths
- Polish or wax (if needed)
- Protective gear (mask, gloves, goggles)
Buy or rent tools from a local hardware store—renting a buffer or sander is often more cost-effective.
How Old Wood Floors Add Value
Restored wood floors are a great investment. According to the National Association of Realtors, hardwood floors can increase a home’s value by up to 2.5%. Buyers love the look and warmth of real wood.
A well-maintained floor can last over 100 years, making it both a sustainable and cost-effective choice compared to carpet or vinyl.
For more on the benefits of wood floors, visit this Wood Flooring Overview.
Frequently Asked Questions
How Can I Tell If My Wood Floor Needs Full Sanding Or Just Buffing?
If the scratches and wear are only in the finish layer (not deep into the wood), buffing and recoating is usually enough. If you see deep gouges, gray spots, or bare wood, full sanding may be needed.
Can I Refinish Engineered Wood Floors?
Yes, but only if the top layer is thick enough (usually at least 2–3mm). Check with the manufacturer or a pro before sanding engineered floors. Too much sanding can expose the core.
Is It Safe To Use Vinegar To Clean Wood Floors?
It’s best to avoid vinegar on wood floors. It’s acidic and can damage the finish over time. Use a pH-neutral cleaner made for wood floors instead.
How Long Should I Wait Before Putting Furniture Back After Refinishing?
Wait at least 24–48 hours after the last coat of finish for light use. For heavy furniture or rugs, wait 7 days to let the finish fully cure.
What Is The Best Way To Remove Pet Stains From Old Wood Floors?
First, try gentle sanding. For deep stains, use a wood bleach or hydrogen peroxide paste. If the stain is very dark and deep, you may need to replace the affected board.
Restoring old wood floors takes patience, but the results are worth it. With the right approach and tools, you can make your floors look new again—and enjoy their beauty for years to come.