Plumbing is the backbone of any well-functioning bathroom. If you’re considering a remodel, building a new home, or simply fixing issues, understanding how to do plumbing for a bathroom can save you money and give you confidence. While some tasks require a licensed plumber, many parts of bathroom plumbing are within reach for careful, well-prepared homeowners.
This guide offers a complete step-by-step approach, making complex ideas simple for everyone.
Bathroom plumbing involves more than just connecting pipes. It’s about planning, using the right tools, following building codes, and creating a safe, leak-free system. Even small mistakes can lead to water damage or expensive repairs. But with the right information, you can avoid common errors and achieve professional results.
This article covers every step you need: from planning and choosing materials, to installing drains, vents, and water lines, to connecting fixtures like toilets, sinks, and showers. You’ll get practical tips, real examples, and insights that even some beginners miss. By the end, you’ll have a full understanding of how to do plumbing for a bathroom—even if you’ve never picked up a wrench before.
Planning Your Bathroom Plumbing
Every successful plumbing project starts with a clear plan. Before you buy any pipes or fittings, spend time on the design. This helps prevent costly changes later and ensures your bathroom works efficiently.
Assessing Your Needs
Think about how many fixtures you want: sink, toilet, shower, bathtub. Each requires a water supply and a drain. Consider the following:
- How many people will use the bathroom daily?
- Do you want features like double sinks or a rain shower?
- Is the bathroom close to the main water and waste lines?
Understanding your needs helps you choose the right pipe sizes and fixture locations.
Creating A Plumbing Diagram
Draw a simple diagram showing where each fixture will go. Mark where the hot and cold water lines run, and where the drains and vents will be. This plan is your roadmap and will help you or a professional avoid mistakes.
Checking Local Codes
Building codes protect you from leaks and health risks. Check your city’s requirements for pipe size, vent placement, and fixture spacing. Many cities require a plumbing permit for new installations or major changes. Skipping this step can lead to expensive corrections later.
Measuring And Layout
Use a tape measure to check the space for each fixture. Double-check door swings and clearance around the toilet (usually at least 15 inches from the center to any wall). Mark the layout on the floor with chalk or painter’s tape to see how everything fits before cutting pipes.
Choosing Materials And Tools
Picking the right materials is critical for a safe, long-lasting bathroom. The wrong pipe or fitting can leak, break, or contaminate your water.
Common Pipe Types
- PVC (Polyvinyl Chloride): Used for drain and vent lines. Easy to cut and glue, resistant to corrosion.
- CPVC (Chlorinated Polyvinyl Chloride): Similar to PVC, but safe for hot water lines.
- PEX (Cross-Linked Polyethylene): Flexible, used for hot and cold water supply lines. Easy to install in tight spaces.
- Copper: Very durable, often used for water supply lines. Requires soldering and is more expensive.
- ABS (Acrylonitrile Butadiene Styrene): Black plastic, used for drains in some regions.
Fittings And Valves
You’ll need various fittings: elbows, tees, couplings, reducers, and adapters. Each connects pipes at different angles or joins different materials. Don’t forget shutoff valves for each fixture—these let you turn off water during repairs without shutting down the whole house.
Tools You’ll Need
- Pipe cutter or hacksaw (for PVC, copper, or PEX)
- Adjustable wrench
- Pipe wrench (for threaded fittings)
- Measuring tape
- Pipe deburring tool
- Pipe thread tape (Teflon tape)
- PVC or CPVC cement
- PEX crimp tool (if using PEX)
- Level
- Drill (for holes in studs or flooring)
- Bucket and rags
Cost Comparison
The cost of materials can vary. Here’s a simple comparison:
| Material | Average Cost (per 10 feet) | Best Use | Installation Difficulty |
|---|---|---|---|
| PVC | $5 | Drain lines | Easy |
| PEX | $8 | Water supply | Easy |
| Copper | $25 | Water supply | Medium (needs soldering) |
| ABS | $6 | Drain lines | Easy |
Pro tip: Always buy a little extra pipe and fittings. Mistakes happen, and it’s better to have spare parts than stop work to buy more.
Rough-in Plumbing: Drain, Waste, And Vent (dwv) System
The DWV system removes used water and waste from your bathroom. It’s the hidden network of pipes under the floor and inside the walls. Correct DWV installation is vital for safety and odor control.
Understanding Drain Slopes
Drains must slope downward—usually 1/4 inch per foot—to allow gravity to carry waste away. Too little slope leads to clogs; too much can cause water to leave solids behind.
Main Drain Line
Most bathrooms connect to a 3-inch or 4-inch main drain. Each fixture ties into this line.
- Toilet: Needs its own 3-inch or 4-inch drain.
- Shower/tub: 2-inch drain.
- Sink: 1 1/4-inch or 1 1/2-inch drain.
Installing The Drain Lines
- Mark the path: Use your diagram to mark where each drain will go.
- Cut holes: Drill holes in the floor for each fixture’s drain. Make them slightly larger than the pipe.
- Dry fit: Assemble the pipes and fittings without glue. This helps you check alignment and slope.
- Glue and assemble: For PVC, apply primer and then cement to each joint. Work quickly—PVC cement sets fast.
- Check slope: Use a level to ensure proper fall.
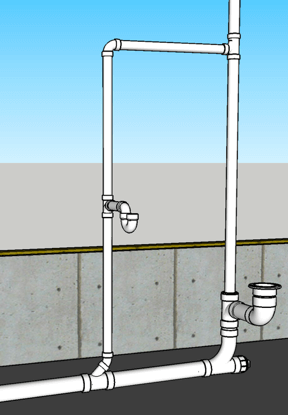
Adding Vent Pipes
Vent pipes let sewer gases escape and prevent drain suction (which could empty traps and let odors in). Every fixture needs a vent.
- Toilets: Often use a 2-inch vent.
- Sinks and tubs: 1 1/2-inch or 2-inch vent.
Vents can join together and run up through the roof. If possible, place vents close to the fixtures to improve air flow.
Trap Installation
A P-trap is a U-shaped bend that keeps water in the pipe, blocking sewer gases. Sinks, tubs, and showers all need one. Never skip the trap—this is a common mistake that leads to bad smells.
Sample Drain Layout
Here’s a typical small bathroom layout:
| Fixture | Drain Size | Vent Size | Trap Type |
|---|---|---|---|
| Toilet | 3–4 inches | 2 inches | Built-in (closet bend) |
| Sink | 1 1/2 inches | 1 1/2 inches | P-trap |
| Shower | 2 inches | 2 inches | P-trap |
Hidden insight: Many beginners forget to vent the shower or tub, causing slow drains and gurgling sounds. Always include vents for every fixture.
Running Water Supply Lines
Clean, reliable water is just as important as good drainage. Supply lines bring hot and cold water to each fixture.
Sizing Water Lines
- 1/2-inch PEX or copper: Standard for most bathroom fixtures.
- 3/4-inch: Used for main supply lines or if you have multiple showers/tubs.
Routing Lines
- Plan the path: Water lines usually run under the floor or inside walls.
- Drill holes: Make holes in studs or joists, slightly larger than the pipe.
- Protect the pipe: Use pipe insulation where lines pass through cold areas to prevent freezing.
- Attach shutoff valves: Every sink, toilet, and tub should have its own shutoff valve.
Connecting Pex, Copper, Or Cpvc
- PEX: Cut with a special tool, connect with crimp or push-fit fittings.
- Copper: Cut, clean, and solder joints. Some push-fit options are available.
- CPVC: Cut and glue, similar to PVC.
Tip: Avoid sharp bends. Gentle curves prevent pipe stress and leaks.
Pressure Testing
Before covering walls, fill the pipes with water and check for leaks. Use a pressure gauge to confirm all connections hold the correct pressure (usually 40–60 psi). Fix any leaks before moving on.

Credit: www.youtube.com
Installing Bathroom Fixtures
After rough-in plumbing is complete and inspected, you can install the fixtures. This step brings your bathroom to life.
Toilet Installation
- Set the closet flange: This ring connects the toilet to the drain. Secure it to the floor at the correct height.
- Install a wax ring: Place it on the flange to seal the connection.
- Set the toilet: Lower it straight onto the flange. Press down to seat the wax ring.
- Bolt the toilet: Tighten nuts evenly, but don’t overtighten.
- Connect water supply: Attach the hose from the shutoff valve to the toilet tank.
Sink Installation
- Install faucet and drain: Assemble the faucet and drain onto the sink before placing it.
- Position the sink: Secure the sink to the vanity or wall.
- Connect water lines: Attach hot and cold supply lines to the faucet.
- Install P-trap: Connect the sink drain to the wall drain using a P-trap.
Shower And Tub Installation
- Set the base: For a tub, level and secure it. For a shower, install the pan or build the floor.
- Install valve and spout: Mount the mixing valve (for hot/cold control) at the correct height.
- Connect shower head and tub spout: Run pipes as needed and test for leaks.
- Seal joints: Use waterproof caulk around fixtures.
Fixture Height Comparison
Here’s a reference for standard fixture heights:
| Fixture | Typical Height (from floor) | Notes |
|---|---|---|
| Sink Faucet | 34–36 inches | Top of sink rim |
| Shower Head | 78 inches | From floor |
| Toilet Seat | 15–17 inches | ADA toilets can be higher |
| Tub Spout | 12–18 inches | Above tub rim |
Non-obvious insight: Check your local code for minimum and maximum fixture heights. Installing at the wrong height may require costly corrections.
Testing And Inspection
Before you close the walls or use your new bathroom, thorough testing is essential.
Filling And Flushing
- Fill all traps with water.
- Run water at every fixture for several minutes.
- Flush the toilet several times.
Look for drips, leaks, or slow drains.
Final Inspection
If your local code requires, schedule an inspection. The inspector checks pipe sizes, slopes, vents, and water pressure. They may use a camera for hard-to-see areas.
Pro tip: Don’t rush this step. Fixing problems now is much easier than after tile and drywall are installed.
Common Mistakes And How To Avoid Them
Even careful DIYers make errors. Knowing what to watch for can save you hours of work and hundreds of dollars.
- Wrong drain slope: Too flat or too steep causes clogs or slow drains.
- Missing or undersized vents: Leads to slow draining, gurgling noises, or sewer smell.
- Loose connections: Hand-tight is often not enough. Use tools, but don’t overtighten plastic fittings.
- Cross-threaded fittings: Always start threads by hand to avoid leaks.
- Using wrong materials: Never mix ABS and PVC without a special adapter.
- Skipping shutoff valves: Every fixture needs one for easy repairs.
- Not pressure-testing: Always check for leaks before closing walls.
Advanced tip: Label every shutoff valve. In emergencies, you’ll know exactly which valve to use.
Safety And Health Considerations
Water leaks can cause mold and structural damage. Incorrectly vented drains can let sewer gases into your home, which is both unpleasant and unsafe.
- Use gloves and safety glasses when cutting pipes.
- Be cautious with power tools.
- Never use open flames (like a torch) near flammable materials.
If you’re not confident, hire a licensed plumber for complex or high-risk work.
Credit: www.hammerpedia.com
When To Call A Professional
Some jobs are best left to experts:
- Connecting to the main sewer line or city water
- Moving walls or major structural changes
- Upgrading old pipes with lead or galvanized steel
- Dealing with water damage or rot
A plumber can handle permits and inspections, and guarantee work meets code. If you hit a problem you can’t fix, don’t hesitate to call for help.
Practical Tips For Long-lasting Bathroom Plumbing
- Use pipe insulation to prevent freezing in cold climates.
- Clean drains monthly with hot water and baking soda (avoid harsh chemicals).
- Check for leaks under the sink and behind the toilet every few months.
- Upgrade old flexible supply lines with stainless steel braided hoses—they last longer and are less likely to burst.
- Keep a small bucket and wrench in your bathroom for quick repairs.
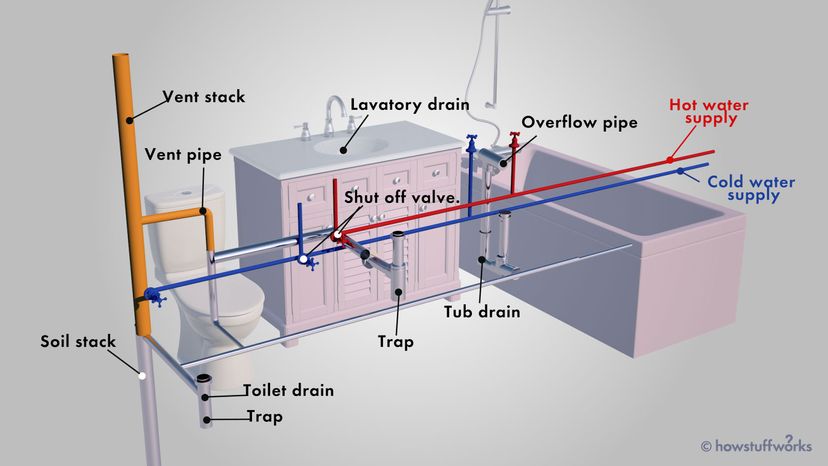
Credit: home.howstuffworks.com
Real-world Example: Small Bathroom Remodel
Let’s look at a real case: remodeling a 6×8-foot bathroom.
- The homeowner wants a toilet, sink, and shower.
- They use PEX for water supply and PVC for drains.
- The total cost for pipes and fittings is about $300.
- The project takes one weekend for rough-in, then another for fixture installation.
Challenges included drilling through old joists and finding space for the vent stack. The homeowner avoided a common mistake: they pressure-tested before installing drywall and found a small leak in a PEX joint, which they fixed easily.
Lesson: Good planning and testing prevent headaches.
Where To Learn More
If you want more details, the Uniform Plumbing Code or your city’s building department website offers diagrams and tips. For visual learners, many home improvement stores host free plumbing classes. For authoritative information, see the Family Handyman bathroom plumbing guide.
Frequently Asked Questions
How Much Does It Cost To Plumb A Bathroom?
The cost depends on the bathroom size, fixture number, and pipe materials. For a simple DIY remodel with basic fixtures, materials may cost $300–$800. Hiring a plumber for a full bathroom (including labor and permits) can range from $2,000 to $5,000 or more.
High-end finishes and moving fixtures add to the price.
Can I Use Pex For All Bathroom Plumbing?
Yes, PEX is safe and approved for hot and cold water lines in most areas. It’s flexible, easy to install, and less likely to burst if frozen. However, it’s not used for drain lines. Always check local codes before choosing PEX.
What Is The Minimum Pipe Size For A Bathroom Sink Drain?
Most codes require a 1 1/4-inch minimum for sink drains, but many plumbers use 1 1/2-inch for better flow and fewer clogs. The trap and wall drain should match the sink drain size.
Do I Need A Vent For Every Bathroom Fixture?
Every fixture needs to be vented, but not always with a separate pipe. Sometimes, multiple fixtures can share a common vent (called a wet vent). Proper venting prevents slow drains and sewer gas smells. Check your local code for details.
What’s The Most Common Mistake In Diy Bathroom Plumbing?
The most common mistake is improper venting. Many beginners skip vents or make them too small, leading to slow drains, gurgling, or odors. Always include vents and follow code for sizing and placement.
Plumbing your own bathroom is challenging, but with careful planning, the right tools, and attention to detail, you can achieve professional results. Take your time, test everything, and don’t hesitate to seek help if needed. Your effort will reward you with a reliable, comfortable bathroom for years to come.