Building your own egg chair is a rewarding project. You create a unique, comfortable seat that adds style to any space—indoors or outdoors. Many people think making an egg chair is too difficult or only for experts. That’s not true. With the right tools, clear steps, and a bit of patience, almost anyone can build an egg chair at home. This guide will show you every step, from choosing materials to finishing details. You’ll learn what really matters, what to avoid, and how to make your egg chair safe and beautiful.
Egg chairs are famous for their cozy, cocoon-like design. They help you relax and support your back and neck. Whether you want to hang it or keep it on a stand, you can adjust this project to your space and style.
You’ll find practical tips, simple safety advice, and creative ideas as you read. By the end, you’ll know exactly how to make an egg chair that lasts for years. Let’s get started.
Understanding The Egg Chair Design
Before you start, it’s important to understand what makes an egg chair special. The shape is the main feature. The seat curves around you, like a half-egg or cocoon. This shape gives comfort and a sense of privacy. Most egg chairs have a frame (usually metal or wood), a woven shell (like rattan or synthetic wicker), and a soft cushion.
Egg chairs come in two main types:
- Hanging egg chairs – These dangle from the ceiling or from a stand. They give a floating, gentle swing.
- Standing egg chairs – These sit on legs or a fixed base. They don’t swing but still offer the same curved comfort.
You need to decide which type you want before starting. This choice affects materials, tools, and where you will place your chair.
Planning Your Egg Chair Project
The success of your project starts with good planning. Here’s what you should decide before buying anything.
Choose Where To Place The Chair
Think about whether your egg chair will be indoors or outdoors. Outdoor chairs need weather-resistant materials, while indoor chairs can use softer, less durable options. Also, check the size of the space. Egg chairs are wide and deep—measure carefully so your chair fits and can swing or move safely.
Decide The Hanging Or Standing Style
If you choose a hanging egg chair, make sure your ceiling or support beam is strong enough. For a standing chair, you’ll need a stable base or legs.
Find Or Draw A Design
You can download free or paid egg chair plans online, or sketch your own. Look for designs that show:
- Frame shape and size
- How the seat shell attaches to the frame
- How the cushion fits
Detailed plans help you avoid mistakes later.
Make A Materials List
Write down every item you’ll need. This includes frame materials, tools, fasteners, weaving supplies, and fabric. A complete list saves time and prevents many problems.
Materials And Tools Needed
The right materials and tools make your egg chair strong and safe. Below is a simple list for a basic, classic egg chair. You can adjust this depending on your design and style.
Frame Materials
You have two main options:
- Steel/metal tubing (strongest, best for hanging chairs)
- Hardwood (oak, maple, teak—good for standing chairs)
For a standard adult-size egg chair, you’ll need:
- About 20 feet (6 meters) of 1-inch diameter steel tubing or hardwood slats
Weaving Materials
The outer shell is usually:
- Natural rattan
- Synthetic rattan (plastic, weatherproof)
- Wicker
- Strong rope (for a modern look)
You’ll need about 200–300 feet (60–90 meters) depending on pattern.
Cushion Materials
- 2–3 yards (2–3 meters) of durable fabric
- Foam (4–6 inches thick, cut to fit)
- Batting (optional, for extra softness)
Hardware And Fasteners
- Bolts and nuts (for metal frames)
- Wood screws (for wooden frames)
- Hanging kit (if making a hanging chair)
- Carabiners or quick links
Tools
- Pipe bender (for metal frames)
- Drill and drill bits
- Saw (if using wood)
- Welding machine (if using metal and you know how to weld)
- Screwdriver set
- Measuring tape
- Pliers and wire cutters
- Staple gun (for attaching fabric)
- Sandpaper or file (for smoothing edges)
- Safety gear: Gloves, goggles, mask
Protective Finishes
- Outdoor paint or powder coating (for metal)
- Wood sealant or varnish (for wooden frames)
Example Materials List Table
Here’s a summary in a table for quick reference:
| Material/Tool | Purpose | Quantity |
|---|---|---|
| Steel tubing or hardwood | Frame | 20 ft (6 m) |
| Synthetic rattan | Weaving shell | 250 ft (75 m) |
| Foam cushion | Seat comfort | 1 (custom cut) |
| Outdoor fabric | Cushion cover | 2–3 yards |
| Drill, saw, pipe bender | Frame assembly | 1 each |
Tip: Always buy a little extra rattan or rope in case you make a mistake.
Building The Egg Chair Frame
The frame is the “skeleton” of your egg chair. This step is the most important for strength and safety.
Measuring And Cutting
- Mark the shape: Use chalk or a marker to draw the egg shape on the floor. For a typical chair, aim for 42–48 inches high and 34–40 inches wide.
- Measure and cut: Use a pipe cutter for metal tubing or a saw for wood. Cut two main “egg” shaped pieces for the sides and a few horizontal pieces for the middle (to hold the seat and back in place).
Bending And Shaping
- For metal: Use a pipe bender. Bend slowly to match your chalk outline. If you don’t have a bender, some hardware stores can do this for you.
- For wood: Use flexible hardwood strips. You may need to steam the wood to bend it without breaking.
Connecting The Frame
- For metal, weld the connections or use strong bolts and brackets.
- For wood, use screws and wood glue. Reinforce all joints.
Adding Cross Supports
Add horizontal bars or slats at the seat, back, and headrest areas. These support your weight and help the shell keep its shape.
Example Frame Comparison Table
Below is a quick comparison of frame materials:
| Frame Material | Strength | Weather Resistance | Tools Needed |
|---|---|---|---|
| Steel | Very high | High (with coating) | Pipe bender, welder |
| Hardwood | High | Medium (needs sealant) | Saw, drill |
| PVC Pipe | Low | High | Pipe cutter |
| Bamboo | Medium | Low–Medium | Saw |
Non-obvious insight: Many beginners forget to test the frame for wobble before weaving. Clamp or loosely bolt everything together, sit inside, and see if the frame feels solid. If not, add more supports now.
Weaving The Egg Shell
The shell gives your egg chair its iconic look. This step can be slow but is not hard if you follow a pattern.
Choosing A Weaving Pattern
Popular patterns include:
- Simple horizontal/vertical
- Diamond or crisscross
- Basketweave
Simple patterns are faster and need less material. Complex patterns look unique but take more time.
Preparing To Weave
- Secure the frame so it doesn’t move.
- Cut your rattan or rope into manageable lengths (15–20 feet is easy to handle).
Weaving Process
- Tie the end to a frame bar using a secure knot.
- Wrap the rattan tightly around the frame, following your chosen pattern.
- Keep tension even so the shell is strong and smooth.
- At each intersection, use a dab of glue or a zip tie for extra hold (remove zip ties later if you want).
- When you reach the end of a piece, tuck it under and glue or tie to the frame.
Extra tip: For outdoor chairs, always use synthetic rattan or rope. Natural rattan will rot quickly if it gets wet.
Finishing The Shell
Once the shell is finished, check for loose ends, sharp pieces, or uneven spots. Trim and tuck all ends. Sand any rough edges.
Another insight: Beginners often weave too loosely at the start. The shell should feel firm when you press on it—not saggy. If you notice sagging, go back and tighten the weave before moving on.
Making And Attaching The Cushion
The cushion makes your egg chair comfortable. You can buy a ready-made cushion, but making your own means you get a perfect fit.
Cutting The Foam
- Lay the foam on the floor.
- Place the finished frame or a template on top.
- Use a marker to trace the egg shape.
- Cut with an electric knife or sharp bread knife for clean edges.
Adding Batting
Batting is optional but adds softness. Wrap it around the foam and secure it with fabric glue or a few stitches.
Sewing The Cushion Cover
- Measure the foam’s length, width, and thickness.
- Cut fabric pieces: One for the top, one for the bottom, and a long strip for the sides.
- Sew the sides to the top, then to the bottom, leaving one end open.
- Insert the foam, then close the opening with a hidden zipper or Velcro.
Attaching The Cushion
- Use strong fabric ties or Velcro straps to attach the cushion to the frame. This prevents slipping.
- For outdoor chairs, use waterproof fabric.
Data point: Most egg chair cushions are 4–6 inches thick. Thinner cushions are less comfortable for long sitting.

Credit: www.youtube.com
Finishing And Protecting Your Egg Chair
Don’t skip this step—finishing keeps your chair looking good and lasting longer.
Painting Or Sealing
- For metal: Use rust-resistant spray paint or powder coating. Paint all joints and let dry fully.
- For wood: Apply 2–3 coats of exterior wood sealant or marine varnish. Sand lightly between coats.
Checking Safety
- Check all bolts, welds, and knots.
- Try sitting in the chair or pressing down with your hands. There should be no creaks, cracks, or wobble.
Adding Hanging Hardware Or Base
- For hanging: Use a heavy-duty eye bolt, carabiner, and chain rated for at least 300 pounds.
- For standing: Attach the frame to a solid base. Some people use a circular base for extra stability.
Non-obvious insight: Many people forget to check the maximum weight their hardware supports. Always use hardware that supports at least 1.5 times the heaviest person who will use the chair.
Decorating And Customizing Your Egg Chair
This is where you make the chair your own.
Choosing Colors And Patterns
Pick colors that match your room or garden. Bright fabrics make the chair stand out. Neutral colors blend in. Try adding a few throw pillows for extra comfort and style.
Adding Extras
- String lights for a cozy look at night
- Small side table for drinks or books
- Blanket or sheepskin for warmth
Weather Protection
If your chair is outdoors, use a waterproof cover when not in use. This will protect your work and make it last longer.
Common Mistakes And How To Avoid Them
Building an egg chair is not hard if you know what to avoid. Here are the most common mistakes:
- Poor measurements – Always measure twice before cutting.
- Weak frame joints – Don’t trust glue alone; use bolts, screws, or welds for strength.
- Loose weaving – Pull rattan or rope tight as you go.
- Wrong hardware – Use only hardware rated for heavy weights.
- Skipping finish – Unprotected wood or metal will quickly rot or rust.
- Ignoring comfort – Thin cushions or no cushion will make the chair uncomfortable.
- Bad placement – Make sure there is enough space around the chair to swing or move.
Maintaining Your Egg Chair
To keep your egg chair looking new:
- Dust or vacuum the shell every week.
- Wash cushion covers as needed—most can go in the washing machine.
- Tighten bolts and check for loose weaving every few months.
- Reapply sealant or paint once a year if used outdoors.
Pro tip: If the rattan or rope shows wear, replace it section by section instead of the whole shell.
Cost Breakdown And Time Estimate
Building an egg chair at home can save money, but it’s good to know the costs.
Typical Costs
- Frame materials: $40–$120 (metal is usually more expensive)
- Weaving supplies: $30–$90
- Cushion and fabric: $40–$100
- Hardware and tools: $30–$70 (less if you already own tools)
Total estimated cost: $140–$380
Time Needed
- Planning and buying materials: 2–3 hours
- Frame construction: 4–8 hours
- Weaving the shell: 6–12 hours (depends on pattern)
- Cushion making: 2–3 hours
- Finishing and assembly: 2–3 hours
Total time: 16–29 hours (spread over a few weekends)
Should You Build Or Buy An Egg Chair?
If you’re still unsure, here’s a quick comparison:
| DIY Egg Chair | Store-Bought Egg Chair |
|---|---|
| Custom size, style, and color | Limited options |
| Lower cost (usually) | Quick and easy |
| Stronger if made well | Sometimes lower quality materials |
| Time and effort required | Ready to use |
Key advice: If you enjoy building things and want a unique chair, DIY is the way to go. If you want a quick solution, buying might be better.
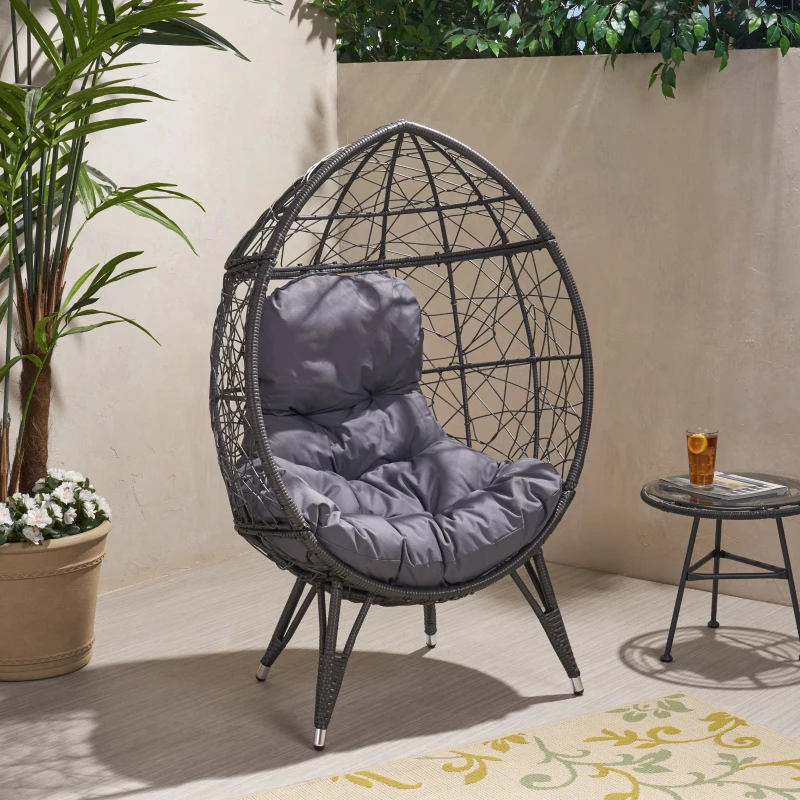
Credit: www.aosom.com
Safety Tips For Using Your Egg Chair
- Always test the chair with extra weight before regular use.
- For hanging chairs, check the ceiling or stand support every few months.
- Never let children swing wildly—egg chairs can tip if not used carefully.
- Replace worn ropes or hardware before they break.
- For outdoor use, move the chair indoors during storms or winter.
Going Further: Advanced Customizations
Once you’ve mastered the basics, you can try:
- Adding a canopy for shade or privacy
- Building a double egg chair for two people
- Installing built-in speakers or reading lights
- Weaving with colored rope for a modern look
You’ll find more inspiration and advanced projects on design websites like ArchDaily.

Credit: www.aosom.com
Frequently Asked Questions
How Much Weight Can A Homemade Egg Chair Hold?
A well-built egg chair with a steel or hardwood frame and proper hardware can usually hold 250–350 pounds. Always check the strength of your frame and use hardware that supports more than your body weight.
Can I Build An Egg Chair Without Welding?
Yes. You can use bolts, screws, and strong brackets to join metal or wood. Welding is stronger but not required if you use enough mechanical fasteners.
What Is The Best Material For Outdoor Egg Chairs?
The best options are powder-coated steel for the frame and synthetic rattan or rope for the shell. These materials resist rain and sun better than natural wood or rattan.
How Do I Hang My Egg Chair Safely?
Use a heavy-duty ceiling hook or stand, strong chain or rope, and carabiner rated for at least 300 pounds. Always mount into a solid beam, not just drywall or plaster.
Can I Use Recycled Materials To Make An Egg Chair?
Yes, but check their strength and condition. Many people use old trampoline frames, bicycle rims, or pallet wood for unique and eco-friendly egg chairs. Make sure all parts are safe and sturdy.
Creating your own egg chair is not just about saving money—it’s about building something special you can enjoy for years. With the right steps, materials, and care, your homemade egg chair will be the highlight of your home or garden.