Creating a water table for children is more than just a weekend project—it’s a gateway to hands-on learning, sensory play, and outdoor fun. Many parents, teachers, and caregivers look for ways to keep kids engaged, especially in a world full of screens. A water table does just that by encouraging exploration, creativity, and even a bit of science. Whether you want to make a simple DIY version or a custom masterpiece, building a water table is a project nearly anyone can tackle with the right guidance.
In this comprehensive guide, you’ll discover every step, tip, and trick to make a water table that will become the highlight of any backyard or classroom. You’ll also learn the different types, materials, and features to consider, plus how to keep your water table safe, clean, and exciting for years to come.
Even if you’ve never built anything before, you’ll find clear instructions and expert advice to help you succeed.
Why Build A Water Table?
Water tables are not just toys—they are powerful learning tools. Children develop fine motor skills as they pour, scoop, and splash. They experiment with floating and sinking, learning early science concepts without even realizing it. Water tables also promote social skills, as kids play together and share tools.
Commercial water tables can cost anywhere from $40 to over $200, and often lack the features you want. Building your own lets you pick the size, height, and activities, all while saving money. Plus, there’s a special satisfaction in making something with your own hands.
Types Of Water Tables
Choosing the right type of water table is your first step. Not all water tables are the same, and your decision will depend on the age of the children, your space, and your budget.
| Type | Best For | Main Materials | Pros | Cons |
|---|---|---|---|---|
| Basic Bin Table | Toddlers & Preschool | Plastic tub, wood/metal frame | Easy, cheap, portable | Simple, no advanced features |
| Multi-Level Table | Multiple children | Plastic or wood, connectors | More activities, social play | More complex to build |
| Sand & Water Combo | Older kids | Two bins, divider | Versatile, more play options | Heavier, harder to clean |
| Custom Themed Table | All ages | Depends on theme | Personalized, unique | Time-consuming, may cost more |
Non-obvious insight: Many people think bigger is always better, but a smaller water table often encourages longer, more focused play sessions. Kids aren’t overwhelmed by too many options and can master the activities you provide.
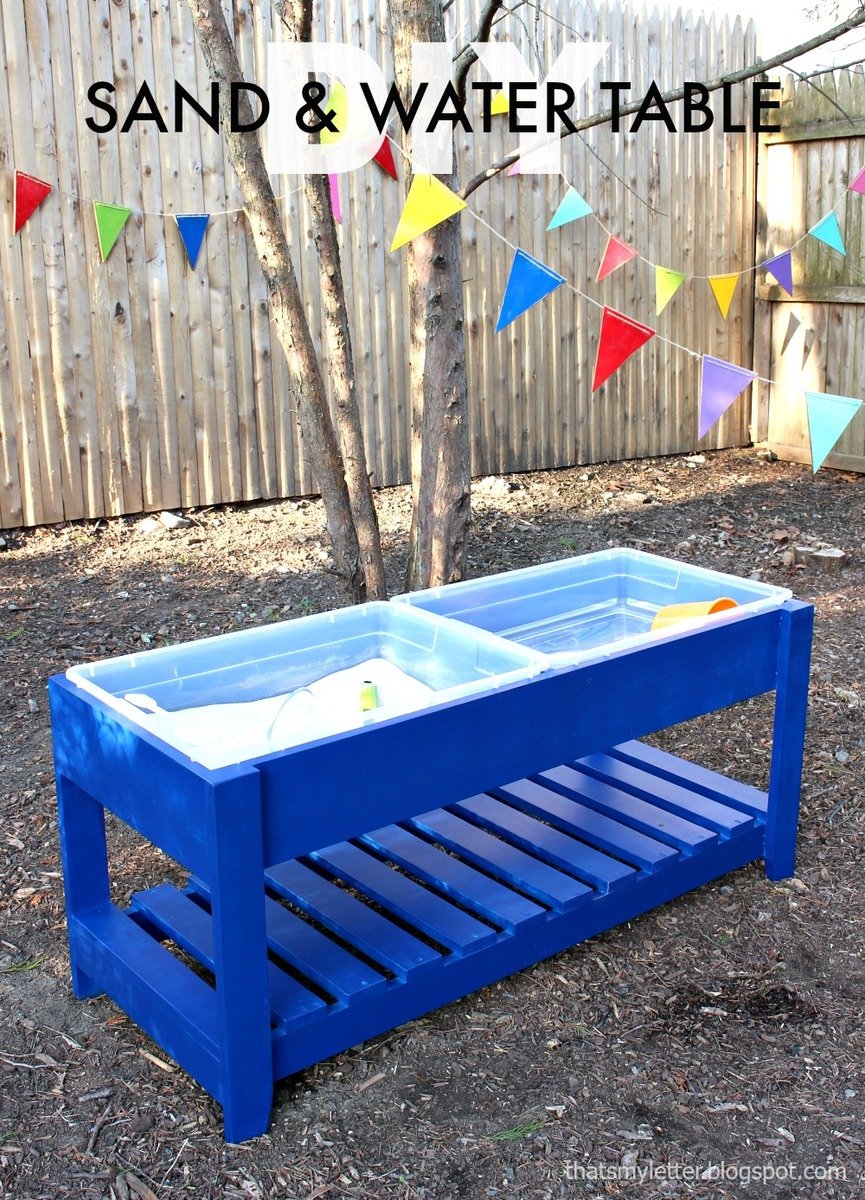
Credit: www.ana-white.com
Planning Your Water Table
Before buying materials, take time to plan. Think about:
- Age and Height: A toddler needs a table around 16-20 inches tall; for older kids, 22-26 inches is usually best.
- Space: Measure the area where you’ll place the table. Leave extra room for kids to move around safely.
- Indoor or Outdoor Use: Outdoor tables need weather-resistant materials. Indoor tables should be easy to empty and clean.
- Features: Do you want simple water play, or extras like pumps, waterfalls, or sand bins?
- Budget: DIY water tables can cost $20-$100+, depending on materials and tools you already own.
Tip: Sketch your design on paper or use free online design tools. Visualizing the table helps avoid mistakes and wasted money.
Tools And Materials
You don’t need fancy tools to build a great water table. Here’s a common materials list:
- Large plastic bin (ideally clear, 28–40 quarts)
- 2×4 or 2×2 lumber (for the frame)
- Deck screws (1.5″ to 2.5″)
- Drill and screwdriver bits
- Saw (hand saw or circular saw)
- Sandpaper (medium and fine grit)
- Measuring tape
- Pencil
- Waterproof wood sealant or exterior paint (for outdoor tables)
- Rubber feet or casters (optional, for mobility)
- Plastic or metal pipes (for water features, optional)
- Funnels, cups, toys, and scoops (for play)
You can substitute materials based on what you have. For example, old end tables, coffee tables, or even sturdy crates can become the base for a water table with just a few changes.
Non-obvious insight: Always check your bin first. Not all storage bins are strong enough to hold water without bowing or cracking. Test your chosen bin with water before building the frame.

Credit: thewoodenmaven.com
Step-by-step Guide: How To Make A Water Table
Let’s break down the process so anyone can follow along. These instructions are for a basic, sturdy water table with a removable bin.
Step 1: Measure And Cut The Wood
- Measure the bin you plan to use. Add 1/4 inch to both the length and width for a comfortable fit.
- Cut four pieces for the top frame (two for length, two for width).
- Cut four legs to your chosen height.
- Cut four shorter pieces for the lower shelf (optional for storage).
Tip: Always sand the cut edges to prevent splinters.
Step 2: Build The Top Frame
- Lay out the four frame pieces in a rectangle.
- Pre-drill holes to prevent splitting.
- Attach the pieces with screws, making sure all corners are square.
Step 3: Attach The Legs
- Stand the frame on its side.
- Position a leg inside each corner.
- Screw the legs into the frame from both sides.
- Check that all legs are the same height, so the table sits flat.
Step 4: Add The Lower Shelf (optional)
- Attach the shelf pieces between the legs, about 4-6 inches from the bottom.
- Secure with screws. This shelf adds stability and provides storage for toys.
Step 5: Seal And Finish
- Sand all surfaces until smooth.
- If you plan to use the table outdoors, apply waterproof sealant or exterior paint. Allow to dry fully before adding the bin.
Step 6: Insert The Bin
- Place the plastic bin into the frame.
- Fill with clean water and check for leaks or weak spots.
- Make adjustments if needed.
Step 7: Add Play Features
- Funnels and tubes: Drill holes in the frame for inserting pipes, or attach funnels with zip ties.
- Water wheels: Buy inexpensive wheels or make your own with plastic lids and spoons.
- Removable lids: Cut a piece of plywood or plastic to fit over the bin for easy storage and to keep out debris.
Example: One parent built a water table using an old coffee table, cutting a hole in the center for a plastic bin. The rest of the table became a play surface for boats and cars, with a shelf below for storing towels and toys.
Customizing Your Water Table
A basic water table is fun, but small changes can make it even better.
Add A Drain
Draining water after play can be a hassle. Add a drain plug to make cleanup easier.
- Buy a standard cooler drain plug or aquarium bulkhead fitting.
- Drill a hole in one end of the bin (choose a low spot).
- Install the drain following package instructions.
- Place a bucket under the plug to catch dirty water for easy disposal.
Multi-bin Designs
Use two or more bins for sand, pebbles, or colored water. This lets kids explore different textures and materials.
Water Circulation
Adding a small aquarium pump creates moving water for rivers, waterfalls, or fountains. Make sure to use a battery-powered or low-voltage pump for safety.
Themed Tables
Paint the frame or add decorations for an ocean, jungle, or construction theme. Attach plastic animals, boats, or bridges to inspire creative play.
Safety Considerations
Water tables are generally safe, but always supervise young children. Here’s what to keep in mind:
- Never leave children unattended. Even shallow water can be dangerous.
- Empty the table after play. Standing water attracts insects and can grow bacteria.
- Check for sharp edges. Sand or cover all corners.
- Use only clean water. Avoid adding soaps or chemicals.
- Secure the table. Make sure it’s stable and won’t tip if leaned on.
Non-obvious insight: Regularly inspect the table for mold or algae, especially if used outdoors. Sunlight and heat can cause rapid growth, which may not be visible at first.
Maintenance And Cleaning
A clean water table lasts longer and keeps children healthy.
- Daily: Empty after each use and rinse the bin with fresh water.
- Weekly: Wash with mild soap and a sponge. Scrub corners where dirt collects.
- Monthly (or as needed): Disinfect with a solution of one tablespoon of bleach per gallon of water. Rinse thoroughly before refilling.
If your table develops a musty smell, soak it with white vinegar and water for an hour, then rinse. Avoid harsh cleaners that could damage plastic or harm children.
Tip: Store the table indoors during winter or rainy months to extend its life.
Fun Water Table Activities
Once your water table is ready, the real fun begins. Here are creative activities to keep kids interested:
- Sink or Float Experiments: Test which items (spoons, blocks, leaves) float or sink.
- Color Mixing: Add a few drops of food coloring to teach color blending.
- Ice Excavation: Freeze small toys in ice cubes and let kids melt them with warm water.
- Boat Races: Make boats from sponges or plastic lids and race them across the water.
- Pouring Station: Provide cups, funnels, and bottles for endless pouring fun.
- Nature Play: Add rocks, leaves, and sticks for a mini pond ecosystem.
- Water Wheels and Pumps: Let kids power water wheels or small fountains.
- Fishing Game: Use magnets and paper clips to “fish” for prizes.
- Bubble Play: Add a small amount of baby shampoo for safe bubbles.
- Animal Rescue: Place toy animals in the water and let kids save them with nets or cups.
Non-obvious insight: Rotate activities every few days. Simple changes—like colored water or new toys—keep kids curious and extend the table’s appeal.
Comparing Diy Vs. Store-bought Water Tables
It’s normal to wonder if building your own table is worth the effort. Here’s a comparison to help you decide:
| Feature | DIY Water Table | Store-Bought Table |
|---|---|---|
| Cost | $20–$80 (average) | $40–$200+ |
| Customization | Unlimited (size, features, theme) | Limited to manufacturer’s options |
| Durability | Depends on materials and build | Usually plastic, may wear out faster |
| Time Required | 2–4 hours (basic), longer for custom | Ready to use out of the box |
| Maintenance | Easy to repair or upgrade | Harder to fix if broken |
Water Table Add-ons And Upgrades
As your child grows, you can add features to keep the table interesting.
Shade Canopy
Attach a small canopy or umbrella to protect kids from sunburn. Use clamps or build a frame from PVC pipes.
Wheels For Mobility
Install locking casters on the legs for easy moving and storage. Make sure the wheels are sturdy enough for outdoor terrain.
Removable Dividers
Use plastic or wood dividers to split the bin into sections for different materials, like water, sand, or pebbles.
Sensory Additions
Add colored rice, pasta, or water beads for sensory play days. Always supervise, as these items can be choking hazards.
Water Recycling System
Install a small pump and tubing to move water from a lower bucket back into the bin, creating a continuous waterfall.
Example: A preschool added a “rain wall” by attaching a piece of clear plastic with holes above the table. Kids poured water at the top and watched it flow in patterns, learning about gravity and water flow.
Creative Themes For Water Tables
A themed water table can spark even more imagination. Here are some popular ideas:
- Ocean Adventure: Add blue food coloring, toy fish, and shells.
- Construction Site: Use trucks, rocks, and brown-colored water.
- Arctic World: Freeze small blocks of ice with toy animals inside.
- Pirate Island: Create islands with sand, and add small boats and treasure chests.
- Car Wash: Add toy cars, soap, and brushes for a mini car wash station.
Change themes easily by switching out toys, adding colored water, or making small decorations.
Common Mistakes To Avoid
Many first-time builders and parents make simple mistakes when making or using a water table.
- Choosing the wrong bin: Too thin or brittle bins can crack or leak. Test before building.
- Making it too tall or too short: Measure your child’s waist height for the perfect fit.
- Skipping the sealant: Outdoor tables will rot or warp without waterproofing.
- Overfilling the bin: Too much water can spill over, making a mess and wasting water.
- Using unsafe materials: Avoid treated lumber or paints not safe for children.
- Neglecting regular cleaning: Dirty water leads to germs and smells.
- Ignoring safety: Leaving kids alone or not checking for sharp edges.
Non-obvious insight: Don’t overload the table with toys. Too many items can make play chaotic and overwhelming. Rotate a small selection for focused, more meaningful play.
Adapting A Water Table For All Ages And Abilities
Water tables are not just for toddlers. With small adjustments, they can be used by children of different ages and abilities.
- For babies, use a shallow bin and always supervise closely.
- For older children, add more complex activities like water pumps, measuring cups, or science experiments.
- For children with limited mobility, build a table with open sides for wheelchair access, and set the height for easy reach.
Tip: Sensory water tables are helpful for children with autism or sensory processing needs. Use soothing materials and simple activities.
Sustainability Tips
Making your own water table is an eco-friendly choice. Here’s how to make it even greener:
- Use reclaimed wood from pallets or old furniture.
- Repurpose bins or containers you already have.
- Collect rainwater for play (check local guidelines for safety).
- Use biodegradable soaps for bubble play.
- Recycle or donate the table when your child outgrows it.
Where To Find Inspiration
If you want to see more ideas, check out online communities, parenting blogs, or educational websites. Pinterest, Instagram, and YouTube are full of creative water table builds, themes, and activities.
For extra guidance and child development research, visit the Wikipedia Sensory Play page, which explains why activities like water tables are so valuable.
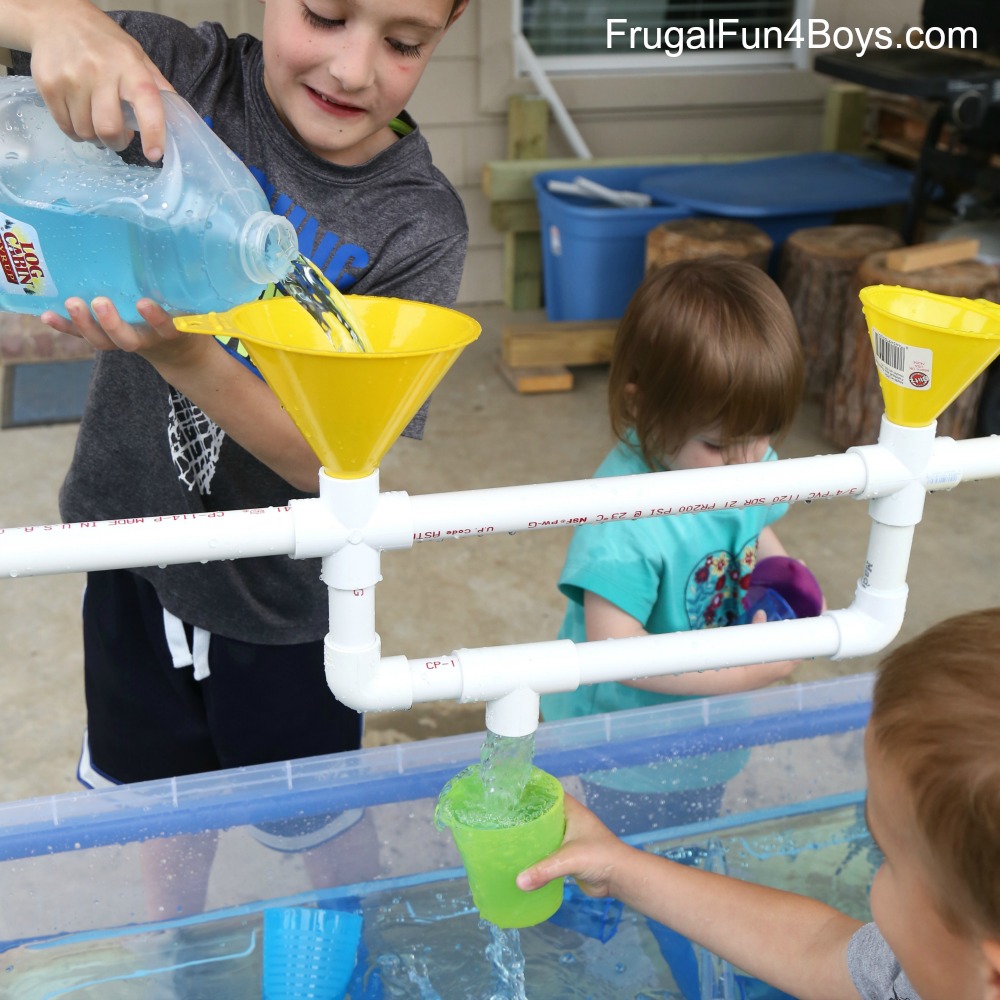
Credit: frugalfun4boys.com
Frequently Asked Questions
How Much Does It Cost To Make A Water Table?
The cost depends on your materials. Most DIY water tables cost between $20 and $80. Using recycled materials can lower the price. Custom features like pumps or fancy themes will increase costs, but simple tables can be made very affordably.
What Size Should A Water Table Be?
The best size depends on your space and your child’s age. A bin size of 28–40 quarts is common, with a table height of 16–26 inches. The table should be large enough for children to play comfortably but small enough to reach all areas.
How Do You Keep A Water Table Clean?
Empty the bin after every play session. Wash with mild soap and water weekly, and disinfect with bleach or vinegar monthly. Store the table out of the sun and weather when not in use. Always use clean water for play.
Can I Use A Water Table Indoors?
Yes, but use a waterproof mat underneath to catch spills. Choose a removable bin for easy emptying and cleaning. Avoid filling the table too full indoors. Always supervise children, as water can damage floors if spilled.
What Activities Work Best In A Water Table?
Popular activities include sink or float tests, color mixing, ice melting, boat races, and nature play. Rotate activities to keep things fresh. Add new toys, change the water color, or theme your play days to keep children engaged and learning.
A water table is a project that brings joy and discovery into any home or classroom. Whether you build a simple bin table or a complex, themed masterpiece, the rewards go far beyond the finished product. Children learn, laugh, and grow every time they gather around to play.
With the right planning, materials, and a little creativity, you can make a water table that becomes the heart of your outdoor or indoor space for years to come.