Building a table for your child is more than a weekend project—it’s a chance to create a special piece that fits your child’s needs and personality. A child’s table can be a place for drawing, homework, or snack time. Making one yourself means you control the size, style, and safety. If you have never built furniture, don’t worry. With the right plan, some simple tools, and a patient approach, you can make a sturdy, beautiful child’s table that will last for years.
This guide walks you through every step of the process, from planning to finishing. You’ll learn how to choose the right materials, measure and cut, assemble the table, and add those little touches that make it special. Along the way, you’ll find practical tips, cost comparisons, and solutions to common mistakes that many beginners miss.
Why Make A Child’s Table Yourself?
Most store-bought children’s tables are made for average ages and sizes. When you make your own, you can adjust the height and width to fit your child perfectly. Homemade tables are often sturdier than cheaper models, and you can choose safe, non-toxic finishes. Plus, building together can be a fun family project.
Another important factor is cost. While high-quality tables in stores can be expensive, building one often saves money. You can also use materials you already have or recycle old wood, making it even more affordable.
Planning: What To Consider Before You Start
Before picking up a hammer, take some time to plan your project. Here are the key points to cover:
1. Table Size
A child’s table should fit your child’s size—not too high, not too low. Here’s a helpful sizing chart:
| Child Age | Recommended Table Height | Recommended Table Width |
|---|---|---|
| 2-4 years | 16-18 inches | 24-30 inches |
| 5-7 years | 18-22 inches | 30-36 inches |
| 8-10 years | 22-24 inches | 36-42 inches |
Measure your child’s chair and compare with this chart for a comfortable fit. If you’re making both the table and chairs, keep the seat height about 8-10 inches below the table.
2. Space And Shape
Think about where the table will go. For tight spaces, a rectangular or square table often fits best. A round table is good for playrooms with lots of room and helps avoid sharp corners.
3. Tabletop Material
The top should be easy to clean and strong. Popular choices:
- Solid wood: Durable, classic look, can be sanded and refinished.
- Plywood: Budget-friendly, smooth surface, lighter weight.
- MDF: Very smooth, easy to paint, but avoid moisture.
Solid wood lasts the longest, but plywood is often best for first-time builders.
4. Safety First
Children climb, jump, and sometimes chew on furniture. Choose non-toxic finishes and always round off sharp corners. Avoid using nails or screws that stick out.
5. Tools And Skill Level
You don’t need a full workshop. Basic tools like a saw, drill, sander, and measuring tape are enough. If you’re nervous about using power tools, consider pre-cut wood from the hardware store.
Choosing Materials: What Works Best
Your material choices affect the final look, price, and strength of the table.
Wood Types Compared
| Wood Type | Pros | Cons | Cost Estimate (per sq. ft.) |
|---|---|---|---|
| Pine | Affordable, easy to cut, light color | Dents easily, softer | $2-3 |
| Oak | Very strong, classic look | Heavy, more expensive | $4-6 |
| Plywood | Stable, affordable, easy to paint | Edges need covering, not as strong as solid wood | $1-2 |
| MDF | Ultra-smooth, cheap, paints well | Weak in moisture, heavy, can split | $1-1.50 |
For most parents, pine or plywood is the best balance of price and strength.
Hardware
You’ll need screws or bolts to hold things together. Use coarse-thread wood screws (1.5 to 2 inches long) for best grip. If you want to take the table apart later, use bolts with nuts.
Finishes
Look for water-based polyurethane or child-safe paint. These dry quickly, have low odor, and are safe after drying. Avoid oil-based finishes, as they can be toxic and take days to cure.
Designing The Table: Simple And Safe
Keep your design simple if this is your first project. Here’s a popular, sturdy option: a rectangular table with four straight legs.
Main Parts
- Tabletop: The main surface, usually a rectangle or square.
- Legs: Four pieces, one at each corner.
- Apron: Wood strips under the tabletop that connect the legs and add strength.
- Fasteners: Screws, brackets, or bolts to hold everything together.
Sketch Your Plan
Draw a rough sketch of your table. Mark the tabletop size, leg positions, and apron pieces. This helps you see if your design makes sense before you start cutting.
Measuring And Cutting: Getting It Right
Accurate measurements are key. Even small mistakes can make the table wobbly or unsafe.
How To Measure
- Use a steel tape measure for best results.
- Mark all cuts with a pencil.
- Double-check before you cut—measure twice, cut once.
Non-obvious insight: Always check your wood for warping or twisting before you cut. Even new boards can be bent, which makes assembly difficult.
Cutting Tools
- Hand saw: Good for a few cuts, cheap, but slow.
- Circular saw: Faster, cleaner edges, but needs practice.
- Miter saw: Fastest and most accurate for straight cuts.
At the hardware store, ask if they will cut wood for you. Many stores offer this service free or for a small fee.
Step-by-step Guide: Building Your Child’s Table
Let’s build a simple rectangular table, about 24 inches wide, 36 inches long, and 20 inches high—ideal for children ages 4 to 7. Adjust the size if needed for your child.
Materials List
- 1 piece of 3/4-inch plywood (24×36 inches) for the tabletop
- 2 pieces of 1×3-inch pine (36 inches each) for the long apron sides
- 2 pieces of 1×3-inch pine (21 inches each) for the short apron sides
- 4 table legs: 1.5×1.5-inch pine, 19.25 inches long each
- 16 wood screws (1.5 to 2 inches long)
- Wood glue
- Sandpaper (medium and fine grit)
- Non-toxic paint or clear finish
Tools Needed
- Saw (hand, circular, or miter)
- Electric drill with screwdriver bit
- Measuring tape
- Square (for marking right angles)
- Clamps (optional, but helpful)
- Paintbrush or roller
Step 1: Prepare The Tabletop
Lay the plywood flat. Sand the top, edges, and corners until smooth. If you want rounded edges, sand more heavily or use a router with a round-over bit.
Practical tip: For young children, round the corners to a 1-inch radius. Mark with a cup or lid and sand until smooth.
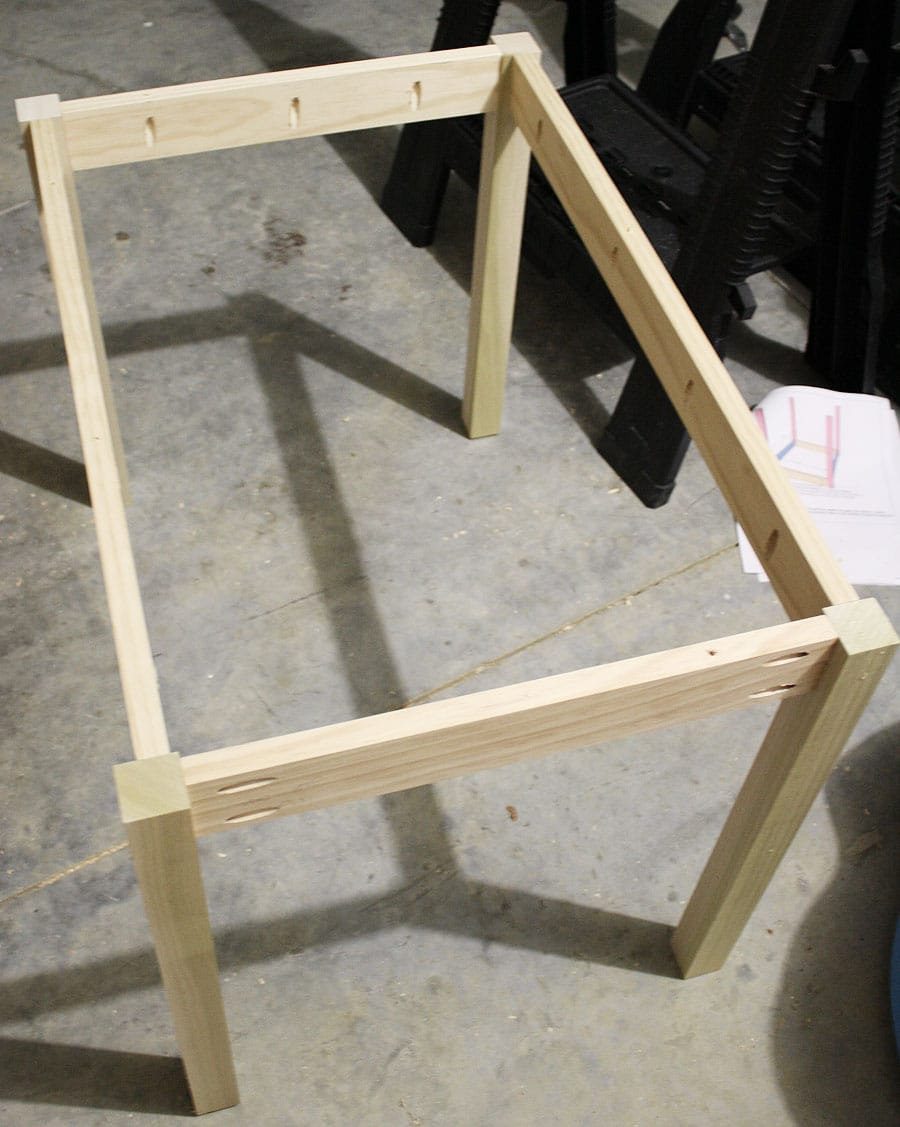
Step 2: Make The Apron
The apron supports the tabletop and keeps it from bowing. Attach the 36-inch and 21-inch pieces together to form a rectangle.
- Lay the pieces flat in a frame.
- Drill pilot holes (small guide holes for screws) at each joint.
- Glue and screw the pieces together.
- Let dry for 20 minutes.
Check the frame is square by measuring diagonals—they should be equal.
Step 3: Attach The Apron To The Tabletop
Place the apron frame upside down on the underside of the tabletop. Center it so there is about 1. 5 inches from the edge all around.
- Drill pilot holes through the apron into the tabletop every 8 inches.
- Add glue, then screw the apron to the tabletop.
Step 4: Attach The Legs
Place each leg inside the apron at the corners.
- Drill two pilot holes through the apron into each leg.
- Glue and screw in place.
- Make sure each leg is flush with the apron.
Check that all legs are vertical using a square or by eye.
Step 5: Sand And Finish
Sand all surfaces again, especially corners and legs. Remove any glue drips.
- Wipe away dust with a damp cloth.
- Apply 2-3 coats of non-toxic finish or paint, letting each coat dry completely.
Non-obvious insight: Many parents forget to finish the underside. Children often touch or chew here, so make sure to seal it as well.
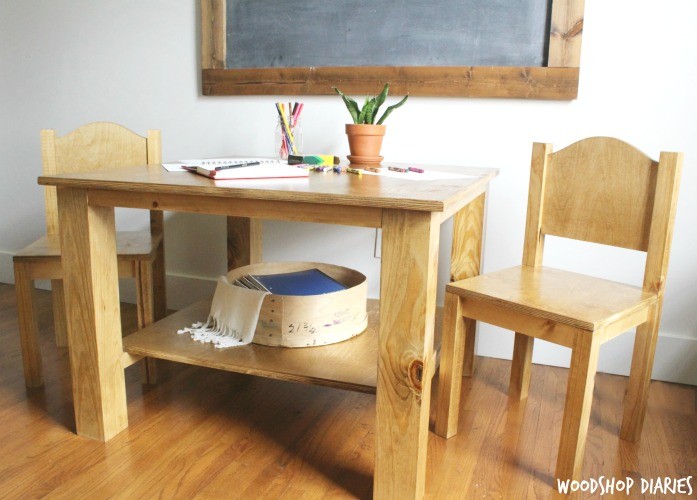
Credit: www.woodshopdiaries.com
Customizing Your Child’s Table
Personal touches make the table special and loved.
Fun Ideas
- Paint the tabletop with chalkboard paint for drawing.
- Add your child’s name or favorite shapes with stencils.
- Glue on a clear plastic sheet for easy cleaning and displaying art.
- Attach small storage bins under the apron for crayons or toys.
- Use stickers or decals for a quick, colorful look.
Tip: Ask your child what colors or decorations they like. Involving them helps them feel proud of the table.
Safety And Durability Checks
Double-check all connections. The table should not wobble or creak.
- Push on the tabletop and wiggle the legs. Tighten screws if needed.
- Check for any sharp spots and sand again.
- Test the weight: A sturdy table should hold at least 50 pounds without bending.
Common mistake: Skipping this step can lead to unsafe furniture. Kids can tip over weak tables, so always check before use.
Credit: jenwoodhouse.com
Maintenance: Keeping The Table In Good Shape
A well-made child’s table can last for many years with simple care.
- Clean with a damp cloth—avoid harsh chemicals.
- Check screws every few months and tighten if loose.
- If the finish wears off, lightly sand and reapply paint or finish.
- For scratches, use a wax crayon in a matching color to fill in, then buff smooth.
Most tables only need a quick wipe and a check every few weeks.
Comparing Store-bought Vs. Diy Child’s Tables
Building your own table has clear advantages, but here’s a quick side-by-side look:
| Feature | Store-Bought | DIY Table |
|---|---|---|
| Price | $50-150 for mid-range | $30-70 (materials only) |
| Customization | Limited (colors, size) | Fully customizable |
| Strength | Often medium, varies | Can be very strong |
| Safety | Usually safe, but check recalls | Control all materials |
| Fun Factor | Low (buy and use) | High (family project) |
DIY tables win in most categories, especially if you want something unique.
Common Problems And How To Fix Them
Table Wobbles
- Check if the floor is uneven.
- Tighten all screws.
- If one leg is short, add a felt pad under it.
Gaps In Joints
- Fill small gaps with wood filler before finishing.
- For large gaps, re-cut the piece for a better fit.
Tabletop Feels Rough
- Sand again with fine-grit sandpaper (220 grit).
- Apply another finish coat, sanding lightly between coats.
Screws Won’t Grip
- Use longer screws or add wood glue.
- If the hole is stripped, insert a wooden toothpick with glue, then re-screw.
Advanced Tips: For Those Wanting More
If you’re comfortable with tools, try these upgrades:
- Tapered legs: Use a saw to angle the bottom of each leg for a more stylish look.
- Adjustable height: Drill several holes in each leg and use bolts so you can raise or lower the table as your child grows.
- Foldable design: Use brackets so the legs fold under for easy storage.
- Drawer: Add a small drawer under the tabletop for art supplies or toys.
Tip: Sketch new designs before you start. Experiment with scrap wood to learn techniques.
Involving Children In The Process
Letting your child help makes the table even more meaningful.
- Allow them to sand (with supervision).
- Let them choose paint colors or decorations.
- Have them help with assembly by handing you screws or holding pieces.
Important: Children should never use power tools, but helping with safe steps teaches responsibility and pride.
Environmental Considerations
Building your own table can be eco-friendly.
- Use reclaimed wood from old furniture or pallets.
- Choose water-based, low-VOC finishes.
- Recycle leftover scraps or use them for other projects.
This not only saves money but also teaches children about sustainability.
Troubleshooting: Mistakes Beginners Make
Forgetting To Sand Properly
Skipping this step can lead to splinters. Always sand until every surface feels smooth.
Using The Wrong Screws
Using too-short or too-long screws can cause weak joints or poke through the tabletop. Always check screw length before installing.
Not Checking For Square
If your apron frame isn’t square, the whole table will be off balance. Measure diagonals to be sure.
Ignoring Finish Dry Times
Rushing the finish can lead to sticky or uneven surfaces. Always let each coat dry fully before using the table.
When To Buy Instead Of Build
Sometimes, buying makes more sense:
- If you need the table immediately.
- If you don’t have tools or space to build.
- If you want a complex design (like adjustable or themed tables).
In those cases, look for solid wood models, check for safety certifications, and read reviews. A good place to compare child’s tables is Consumer Reports.
The Joy Of A Homemade Child’s Table
Building a child’s table is more than just carpentry. It’s a way to create memories and teach your child about creativity, safety, and caring for their things. Every mark, color, or scratch will tell a story. And as your child grows, this table will be a reminder of your effort and love.
Remember, you don’t need to be perfect. Small mistakes add character and show that the table was made by hand. With careful planning, patience, and a bit of creativity, you can build a piece that your child will cherish for years.
Frequently Asked Questions
How Long Does It Take To Make A Child’s Table?
For most people, the project takes about one to two days. This includes cutting, assembly, sanding, and finishing. Drying time for paint or finish can add extra hours, but you can usually work on other steps while waiting.
What’s The Best Wood For A Child’s Table?
Pine is the most popular choice because it’s affordable, easy to work with, and safe for children. Plywood is also good for the tabletop because it’s stable and smooth. Avoid woods with heavy splinters or strong odors.
How Do I Make The Table Safe For Children?
Always sand all surfaces until smooth. Round off corners, and use non-toxic finishes. Avoid nails or screws that stick out. Check all joints for tightness, and test the table before your child uses it.
Can I Build A Table If I Have No Woodworking Experience?
Yes! This project is a great introduction to woodworking. Choose a simple design, use basic tools, and take your time. Many hardware stores will cut wood for you, making the process even easier.
How Do I Clean And Maintain A Homemade Child’s Table?
Wipe with a damp cloth and mild soap. Avoid harsh cleaners that can damage the finish. Check screws and finish every few months. If you see scratches, sand lightly and reapply finish as needed.
Building a child’s table is a project you’ll be proud of. With the right approach, your homemade table will bring joy and learning to your family for years to come.
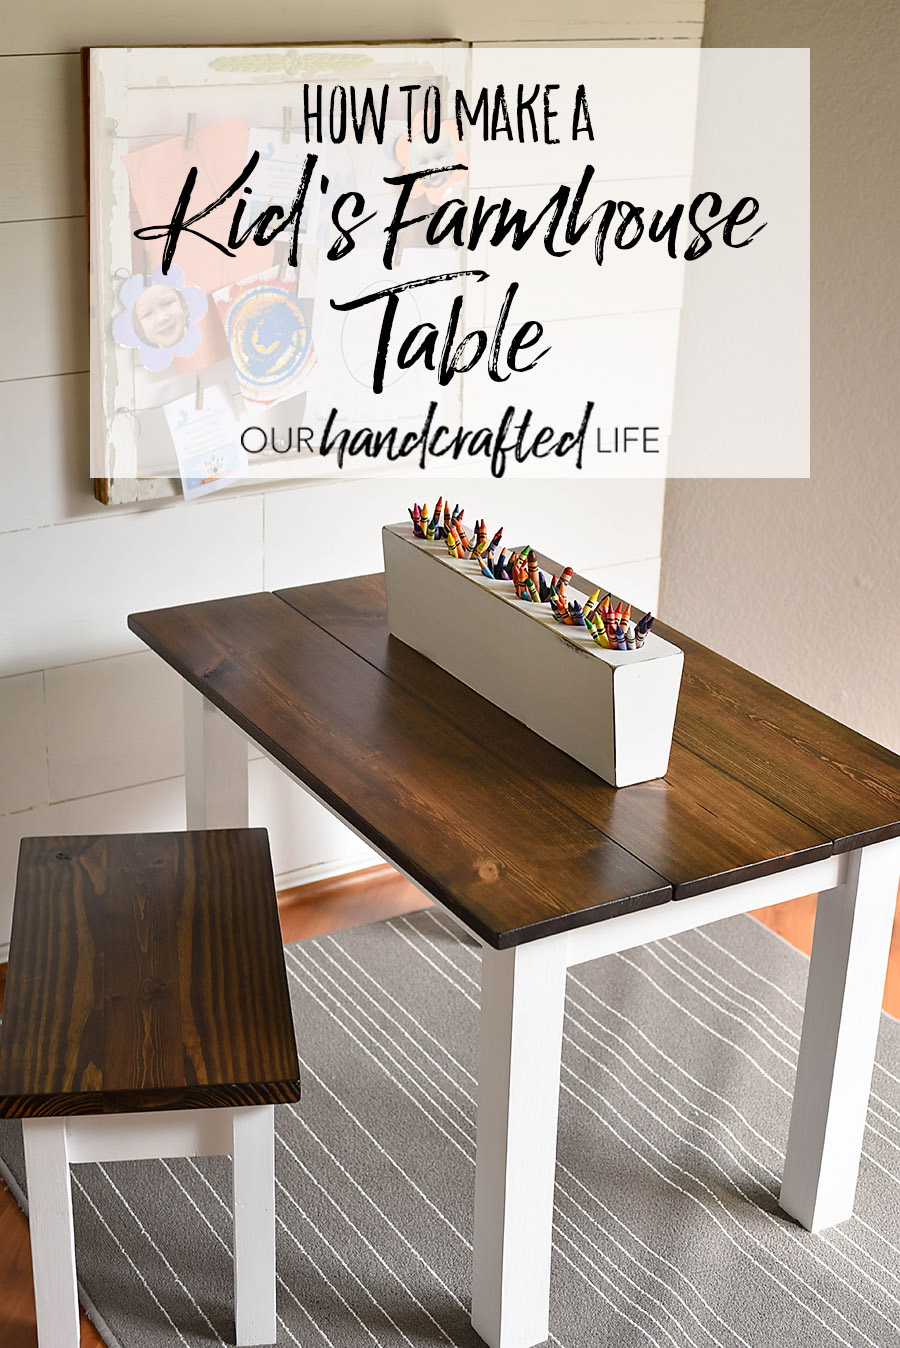
Credit: ourhandcraftedlife.com