A cold, uncomfortable basement floor is a common problem in many homes. Concrete is strong and durable, but it is also naturally cold and often damp. Insulating your concrete basement floor can change everything: the space becomes warmer, more energy-efficient, and suitable for living, storage, or recreation. Many homeowners do not realize how much heat is lost through an uninsulated concrete slab. According to the U.S. Department of Energy, up to 30% of a home’s energy loss can occur through the basement. This means insulating your basement floor is not just about comfort—it’s about saving money and increasing your home’s value.
Insulating a basement floor is not a simple weekend project. You need to plan, choose the right materials, prepare the space, and follow careful steps to get the best results. Even a small mistake can cause problems like mold, moisture, or wasted money.
This guide will walk you through every part of the process, from understanding why insulation matters to detailed, step-by-step instructions. Whether you want to create a cozy family room or just keep your feet warm in winter, you will find clear answers and practical tips here.
Why Insulate A Concrete Basement Floor?
Many people ask if basement floor insulation is worth the effort. The answer is almost always yes. Concrete is a poor insulator, which means heat passes through it easily. In winter, the floor pulls heat from your basement air, making the space feel colder than it should. In summer, an uninsulated floor can let in moisture, leading to a damp feeling and possible mold growth.
Insulating your basement floor brings several important benefits:
- Comfort: The floor stays much warmer to the touch, making the basement pleasant for living, playing, or working.
- Energy savings: Heating costs drop, especially if you use the basement often.
- Moisture control: Proper insulation includes vapor barriers that help stop moisture from coming up through the concrete.
- Air quality: Less mold and mildew mean healthier air for your family.
- Home value: A finished, comfortable basement adds value to your property.
It is easy to underestimate how much difference insulation can make. Many people only realize the impact after they finish the project. For example, a basement that was once only used for storage can become a cozy TV room or a home office that you actually want to spend time in.
In homes with children, a warmer basement floor means safer, more comfortable play areas during winter months.
Another point to remember is that insulation helps keep your basement cool during hot summer days as well. The insulation acts as a barrier, not just against cold, but also against heat and humidity. This means the basement is more comfortable year-round, not just in winter.
In fact, many people find that after insulating their basement floors, they use their basement space much more often for hobbies, exercise, or even as a guest bedroom.
Understanding Moisture: The Key To Success
Moisture is the number one enemy when insulating a concrete basement floor. If you trap moisture under or inside your insulation, you can create serious problems—mold, odors, and even damage to your home’s structure.
There are two main ways moisture enters a basement:
- From the ground (capillary action): Water can move up through the soil and concrete.
- From the air (condensation): Warm, moist air can hit the cold concrete and turn into water droplets.
Before you begin, you must check for both. Here’s how:
- Tape test: Tape a 2-foot square of clear plastic to the concrete for 48 hours. If moisture appears under the plastic, your floor has a moisture problem.
- Look for signs: Damp spots, white powder (called efflorescence), or a musty smell all point to moisture issues.
If you find moisture, do not start insulating until the problem is solved. You may need to improve drainage, seal cracks, or install a sump pump.
Another method to check for moisture is to use a moisture meter. This tool can give you a more precise measurement of how wet your floor actually is. If you see readings above 4% moisture content, it’s a warning sign.
Investing in this step can prevent costly repairs later.
One detail many beginners miss: water can travel sideways under the floor, especially in older homes. Even if the center of your basement seems dry, moisture can seep in around the walls. Always check the perimeter carefully, and fix any leaks or foundation issues before you start. If your house sits in a high water table area, consider consulting a waterproofing expert before insulating.
Choosing The Right Basement Floor Insulation
Not all insulation is equal. The right choice depends on your budget, the climate, and how you plan to use the basement. Here’s a comparison of the most popular options:
| Type | R-Value (per inch) | Moisture Resistance | Cost | Common Uses |
|---|---|---|---|---|
| Rigid Foam Board (XPS) | 5 | Excellent | $$ | Below slabs, walls |
| Rigid Foam Board (EPS) | 3.6–4.2 | Good | $ | Below slabs, walls |
| Polyiso Board | 6–6.5 | Good | $$$ | Above grade floors, walls |
| Spray Foam | 6–7 | Excellent | $$$$ | Hard-to-reach areas |
| Mineral Wool Batts | 4.2 | Resistant | $$ | Walls, not direct floor contact |
Most Recommended: Rigid Foam Board
For most basement floors, rigid foam board—especially extruded polystyrene (XPS)—is the top choice. It has a high R-value (insulation power), excellent moisture resistance, and is strong enough to support flooring. XPS is also easy to cut and shape, making it suitable for DIY projects. Expanded polystyrene (EPS) is cheaper and more eco-friendly, but slightly less resistant to moisture.
Avoid Fiberglass Batts
Fiberglass batts are not suitable for direct contact with concrete. They absorb moisture, which leads to mold. Even “mold-resistant” fiberglass can still develop problems if it gets wet. For basement floors, always use products specifically rated for below-grade moisture conditions.
Non-obvious Insight 1
Many beginners think thicker is always better. But, using very thick insulation can raise your floor too much, causing problems with doors, stairs, or ceiling height. Plan for a balance between insulation and available space.
Another detail: Some rigid foam boards have foil facings. These are designed to reflect heat, but in a basement, they can also trap moisture if not installed correctly. If you use foil-faced boards, make sure the shiny side faces up and is above the vapor barrier, not below.
Calculating How Much Insulation You Need
Choosing the right R-value matters. The R-value is a measure of thermal resistance. Higher numbers mean better insulation. In the U.S., the Department of Energy recommends R-10 to R-15 under basement slabs in most climates.
To calculate how much material you need:
- Measure your basement length and width.
- Multiply to get square feet (e.g., 20 ft x 30 ft = 600 sq. Ft.).
- Check the thickness and coverage of your chosen insulation.
For example: One 4×8 ft XPS board covers 32 sq. ft. If your basement is 600 sq. ft., you need about 19 boards (600 ÷ 32 = 18.75).
Add 10% extra for waste and mistakes.
Remember, it’s better to buy a few extra boards than to run out mid-project. Extra pieces are useful for patching small gaps or future repairs. Also, don’t forget to include the area under stair landings or closets if you want a completely insulated floor.
If your basement is not a perfect rectangle, break it into smaller squares or rectangles and add up the total area.
Tools And Materials Needed
You will need more than just insulation boards. Here’s a full list:
- Rigid foam insulation boards (XPS or EPS)
- Vapor barrier (6 mil polyethylene plastic)
- Tape measure
- Utility knife or insulation saw
- Heavy-duty tape (for seams)
- Construction adhesive (compatible with foam)
- Foam spray sealant (for gaps)
- Subfloor panels (optional, for finished floors)
- Protective gloves and mask
- Pry bar and hammer (for removing old flooring)
- Level
- Chalk line
Non-obvious insight #2: If you plan heated floors, make sure your insulation and vapor barrier are compatible with your heating system.
Don’t forget small items like a straightedge for cutting foam cleanly, or safety glasses. If you’re working in a basement with limited ventilation, a fan can help move dust and fumes outside. For larger basements, a power saw can speed up cutting, but always wear a mask to avoid inhaling foam particles.
Preparing Your Basement Floor
Preparation is key. Skipping steps here can ruin your project.
Clean And Inspect
- Remove everything: Take out old carpet, tile, or wood. Get to bare concrete.
- Clean well: Sweep and vacuum. Remove dust, dirt, and especially any paint or glue.
- Check for cracks: Small cracks can be sealed with concrete filler. Large cracks may need professional repair.
- Test for moisture: Repeat the tape test. Do not continue if you find moisture.
It’s also smart to check for any insect problems, as some pests like damp, dark environments. If you find evidence of termites or ants, address this before continuing.
Level The Floor
A level floor is essential for insulation and new flooring.
- Small dips (<1/4 inch):Use self-leveling compound.
- Large dips or humps: These may need grinding or patching.
For best results, use a long straightedge or level to find uneven spots. Mark them with chalk so you don’t miss them later. If you skip this step, you might end up with squeaky floors or cracked tiles.
Dry The Area
If the space is damp, use a dehumidifier for several days. Insulation works best in a dry environment.
If you live in a humid climate or have had basement water problems in the past, consider running the dehumidifier for a full week before starting. This extra step can make a big difference in long-term performance.
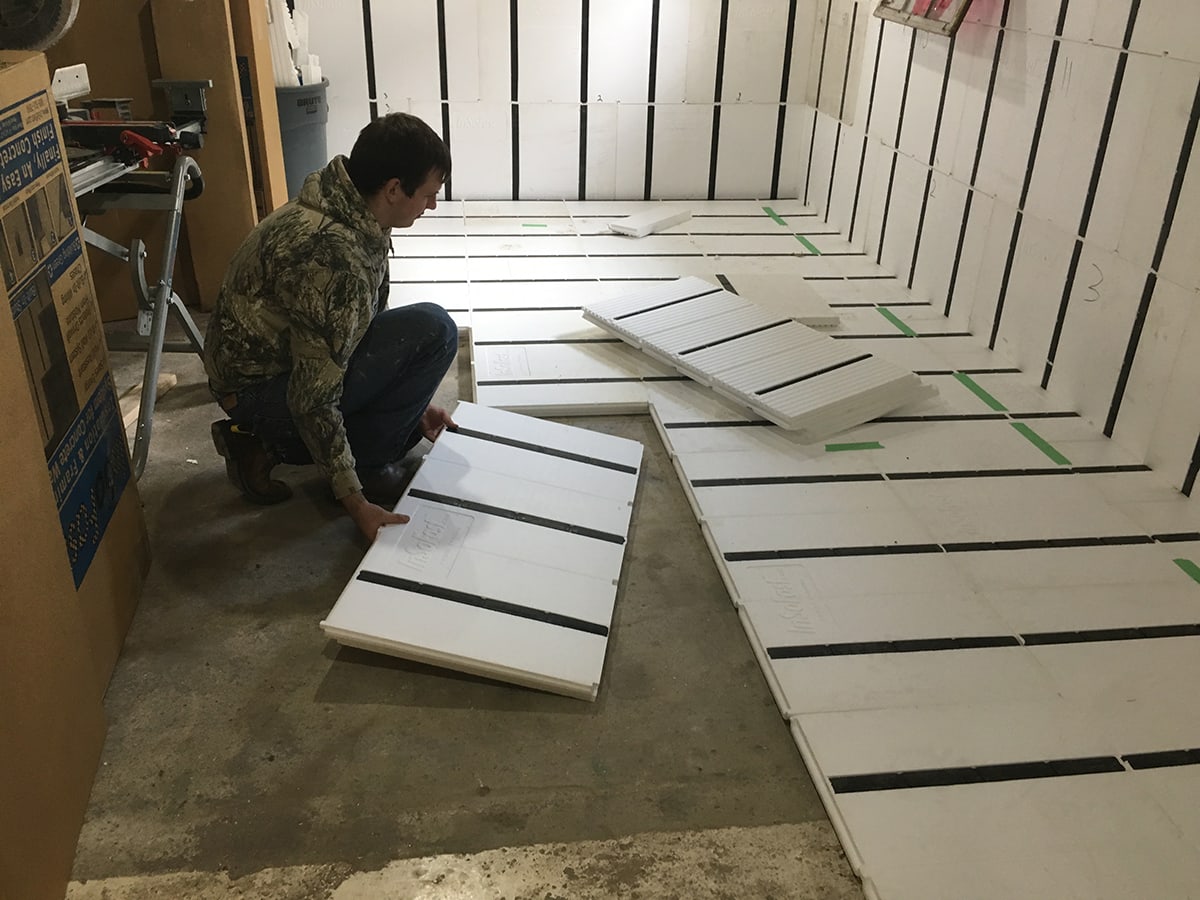
Credit: buildwithhalo.com
Installing A Vapor Barrier
A vapor barrier is critical. It stops ground moisture from entering your insulation.
- Roll out the plastic: Cover the whole floor, overlapping sheets by at least 6 inches.
- Seal seams: Use heavy-duty tape on all overlaps.
- Up the walls: Run the plastic 2–4 inches up the wall, then trim after the floor is finished.
- Smooth out: Remove air pockets or wrinkles.
Non-obvious insight: Some insulation boards come with a built-in vapor barrier. If yours does, you may not need extra plastic.
If you need to cut the vapor barrier around obstacles like support posts, make clean cuts and seal edges tightly with tape or foam sealant. Even a small gap can let moisture through. On older concrete, double up the plastic in problem areas for extra protection.
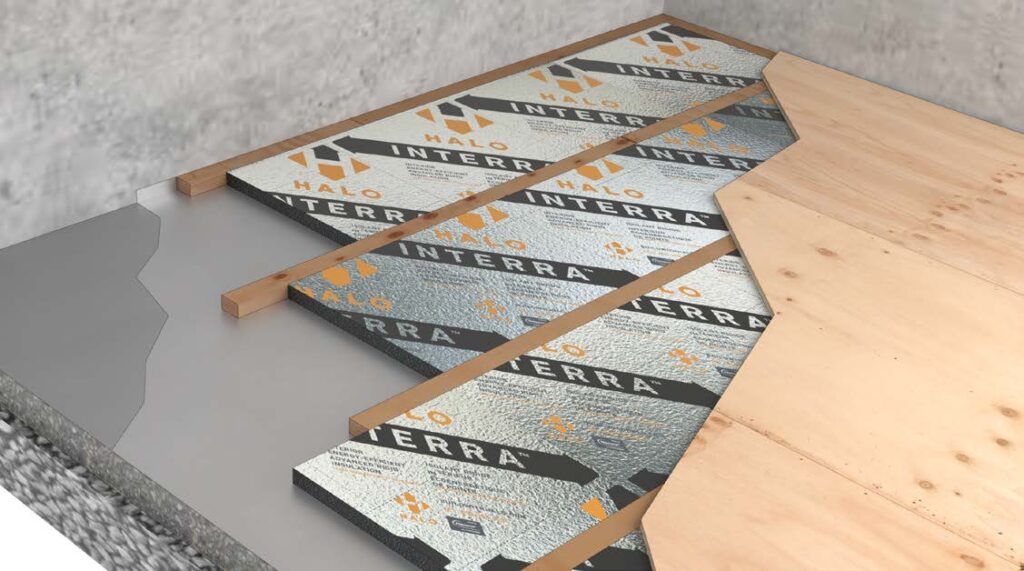
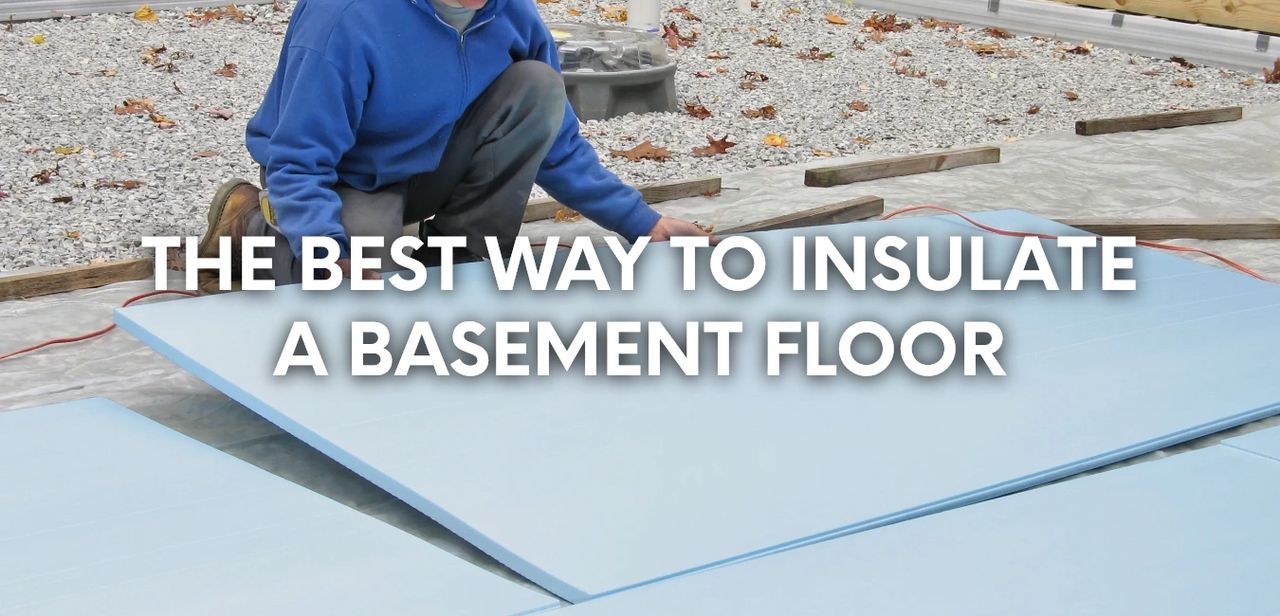
Installing Rigid Foam Insulation
Now it’s time to place your insulation. Work carefully to avoid gaps or spaces.
- Lay the first board in a corner. Cut as needed with a utility knife.
- Butt boards tightly together. Gaps allow heat to escape.
- Stagger seams between rows for better strength.
- Seal all joints with heavy-duty tape or spray foam sealant. This step is often skipped, but it makes a big difference.
- Trim at edges: Use a utility knife to fit around pipes or corners.
| Step | Detail |
|---|---|
| 1 | Lay vapor barrier |
| 2 | Install first row of rigid foam boards |
| 3 | Stagger seams between boards |
| 4 | Seal all joints and edges |
| 5 | Check for gaps and fill with spray foam |
Securing The Boards
Most rigid foam insulation stays in place under its own weight, especially once you add flooring. In high-traffic areas, or if you are using a floating subfloor, construction adhesive can help.
- Apply adhesive in lines or dabs on the bottom of each board.
- Press firmly to set.
Avoid using nails or screws, which can damage the vapor barrier.
If your basement has posts or plumbing, use a handsaw or hot knife for precise cuts around obstacles. Always seal the edges with spray foam to prevent air and moisture leaks. If you need to walk on the boards during installation, lay a scrap sheet of plywood over the foam to spread your weight.
Adding A Subfloor (optional But Recommended)
Insulation alone is not a finished floor. For a comfortable, long-lasting basement, add a subfloor above the foam.
Types Of Subfloor Systems
There are two main approaches:
- Floating subfloor panels: These are tongue-and-groove panels designed to sit above insulation. They are easy to install and provide a smooth base.
- Plywood sheets: 3/4-inch tongue-and-groove plywood is a strong, cost-effective option.
Comparison of subfloor systems:
| Subfloor Type | Installation Time | Moisture Resistance | Cost | Best Use |
|---|---|---|---|---|
| Floating Panels | Fast | Excellent | $$$ | Finished basements |
| Plywood Sheets | Medium | Good | $$ | DIY projects |
| No Subfloor | Fastest | Poor | $ | Utility/storage |
Installing The Subfloor
- Lay panels or plywood directly over the insulation.
- Stagger seams for stability.
- Leave 1/4-inch gap at walls for expansion.
- Tape seams if using floating panels.
- Screw panels together (not to concrete).
If you use plywood, consider painting the underside with a moisture-resistant primer for extra protection. If your basement is large, ask a friend for help—subfloor panels are heavy and easier to move with two people.
Choosing The Right Finish Flooring
Once your insulation and subfloor are down, you can install almost any type of flooring.
Best Flooring Choices
- Engineered wood: Stable and less likely to warp.
- Luxury vinyl plank (LVP): Waterproof, durable, and stylish.
- Carpet: Warm and soft, but use moisture-resistant padding.
- Ceramic tile: Cold, but works well with radiant heat.
Avoid Solid Hardwood
Solid hardwood is not recommended on basement floors. It can absorb moisture and warp.
Special Tip
If you want radiant floor heating, install it above the insulation but under the finish flooring. This setup provides the best energy efficiency.
A less common but excellent choice for basements is rubber flooring. It’s comfortable, easy to clean, and good for home gyms or playrooms. If you have pets, choose a flooring that is scratch-resistant and not easily stained by accidents.
Common Mistakes To Avoid
Beginners often make these errors when insulating a concrete basement floor:
- Skipping the vapor barrier: This leads to trapped moisture and mold.
- Using the wrong insulation: Never use fiberglass batts or regular foam without checking moisture resistance.
- Not sealing seams: Small gaps can cut insulation performance by 20–30%.
- Ignoring ceiling height: Thick insulation and a subfloor can reduce ceiling height below building code.
- Forgetting about floor drains or plumbing: Plan for access or removable panels where needed.
Non-obvious insight: Always check local building codes before starting. Some areas require a minimum ceiling height or special vapor barriers.
Another mistake is not labeling the order and location of the boards as you work. This can make it difficult to replace or repair sections later. Take photos during installation for your records.
What About Insulating Existing Finished Basements?
If your basement is already finished, adding insulation is much harder. The best time to insulate is before finishing the space. If you must insulate an existing floor, you may need to remove flooring and possibly subfloor panels. This is a big job, but it’s often worth it for comfort and energy savings.
Consider this: if your finished basement feels cold and you see condensation or smell musty odors, it’s a sign that the floor is not properly insulated. While it’s a hassle to remove and reinstall flooring, the long-term benefits—better comfort and lower energy bills—are usually worth the temporary inconvenience.
Credit: extremehowto.com
Cost Of Insulating A Concrete Basement Floor
The cost depends on the size of your basement, materials, and whether you hire a professional or do it yourself.
- DIY cost: $2–$5 per square foot for insulation, vapor barrier, and subfloor panels.
- Professional cost: $6–$12 per square foot, including labor.
For a 600 sq. Ft. basement, expect to pay $1,200–$3,000 for a DIY job, or $3,600–$7,200 for professional installation.
Remember, you may save hundreds of dollars per year on heating and cooling after insulating your basement floor.
When budgeting, include the cost of tools, any repairs needed for moisture problems, and possible disposal fees for old flooring. If you plan to sell your home, a comfortable, finished basement can return much of your investment by increasing resale value.
Safety Tips And Building Codes
Safety is just as important as comfort.
- Wear gloves and a mask when cutting insulation.
- Check for radon: Basements can have high radon levels. Test and, if needed, install a mitigation system before sealing the floor.
- Electrical and plumbing: If your basement has floor drains or pipes, plan for access. Do not block with insulation.
- Building codes: Always check local codes for insulation thickness, vapor barrier requirements, and fire safety.
If you’re unsure about any step, contact your local building department. Failing to follow codes could mean expensive fixes later. For example, some areas require a fire-resistant layer above certain types of foam insulation.
Maintenance And Long-term Care
A well-insulated basement floor is low-maintenance, but it is smart to check it every year or two.
- Check for moisture: Look for damp spots, especially after heavy rain.
- Inspect edges: Make sure insulation and vapor barrier are still tight at walls.
- Watch for flooring problems: Buckling, warping, or odors can be signs of hidden moisture.
If you ever need to do repairs, remove finish flooring and subfloor panels to access the insulation.
A good habit is to check the basement after each season, especially after heavy storms or snowmelt. Early detection helps prevent big problems.
Real-life Example: Saving Money And Improving Comfort
Consider the case of a family in Minneapolis, Minnesota. They insulated their 800 sq. Ft. basement floor with 2-inch XPS foam, vapor barrier, and floating subfloor panels. Before, the basement was cold and the furnace ran constantly. After the upgrade, the basement temperature stayed 10–12°F warmer, and their annual heating bill dropped by about $400.
More importantly, their kids could play on the floor all winter.
This family also noticed the basement felt much less humid in the summer, and they no longer had musty smells. The project took one weekend with two adults working together, and they were able to install new flooring and furniture without worrying about mold or water damage.
When To Call A Professional
Some homeowners prefer to hire a pro. If you find:
- Serious moisture problems
- Large cracks or uneven concrete
- Radon issues
- Complex floor plans or built-in features
…it is smart to get expert help. A contractor can also help you choose the best materials and finish the job quickly.
For more building science details, the U.S. Department of Energy offers trusted advice.
Frequently Asked Questions
What Is The Best Insulation For A Concrete Basement Floor?
The best choice for most homes is rigid foam board insulation (XPS or EPS). It offers a high R-value, excellent moisture resistance, and is easy to install under flooring.
How Thick Should Basement Floor Insulation Be?
In most U.S. climates, 2 inches of rigid foam board (R-10) is standard. If you live in a very cold area, consider 2.5–3 inches, but make sure you have enough ceiling height.
Can I Insulate A Damp Basement Floor?
No. You must solve moisture problems first. Insulating a damp floor can trap water, cause mold, and damage your home.
Do I Need A Vapor Barrier Under Basement Floor Insulation?
Yes, a vapor barrier is critical. It stops ground moisture from reaching your insulation and flooring. Use at least 6 mil polyethylene plastic.
What Flooring Can I Put Over Insulated Basement Floors?
You can install engineered wood, luxury vinyl plank, carpet (with moisture-resistant pad), or tile. Avoid solid hardwood because it can warp in moist environments.
A properly insulated concrete basement floor is a smart investment. It brings lasting comfort, saves money, and protects your home from moisture and mold. With the right planning and steps, you can transform even the coldest basement into a warm, inviting space your family will love.
Credit: asiri-designs.com