Hiding Wood Filler After Staining: Expert Tips for a Seamless Finish
Every woodworker, DIY enthusiast, or homeowner faces a common challenge: visible wood filler spots after staining. You patch a hole or crack, sand it smooth, apply your favorite stain—and the patched area stands out, either lighter or darker than the rest of the wood. Even expensive wood fillers can look obvious under certain light. So, how do you really make wood filler invisible after staining? Let’s explore advanced methods, professional secrets, and science-backed solutions to help you achieve a flawless wood finish.
Why Wood Filler Stands Out After Staining
Before you can hide wood filler successfully, you need to understand why it shows in the first place. Most commercial wood fillers do not absorb stain like natural wood. Their texture, color, and chemical make-up differ from the surrounding wood fibers. Fillers often contain synthetic resins, sawdust, or minerals, and the pores are not the same as real wood. This means that after staining, the patched area can:
- Turn out much lighter or darker than the wood
- Appear with a flat or unnatural sheen
- Show up as a dull or shiny spot
Even “stainable” wood fillers can disappoint. Manufacturers may claim their fillers match any stain, but in real projects, results often fall short. Sunlight, angle, and type of stain all affect how visible your filler will be.
Another factor is the wood’s grain pattern. Wood filler is smooth, while most woods have texture. When light hits the smooth patch, it reflects differently than the natural surface, making the repair stand out. Dust left in the patch or around the repair can also create a barrier, keeping stain from soaking in fully.
Sometimes the wood itself absorbs more stain around the repair, creating a “halo” effect.
The good news? With the right process and a few expert tricks, you can make those patched areas almost disappear—even to a trained eye.
Choosing The Right Wood Filler
Not all wood fillers are equal. The kind you choose will have a big impact on the final look.
Types Of Wood Fillers
Here are the main types and how they behave with stains:
| Wood Filler Type | Stain Absorption | Best Use |
|---|---|---|
| Water-Based | Poor to moderate | Indoor, small repairs |
| Solvent-Based | Moderate | Floors, high-traffic wood |
| Stainable (Pre-Mixed) | Varies | General use, easy to sand |
| Two-Part Epoxy | Poor | Large repairs, exterior |
| Homemade (Sawdust + Glue) | Good | Best color match |
Practical tip: For the closest color match, many pros create their own filler using fine sawdust from the actual wood mixed with wood glue. This homemade filler absorbs stain much like the surrounding surface. For wide cracks or deep holes, you can even use sawdust from the sanding process, which ensures the color and grain will match nearly perfectly. One thing to remember: not all glues are equal. Yellow wood glue is a safe choice, but avoid white glue, which can sometimes dry too light or resist stain.
Color Selection Matters
Always choose a filler color that matches the unstained wood as closely as possible, not the final stained color. Light-colored fillers can be tinted, but dark fillers are hard to lighten. When in doubt, go slightly lighter—it’s easier to darken a patch than lighten it.
Some brands offer a variety of premixed colors; picking the closest shade to your wood’s natural color can save a lot of blending work later. If you’re working with exotic woods or unusual colors, experiment with mixing small batches of filler with universal colorants or artist’s pigments to get a closer match.
Surface Preparation: The Foundation Of A Hidden Patch
No matter how good your filler, poor prep will ruin the result.
Cleaning The Area
Remove dust, oil, and loose wood fibers before applying filler. Use a vacuum or a tack cloth for fine particles. Even fingerprints can affect how stain settles, so it’s a good idea to wipe the area with a damp cloth and let it dry before filling.
For oily woods like teak or rosewood, cleaning with a bit of denatured alcohol or mineral spirits can help. This removes natural oils that might keep the filler from sticking or cause the stain to pool around the patch.
Applying The Filler
- Press the filler firmly into the defect with a putty knife.
- Overfill slightly, as fillers shrink when drying.
- Smooth off excess. A razor blade can help on flat surfaces.
For deep or wide gaps, apply filler in thin layers. Let each layer dry before adding more. This prevents cracking and ensures a solid repair. On vertical surfaces, tape around the defect to keep filler from spreading where you don’t want it.
If you’re using a homemade sawdust filler, mix only what you need for each repair. The mixture dries fast, so work quickly and press it tightly into the hole.
Drying And Sanding
Let filler dry fully (check product instructions). Sand with the same grit as the rest of the project. Feather the edges so the patch blends into the wood. If you sand only the patch, you may create a “dish” that catches stain differently.
Important detail: Sanding too smooth (using fine grits like 220 or higher) can close the wood’s pores, causing the stain to absorb unevenly. Match the grit to the surrounding area.
Always sand with the grain. Cross-grain sanding scratches will highlight the patch even more after staining. If you’re unsure, lightly sand the entire area around the patch to ensure the surface texture is consistent.

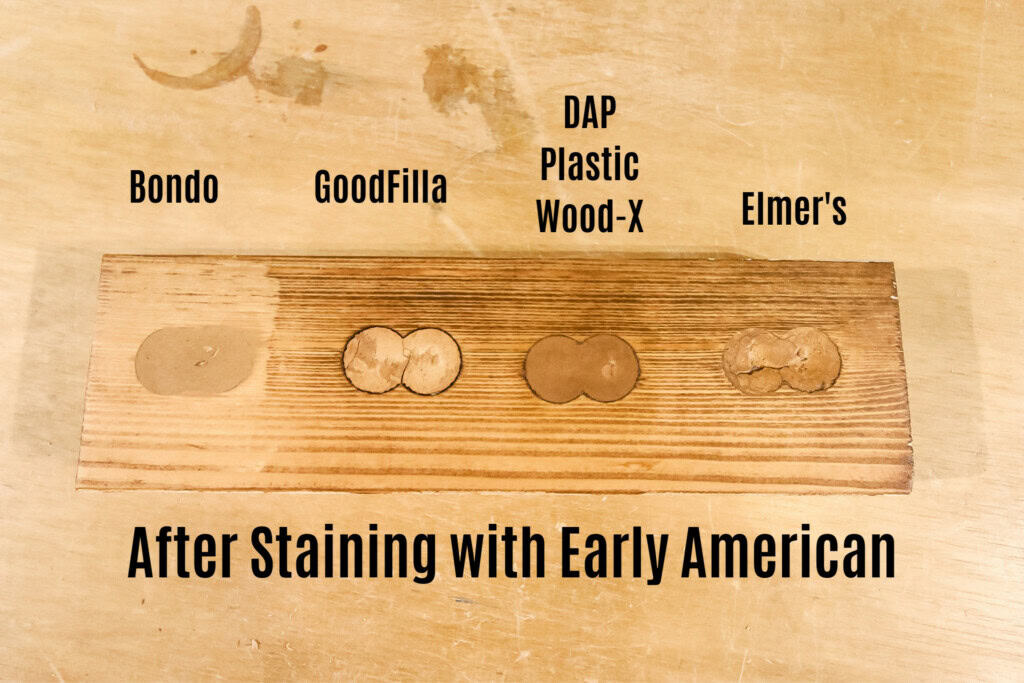
Credit: www.zar.com
Staining Techniques For Invisible Filler
Even the best-prepared patch can stand out if stained incorrectly. Here’s how to get a seamless look.
Test Before You Commit
Always do a test stain on scrap wood with filler applied. This shows how the combination will look under real conditions.
If you’re working on a valuable or visible surface, test your entire process—from filling to sanding to staining—on a hidden spot or extra board. This will save you from unwanted surprises and wasted time.
Stain Types And Their Effects
Different stains interact with fillers in unique ways:
| Stain Type | Behavior with Filler | Best Practice |
|---|---|---|
| Oil-Based | May highlight filler spots | Apply thin coats, wipe well |
| Water-Based | Less penetration, may look patchy | Work fast, feather edges |
| Gel Stain | Good for blending, sits on top | Use on stubborn patches |
| Dye Stain | Deep color, can even out tone | Careful application needed |
Non-obvious insight: Gel stains are often overlooked, but they work well over filled areas because they don’t soak in as much. This can help balance out differences.
Stain Application Order
- Stain the entire surface lightly.
- Let dry, then check patch visibility.
- If the patch is lighter, apply more stain only on the patch using a small artist’s brush.
- If the patch is darker, gently sand it and re-stain.
Feathering the stain outward from the patch helps blend edges. Avoid puddling or dripping stain on the filler.
If you need to layer stain, let each coat dry fully before adding more. Thin, even coats help you control the final color. In some cases, using a cotton swab or corner of a rag lets you apply stain with more precision.
Layering And Tinting
For tough spots, apply stain in thin layers, letting each one dry. You can custom-tint stain with a little artist’s oil paint to match stubborn filler spots.
If you need to adjust the stain’s tone, try mixing small amounts of different stain colors before applying. Keep notes on your mixtures so you can reproduce the same result if needed.
Advanced Tricks For Professional Results
Sometimes, even with perfect prep, a patch still shows up. Here are pro techniques to hide it:
Graining With A Marker Or Pencil
Use a fine artist’s marker or colored pencil to mimic wood grain over the filled area. Match the surrounding grain pattern. This visual trick works especially well on oak, walnut, and other strong-grained woods.
Don’t press too hard—light, thin lines are best. Practice on scrap first. For extra realism, use two or three shades to mimic the natural color changes in the wood grain.
Spot Staining
Dab extra stain directly onto the patch with a cotton swab or tiny brush. This builds up color only where needed. Wipe off excess immediately to avoid rings.
Patience is key here. It’s better to add several light applications than to try to fix everything in one go. Check your work in different light to make sure the patch blends from all angles.
Using Glaze
A wood glaze is a tinted, slow-drying colorant applied after staining but before clear finish. It can be brushed or wiped over the patched area to blend color and add subtle grain effects.
Glazing is especially helpful if you’re working with woods that have dramatic grain patterns. You can use the glaze to “paint” grain lines right over the patch, hiding it further.
Applying Toner
A toner is a clear finish with a small amount of dye. Spray or brush it over the entire surface to “even out” differences between wood and filler. This is a common cabinet-finishing secret.
For small jobs, you can tint clear shellac or lacquer with a little stain and brush it on as a toner. Always practice on scrap first to avoid over-darkening the wood.
Color-matched Putty
After the final coat of finish (not before), use a color-matched putty stick to touch up any visible filler. These putties come in many shades and can be pressed into small cracks or nail holes for an almost invisible repair.
For best results, warm the putty in your hands before applying; it will blend more easily. Buff gently with a soft cloth to remove excess and match the surrounding sheen.
Common Mistakes And How To Avoid Them
Many beginners repeat the same errors. Here’s how to avoid them:
- Skipping the test board: Always test stain and filler together on scrap.
- Filling after staining: Filler almost never matches if applied after stain. Fill, sand, then stain.
- Using the wrong filler: Not all fillers are “stainable” as advertised.
- Over-sanding the patch: Super-smooth filler absorbs less stain, causing a lighter patch.
- Not cleaning dust: Fine dust in the patch can prevent stain absorption.
- Using only one stain coat: Sometimes filler needs extra layers or spot staining.
- Ignoring grain direction: Filler in open-grained wood (like oak) may need graining with pencil/marker.
- Rushing the process: Allow full drying time for both filler and stain.
A less obvious mistake: not checking your work under different lighting. What looks blended in one light may stand out in another. Always inspect your project in both daylight and artificial light before finishing.
Real-world Examples And Solutions
Let’s look at two common situations:
Example 1: Filling Nail Holes In Pine Trim
You patch nail holes with pre-mixed stainable filler. After staining, the holes appear lighter.
Solution: Use pine sawdust mixed with glue for the filler. Apply, sand flush, then stain. If still visible, spot-stain with a gel stain and a fine brush. For final touch, use a matching putty stick after finishing.
If the pine trim is being painted rather than stained, a standard filler is fine. But for natural or stained pine, the homemade filler blends better and is less likely to telegraph through the finish.
Example 2: Repairing A Gouge In Oak Tabletop
You fix a deep gouge with two-part epoxy filler. The patch looks gray after staining.
Solution: Before staining, use a colored wood marker to pre-tint the patch. After staining, use a glaze tinted to the oak color, feathered over the patch. Mimic the grain with a sharp brown pencil. Spray a toner if needed.
Unexpected tip: Sometimes, a tiny drop of the stain mixed with clear finish can be brushed onto the patch for better blending.
For future repairs, consider using a tinted epoxy (mixed with a little artist pigment) to get closer to the wood’s base color right from the start.
Credit: www.charlestoncrafted.com
Alternative Approaches For Special Woods
Some woods are extra tricky. Here’s what works best:
- Maple and cherry: Use water-based fillers and light stains. These woods blotch easily; apply a pre-stain conditioner.
- Walnut: Match filler to the heartwood color, not the sapwood. Walnut changes color as it ages.
- Ash and oak: Open pores mean filler can stand out. Consider filling grain with a colored paste grain filler for a uniform look.
For highly figured or exotic woods like zebrawood or purpleheart, always test your approach on scrap. Their dramatic colors and patterns are hard to match, so you may need to blend several techniques.
When To Use Wood Putty Instead Of Filler
Wood putty is different from wood filler. Putty stays flexible and is usually applied after finishing. It works well for filling tiny holes or gaps after staining and topcoating. Choose a color-matched putty for the best results. For large defects or structural repairs, use wood filler before staining.
Putty is especially helpful for baseboards, trim, and other areas where small nail holes show up after installation. It’s also a good solution for touch-ups on old furniture or floors.
Comparing Filler Brands And Products
With so many choices, which products give the best results? Here’s a quick comparison of popular options:
| Brand/Product | Type | Stain Compatibility | Best Feature |
|---|---|---|---|
| Minwax Stainable Wood Filler | Pre-mixed, water-based | Moderate | Easy to sand |
| Elmer’s Carpenter’s Wood Filler | Water-based | Poor to moderate | Low odor |
| Famowood Latex Wood Filler | Latex-based | Good | Dries hard, minimal shrinkage |
| Timbermate Wood Filler | Water-based | Good | Re-wettable, no waste |
| Homemade (Sawdust + Glue) | Custom mix | Excellent | Best color match |
Pro insight: Commercial fillers are convenient, but for high-visibility surfaces, a homemade filler with sawdust from your project wood will almost always blend better.
Remember, no filler is perfect for every job. Try different brands and techniques on less important pieces to find your preferred combination.
Final Finishing Steps
After staining and touch-ups, apply your clear finish—varnish, polyurethane, shellac, or lacquer. The finish can slightly change the appearance of the patch. Sometimes a patch that looks perfect before finishing will stand out after. Here’s how to fix it:
- Let the first finish coat dry, then inspect under different lights.
- If the patch is visible, apply a thin glaze or toner, then another finish coat.
- For glossy finishes, buff gently with very fine steel wool between coats to blend sheen.
Unexpected detail: The angle of light can make even a well-blended patch appear or disappear. Always check your work from several angles.
For large surfaces, consider using a “raking light”—a bright lamp placed at a sharp angle to the surface. This reveals any remaining flaws before your final finish.
If you’re working with a matte or satin finish, a light buff with a brown paper bag (yes, really) can help even out minor sheen differences without scratching the surface.
Credit: www.reddit.com
Preventing Future Filler Problems
Once you know how to hide wood filler after staining, you can take steps to avoid the problem in the first place:
- Use the smallest amount of filler needed.
- Collect dust from your sanding and save it for making your own filler.
- Match the filler to the wood’s base color, not the final stain.
- Apply stain evenly—uneven staining makes patches stand out more.
- Consider clear finishes that add warmth (like oil-based polyurethane) to help blend repairs.
A good habit: always keep a small jar of sawdust from each species of wood you use. This makes future repairs easier and more accurate.
Frequently Asked Questions
How Do I Make Wood Filler Match Stain Perfectly?
Matching wood filler to stain is a challenge because most fillers absorb stain differently than wood. For the best match, use sawdust from your project wood mixed with glue as filler. Always test on scrap first, and consider spot staining or using a colored glaze to blend the area. Patience and layering often give the best results.
Can I Stain Over Wood Filler?
Yes, but the results depend on the type of filler. Most commercial wood fillers do not absorb stain like wood, so the patch may show. Use stainable or custom fillers, and always test the combination before working on your main project.
What’s The Difference Between Wood Filler And Wood Putty?
Wood filler is for unfinished wood, dries hard, and is sanded before staining or finishing. Wood putty stays flexible, is used after finishing, and is great for small touch-ups or gaps. Filler is for structural repairs; putty is for cosmetic fixes.
Why Does My Wood Filler Look Lighter Than The Rest Of The Wood After Staining?
This happens because the filler doesn’t absorb stain the same way wood does. To fix it, try spot staining with a gel stain, using a colored pencil to draw in grain, or applying a glaze before the final finish. Always match filler to the unstained wood, not the stained color.
Are There Any Fillers That Are Truly Invisible After Staining?
No commercial filler is 100% invisible, but a homemade filler using sawdust and glue comes closest. Skillful use of spot staining, graining with pencils, and tinted glazes can make repairs nearly invisible to the naked eye.
Finishing Thoughts
Hiding wood filler after staining is both a science and an art. It requires careful material selection, precise preparation, and a few advanced finishing tricks. While no filler is ever completely invisible under all conditions, with patience and attention to detail, your repairs can blend so well that only you know they’re there. Whether you’re restoring a family heirloom or finishing a DIY project, these methods will help you achieve a finish you’re proud to show off. For more in-depth woodworking tips, check out this guide from Wood Magazine.
With practice, you’ll see that even tricky wood filler can be conquered—and your finished piece will look beautiful for years to come.