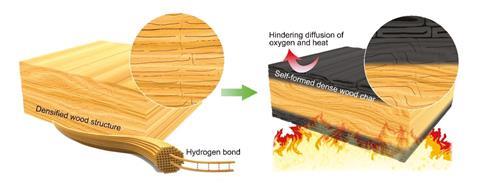
Fire and wood have always shared a risky relationship. While wood gives warmth and beauty to homes and buildings, it is also one of the most vulnerable materials when it comes to fire. In recent years, there has been a growing focus on making wood safer—especially in homes, schools, and public spaces.
Fireproofing wood does not mean making it impossible to burn, but it greatly slows down how fast fire spreads. This gives people more time to react and can save lives and property.
Learning how to fireproof wood is important for anyone who builds, renovates, or owns wooden structures. It is also valuable for people who enjoy woodworking as a hobby. Many believe fireproofing is only for large buildings, but even a simple wooden shelf or fence can benefit from these methods.
This guide explains every major way to fireproof wood, step by step. You will see practical solutions, learn how products work, and understand the science behind them. By the end, you will have a clear plan to protect your wood from fire—whether for a small project or an entire house.
Why Fireproofing Wood Matters
Wood is a natural material with a high risk of burning. When exposed to fire, it can ignite quickly, especially if it is dry or untreated. Once a fire starts on wood, it can spread fast, damaging structures and putting people in danger.
According to the National Fire Protection Association, structure fires in the United States cause billions of dollars in property loss every year, with wood being a major factor in fire spread.
Fireproofing wood does not remove all risk, but it makes a big difference. Treated wood can resist ignition, burn more slowly, and produce less smoke. This improves safety and gives firefighters more time to respond. In many places, fireproofing is required by building codes, especially for commercial buildings or public spaces.
Even if it is not required, it brings peace of mind to know your property is better protected.
How Fire Damages Wood
Before choosing a fireproofing method, it helps to understand what happens when wood burns. Wood is made of cellulose, hemicellulose, and lignin. When exposed to heat, these parts break down and release gases that ignite, causing flames and smoke. The process depends on several factors:
- Moisture content: Dry wood burns much faster than wet wood.
- Wood type: Softwoods (like pine) usually ignite faster than hardwoods (like oak).
- Surface area: Thin pieces of wood catch fire faster than thick beams.
- Ventilation: More oxygen means faster burning.
Fireproofing methods work by slowing one or more steps in this process. Some chemicals make wood form a protective layer, while others block the release of gases. Understanding these basics helps you choose the right solution for your needs.
Main Methods To Fireproof Wood
There are several effective ways to fireproof wood. Each has its strengths and is suited to different situations. Some are simple DIY solutions, while others need professional help. Let’s look at the most common and proven methods.
1. Fire Retardant Paints
Fire retardant paints are a popular choice for both new and old wooden surfaces. These paints contain special chemicals that react when heated. Instead of burning, the paint forms a thick, insulating layer called intumescence. This layer protects the wood underneath from the heat and slows down the fire.
How to use:
- Clean the wood surface. Remove dust, oil, and old paint.
- Apply the fire retardant paint with a brush, roller, or spray.
- Follow the manufacturer’s instructions for the number of coats and drying time.
- Let the paint cure completely before exposing it to any risk.
Pros:
- Easy to apply, even for beginners.
- Adds a layer of protection without changing the wood’s shape.
- Available in many colors and finishes.
Cons:
- May cover the natural look of wood.
- Needs reapplication over time, especially outdoors.
Non-obvious insight: Not all fire retardant paints are the same. Some only work on interior surfaces, while others are made for outdoor use. Always check the product rating and where it can be used.
2. Fire Retardant Varnishes And Stains
If you want to keep the natural look of wood, fire retardant varnishes or stains are a good option. These products soak into the wood and leave a clear or tinted finish. They use chemicals that slow burning and reduce smoke.
How to use:
- Sand the wood to open up the surface.
- Clean away dust and debris.
- Apply the varnish or stain evenly, following the grain of the wood.
- Allow to dry fully. Sometimes, a second coat is needed for best results.
Pros:
- Preserves the wood’s texture and grain.
- Suitable for furniture, floors, and visible woodwork.
- Often water-resistant.
Cons:
- Usually less protective than thick fireproof paints.
- Needs regular maintenance.
Non-obvious insight: Fire retardant stains often work best on softwoods, which absorb more product. Hardwoods may need extra coats or special primers.
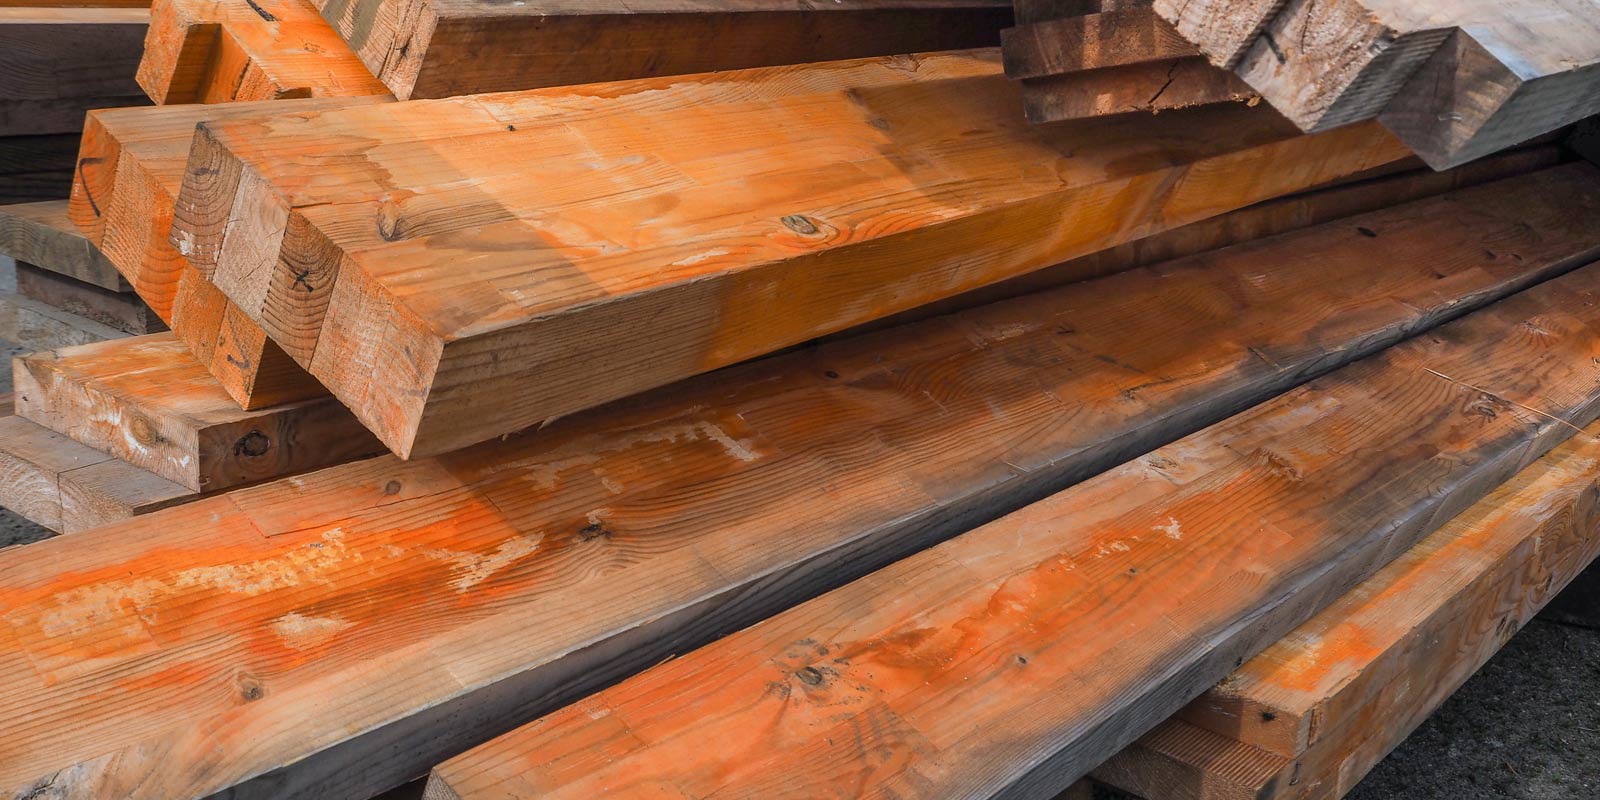
3. Pressure Impregnation Treatments
For large-scale or professional projects, pressure impregnation is one of the most reliable methods. Wood is placed in a chamber, and fire retardant chemicals are forced deep inside under high pressure. This makes the protection last much longer, even if the wood is cut or sanded.
How it works:
- Wood is loaded into a sealed chamber.
- Air is removed to create a vacuum.
- Fire retardant solution is added, and pressure pushes it into the wood.
- The wood is dried and ready for use.
Where to use: Often used for construction lumber, decking, playground equipment, and utility poles.
Pros:
- Deep and long-lasting protection.
- Good for outdoor or structural wood.
Cons:
- Needs special equipment and trained workers.
- Usually done in a factory, not on-site.
- Can change the wood’s color or mechanical properties.
Non-obvious insight: Some pressure-treated wood can corrode metal fasteners over time. Use stainless steel or coated hardware to avoid this problem.
4. Home-made Fire Retardant Solutions
For small projects or DIY enthusiasts, there are recipes for simple fire retardant solutions. These are not as powerful as commercial products but can add some protection to crafts, decorations, or temporary structures.
Common DIY recipe:
- Mix 7 ounces of borax (sodium borate) and 3.5 ounces of boric acid in one gallon of warm water.
- Stir until dissolved.
- Apply with a brush or spray to bare wood.
- Let dry completely.
Pros:
- Low cost and easy to make.
- Non-toxic and safe for indoor use.
Cons:
- Not as effective as commercial treatments.
- Needs frequent reapplication, especially outdoors.
- May raise the wood grain or leave a residue.
Non-obvious insight: Homemade mixtures work best on indoor decorations or props. They are not recommended for structural wood or anything exposed to rain.
5. Fire Retardant Sprays
Sprays are another simple way to add fire resistance. Many commercial sprays are available for both interior and exterior use. They work by soaking into the wood and forming a barrier that slows ignition and reduces flame spread.
How to use:
- Clean the wood surface.
- Spray evenly, making sure all areas are covered.
- Let dry as directed.
Pros:
- Quick and easy to apply.
- Good for furniture, curtains, or hard-to-reach areas.
Cons:
- Often less durable than paints or impregnation.
- Can wear off with washing or weather.
Non-obvious insight: Some sprays are designed for specific woods or uses (like fabrics). Always check the label for compatibility.
6. Charring Or “shou Sugi Ban” Technique
This ancient Japanese method, known as Shou Sugi Ban, involves lightly charring the wood surface with a flame. The charred layer acts as a barrier, making the wood more fire-resistant and also protecting against insects and rot.
How to do it:
- Use a propane torch to burn the surface evenly.
- Brush off loose char with a wire brush.
- Seal with natural oil if desired.
Pros:
- No chemicals needed.
- Creates a unique, beautiful finish.
- Increases durability against weather and pests.
Cons:
- Changes the appearance and texture of wood.
- Needs practice to avoid damage.
- Not suitable for all projects.
Non-obvious insight: Charring works best on cedar, cypress, and pine. Hardwoods are more difficult to char evenly.
Comparing Fireproofing Methods
To help you choose, here is a side-by-side look at major methods:
| Method | Protection Level | Durability | Best For | DIY-Friendly |
|---|---|---|---|---|
| Fire Retardant Paint | High (surface) | Medium-High | Walls, ceilings | Yes |
| Fire Retardant Varnish/Stain | Medium | Medium | Furniture, visible wood | Yes |
| Pressure Impregnation | Very High (deep) | Very High | Structural, outdoor | No |
| Home-Made Solution | Low | Low | Decorations | Yes |
| Fire Retardant Spray | Medium | Low-Medium | Fabrics, small items | Yes |
| Charring/Shou Sugi Ban | Medium-High | High | Outdoor, siding | With skill |
Credit: www.chemistryworld.com
Step-by-step Guide: Fireproofing Wood For Home Use
Most people want to fireproof wood for safety at home—such as decks, walls, or furniture. Here’s a practical guide:
1. Choose The Right Product
Consider:
- Where will the wood be used? Indoors or outdoors?
- Do you want to keep the wood’s natural look?
- Is this for a small item or a large structure?
- Do you need a quick DIY fix or a long-term solution?
For visible wood, a fire retardant varnish is often best. For hidden wood or large areas, fire retardant paint or pressure-treated wood works well.
2. Prepare The Wood
Clean the surface to remove dirt, grease, and old finishes. Sand lightly to open up the grain—this helps the fire retardant soak in better. Wipe off dust with a damp cloth.
3. Apply The Fireproofing Product
- Paint or varnish: Use a brush, roller, or sprayer. Follow the grain for a smooth finish.
- Spray: Hold nozzle about 6–12 inches from the surface. Apply evenly.
- DIY solution: Use a brush for full coverage.
Allow to dry fully before handling or applying a second coat.
4. Reapply As Needed
Many products require regular maintenance—especially outdoors. Check the manufacturer’s advice for how often to reapply.
5. Check For Gaps
Make sure all edges, corners, and joints are covered. Fire can start at any weak spot.
6. Test For Effectiveness
If possible, test a small scrap piece before and after treatment. Hold a small flame to the wood—treated wood should char but not burst into flame easily.
Practical tip: No treatment is 100% fireproof. Always combine fireproofing with smoke alarms and good safety practices.
Advanced Options: Commercial Fire Retardants
Some commercial projects need higher levels of fire safety. In these cases, special products are used:
- Intumescent coatings: These paints or sprays swell up and form a thick foam when heated, providing extra insulation.
- Fire retardant plywood: Manufactured with chemicals during production for deep protection.
- Fire-resistant panels: Made from engineered wood and minerals for maximum safety.
These options are usually more expensive and require professional installation. However, they offer the best protection for schools, hospitals, hotels, or large buildings.
Credit: www.chemistryworld.com
Fire Ratings And Standards
When choosing a fireproofing product, look for official ratings. In the US, the most common standard is the ASTM E84 test, which measures how fast flames spread on a material. Other countries use similar systems.
Class A rating is the best, with the slowest flame spread. Always check product labels for these ratings. If you are building or remodeling, your local building code may require certain fireproofing levels.
Non-obvious insight: Many imported fireproofing products do not meet US or European standards. Always buy from trusted brands and check for certification.
Mistakes To Avoid When Fireproofing Wood
Even good fireproofing products can fail if used incorrectly. Here are common mistakes:
- Skipping surface preparation: Dirt or old finishes can block fire retardants from soaking in.
- Using the wrong product: Not all products work on every type of wood or for outdoor use.
- Applying too thinly: Many products need a thick layer or multiple coats to be effective.
- Ignoring maintenance: Sun, rain, and wear can break down fire retardants over time.
- Not covering all surfaces: Fire can start on the back, ends, or joints of wood.
Always read instructions and do a test patch before starting a big project.
Environmental And Health Considerations
Some older fireproofing chemicals contain harmful substances, such as formaldehyde or heavy metals. Modern products are much safer, but always check the Safety Data Sheet (SDS) for any product you use.
- Use gloves and masks when applying chemicals.
- Ventilate the area well.
- Store products away from children and pets.
Many new fireproofing solutions are water-based and low in volatile organic compounds (VOCs). This is better for indoor air quality and the environment.
How Long Does Fireproofing Last?
The durability of fireproofing depends on the method and where the wood is used:
- Paints and varnishes: Usually last 3–5 years indoors, but may need reapplication sooner outdoors.
- Pressure-impregnated wood: Can last 10–20 years, but still needs checking for damage.
- DIY solutions: May only last a few months, especially if exposed to water.
Always check the wood every year, especially in high-risk areas like kitchens or decks.
Real-world Examples
Case 1: A historic theater in London used fire retardant varnish on its 100-year-old wooden seats. During a small electrical fire, the flames did not spread, and the seats were saved.
Case 2: After a wildfire, homes built with charred wood siding in California survived better than those with untreated wood.
Case 3: In a school renovation, pressure-treated plywood was used for new walls. In a later kitchen fire, the treated plywood slowed the spread, giving time for evacuation.
These stories show that no method is perfect, but fireproofing makes a real difference.
Cost Comparison
Fireproofing wood costs more up front, but can save money in the long run. Here’s a rough comparison:
| Method | Average Cost per sq. ft. | Maintenance Frequency |
|---|---|---|
| Fire Retardant Paint | $1.50 – $3.00 | Every 3–5 years |
| Fire Retardant Varnish | $2.00 – $4.00 | Every 3–5 years |
| Pressure Impregnation | $3.00 – $5.00 | 10+ years |
| DIY Solution | $0.50 – $1.00 | 6–12 months |
| Fire Retardant Spray | $1.00 – $2.00 | 1–2 years |
| Charring/Shou Sugi Ban | $2.00 – $3.00 | 10+ years |
Practical tip: Always factor in the cost of time and maintenance, not just the first application.
Combining Methods For Best Results
Sometimes, using more than one fireproofing method gives extra protection. For example:
- Use fire retardant paint on structural beams, then add a clear varnish on top for a natural look.
- Pressure-treat wood, then seal with a water-resistant stain for outdoor decks.
- Char wood siding, then finish with natural oil for weather resistance.
However, make sure the products are compatible. Some chemicals do not mix well or can reduce each other’s effectiveness. Always do a small test before treating a large area.
Maintenance Tips
To keep fireproofed wood safe for many years:
- Inspect treated wood every year for wear or damage.
- Reapply fire retardants as recommended.
- Clean surfaces gently; harsh chemicals can remove protection.
- Repair cracks or splits quickly, as these can let fire in.
For outdoor wood, check after big storms or hot summers. Water and UV can break down even the best treatments.
Where To Learn More
For those who want the latest research or to see official standards, visit the National Fire Protection Association. They publish guides, codes, and safety tips for both home and business use.
Frequently Asked Questions
How Long Does Fireproofing Last On Wood?
The lifespan depends on the method used. Pressure-impregnated wood can last 10 to 20 years. Paints and varnishes usually need reapplication every 3 to 5 years, while DIY solutions may last only 6 to 12 months. Weather, sunlight, and wear all affect durability.
Can I Fireproof Wood At Home Without Special Tools?
Yes, many fire retardant paints, varnishes, and sprays are made for home use. For deeper protection (like pressure impregnation), you need factory equipment. Always follow safety instructions and do a small test first.
Does Fireproofing Change The Look Of Wood?
Some methods, like paints, cover the wood’s natural look. Clear varnishes and stains let the grain show through. Charring gives a dark, textured finish. Always choose a method that matches your style needs.
Are Fireproofing Chemicals Safe For Indoor Use?
Most modern fire retardants are safe when dry. Use gloves and masks during application, and ventilate well. Avoid older products with harmful chemicals. Check the Safety Data Sheet for any product you use.
Is Fireproofed Wood Completely Safe From Fire?
No treatment makes wood 100% fireproof. Fireproofing slows burning and gives more time to escape or fight a fire. Always combine with smoke alarms, fire extinguishers, and good safety habits.
Protecting wood from fire is a smart step for any property owner. By understanding your options and applying the right methods, you can greatly reduce the risk. Fireproofed wood does not just save property—it can save lives. Be proactive, choose your method carefully, and maintain it well for lasting safety.
Credit: clp-inc.com