Building a pantry cabinet can completely change how you use your kitchen. It gives you more storage, helps you organize food, and can even make cooking easier. Many people think making a pantry cabinet is only for expert woodworkers. But with the right steps, tools, and advice, you can build a sturdy, custom cabinet—even if you are a beginner.
This guide explains every part of making a pantry cabinet. You’ll learn how to plan, choose materials, measure, cut, assemble, and finish your cabinet. You’ll also see common mistakes, get tips from experience, and find out how to make your pantry fit your kitchen and your needs.
By the end, you’ll have the knowledge and confidence to build a pantry cabinet that looks great and works well for years.
Understanding Pantry Cabinets
A pantry cabinet is a tall storage unit, usually placed in or near the kitchen. Its main purpose is to store food, cooking tools, and sometimes cleaning supplies. Unlike regular kitchen cabinets, a pantry cabinet is designed for easy access and maximum use of vertical space.
Types Of Pantry Cabinets
- Freestanding Pantry – Not attached to the wall. You can move it if needed.
- Built-in Pantry – Fixed in place, often matching your kitchen cabinets.
- Pull-out Pantry – Slides out from between appliances or walls.
- Corner Pantry – Fits into a kitchen corner to save space.
- Butler’s Pantry – A separate small room or area, often with counters.
Most homes use a tall, built-in or freestanding pantry cabinet. This article explains how to make a classic, tall pantry cabinet with shelves and doors.
Why Build Your Own Pantry Cabinet?
- Custom size: Fit your kitchen perfectly.
- Better materials: Choose wood or plywood, not cheap particleboard.
- Cost-saving: Usually 30–50% less than buying ready-made.
- Personal design: Pick shelves, doors, and hardware you like.
Many people miss that a custom pantry can use awkward spaces—like a narrow wall or unused corner. It’s also possible to add features like pull-out shelves or spice racks as you learn.
Planning Your Pantry Cabinet
A successful project starts with a good plan. Rushing into building leads to wasted materials and frustration.
Measure Your Space
- Measure height, width, and depth where the pantry will go.
- Check for electrical outlets, vents, or pipes.
- Leave at least 1 inch above the cabinet for easy installation.
- For doors, make sure they can swing open without hitting anything.
Write down all measurements. Double-check them. This step saves big headaches later.
Decide On The Size
Common pantry cabinet sizes:
- Height: 84–96 inches (7 to 8 feet)
- Width: 24–36 inches
- Depth: 12–24 inches
A deeper cabinet holds more, but items can get lost at the back. For most kitchens, 16–18 inches deep is ideal.
Sketch Your Design
Draw a simple picture of your pantry cabinet. Mark:
- Number and height of shelves
- Door type (single or double)
- Any special features (drawers, pull-outs, spice racks)
A free design tool or even graph paper works fine. Planning on paper prevents mistakes when cutting wood.
Choose Your Features
Consider these:
- Adjustable shelves: More flexible storage.
- Pull-out drawers: Easier to reach items at the back.
- Built-in spice rack: Saves shelf space.
- Ventilation holes: Reduce moisture build-up.
Adding features later is harder, so decide now.
Choosing Materials And Tools
Good materials make a strong, long-lasting cabinet. Tools affect how easy and safe the work is.
Best Materials For Pantry Cabinets
| Material | Pros | Cons |
|---|---|---|
| Plywood (3/4 inch) | Strong, stable, easy to cut, smooth finish | More expensive than MDF |
| MDF (Medium Density Fiberboard) | Cheap, smooth surface, easy to paint | Heavy, not water-resistant, chips easily |
| Solid Wood | Very strong, beautiful grain | Expensive, can warp, heavy |
| Melamine/Particleboard | Low cost, comes pre-finished | Weak, swells with moisture, hard to repair |
For most home pantries, 3/4 inch plywood is best. It’s strong, easy to work with, and holds screws well.
Hardware And Accessories
- Cabinet hinges (concealed or visible)
- Cabinet handles or knobs
- Shelf pins (for adjustable shelves)
- Wood screws (1 1/4″ and 2″)
- Wood glue
- Drawer slides (if adding drawers)
- Leveling feet (optional)
Tools You’ll Need
- Measuring tape
- Pencil
- Circular saw or table saw (for straight cuts)
- Drill/driver
- Clamps
- Level
- Hammer
- Screwdriver
- Sanding block or electric sander
- Stud finder (for built-in cabinets)
- Square (for marking right angles)
Renting tools is fine if you don’t own them. Safety glasses and hearing protection are also important.
Cost Estimate
A basic pantry cabinet (84″x24″x18″) built with plywood and basic hardware usually costs $150–$350 for materials. Adding drawers or fancy hardware increases cost.
Cutting And Preparing The Parts
Accurate cutting is the difference between a cabinet that fits well and one that wobbles.
Make A Cutting List
Based on your design, list all the parts you need. For a standard tall pantry cabinet:
- 2 side panels (height x depth)
- 1 top panel (width x depth)
- 1 bottom panel (width x depth)
- 1–2 fixed shelves (width x depth)
- Adjustable shelves (as many as you want)
- Back panel (thin plywood, width x height)
- 2 doors (height x half the width each, minus a gap for hinges)
- Toe kick/base (optional)
Example cutting list for a 84″H x 24″W x 18″D cabinet:
- Sides: 2 at 84″x18″
- Top/Bottom: 2 at 24″x18″
- Shelves: 4 at 23.5″x17″
- Back: 1 at 83.5″x23.5″ (1/4″ plywood)
- Doors: 2 at 83.5″x11.5″
Always cut shelves and panels a bit smaller than the outer size to allow for hinges and movement.
Mark And Cut The Panels
- Mark all cuts with a pencil and square.
- Cut slowly with a sharp blade to avoid splinters.
- Support large panels as you cut to prevent breaking.
A common beginner mistake is not checking for square cuts. Always measure twice and cut once.
Edge Preparation
Plywood edges can be rough. Options:
- Sand smooth with 120-grit paper.
- Apply iron-on edge banding for a finished look.
- For solid wood, sand and round the edges slightly.
Edge banding is cheap and gives a professional look.
Credit: www.woodshopdiaries.com
Assembling The Cabinet Box
With all parts ready, you can build the cabinet box.
Dry Fit First
Before gluing or screwing, put all pieces together without fasteners. Check for fit and squareness. Adjust if needed.
Build The Box
- Lay the two side panels flat.
- Attach top and bottom panels between the sides, flush with the ends.
- Use wood glue along the edges, then clamp panels in place.
- Drill pilot holes and drive 2″ wood screws every 8–10 inches.
- Repeat for any fixed shelves (usually one near the middle for strength).
Check with a level and square as you build. The box should not wobble or twist.
Attach The Back Panel
- Place the box face-down.
- Lay the thin plywood back panel over the box.
- Square the box again.
- Nail or staple the back panel every 6–8 inches.
The back panel keeps the cabinet rigid. For built-in pantries, you can leave the back open if the wall is flat and clean.
Build The Toe Kick (optional)
A toe kick is a small recessed space at the bottom front, making it easier to stand close to the cabinet.
- Cut a strip 4″ high and full cabinet width.
- Attach behind the bottom panel, set back 2–3 inches.
- Screw or nail in place.
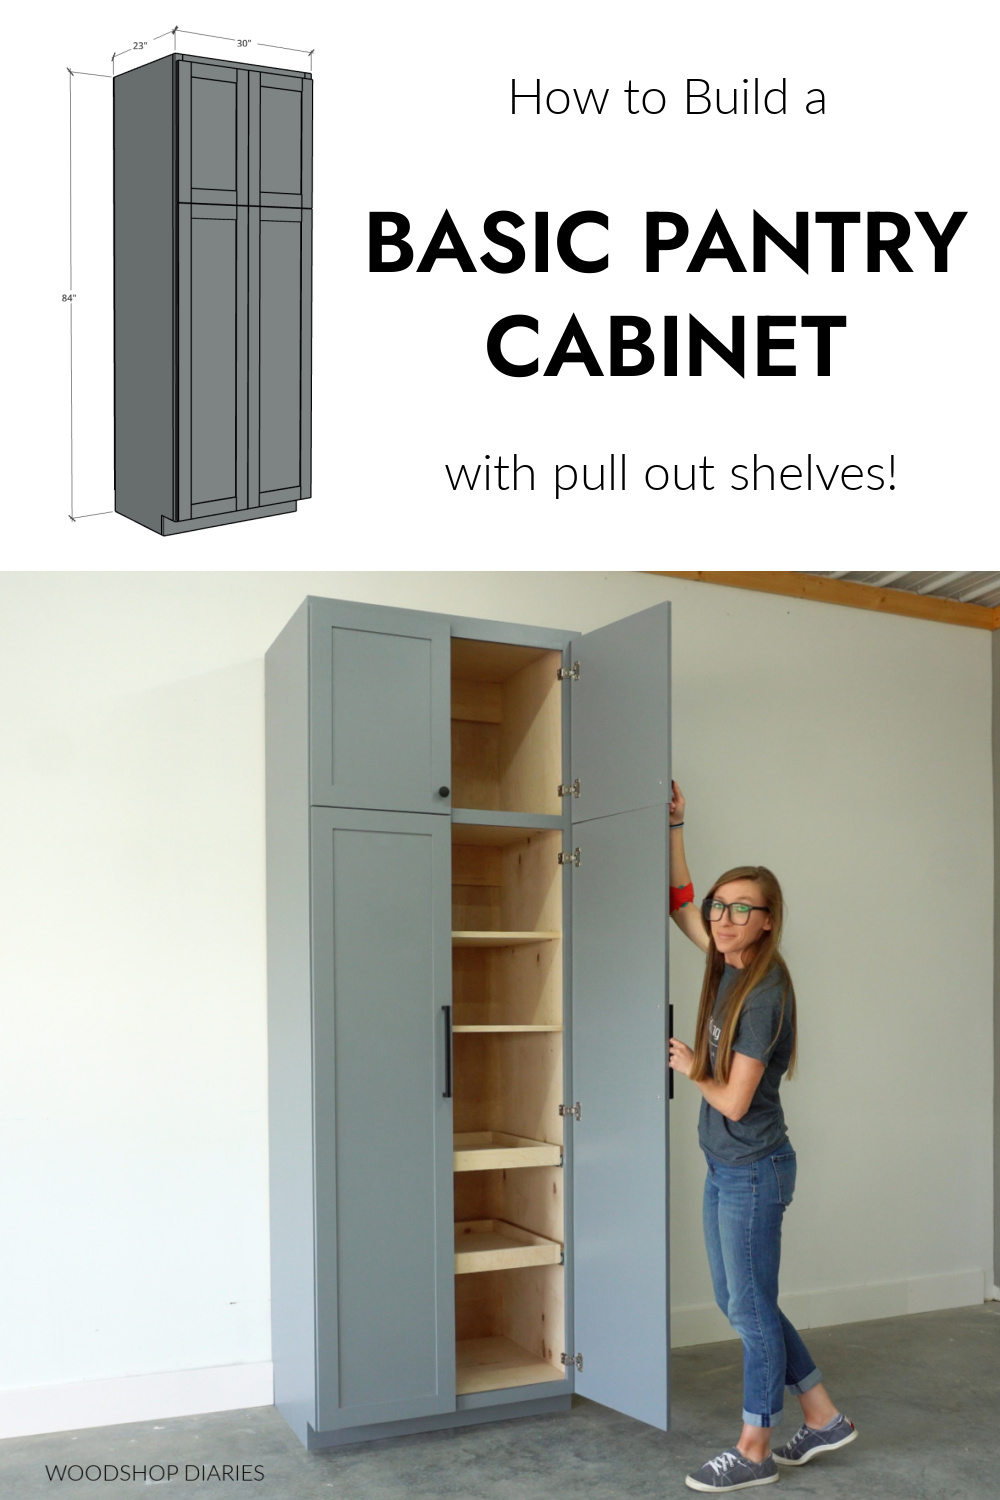
Making And Installing Shelves
Shelves are what make a pantry useful. You can choose fixed or adjustable shelves.
Fixed Shelves
Fixed shelves are screwed or nailed in place.
- Best for structural strength.
- Good to have one fixed shelf around the middle.
Adjustable Shelves
These use shelf pins in holes drilled into the side panels.
- Mark a line 2–3 inches from the front and back edge, inside both sides.
- Drill 1/4″ holes every 2 inches along the line.
- Use a shelf pin jig for even spacing.
Adjustable shelves make your pantry much more flexible.
Shelf Thickness And Strength
| Shelf Material | Max Width (before sagging) | Recommended Uses |
|---|---|---|
| 3/4″ plywood | 36 inches | Heavy cans, appliances |
| 5/8″ plywood | 30 inches | Dry foods, boxes |
| 1/2″ plywood | 24 inches | Light items only |
Beginners often use thin, cheap wood for shelves. This leads to sagging. For a strong shelf, use 3/4 inch plywood and keep spans under 36 inches.

Credit: www.thehandymansdaughter.com
Building And Hanging The Doors
Doors protect food from dust and give a finished look.
Door Types
- Slab doors: Simple flat panels.
- Shaker doors: Frame with a flat center panel.
- Glass doors: Show off contents.
For beginners, slab doors are easiest.
Cutting And Preparing Doors
- Cut doors 1/8″ smaller than the opening (for gaps).
- Sand all edges smooth.
- If painting, prime first for a smooth finish.
Hinge Choices
- Concealed (European) hinges: Hidden when doors are closed, adjustable.
- Butt hinges: Visible, easier to install.
Concealed hinges look modern and allow easy adjustment. Check hinge instructions for how much to cut off the door edge.
Hanging The Doors
- Mark hinge positions (usually 3–4 inches from top and bottom).
- Drill holes for hinges.
- Attach hinges to doors.
- Hold the door in place and screw hinges to the cabinet.
- Adjust for even gaps.
If doors don’t line up, adjust the hinges. Don’t force the wood—it can split.
Attaching Handles Or Knobs
- Mark handle location with a template or ruler.
- Drill a pilot hole.
- Screw handle in from the back.
Finishing Touches: Painting, Staining, And Sealing
Finishing protects the wood and makes your cabinet look great.
Paint Or Stain?
- Paint: Hides wood grain, easy to clean, matches any color.
- Stain: Shows wood grain, classic look, harder to change later.
Most pantries are painted for easy cleaning.
How To Finish
- Sand all surfaces with 120–220 grit paper.
- Wipe off dust.
- Apply primer (for paint) or wood conditioner (for stain).
- Sand lightly between coats.
- Apply 2 coats of paint or stain.
- Finish with a clear polyurethane coat for durability.
Always let each coat dry fully. Paint or finish before adding hardware for the smoothest result.
Sealing Edges
Pantries are in kitchens, so spills happen. Seal all cut edges with paint or polyurethane. This stops water from soaking in and damaging the wood.
Installing The Pantry Cabinet
Once built, it’s time to put your cabinet in place.
Standalone Vs. Built-in
- Freestanding: Just slide it into place. Use shims to level.
- Built-in: Screw through the cabinet back or sides into wall studs.
Always find wall studs with a stud finder. Use 2. 5–3 inch screws for a secure hold.
Leveling The Cabinet
- Use a level to check front-to-back and side-to-side.
- Add shims under the base as needed.
- Screw through the cabinet back into shims to keep it stable.
Unleveled cabinets cause doors to swing open or closed by themselves.
Securing To The Wall
For safety, always secure tall cabinets to the wall, especially in homes with children. Even heavy cabinets can tip if pulled.
Organizing Your Pantry Cabinet
A well-organized pantry saves time and reduces waste.
Shelf Placement
- Place tall shelves at the bottom for appliances or cereal boxes.
- Use shorter shelves for cans and jars.
- Adjustable shelves let you change as your needs change.
Storage Containers
- Use clear bins for flour, sugar, snacks.
- Label shelves and bins for fast finding.
- Store heavy items low, light items high.
Non-obvious Organization Tips
- Install a battery-powered motion light inside for dark corners.
- Store “first-in, first-out”: Put new food at the back, old at the front.
- Use a small turntable for spices.
Common Mistakes To Avoid
- Poor measuring: Leads to cabinets that won’t fit.
- Weak shelves: Thin shelves sag and break.
- Skipping edge banding: Makes cabinets look unfinished.
- Not securing to wall: Dangerous, especially with kids.
- No finish on edges: Moisture damages raw wood.
Beginners often forget to plan for door swing or to check for nearby outlets.
How To Customize Your Pantry Cabinet
Once you know the basics, you can add personal touches.
Add Drawers Or Pull-outs
- Pull-out baskets for onions and potatoes.
- Slide-out trays for baking sheets or cutting boards.
Built-in Spice Racks
- Narrow racks on the inside of doors.
- Adjustable shelves for spices.
Chalkboard Or Whiteboard
- Paint a door with chalkboard paint for shopping lists.
Lighting
- Stick-on LED strips or puck lights for easy visibility.
Ventilation
- Drill small holes in shelves or sides to keep air moving.
Custom features make your pantry cabinet fit your cooking style.
Maintenance And Cleaning Tips
A pantry cabinet is easy to care for if you set good habits.
- Wipe shelves with a damp cloth every month.
- Check for expired food and throw it out.
- Tighten any loose screws or handles.
- Repaint or touch up as needed.
Sealed and painted cabinets resist stains and last longer.
Sample Project Timeline
Here’s a realistic timeline for a beginner building a pantry cabinet:
| Task | Time Estimate |
|---|---|
| Planning & Measuring | 1–2 hours |
| Buying Materials | 1–2 hours |
| Cutting Parts | 2–3 hours |
| Assembly | 3–5 hours |
| Painting/Finishing | 2–4 hours (plus drying time) |
| Installation | 1–2 hours |
Most people finish the project over a weekend.

Credit: www.youtube.com
Where To Learn More And Get Inspiration
There are many free and paid resources for building cabinets. Woodworking forums, DIY websites, and YouTube channels show real builds and tips. The Family Handyman website has helpful guides and videos for beginners.
Frequently Asked Questions
How Much Weight Can Pantry Shelves Hold?
With 3/4 inch plywood, shelves up to 36 inches wide can hold 75–100 pounds if supported at the sides. For heavy items, keep shelf spans short and use strong brackets.
Can I Build A Pantry Cabinet Without Power Tools?
You can use hand saws and screwdrivers, but it’s much harder and takes longer. Power tools give smoother cuts and save time. Many hardware stores rent tools if you don’t own them.
What Is The Best Material For Pantry Cabinets?
Plywood is best for most home pantries. It’s strong, doesn’t warp easily, and takes paint or stain well. MDF is OK for painted cabinets but avoid it in damp kitchens.
How Do I Install Adjustable Shelves?
Drill evenly spaced holes inside the cabinet sides and use shelf pins. Start the first hole 2–3 inches from the bottom and space them every 2 inches. A shelf pin jig helps a lot.
Can I Make A Pantry Cabinet Fit A Small Space?
Yes! Measure carefully and design your cabinet to fit the space you have. You can build narrow pantries (as little as 12 inches wide) or make corner units for awkward spaces.
Building your own pantry cabinet takes time and patience, but the results are rewarding. You’ll end up with a custom storage solution that fits your kitchen perfectly and saves money. With careful planning, good materials, and a bit of confidence, even a beginner can make a pantry cabinet to be proud of.