Painting your front door to look like real wood is a clever way to give your home a warm, classic appearance—without paying for a solid wood door. Many people have metal or fiberglass front doors. These doors are strong and weather-resistant but often look plain and lack the rich look of natural wood.
The good news is, you can create a convincing wood grain effect with the right tools, paint, and technique. This project is possible for beginners and experienced DIYers alike. You just need patience, good preparation, and attention to detail.
A beautifully painted front door not only boosts curb appeal but also creates a welcoming entrance for guests. You might be surprised how much a faux wood finish can transform the entire look of your house. This guide will walk you through every step, from planning and picking products, to applying the final protective coat.
You’ll learn about choosing colors, common pitfalls, and insider tricks that help your painted wood grain look truly natural. By the end, you’ll have the knowledge and confidence to tackle this satisfying project.
Why Paint A Front Door To Look Like Wood?
Many homeowners love the look of natural wood doors. They bring warmth, character, and a sense of quality to your entryway. However, true solid wood doors are expensive and require regular upkeep. They can also warp, crack, or rot in harsh weather.
Painting your door to look like wood offers several advantages:
- Cost savings: Metal or fiberglass doors are usually much cheaper than solid wood.
- Durability: Non-wood doors can handle extreme weather and need less maintenance.
- Customization: You can match any wood color or grain style you like.
- Eco-friendliness: No need to cut down trees for a wooden door look.
A painted wood grain effect is also a smart solution if your existing door is in good shape but just looks outdated. You avoid the mess and hassle of a full door replacement.
What You’ll Need: Tools And Materials
To create a faux wood finish, you’ll need specific supplies. Some items are standard painting tools; others are specialty products that help create the wood grain effect.
Essential tools and materials:
- High-quality exterior paint in two colors (base and glaze/wood tone)
- Exterior primer (if needed)
- Wood grain tool (also called a wood graining rocker)
- Synthetic bristle paintbrushes (2-inch and 4-inch)
- Small foam rollers
- Painter’s tape
- Drop cloths or plastic sheeting
- Sandpaper (120–220 grit)
- Degreaser or mild soap
- Clean rags or lint-free cloths
- Screwdriver (for removing door hardware)
- Protective gloves
- Polyurethane or clear exterior sealer
Optional items:
- Tack cloth (for removing dust)
- Small artist’s brush (for touch-ups)
- Putty knife (for filling holes)
- Wood filler (if repairing damage)
Most big hardware stores sell wood graining tools and suitable paint products. If you’re not sure which brand to choose, ask an employee for recommendations on exterior paints and sealers.
Choosing The Right Paint And Color
Picking the correct paint and colors is key to a believable wood look. You need two main paint colors:
- Base coat: This is usually a lighter, neutral color. It serves as the “background” of your wood grain. Choose a shade similar to the lightest part of the wood you want to mimic.
- Glaze or wood tone: This is the darker, richer color that forms the grain patterns. It’s often a deep brown, red-brown, or golden color, depending on your desired wood type.
Popular Color Combinations
Here are some common pairings for realistic wood finishes:
- Oak look: Base – light tan or golden beige; Glaze – medium brown
- Walnut look: Base – pale gray-brown; Glaze – deep chocolate brown
- Cherry look: Base – pale blush; Glaze – reddish-brown
Some paint brands sell pre-mixed “wood grain kits” with matching colors and glaze. You can also create your own by picking a latex exterior paint for the base, and a water-based or oil-based glaze for the wood grain.
Pro tip: Test your color choices on a scrap piece of wood or cardboard before starting. This helps you see how the colors interact and practice your wood grain effect.
Flat, Satin, Or Gloss?
For the most realistic wood look, use a satin or semi-gloss finish. Flat paint hides flaws but does not look like polished wood. Gloss is very shiny and can look fake. Satin or semi-gloss gives a subtle sheen, similar to real wood with a clear coat.
Prepare Your Door For Painting
Preparation is the most important step for a flawless finish. Skipping or rushing prep work usually leads to paint peeling, streaks, or a messy grain pattern.
Follow these steps:
- Remove hardware: Take off the doorknob, locks, and kick plate using a screwdriver. Store the pieces safely.
- Clean the surface: Wash the door with a mild degreaser or soap and water to remove dirt, grease, and old wax. Rinse well and dry with a clean cloth.
- Sand the door: Lightly sand all surfaces with 120–220 grit sandpaper. This scuffs the surface so paint sticks better. Wipe away dust with a tack cloth or damp rag.
- Repair flaws: Fill any dents or holes with wood filler. Let it dry, then sand smooth.
- Tape off edges: Use painter’s tape around windows, trim, or any areas you don’t want to paint.
- Protect the area: Lay down drop cloths to shield your floor or porch.
If your door is painted with old, peeling paint or has a very glossy surface, you may need to sand more deeply or use a deglosser. For bare metal or fiberglass doors, always use a suitable primer to help paint stick.
Step-by-step Guide: Painting Your Door Like Wood
Now you’re ready to create your faux wood finish. This process involves painting a base coat, applying a glaze, and using a special tool to mimic wood grain.
Step 1: Apply The Base Coat
- Stir your base paint thoroughly.
- Use a roller or brush to apply a thin, even coat over the whole door.
- Let it dry as directed (usually 4–6 hours). Most doors need two coats for full coverage.
- Allow the final base coat to dry overnight for best results.
Tip: Paint with smooth, long strokes in the direction you want your “wood grain” to run (usually up and down for panels, side-to-side for horizontal rails).
Step 2: Mix And Apply The Glaze
The glaze is what creates the wood color and texture. Most people use a mixture of paint and clear glaze (often 1 part paint to 4 parts glaze), but check your product’s instructions.
- Pour the glaze into a paint tray.
- Working in small sections (about 18 inches at a time), brush or roll a thin layer of glaze over the base.
- Don’t cover the entire door at once—the glaze dries quickly.
Step 3: Use The Wood Graining Tool
This is the fun part! The wood graining rocker is a rubber tool with curved patterns that mimic wood knots and lines.
- Hold the tool at the top of your wet glazed section.
- Pull it down in a straight line, rocking it gently back and forth.
- The tool creates realistic grain and knot patterns as it moves.
- Wipe the tool clean after each pass to avoid smears.
- Repeat this step for each section, always working while the glaze is still wet.
If you make a mistake, just brush more glaze over the area and try again. Take your time—the more patient you are, the more natural your “wood” will look.
Step 4: Blend And Refine
Once the whole door is grained, lightly drag a dry brush or soft rag along the grain lines to soften any harsh marks. This helps blend the glaze and makes the effect look less “stamped” and more organic.
For added realism, use a small artist’s brush to add extra knots or swirls in the glaze. Look at photos of real wood for inspiration.
Step 5: Let It Dry
Allow the door to dry completely, usually overnight. Do not touch or close the door until the glaze is fully cured. This prevents smudges or fingerprints.
Step 6: Seal For Protection
Finish your project with a clear exterior sealer. This keeps your painted wood grain safe from rain, sun, and daily wear.
- Use a high-quality polyurethane or marine varnish.
- Apply at least two thin coats with a clean brush, letting each coat dry fully.
- Avoid heavy brush marks by using gentle, even strokes.
Some sealers can slightly darken the paint colors, so test on a small spot first.
Working With Different Door Materials
Not all front doors are the same. Your painting process may change slightly depending on whether you have a wood, fiberglass, or metal door.
Fiberglass Doors
Fiberglass is common for newer homes because it’s weatherproof and energy-efficient. The smooth surface needs a special primer designed for fiberglass. Otherwise, the paint may peel.
- Sand lightly before priming.
- Use an acrylic-bonding primer.
- Continue with the same base coat, glaze, and graining steps.
Metal Doors
Metal doors are sturdy but can rust if scratched. Preparation is key:
- Sand any rust spots and clean thoroughly.
- Use a rust-inhibiting primer.
- Follow the same painting and graining method.
Real Wood Doors
If your door is already wood but painted, you can still use the faux finish to refresh it or change the wood tone.
- Remove any peeling paint.
- Sand and prime as needed.
- Use the same base coat and glaze technique.
Non-obvious insight: Some older metal doors have a plastic skin that can feel like fiberglass. Always test primer and paint on a hidden spot to check for compatibility.
Designing Your Door’s Wood Grain Pattern
Real wood has many natural variations. A realistic faux wood finish isn’t just straight lines—it includes knots, swirls, and changes in direction.
Plan your “grain” before painting:
- Look at photos of oak, cherry, or walnut doors for reference.
- Sketch out where you want knots or swirls to appear.
- On paneled doors, remember the grain goes up and down on vertical panels, and side to side on horizontal rails.
If you want your door to look like a specific wood species, search for close-up images of that wood. Try to copy the size and shape of the grain lines.
Pro tip: Practice using the wood graining tool on cardboard or scrap wood. This helps you learn how much pressure to use and how to rock the tool for different effects.
Common Mistakes (and How To Avoid Them)
Even careful DIYers can make errors that ruin the wood look. Here are some pitfalls to avoid:
- Skipping primer: Paint peels off smooth doors without proper priming.
- Rushing the glaze: Working too fast makes the grain look fake or smeared.
- Forgetting to clean: Dust and grease under paint cause bumps and poor adhesion.
- Overusing the graining tool: Repeating the same pattern makes the door look unnatural.
- Not sealing the finish: Skipping the clear coat leads to fading and water damage.
Non-obvious insight: Weather plays a big role. Don’t paint on very hot, cold, or humid days. The glaze can dry too fast or not set properly. Aim for dry, mild weather for best results.
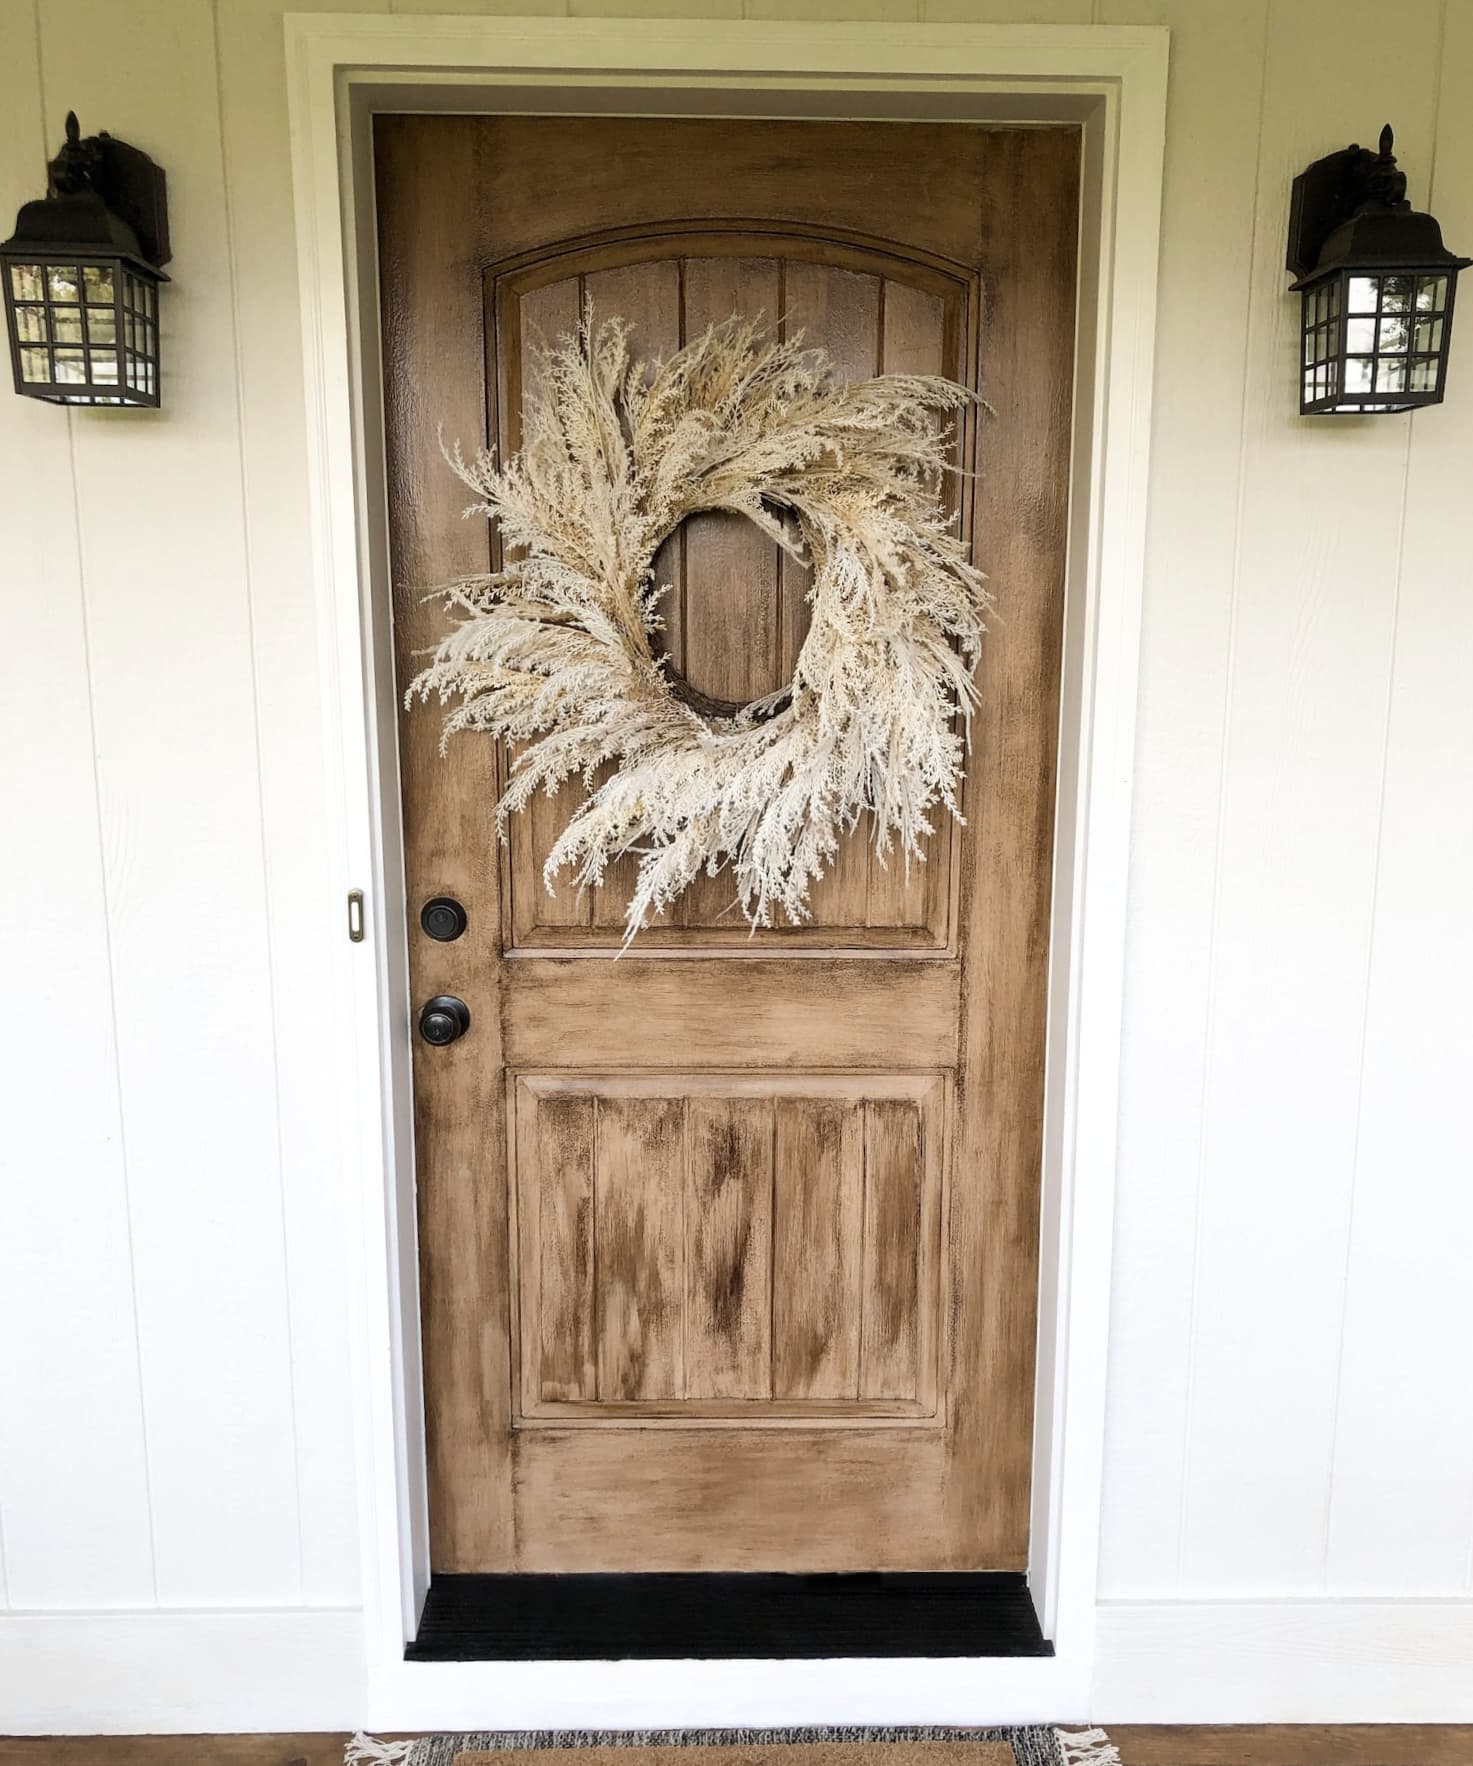
Credit: realgirlliving.com
Visual Comparison: Faux Wood Vs. Real Wood Doors
Here’s a quick comparison to help you see how a painted faux wood door matches up to a real wood door.
| Feature | Faux Wood (Painted) | Solid Wood Door |
|---|---|---|
| Cost | Low to Moderate | High |
| Maintenance | Low | High |
| Weather Resistance | Excellent (if sealed) | Can warp or rot |
| Customization | Any color/grain | Natural wood only |
| Realism | Very convincing with skill | 100% genuine |
Maintenance And Longevity
A painted wood grain finish can last for years if you keep it clean and protect it from harsh weather. Here’s how to care for your door:
- Wipe dirt and dust with a damp cloth as needed.
- Avoid harsh cleaners or scrubbing pads, which can scratch the sealer.
- Check for chips or scratches every spring and fall. Touch up with matching paint and sealer if needed.
- Reapply a clear topcoat every 2–3 years, especially if your door gets full sun.
Here’s a comparison of maintenance needs for different door finishes:
| Door Finish | Cleaning Required | Re-coating Needed |
|---|---|---|
| Faux Wood Paint + Sealer | Wipe with soft cloth | Every 2–3 years |
| Solid Wood (Stained) | Gentle soap, oiling | Every 1–2 years |
| Unpainted Fiberglass/Metal | Rarely needed | 5+ years |
Experience-based tip: If you live near the ocean or in a rainy climate, check your door more often. Salt and moisture can wear away the sealer faster.
Advanced Techniques For A More Realistic Finish
If you want your door to really fool people, try these extra steps:
- Layer multiple glaze colors. Use a dark brown for the main grain, then add touches of black, gold, or red glaze in small areas for depth.
- Vary your tool pressure. Press harder in some spots and lighter in others to create thick and thin lines, like real wood.
- Add “defects.” Real wood has knots, streaks, and color changes. Don’t make your grain too perfect.
- Highlight edges. Lightly brush a lighter glaze along panel edges or corners to mimic worn or sun-bleached wood.
Pro tip: Stand back every so often and look at your door from the street. This helps you spot areas that need more blending or detail.
Safety And Weather Considerations
Painting a front door means working with chemicals and sometimes strong smells. Here’s how to stay safe:
- Always work in a well-ventilated area.
- Wear gloves to avoid skin irritation.
- If you remove the door to paint, store it flat in a dry place.
- Don’t paint in direct sun, high humidity, or below 50°F (10°C).
Check the weather forecast before starting. Unexpected rain or wind can ruin your finish before it’s dry.

Credit: www.youtube.com
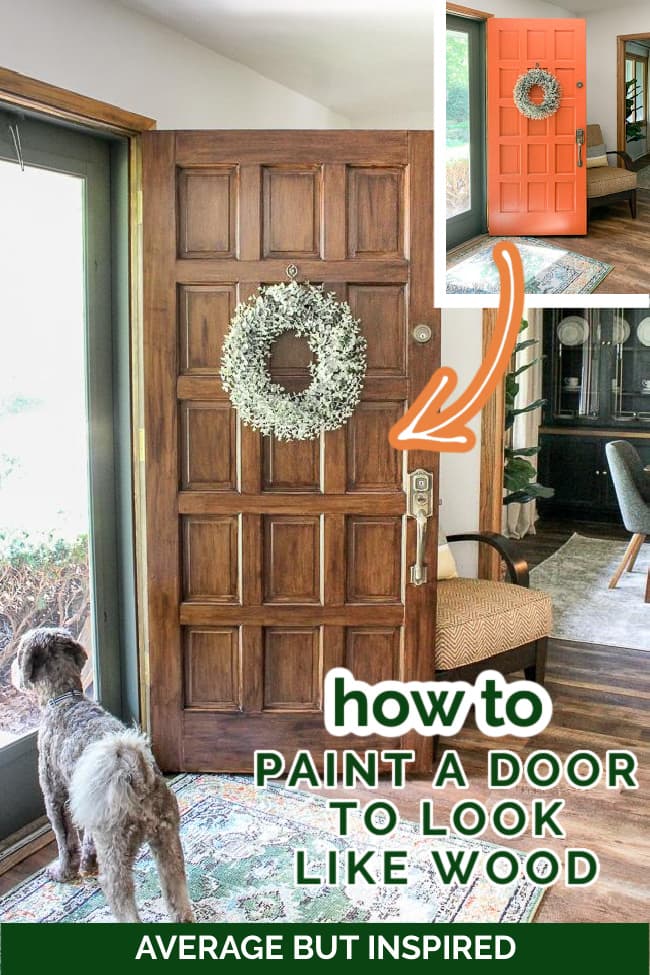
Real-world Examples And Inspiration
Many homeowners have had great success with the faux wood painting technique. For instance, a basic white steel door can be transformed into a “mahogany” look in a single weekend. Some use the technique on garage doors or interior doors for a unified style.
A good resource for project photos and step-by-step visuals is the This Old House website. You’ll find inspiration for different colors, grain styles, and finishing touches.
Is It Worth The Effort?
Painting your front door to look like wood takes time, but the results can be striking. For a small investment in supplies and a weekend of effort, you get a custom entryway that looks high-end and unique. It’s also a great way to boost home value if you’re planning to sell.
One thing many beginners overlook: It’s not about creating a perfect, factory-finished look. The best faux wood doors have little imperfections, just like real wood. That’s what makes them charming and authentic.
Credit: averageinspired.com
Frequently Asked Questions
How Long Does The Faux Wood Finish Last On A Front Door?
With good preparation and a quality sealer, a painted wood grain finish can last five years or more before you need to refresh it. Sun, rain, and heavy use will wear the finish faster, so regular touch-ups help extend its life.
Can I Paint A Plastic Or Vinyl Door To Look Like Wood?
Yes, but it’s important to use a primer made for plastic or vinyl. Clean the surface well, sand lightly, and follow the same base coat and glazing steps. The result can be very convincing if you take your time.
What’s The Best Way To Clean A Faux Wood Door?
Wipe it gently with a damp, soft cloth. Avoid abrasive pads or harsh chemicals. For stuck-on dirt, use a mild soap solution and rinse with water. Always dry the surface afterward.
Do I Need To Remove The Door To Paint It?
You don’t have to remove the door, but it’s easier to get a perfect finish if you do. Painting with the door in place is fine as long as you protect the floor and tape off the hinges and hardware.
Can I Use Spray Paint For The Base Or Glaze?
Spray paint can be used for the base coat if you want a very smooth surface. However, the grain effect is best created with a brush, roller, and wood graining tool. Spray glaze is not recommended for this project.
A faux wood finish is a creative way to refresh your entryway and add real style to your home. With careful work and a little practice, you can enjoy the beauty of “wood” without the cost or maintenance. Give it a try—the results can truly surprise you.