As an Amazon Associate I earn from qualifying purchases.
A small hole in your cabinet door can be annoying. It doesn’t just look bad—it can also let in dust, moisture, and even bugs. Many people think they need to replace the whole door, but that’s rarely true. With a few simple tools and some patience, you can make your cabinet look almost new again.
This guide explains exactly how to fix a hole in a cabinet door, even if you have no carpentry experience. We’ll cover the tools you need, the best techniques for different cabinet materials, and tips to get a smooth, invisible repair.
Whether your door is wood, MDF, or laminate, you’ll find step-by-step instructions here.
Understanding Cabinet Door Damage
Before you fix anything, it’s smart to understand what you’re dealing with. Not all holes are the same.
A small screw hole left by a handle is different from a large accidental hole. The repair method will depend on the size, location, and material of the cabinet door.
Common causes of holes:
- Moving handles or hardware
- Accidental drilling
- Wear and tear over time
- Water or moisture damage (especially in bathrooms)
Cabinet doors are often made from:
- Solid wood – strong and easy to repair
- MDF (medium-density fiberboard) – smooth but can swell with water
- Plywood – layered structure, sometimes tricky to patch
- Laminate over MDF or particleboard – plastic-like surface, needs special care
Each material has its own strengths and weaknesses. Solid wood is strong and can handle sanding and filling well, but wood grain can make it hard to hide repairs if not finished properly. MDF is smoother, making painting easier, but it is sensitive to water and can crumble if handled too roughly.
Plywood’s layers can make holes tricky to patch if the edges are splintered, and laminate can be slippery, so repairs may not always stick without preparation.
Non-obvious insight: Some cabinet doors have a thin veneer on the outside. If the hole goes through this layer, you must be gentle to avoid making the damage worse. Veneer is very thin—sometimes less than 1/16 inch. If you press too hard, it can crack or peel up around the hole. Always check the edge of the hole to see if you’re dealing with a veneer before you start sanding or filling.
Tools And Materials You’ll Need
Fixing a cabinet door hole is a DIY project, but you need the right tools and supplies. Here’s what works best for most repairs:
- Wood filler (for wood, MDF, or plywood doors)
- Two-part epoxy (for larger holes or laminate surfaces)
- Putty knife (a flexible one is easier to use)
- Sandpaper (medium and fine grit: 120 and 220 work well)
- Primer (for painting after repair)
- Matching paint or stain (to blend the repair)
- Painter’s tape
- Utility knife
- Vacuum or brush (to clean dust)
- Cloth (for wiping)
Optional items:
- Masking tape (to protect edges)
- Small brush or roller (for painting)
- Wood veneer patch (for large or deep veneer holes)
Having the right type of filler is important. Wood filler is best for small to medium holes in wood or MDF. Two-part epoxy is great for large holes or for use on laminate because it cures very hard and bonds well to smooth surfaces.
When choosing sandpaper, medium grit (around 120) is good for shaping dried filler, while fine grit (220) helps smooth the surface before painting.
Pro tip: Don’t use regular wall spackle on cabinet doors. It’s too soft and won’t hold up to cleaning or handling. Cabinet doors are touched and cleaned often, so use a filler made for wood or hard surfaces.
Safety And Preparation
Even a simple repair can get messy. Prepare your work area first:
- Remove the door if possible. It’s easier to work flat.
- Lay the door on a sturdy surface.
- Use painter’s tape to protect nearby areas.
- Wear a mask if you’re sanding indoors.
If you can’t remove the door, open it as wide as possible and support it with a block or towel so it doesn’t move while you work. Cover the floor below to catch dust and drips. Good lighting is also important—shine a lamp directly at the hole so you can see every detail.
Non-obvious insight: Always test your filler or paint on a hidden spot first. Some materials react differently and can change color. This is especially true for MDF and laminate, which sometimes absorb paint or filler in ways that make the repair stand out. If you have some leftover board or an inside edge, do your test there.
Fixing Small Holes (screw Or Nail Holes)
Small holes, like those left by screws or nails, are the easiest to fix. Follow these steps for a neat repair:
1. Clean The Hole
Use a vacuum or brush to remove any dust or loose wood. For MDF, gently scrape away any loose fibers with a utility knife. If the hole edges are raised, press them down gently with the flat of your putty knife.
2. Apply Wood Filler
Use a putty knife to push filler into the hole. Overfill slightly—wood filler shrinks as it dries. Press firmly to make sure the filler fills the entire space, and scrape away excess around the hole.
3. Let It Dry
Check the label for drying times. Most fillers take 30 minutes to 2 hours. In humid weather, give it extra time. You want the filler to be completely hard before sanding.
4. Sand Smooth
Start with medium-grit sandpaper, then switch to fine grit. Sand until the repair is flush with the door. Use a sanding block to keep the surface flat and avoid sanding a dip around the hole.
5. Prime And Paint Or Stain
Apply primer if you plan to paint. For stained cabinets, use a filler that accepts stain. A second coat of stain may be needed to blend the repair.
Pro tip: For dark cabinets, use a tinted filler. White filler under dark stain often looks gray. Some brands sell pre-tinted filler, or you can mix a little stain into the filler before applying.
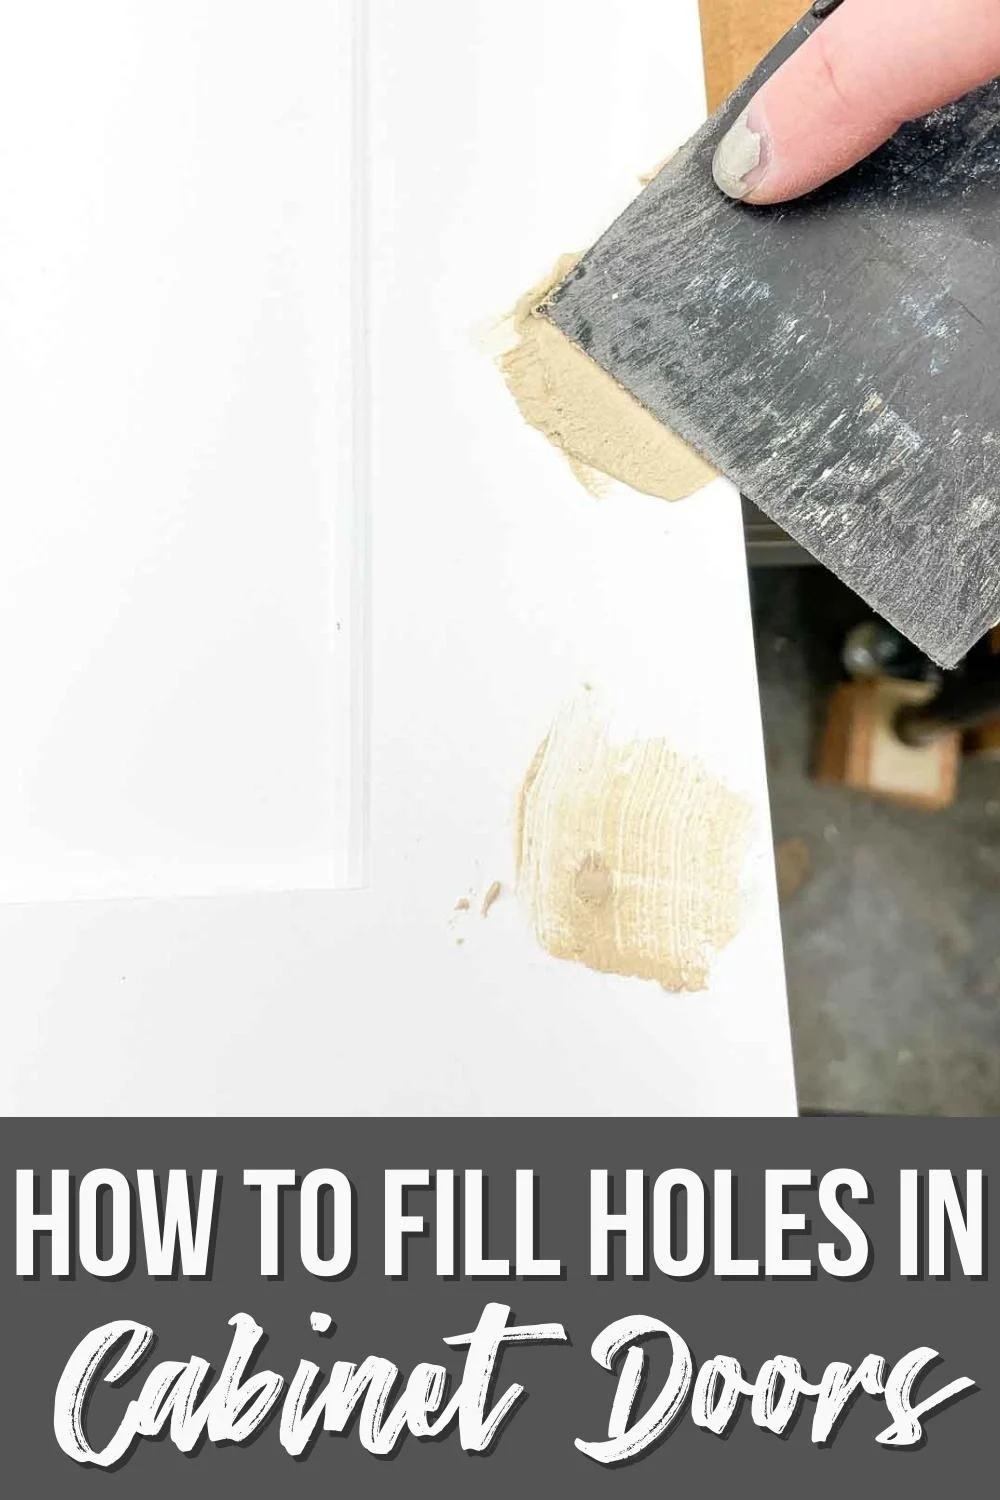
Credit: www.thehandymansdaughter.com
Fixing Medium Holes (1/4 To 1 Inch)
Medium holes are common if hardware was moved or a handle was pulled out. They need a little more care.
1. Trim Rough Edges
Use a utility knife to make the hole edges neat. This helps the filler stick. If the hole is splintered, cut away loose fibers so your patch will be strong.
2. Fill In Layers
For holes over 1/4 inch, apply filler in two or more thin layers. Let each layer dry before adding the next. This prevents sagging and cracking. Press the filler firmly into the hole, filling all gaps.
3. Sand Between Layers
Lightly sand each layer for a smooth finish. This also helps the next layer bond well.
4. Finish As Above
Prime, then paint or stain to match the door. For larger repairs, sometimes a second coat of paint or stain makes the patch completely invisible.
Experience-based tip: For a perfect color match, mix a little sawdust from the same door into the filler. Collect sawdust when you sand the door or drill a new hole, then blend it into the wood filler before applying. This helps the patch take stain more naturally and match the grain.
Extra detail: For holes that go completely through the door, you may need to tape the back side before filling. This keeps the filler from pushing out the back. When dry, remove the tape and sand the back smooth.
Repairing Large Holes (over 1 Inch)
A big hole might look scary, but it’s repairable. For holes this size, you need extra support so the patch doesn’t sink or crack.
Using A Backer Board
1. Cut A Backing Patch
Use thin plywood or a scrap of MDF. The piece should be bigger than the hole and thin enough to slide inside. Aim for about 1/8″ to 1/4″ thick.
2. Secure The Backer
Hold the patch behind the hole with tape or glue. If the hole is too small for your fingers, tie a string to the patch and pull it against the back. You can also use a dab of hot glue on a stick to position the patch, then remove the stick once the glue sets.
3. Fill The Hole
Use two-part epoxy or wood filler. Press it into the hole so it bonds with the backer. Use your putty knife to press hard and make sure there are no air gaps.
4. Build Up In Layers
Large fills may sag or crack if done in one go. Let each layer dry before adding more. The first layer should be just enough to cover the backer.
5. Sand, Prime, And Finish
Once the filler is level, sand smooth. Prime and paint to match. For very large holes, you may want to feather the repair area out wider to make the patch less visible.
Straight-to-the-point advice: Don’t rush layers. Thick filler will always crack if it dries too fast. If you’re patient, the finished repair will be stronger and look better.
Using A Wood Patch
For holes near the edge or in visible areas, a wood patch gives a stronger, more natural result.
1. Cut A Wood Plug
Find a dowel or wooden plug a bit larger than the hole. Hardware stores sell pre-made plugs in common sizes.
2. Drill The Hole If Needed
Enlarge the hole for a snug fit. Use a drill bit or a round file. The sides of the hole should be straight, not tapered.
3. Glue The Plug
Use wood glue. Tap the plug in until flush. Wipe away extra glue right away with a damp cloth.
4. Sand And Finish
Stain or paint as needed. For a nearly invisible repair, match the wood grain direction of the plug to the door.
Extra insight: Wood plugs are best for structural repairs—like if the hole is where a hinge or screw will go. They hold screws better than filler alone.
Fixing Holes In Laminate Cabinet Doors
Laminate is less forgiving than wood. It’s hard and slippery, so regular filler may not stick.
1. Clean The Area
Remove any loose laminate or dust. If the edges are peeling, glue them down with contact cement and let dry.
2. Sand Lightly
Use fine sandpaper to roughen the edges of the hole. This helps the repair stick. Don’t sand too much, or you’ll damage the surface.
3. Apply Two-part Epoxy
Epoxy bonds well to plastic-like surfaces. Mix as directed and press into the hole. Work quickly—epoxy sets fast.
4. Smooth With A Putty Knife
Try to get the epoxy level with the door surface. It dries hard, so sanding is harder later. Use a damp finger or a plastic scraper for final smoothing.
5. Sand And Paint
Once dry, sand smooth. Use a primer designed for laminate, then paint. Spray paint often gives a smoother finish on laminate than brushing.
Pro tip: Laminate touch-up kits are available in many hardware stores. They’re good for small chips and scratches. These kits often include colored waxes or markers to blend the repair.
Extra detail: For white or light-colored laminate, use a white epoxy or filler. Dark fillers can show through thin paint.
Matching Paint And Finish
A perfect patch is only as good as the finish. Matching the paint or stain is the hardest part for most people.
1. Find The Right Color
Cabinet makers often have touch-up kits. Take a door or drawer to the store if you’re unsure. Some paint stores offer color matching with a scanner.
2. Test Before Painting
Apply a small amount of paint or stain to a hidden spot. Let it dry completely before judging the match.
3. Use A Sealer
This helps the new finish blend with the old and protects against future damage. For stains, a clear topcoat makes the color deeper and more even.
4. Blend The Edges
Feather the new paint into the old finish with a small brush. Work in thin layers, and let each layer dry before adding another.
Non-obvious insight: Gloss level matters as much as color. A perfect color with the wrong sheen (matte, satin, gloss) will still look wrong. Always check the finish type (e.g., satin or semi-gloss) before buying paint.
Extra tip: If your cabinet is very old, the color may have faded. Mixing a little gray or brown into your paint can help match an aged look.
When To Replace Instead Of Repair
Sometimes, repair just isn’t worth it. Here’s when to consider replacing the door:
- The hole is larger than 2 inches and affects the structure
- The door is warped or swollen (often from water damage)
- The finish is peeling from a large area
- The door is very old, and matching the finish is impossible
If your cabinet doors are custom or have special shapes, getting a replacement may take time. Check with local cabinet shops—they can often order just one new door. For standard cabinets, home improvement stores often carry replacement doors in common sizes.
Experience-based advice: If your cabinets are standard size, buying a replacement door may be cheaper and faster than a complex repair. But always compare the cost of repair materials and your time to the price of a new door before deciding.
Common Mistakes To Avoid
1. Skipping Sanding
Rough surfaces show through paint and make patches obvious. Always sand between steps.
2. Using The Wrong Filler
Wall spackle or caulk won’t hold up to cleaning. Only use fillers made for wood or hard surfaces.
3. Painting Too Soon
If filler isn’t fully dry, paint will crack or bubble. Be patient—wait for the filler to be hard all the way through.
4. Ignoring Primer
Especially on MDF or laminate, primer is key for a smooth finish. Skipping primer can lead to uneven color and poor adhesion.
5. Not Cleaning Dust
Dust under paint creates rough, uneven surfaces. Wipe the area with a damp cloth before painting.
Extra detail: Rushing the job is the most common mistake. Each step—filling, drying, sanding, priming, painting—needs time for the best result.

Credit: www.reddit.com
Example: Repair Comparison
To help you choose the best method, here’s a side-by-side look at how different repairs compare:
| Repair Method | Best For | Durability | Skill Level |
|---|---|---|---|
| Wood Filler | Small holes in wood/MDF | Good | Beginner |
| Epoxy | Laminate or large holes | Very high | Intermediate |
| Wood Plug/Patch | Edge or large wood holes | Excellent | Advanced |
If you’re unsure about your skill level, start with a small hole on the back of a door to practice.
Cost Of Cabinet Door Repair
Repair is almost always cheaper than replacement, but prices depend on the materials and tools you need.
| Item | Typical Cost (USD) |
|---|---|
| Wood filler | $5–$10 |
| Two-part epoxy | $10–$20 |
| Sandpaper (pack) | $5 |
| Primer/paint | $10–$30 |
| Replacement door | $40–$100+ |
Straight-to-the-point insight: Most repairs cost under $30 if you already own basic tools. If you need to buy paint or special epoxy, the cost may be a bit higher, but still much less than a new door.
Extra detail: Some hardware stores sell small tubes of wood filler and sample-size paint, so you don’t need to buy a full can for a tiny repair.
Time Needed For Each Repair
Knowing how much time you’ll need helps plan the job.
| Repair Type | Active Work Time | Drying/Waiting Time |
|---|---|---|
| Small hole | 10–20 minutes | 1–2 hours |
| Medium hole | 30–45 minutes | 2–4 hours |
| Large hole | 1–2 hours | 4–24 hours |
Pro tip: Drying times can be much longer in cold or humid weather. If you’re unsure, let filler dry overnight before sanding and painting.
Special Cases: Veneer And Decorative Doors
Some cabinet doors have a thin wood or vinyl veneer. These need extra care.
- Use a veneer patch or iron-on edge banding for large damaged areas.
- Always cut patches a little bigger than the hole, then trim to fit.
- For raised panel doors, match the shape and profile as closely as possible.
When applying veneer patches, use a sharp utility knife and a straightedge for clean cuts. Press the patch down firmly and use a roller or a block of wood to smooth it.
Non-obvious insight: Many modern cabinets use photo-printed finishes. For these, paint may not match, and a patch may always be slightly visible. In these cases, try to hide repairs in less visible places, or use decorative hardware (like a new handle) over the repair.
Extra detail: Some specialty stores sell heat-activated veneer patches that bond with an iron. These are easier to apply and often look better than glue-on types.
Credit: www.reddit.com
Extra Tips For A Professional Finish
- Use a damp cloth to remove sanding dust before painting.
- For glossy doors, use a foam roller for a smooth paint finish.
- If the repair is on the door edge, use clamps to hold patches in place while drying.
- For stained cabinets, use a gel stain over the filler to better match color.
- Apply two coats of paint or sealer for extra durability.
Practical tip: If you want an extra-smooth finish, sand lightly between coats of paint or sealer. This removes any dust or brush marks.
Extra insight: Let the repair cure for several days before heavy use, especially if your kitchen or bathroom is humid.
When To Call A Professional
DIY is possible for most repairs, but call a pro if:
- The damage is on a high-end or antique cabinet
- The door has a complex shape or carving
- You tried to fix it and made it worse
Professionals have tools to match finishes and make repairs invisible. For valuable cabinets, it’s often worth the extra cost.
If you have custom colors, curved or routered details, or a door that’s part of a set in a visible place (like at eye level), a professional can save you time and frustration. They may also be able to touch up surrounding areas, making the repair even less visible.
Environmental And Health Considerations
- Many fillers and paints have VOC (volatile organic compounds). Work in a ventilated area.
- Dispose of old paint and filler according to local rules.
- Reusing cabinet doors instead of replacing them reduces waste.
Whenever possible, choose low-VOC or water-based products, especially if you have children or pets in the house. Always clean your brushes and tools with water (for water-based products) or proper solvents, and store chemicals out of reach.
For more on safe handling, see the US EPA Safer Choice program.
Frequently Asked Questions
How Do I Fix A Hole If The Cabinet Door Is Hollow?
Most hollow doors have a thin layer of wood on the outside. Use a backer board behind the hole, then fill as described above. If the hole is very large, consider replacing the door.
Can I Use Spackle Instead Of Wood Filler?
Spackle is made for walls, not wood. It can crack and fall out on cabinet doors. Use wood filler or epoxy for best results.
How Do I Get An Exact Paint Match For My Cabinet?
Take a small part (like a drawer) to a paint store. Many stores can scan and mix paint to match your cabinet’s color and sheen.
Is It Possible To Repair A Hole In A Laminate Cabinet Without Painting?
For small chips, use a laminate repair kit in a matching color. For larger holes, painting is usually needed for a seamless look.
What If The Hole Keeps Coming Back?
If a patch cracks or falls out, it usually means the door moves or the filler wasn’t applied correctly. Sand out the area, clean well, and try epoxy for a stronger repair.
Repairing a hole in a cabinet door takes time and care, but it’s well within reach for most DIYers. The right method depends on the size of the hole and the door’s material. Take your time, use quality materials, and soon your cabinet will look good as new.
