Filling the gap under an exterior door threshold is one of those home maintenance tasks people often overlook—until problems begin. Maybe you notice a draft, water leaks after rain, or insects making their way inside. These issues can lead to higher energy bills, water damage, or even pest infestations.
Even a small gap beneath your exterior door can let in a surprising amount of cold or hot air, dust, and moisture. Fixing this gap not only makes your home more comfortable but also protects it from damage.
Most people assume it’s a complicated job, but with the right materials and a step-by-step approach, almost anyone can do it. This guide walks you through everything: understanding why the gap exists, choosing the right filler, step-by-step instructions, tools you’ll need, common mistakes, and even how to handle unique situations like concrete or wooden thresholds. Along the way, you’ll find real-world tips, practical examples, and answers to the most common questions. Whether you’re a DIY beginner or have some experience, you’ll finish with the confidence to tackle this important home improvement.
Why Does A Gap Form Under An Exterior Door Threshold?
Gaps can appear for several reasons. Understanding the cause helps you pick the best long-term solution.
1. Settling Foundations
Over time, houses settle. This movement can create or widen gaps under doors, especially if the threshold wasn’t installed perfectly level. Even a small shift can leave a space.
2. Weather And Moisture Changes
Wood expands and contracts with humidity and temperature. In winter, materials shrink, sometimes making gaps appear larger. In summer, swelling can make the threshold tight—but the gap returns when it dries out.
3. Wear And Tear
Constant foot traffic slowly wears down the threshold or the floor beneath it. Over years, this makes the gap bigger.
4. Improper Installation
Sometimes, thresholds aren’t installed flush with the floor, especially in older homes or rushed builds.
5. Pest Or Rot Damage
Termites, carpenter ants, or rot can eat away at wood, causing unevenness and new spaces.
Not all gaps have the same cause, so solutions may be different. If you see wood crumbling or soft spots, check for rot before filling the gap.
Why Filling The Gap Matters
Ignoring the gap under an exterior door threshold leads to many problems:
- Energy Loss: Gaps let heated or cooled air escape, causing your HVAC system to work harder. The US Department of Energy estimates that air leaks can increase energy bills by 10–20%.
- Water Intrusion: Rainwater can seep in, leading to mold, warping, and floor damage.
- Pest Entry: Gaps are an open invitation for ants, spiders, and even mice.
- Dust and Allergens: Outdoor dust and pollen find their way in, affecting air quality.
- Noise: Outside sounds become more noticeable.
A well-sealed threshold keeps your home comfortable, saves money, and reduces maintenance headaches.
Credit: www.doityourself.com
Tools And Materials You Need
Before you start, gather the right tools and materials. This saves time and helps you achieve a professional result.
Essential Tools:
- Tape measure
- Utility knife
- Pry bar (if removing old threshold)
- Hammer
- Caulking gun
- Putty knife
- Screwdriver
- Safety glasses and gloves
Materials (pick what fits your situation):
- Exterior-grade caulk (silicone or polyurethane)
- Backer rod (foam rod for large gaps)
- Expanding foam (for very large or deep gaps)
- Threshold replacement kit (if the old one is damaged)
- Weatherstripping
- Wood shims or composite shims
- Mortar or concrete patch (for masonry thresholds)
- Sandpaper
- Paint or stain (for wood repair)
- Cleaner (to remove dust and debris)
Pro Tip: Always use materials rated for exterior use. Interior caulk or foam breaks down quickly when exposed to weather.
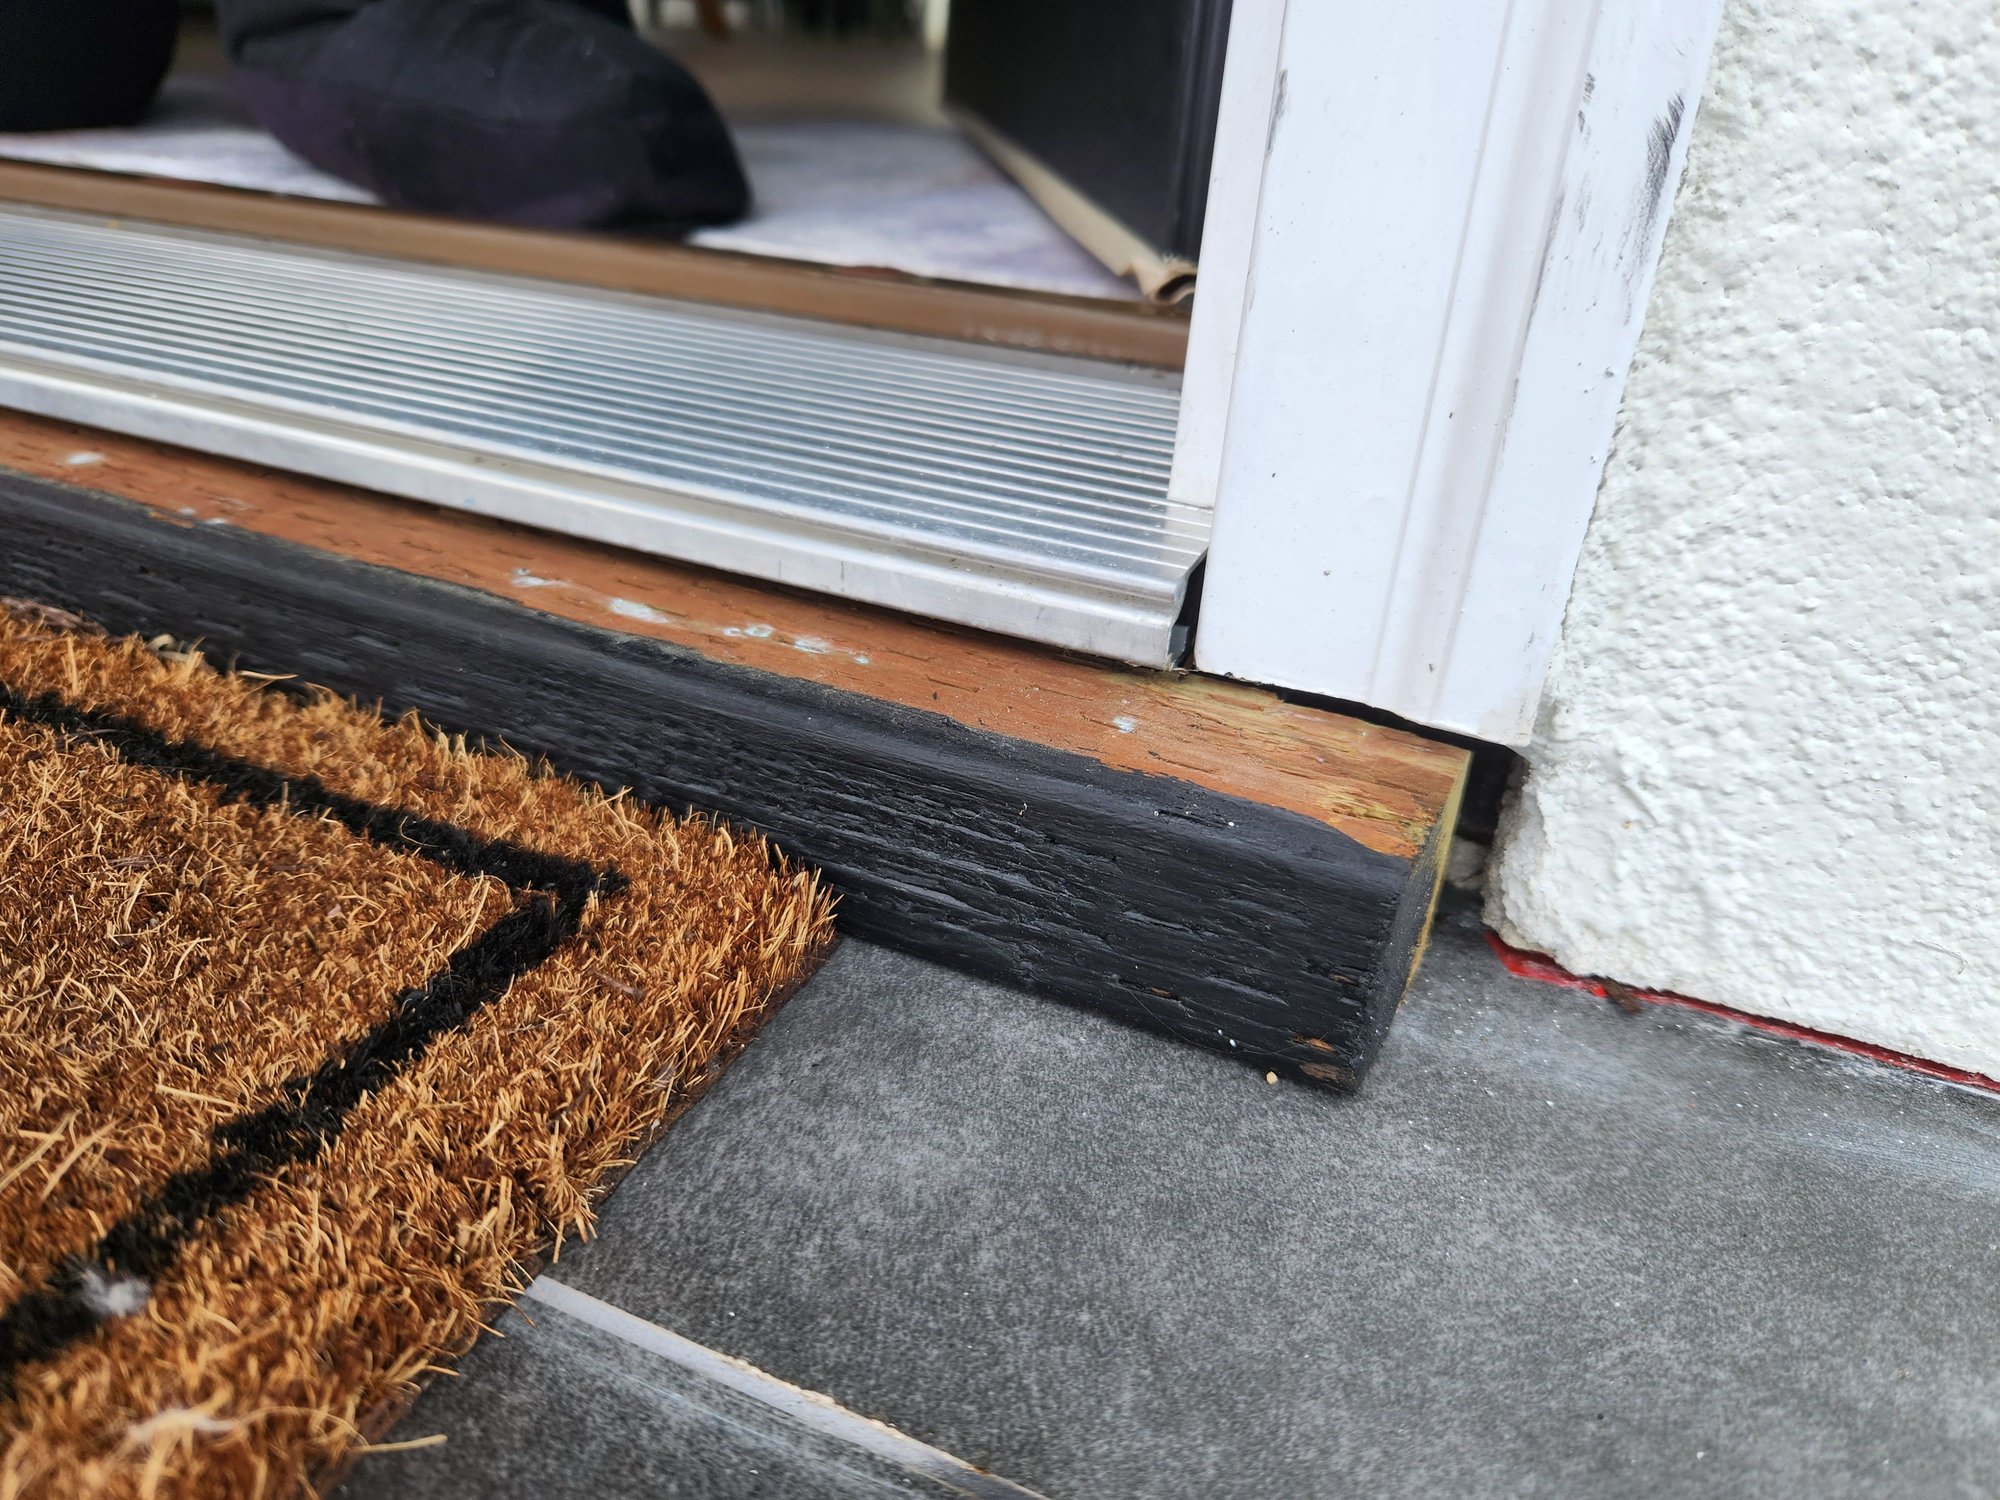
Types Of Gaps And How To Identify Them
Not all gaps are the same. Identifying the type helps you choose the right fix.
1. Small Surface Gaps (less Than 1/4 Inch)
These are usually just at the surface, between the threshold and the floor. They’re often caused by settling or seasonal expansion.
2. Medium Gaps (1/4 Inch To 3/4 Inch)
These may go deeper and can be caused by installation errors or wear. You’ll often see daylight through them.
3. Large/deep Gaps (over 3/4 Inch)
These are often due to significant settling, removal of old material, or rot. You may even feel a breeze or see insects moving through.
4. Irregular Gaps
The space is uneven—wider on one side. This requires a flexible solution or sometimes a combination of approaches.

Credit: www.diychatroom.com
Choosing The Right Filler For Your Gap
Selecting the right filler material is essential for a lasting repair. Here’s a comparison to help you decide:
| Filler Type | Best For | Pros | Cons |
|---|---|---|---|
| Exterior Caulk | Small gaps | Flexible, easy to apply, weatherproof | Not suitable for large gaps, may need reapplication |
| Backer Rod + Caulk | Medium gaps | Fills depth, caulk seals surface, flexible | Extra step, not for gaps wider than 1 inch |
| Expanding Foam | Large or deep gaps | Fills voids, insulates, quick application | Hard to remove, can expand too much, not always paintable |
| Wood or Composite Shims | Gaps under wood thresholds | Solid, structural, can be trimmed | Requires cutting, may need caulking after |
| Mortar/Concrete Patch | Masonry thresholds | Durable, weatherproof | Needs skill, long drying time |
Pro Insight: For maximum durability, use a combination. For example, fill most of a deep gap with backer rod or foam, then seal with caulk for a smooth, weatherproof finish.
Step-by-step Guide: Filling Gaps Under An Exterior Door Threshold
Every home is a little different, but these steps cover the most common situations. Adjust as needed for your door and threshold type.
Step 1: Inspect And Measure The Gap
Start by carefully looking at the gap. Use a tape measure to check both depth and width at several points. Shine a flashlight underneath for a better view.
Tip: Check for soft or rotten wood. If the threshold is damaged, you’ll need to repair or replace it first.
Step 2: Clean The Area
Dirt, dust, and debris prevent fillers from sticking. Use a vacuum or a stiff brush to remove loose material. For greasy spots, wipe with a mild cleaner and let dry.
Step 3: Choose Your Filler
- Small gaps: Use high-quality exterior caulk.
- Medium gaps: Insert a backer rod first, then caulk.
- Large gaps: Use expanding foam, then trim and cover with caulk or threshold plate.
- Under threshold: Use wood or composite shims for support, then caulk edges.
Step 4: Prepare Materials
Cut the tip of your caulk tube at a 45-degree angle. If using a backer rod, cut to length for each section. Shake expanding foam cans well before use.
Step 5: Apply The Filler
For Small Surface Gaps
- Load the caulk tube into the gun.
- Apply a steady bead of caulk along the gap.
- Smooth with a wet finger or putty knife.
- Wipe away excess before it dries.
For Medium Gaps
- Push the backer rod into the gap with a putty knife.
- The rod should sit just below the surface.
- Cover with caulk as above.
For Large Or Deep Gaps
- Spray expanding foam into the gap. Fill about 50%—it will expand.
- Let it cure (usually 1–2 hours).
- Trim excess foam flush with a utility knife.
- Apply caulk or paintable sealant over foam for UV protection.
For Gaps Under A Wood Threshold
- Gently lift the threshold with a pry bar (if possible).
- Slide in wood or composite shims to fill the space.
- Tap the threshold back down.
- Apply caulk to seal edges.
For Masonry (concrete/stone) Thresholds
- Mix mortar or concrete patch per package instructions.
- Trowel into the gap, pressing firmly.
- Smooth and shape to match the existing threshold.
- Allow to cure fully before using the door.
Expert Tip: When using expanding foam, cover nearby flooring with drop cloths. The foam is very sticky and hard to remove once cured.
Step 6: Check For A Snug Fit
After filling, close the door and check for light or air leaks. There should be no drafts. If you still see gaps, add weatherstripping to the door bottom or threshold.
Step 7: Finish And Clean Up
Let all materials cure as directed (caulk: 2–6 hours, foam: 1–2 hours, mortar: 24 hours). Paint or stain wood repairs to match the existing threshold. Clean your tools right away.

Credit: www.youtube.com
Special Cases: Dealing With Unique Thresholds
Sometimes, standard fixes don’t work. Here’s how to handle less common situations.
Metal Thresholds
Metal thresholds are durable but can corrode or bend. Use a combination of shims and caulk for small gaps. If the metal is warped, consider replacing it.
Thresholds Over Concrete
If your door sits directly on concrete, use a concrete patch or non-shrinking mortar for large gaps. For smaller spaces, a backer rod and caulk works well.
Wide Irregular Gaps
If the gap changes width along the threshold, use foam or backer rod in the largest part and caulk everywhere else. For very uneven surfaces, consider installing a new, adjustable threshold.
Doors With Sills Below Grade
If your door sits below ground level (e. g. , a basement door), always use waterproof sealants and check exterior drainage. Consider installing a drain or raising the threshold if water is a recurring problem.
Weatherstripping: The Extra Layer
Even after filling the gap, adding weatherstripping makes a big difference. It blocks drafts and moisture, and it’s easy to install.
Types of Weatherstripping:
- Adhesive foam tape: Quick and easy, sticks to the door bottom.
- Rubber or vinyl door sweeps: Screws onto the bottom of the door, very durable.
- Metal-and-vinyl combination: For heavy-duty sealing.
Installation Tips:
- Measure the door width.
- Cut the weatherstripping to size.
- Clean the surface before applying.
- Test the door to ensure it closes easily.
Non-obvious insight: Many people forget to adjust the threshold plate’s screws after adding weatherstripping. Loosen or tighten them to get the perfect seal.
Common Mistakes And How To Avoid Them
Even experienced DIYers make these errors. Here’s what to watch for:
1. Using Interior Caulk Or Foam:
These break down quickly outdoors. Always use products rated for exterior use.
2. Skipping Cleaning:
Dirt and dust prevent adhesion. Always clean thoroughly before applying fillers.
3. Overfilling With Expanding Foam:
Foam expands a lot. Fill only halfway to avoid making a mess or lifting the threshold.
4. Not Allowing For Movement:
Wood thresholds expand and contract. Leave a little flexibility with caulk, and don’t pack fillers too tightly.
5. Ignoring Water Problems:
If you see signs of water entry, fix the source (e. g. , gutter leaks, grading) before sealing the gap.
6. Painting Too Soon:
Paint or stain only after all fillers have fully cured.
Real-world tip: Check the filled gap at the start of each season. Reapply caulk if you notice cracks or shrinking.
When To Replace The Threshold Instead
Sometimes filling the gap isn’t enough. You may need to replace the threshold if:
- The wood is soft, crumbling, or shows signs of rot.
- Metal is bent, rusted, or loose.
- The gap is more than 1 inch and can’t be filled securely.
- Water still leaks inside after sealing.
Replacement Steps:
- Pry up the old threshold carefully.
- Clean and level the area.
- Cut the new threshold to fit.
- Set in place, using caulk or mortar underneath.
- Secure with screws or adhesive.
- Seal all edges after installation.
A new threshold is an investment but can solve years of leaks and drafts in one go.
Maintenance: Keeping The Gap Sealed For Years
Even a perfect seal can wear out. Here’s how to keep your threshold in top shape:
- Inspect the area twice a year (before winter and after spring).
- Touch up caulk or foam if you see cracks or gaps.
- Clean debris from the threshold regularly.
- Repaint wood as needed.
- Check weatherstripping for wear and replace as necessary.
Non-obvious insight: Threshold screws sometimes loosen over time. Tighten them every few months to keep everything snug.
Real-world Example: Filling A Gap Under A 1950s Door
A homeowner with a 1950s brick house noticed cold air and ants coming in under their back door. The threshold was original—hardwood, but with a 3/4-inch gap on one side.
What worked:
- They inserted a 5/8-inch backer rod in the deepest part, then filled the remaining space with flexible polyurethane caulk.
- For the last 1/8 inch, they added adhesive-backed rubber weatherstripping to the door bottom.
- The result: No more drafts, and ants stopped appearing inside.
Lesson: Combining fillers and weatherstripping fixes most gaps, even in older homes.
Cost Comparison: Diy Vs. Professional Repair
Wondering if you should hire help? Here’s a quick cost breakdown:
| Option | Average Cost | What’s Included | Typical Lifespan |
|---|---|---|---|
| DIY (caulk, backer rod, foam) | $15–$40 | All materials for one door | 3–7 years |
| DIY (threshold replacement kit) | $30–$80 | New threshold, caulk, screws | 10+ years |
| Professional Repair | $100–$300 | Labor, all materials | 5–15 years |
DIY saves money, but pros may be best for major damage or tricky installations.
Sustainability And Energy Savings
Sealing gaps under exterior doors is a simple way to make your home more energy-efficient. The US Environmental Protection Agency (EPA) notes that reducing air leaks can cut heating and cooling costs by up to 15%. It also lowers your carbon footprint by reducing wasted energy.
Tip: Combine gap sealing with other weatherization steps—like attic insulation and window sealing—for the best results.
Frequently Asked Questions
What Type Of Caulk Is Best For Exterior Door Thresholds?
Use 100% silicone or polyurethane caulk labeled for exterior use. These sealants are flexible, waterproof, and resist UV rays. Avoid latex or acrylic caulks for outdoor applications.
How Long Does It Take To Fill A Gap Under A Door Threshold?
For small to medium gaps, the job usually takes 30–60 minutes including cleaning and caulking. Large gaps with foam or mortar may need extra time for curing, sometimes up to 24 hours before the door is used normally.
Can I Use Spray Foam Under A Wooden Threshold?
Yes, expanding spray foam works for deep or uneven gaps. Use a minimal-expansion type to avoid lifting the threshold. Always trim excess foam after curing and seal the top with paintable caulk for protection.
How Do I Know If I Need To Replace The Threshold Instead Of Just Filling The Gap?
If the threshold is rotting, soft, heavily warped, or metal is corroded, replacement is a better long-term fix. Filling gaps works only if the structure is solid.
Is It Necessary To Add Weatherstripping If I’ve Already Filled The Gap?
Yes, weatherstripping adds an extra barrier against drafts, moisture, and noise. It’s especially important in older homes or extreme climates. Even a well-sealed gap can benefit from this added layer.
Fixing the gap under your exterior door threshold is a smart, affordable project that pays off in comfort, savings, and peace of mind. With the right approach, most homeowners can do it in an afternoon. If you want to learn more about home weatherization and energy savings, the US Department of Energy has excellent resources.
A well-sealed door not only keeps out the weather—it makes your whole home feel safer and more welcoming. Don’t wait for the next big draft or rainstorm; take action today and enjoy a quieter, cozier space for years to come.