A ceiling medallion adds instant elegance to any room. This decorative piece, often installed around a ceiling light or fan, creates a classic look and can hide imperfections where fixtures meet the ceiling. Many homeowners love the visual upgrade, but are unsure how to install a ceiling medallion themselves.
The process is less complicated than it seems, and with careful steps, you can get a professional-looking result without hiring an expert.
This guide will walk you through everything you need to know about installing a ceiling medallion. You will learn how to choose the right medallion, gather essential tools, prepare your space, and handle common challenges. Whether you are refreshing a dining room, bedroom, or entryway, this in-depth article will help you avoid beginner mistakes and finish with a flawless look.
Why Install A Ceiling Medallion?
A ceiling medallion is more than decoration. It brings together the room’s design and can turn a basic light fixture into a showpiece. Here are a few reasons why people choose to add one:
- Elevates style: Medallions come in many styles, from simple circles to detailed floral patterns. They work with traditional, modern, or transitional décor.
- Covers imperfections: Many ceilings have cracks or rough edges where fixtures are installed. A medallion hides these spots easily.
- Adds value: Decorative touches make a space more attractive to buyers and guests.
- Easy upgrade: Unlike large renovations, installing a medallion is a quick project you can do in a day.
Types Of Ceiling Medallions
Choosing the right medallion is the first key step. There are three main types, each with unique advantages:
| Material | Pros | Cons |
|---|---|---|
| Polyurethane | Lightweight, easy to paint, resists moisture, budget-friendly | Can crack if handled roughly |
| Wood | Classic look, can be stained or painted, sturdy | Heavier, may need extra support, higher cost |
| Plaster | Luxurious detail, authentic for historical homes | Very heavy, expensive, fragile during installation |
Polyurethane medallions are most popular today. They are light, easy to cut, and simple for beginners. If you want a large medallion with dramatic detail, polyurethane is the best choice.
Credit: chrislovesjulia.com
Choosing The Right Size And Shape
The medallion should fit the room and light fixture for a balanced look. Here’s how to decide:
- Measure the fixture’s diameter (for example, a chandelier base).
- Room size matters: For rooms up to 100 sq. Ft., choose a medallion 18 inches or smaller. Larger rooms can handle medallions 20 inches or more.
- Ceiling height: Higher ceilings can support larger, thicker medallions.
- Shape: Round is classic, but oval and square medallions work for modern spaces or rectangular tables.
A simple formula: Add the room’s length and width in feet, then use that number in inches for your medallion’s diameter. Example: For a 12×14 ft room, 12 + 14 = 26 inches.
Tools And Materials You Will Need
Gather everything before you start. Missing a tool halfway can be frustrating. Here’s a complete list:
- Ceiling medallion (correct size and material)
- Ladder
- Measuring tape
- Pencil
- Drill and drill bits
- Screwdriver
- Caulk gun
- Construction adhesive (paintable, for ceiling use)
- Painter’s caulk (for seams)
- Utility knife or saw (for trimming)
- Sandpaper (medium and fine grit)
- Paint and brushes (if painting before or after installation)
- Painter’s tape
- Screws (1½-inch or as recommended)
- Wire nuts and electrical tape (for rewiring fixture)
- Protective eyewear and dust mask
Important: If you are not comfortable with electrical work, get a licensed electrician to disconnect and reconnect the fixture.

Credit: www.youtube.com
Step-by-step Preparation
Proper prep means less mess and a smoother finish. Don’t skip these steps:
- Turn off power at the breaker. Never trust just the wall switch—always cut electricity from the main box before removing a light or fan.
- Remove the existing fixture. Unscrew bulbs, shades, and fixture base. Carefully disconnect wires and set the fixture aside.
- Clean the ceiling. Dust, dirt, or old paint can stop glue from sticking. Wipe the area with a damp cloth and let it dry.
- Check the ceiling surface. Patch holes or cracks with filler if needed. Sand smooth after drying.
- Test fit the medallion. Hold it against the ceiling to check for gaps or uneven spots. Mark the center with a pencil.
Painting Your Ceiling Medallion
Painting is best done before installation, unless you want the medallion the same color as your ceiling. Here’s how to get a perfect finish:
- Choose the right paint: Use a high-quality latex or acrylic. Semi-gloss looks elegant and is easy to clean.
- Prime if needed: Raw wood or plaster medallions should be primed first.
- Use a small brush: For detailed designs, a 1-inch brush or artist’s brush helps reach grooves.
- Apply thin coats: Two to three light coats are better than one thick coat. Let each coat dry fully.
- Let it cure: Wait at least 24 hours before handling the medallion.
If you want a metallic or antique look, there are special finishes and glazes designed for decorative trim.
Cutting The Center Hole
Most medallions come with a center hole, but sometimes you need to make it larger or create one yourself. This is especially true if you have a wide fixture canopy or a ceiling fan.
- Measure the fixture’s base to know the exact size needed.
- Mark the hole on the back of the medallion.
- Cut with a utility knife (for polyurethane) or a hole saw (for wood or plaster). Go slowly to avoid cracking.
- Sand the edge for a smooth finish.
If you are installing a ceiling fan, check the medallion’s strength and the fixture’s weight before cutting.
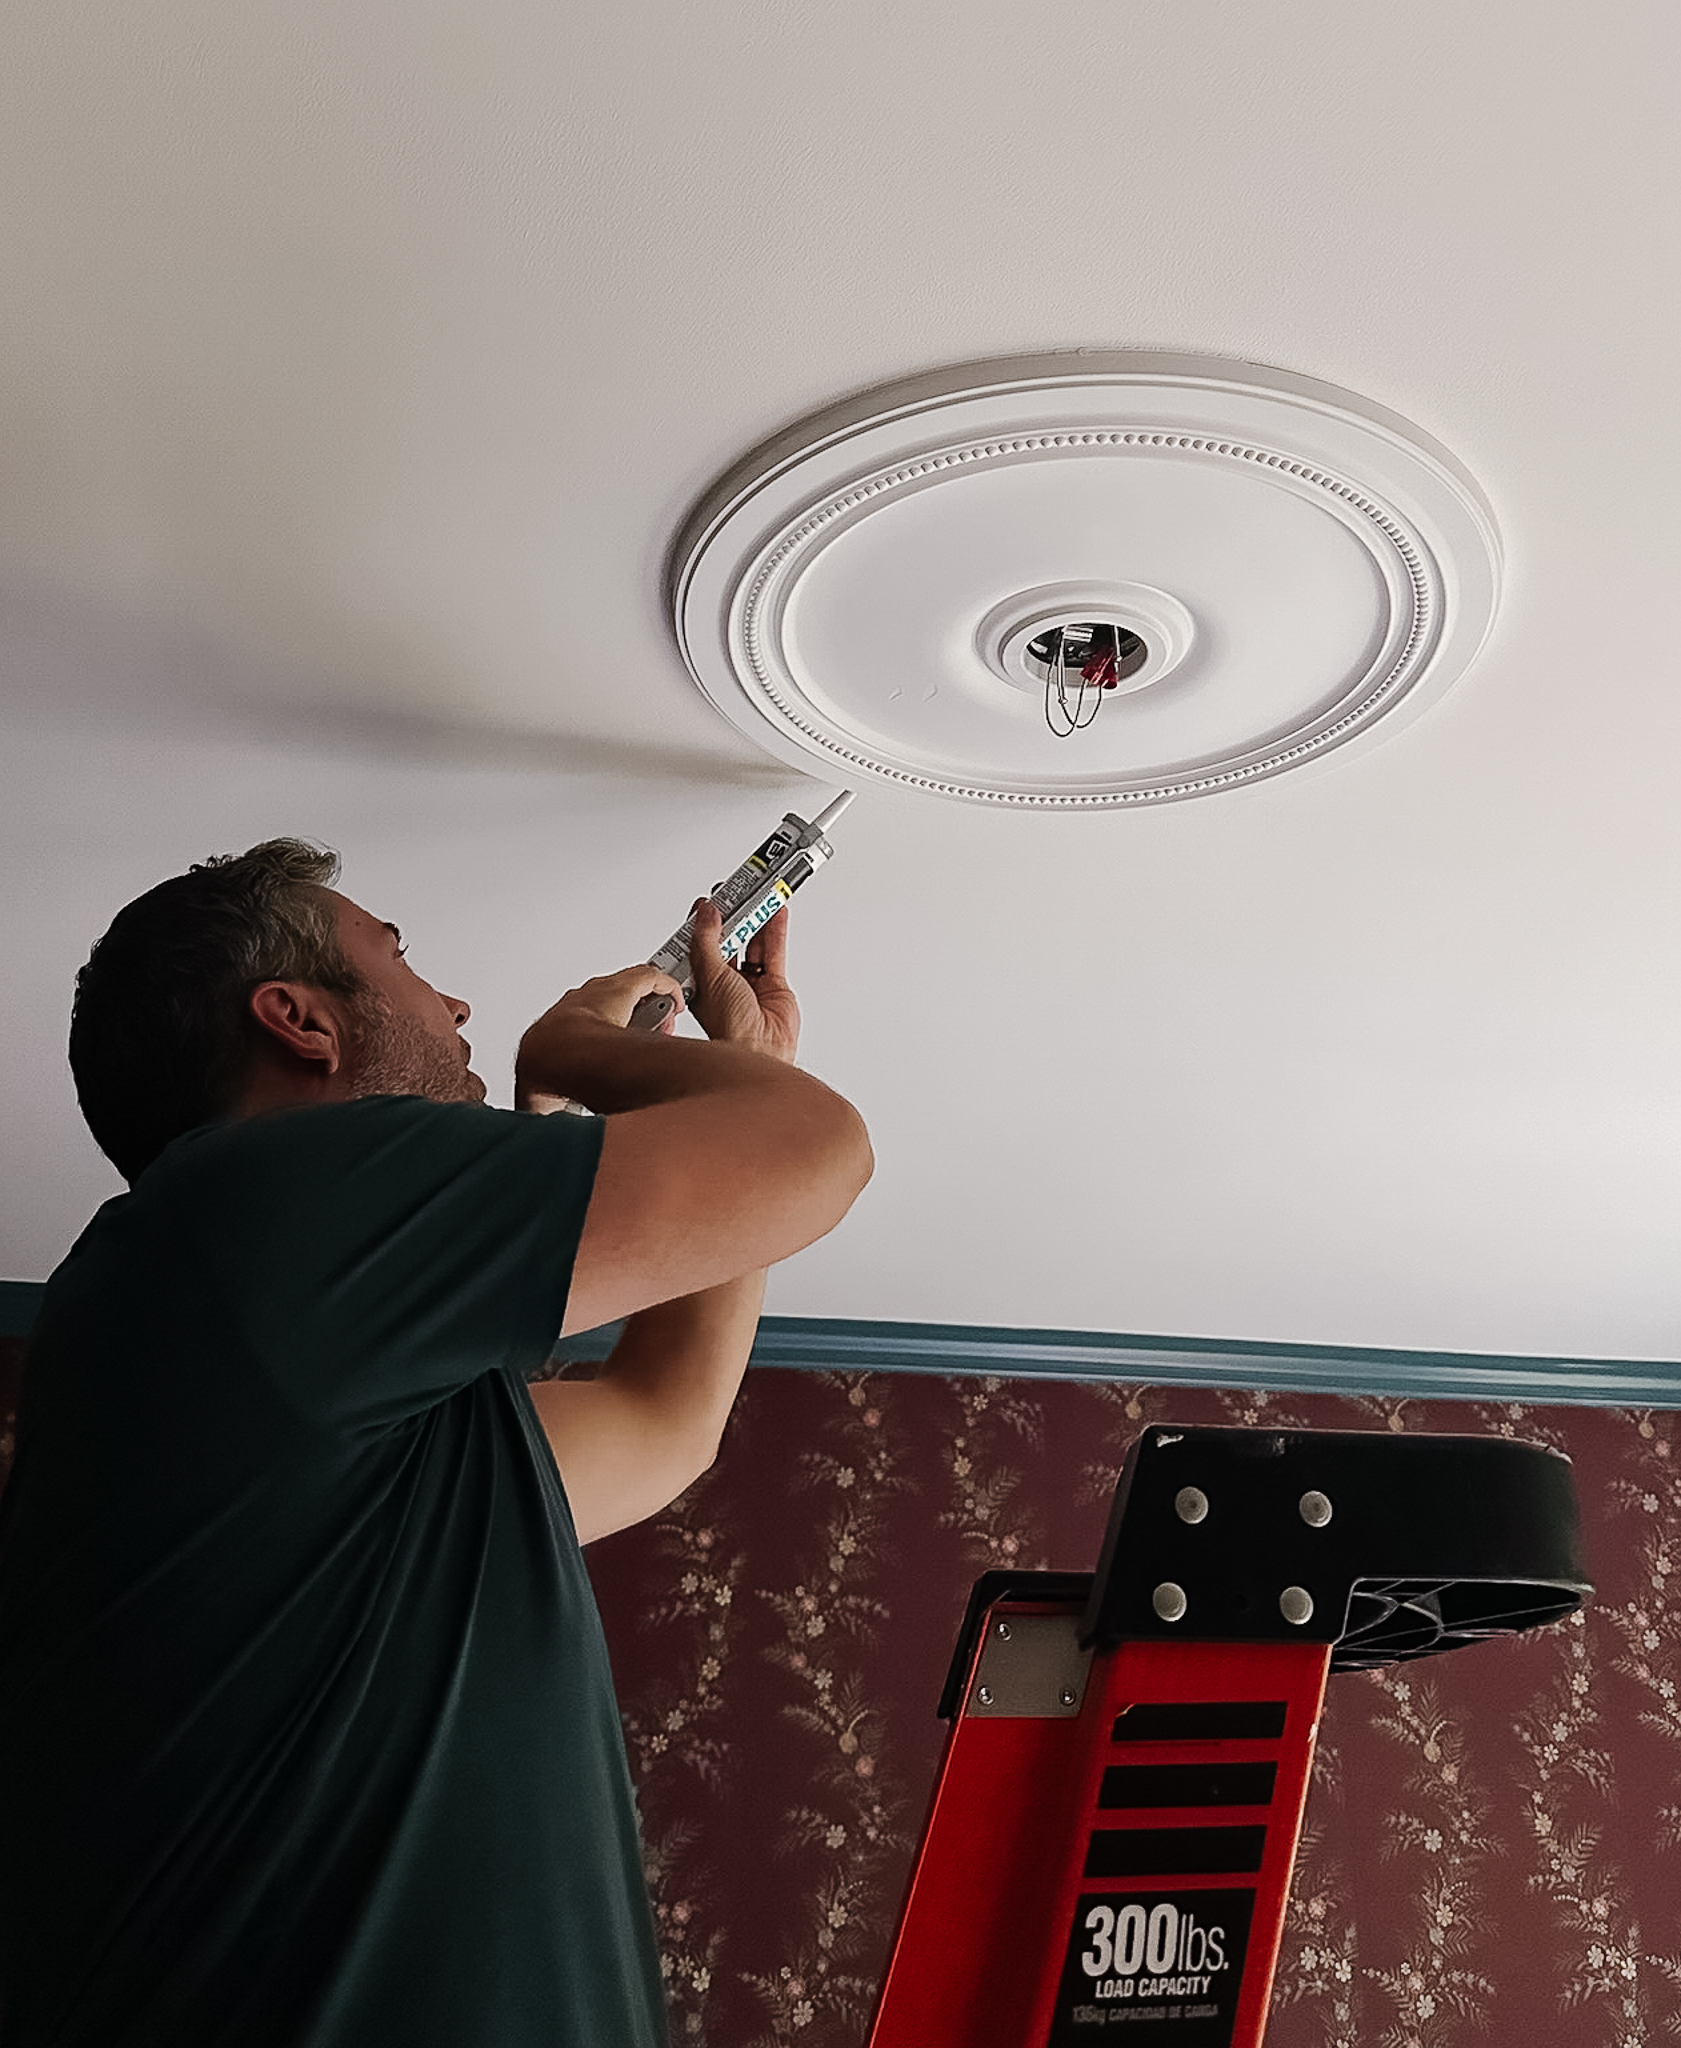
Gluing And Securing The Medallion
Attaching the medallion securely is crucial. Poor adhesion can cause it to sag or fall. Follow these steps:
- Apply construction adhesive in a zigzag or circle on the back of the medallion. Stay 1 inch away from the edge to avoid squeeze-out.
- Optional: Add screws. For large or heavy medallions, drive two or three screws through the medallion into the ceiling joist or drywall anchors.
- Position the medallion. Line up the center hole with the ceiling’s electrical box. Press firmly.
- Tape in place. Use painter’s tape to hold the medallion while the adhesive sets (about 24 hours).
- Fill screw holes with caulk or spackle. Sand smooth after drying.
Tip: Screws are best for wood and plaster. For lightweight polyurethane, adhesive is often enough.
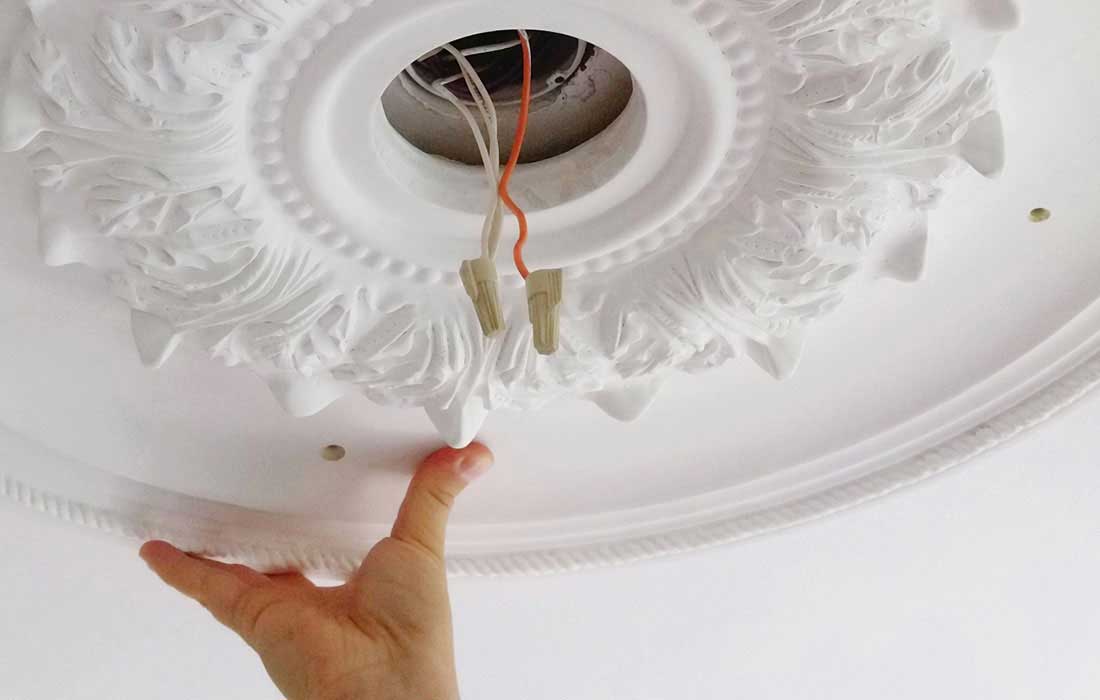
Reinstalling The Light Fixture Or Ceiling Fan
Once your medallion is secure, it’s time to put the fixture back. This can be tricky because wires and mounting bars must pass through the medallion’s center.
- Pull wires through the medallion’s hole.
- Attach the mounting bracket for the fixture or fan. Make sure it’s flush and stable.
- Connect wires: Black to black, white to white, and ground to ground, using wire nuts.
- Secure the fixture: Tighten screws to hold the base against the medallion and ceiling.
- Restore power at the breaker and test.
Do not overtighten—this can crack the medallion, especially polyurethane types.
Sealing And Finishing Touches
For a seamless, professional look, finish with these steps:
- Caulk the gap: Run a thin bead of painter’s caulk around the medallion’s edge. Smooth with a damp finger or tool.
- Touch up paint: Cover any marks or caulk lines with matching paint.
- Clean the area: Remove tape and dust off the medallion and fixture.
If you see visible gaps or the medallion is not flush, double-check for ceiling irregularities. Small flaws can be hidden with extra caulk and careful painting.
Common Mistakes And How To Avoid Them
Even careful DIYers make errors with ceiling medallions. Here are common mistakes and how to avoid them:
- Wrong size medallion: Too small looks lost, too big overwhelms. Measure carefully and use the formula above.
- Skipping adhesive or screws: Relying on adhesive alone for heavy medallions can lead to falls. Use screws for anything over 2 pounds.
- Not turning off power: This is a safety hazard. Always cut power at the breaker.
- Poor surface prep: Dust or uneven ceilings can cause the medallion to fall or crack later.
- Overtightening fixture screws: This can damage lightweight medallions.
- Not checking fixture compatibility: Some medallions block large fan bases or odd-shaped lights.
- Painting after installation: This makes it hard to reach details and can stain your ceiling.
Advanced Tips For A Flawless Installation
If you want your medallion to look like it was installed by a pro, consider these advanced tips:
- Use a laser level to align the medallion perfectly, especially in large rooms.
- Stagger caulk applications: Apply one layer, let dry, then add a second for a perfect seal.
- Create a shadow effect: Paint the medallion a shade lighter or darker than the ceiling for subtle drama.
- Add accent paint: Highlight details with metallic or contrasting color.
- Test fit with the fixture before gluing. Some canopies don’t fit snugly—adjust before the adhesive dries.
Cost Breakdown: Diy Vs. Professional Installation
What will it cost to install a ceiling medallion? Here’s a quick comparison:
| Item | DIY Cost | Pro Cost |
|---|---|---|
| Medallion (18″ polyurethane) | $30 – $80 | $30 – $80 |
| Adhesive, caulk, screws | $10 – $20 | Included |
| Paint & brushes | $15 – $40 | Included |
| Labor | Free (your time) | $100 – $250 |
| Total | $55 – $140 | $145 – $370 |
DIY is much cheaper, especially if you already have tools. Hiring a pro is safer if you are not comfortable with electricity or have a heavy fixture.
Troubleshooting: What To Do If Problems Happen
Even after careful installation, you might face issues. Here’s how to fix common problems:
Medallion Won’t Stay Up
If the medallion sags or falls, the adhesive was not strong enough, or the ceiling was not clean. Remove it, scrape off old adhesive, clean the surface, and reinstall with screws plus adhesive.
Visible Gaps After Installation
Caulk is your friend. Use painter’s caulk to fill gaps, then paint over for a seamless look.
Cracked Or Damaged Medallion
Small cracks can be filled with spackle or caulk, then sanded and painted. For large breaks, it’s best to replace the medallion.
Fixture Base Doesn’t Cover The Center Hole
If the canopy is smaller than the medallion’s hole, use a medallion with a smaller center, or add a decorative ring.
Paint Peeling
This usually happens if the medallion was not primed or cleaned before painting. Sand lightly, re-prime, and repaint.
Real-life Examples: Homeowners’ Experiences
Anna from Boston wanted to refresh her dining room. She chose a 20-inch polyurethane medallion with a floral motif. The hardest part was aligning the medallion while holding wires out of the way. Anna used painter’s tape and a friend to help, finishing the project in about three hours. “The room instantly felt more elegant,” she said.
Mike in Dallas installed a wood medallion for his ceiling fan. He underestimated the weight and didn’t use screws, so it sagged within a week. After reinstalling with longer screws into the joist, it’s now solid. “Don’t skip the screws for heavy medallions,” Mike advises.
Jasmine from Seattle painted her medallion gold and white for a unique look. She used an artist’s brush for details and found that painting before installation made things much easier.
Sustainability And Maintenance
Polyurethane medallions are durable and resist moisture, making them good for kitchens and bathrooms. Wood and plaster need more care—wipe with a dry cloth and avoid harsh cleaners.
For long-term durability:
- Dust regularly with a microfiber cloth.
- Touch up paint as needed, especially after cleaning.
- Check for cracks or sagging once a year.
Most medallions last decades with little maintenance, but a quick inspection keeps them looking fresh.
Credit: houseofhipsters.com
When To Call A Professional
Sometimes, hiring a pro is the best choice. Call an electrician or contractor if:
- You are uncomfortable working with electrical wires.
- The medallion is very large or heavy (over 5 pounds).
- The ceiling is damaged or uneven.
- You want a perfect paint job on a highly detailed medallion.
Professionals have the tools to handle difficult ceilings and heavy fixtures safely.
Where To Buy Ceiling Medallions
You can find ceiling medallions at home improvement stores, lighting showrooms, and online retailers. Look for brands with good reviews and clear installation guides. Specialty shops offer custom designs or period-correct styles for historical homes.
For more about the history and styles of medallions, see this Wikipedia article.
Frequently Asked Questions
How Do I Know What Size Ceiling Medallion To Buy?
Add the room’s length and width (in feet) and use that number in inches for the medallion diameter. For example, a 10×12 ft room works well with a 22-inch medallion. Also, make sure it’s larger than your fixture’s base for a balanced look.
Can I Install A Ceiling Medallion Without Removing The Light Fixture?
It’s possible with very lightweight medallions, but not recommended. Removing the fixture lets you center the medallion perfectly and ensures good adhesion. It’s safer and gives a cleaner result.
Do Ceiling Medallions Work With Ceiling Fans?
Yes, but choose a medallion rated for fan use. It must be strong enough and have a large enough center hole for the mounting bracket. Always use screws for added support with heavy fixtures.
Can I Paint A Ceiling Medallion After It’s Installed?
You can, but it’s harder to reach details and protect the ceiling or fixture from drips. Most people paint before installation for best results.
What If My Ceiling Isn’t Perfectly Flat?
Use flexible painter’s caulk to fill any gaps between the medallion and the ceiling. For very uneven ceilings, you may need to sand or shim the medallion’s back for a snug fit.
Adding a ceiling medallion is a rewarding project. With the right preparation, careful measuring, and a steady hand, you can transform any room in just a few hours. This classic detail never goes out of style and gives your home a touch of elegance that lasts for years.