Printer problems can be very frustrating, especially when you need to print something important and the quality is poor. One of the most common reasons for bad print quality is a dirty or damaged printer drum. The drum is a key part of many printers, especially laser printers. It transfers the toner powder onto the paper to make the image or text. If the drum is dirty, you might see lines, spots, or faded areas on your prints. The good news is that you can often solve these problems yourself by learning how to clean your printer drum properly.
Cleaning a printer drum is not as hard as it sounds, but you do need to follow the right steps. If you clean the drum the wrong way, you can easily damage it or make the problem worse. This guide will show you everything you need to know—from understanding what a printer drum does, to cleaning methods for different printer brands, to tips for keeping your drum in good shape for a long time.
Whether you are using a printer at home or in the office, you will find practical advice here to keep your prints clear and sharp.
Understanding The Printer Drum
Before you start cleaning, it’s helpful to understand what the printer drum does. The drum is a cylinder-shaped part that plays a big role in laser printers and some multifunction copiers. When you print, the drum gets a static electric charge from the printer’s laser. This charge attracts toner particles, which are then pressed onto the paper to create your image or text.
A dirty drum can cause a range of problems:
- Streaks or lines on the page
- Blurry or faded prints
- Dark or light spots
- Repeating marks (because the drum rotates as it prints)
Some drums are built into the toner cartridge, while others are separate parts. You should check your printer’s manual to know which type you have.
Non-obvious insight: Many people don’t realize that even tiny bits of dust or leftover toner can cause big print quality problems. That’s why regular cleaning is important, even if you don’t see major issues yet.
When Should You Clean Your Printer Drum?
You don’t need to clean the drum every time you print. There are signs that tell you it’s time for cleaning:
- Print quality has suddenly dropped
- You see lines, streaks, or spots
- Printer alerts you to drum issues
- After replacing toner (sometimes toner leaks onto the drum)
- After long periods of not using the printer (dust can build up)
Experience-based tip: If your printer is used in a dusty room or you print a lot, you may need to clean the drum more often. Office environments with heavy use often need monthly checks, while home printers may only need cleaning every few months.
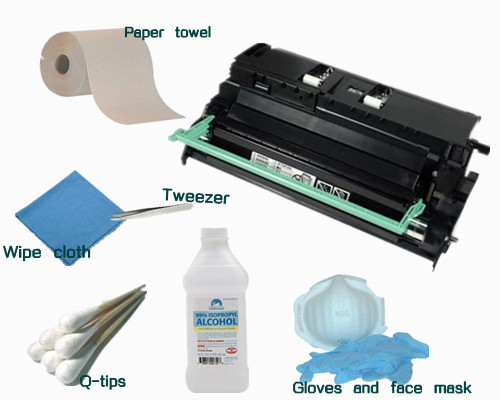
Tools And Materials Needed
You don’t need many tools, but using the right ones will help you avoid damage:
- Lint-free cloth or microfiber cloth: Regular tissues or towels can leave fibers.
- Isopropyl alcohol (90% or above): Helps dissolve toner and ink.
- Cotton swabs: For small, hard-to-reach spots.
- Gloves: To keep your hands clean and avoid fingerprints on the drum.
- Compressed air (optional): Good for blowing away loose dust.
- Protective mask (optional): To avoid breathing in toner dust.
Common mistake: Never use rough paper towels or kitchen sponges. These can scratch the sensitive drum surface.
Preparing For Cleaning
A little preparation will keep your printer safe and make cleaning easier.
- Turn off and unplug the printer: Never clean while it’s on.
- Let the printer cool down: Some parts can get hot during use.
- Find a clean, flat workspace: Avoid cleaning near open windows or fans.
- Lay down old newspaper or a cloth: To catch any spilled toner.
- Wash your hands or wear gloves: Fingerprints can damage the drum.
Practical insight: Many people forget to let the printer cool. Drums can hold a static charge or get hot—always wait at least 10–20 minutes after printing.
Step-by-step Guide: How To Clean Printer Drum
Cleaning the printer drum is a careful process. Here’s how to do it the right way:
1. Access The Printer Drum
- Open the printer cover as shown in your printer’s manual.
- Remove the toner cartridge or drum unit (sometimes they’re one piece, sometimes separate).
- Handle with care—the drum is sensitive to light and scratches.
Non-obvious insight: Avoid touching the green or blue drum surface with your fingers. Skin oils can cause permanent marks.
2. Inspect The Drum
- Hold the drum up to the light.
- Look for obvious marks, toner dust, or scratches.
- If you see deep scratches, the drum may need to be replaced.
3. Remove Loose Toner And Dust
- Hold the drum over your workspace.
- Use compressed air or gently tap to remove loose particles.
- If using a cloth, make sure it’s lint-free and dry.
4. Clean The Drum Surface
- Dampen a microfiber cloth or cotton swab with a little isopropyl alcohol (don’t soak it).
- Gently wipe the drum surface in one direction. Do not scrub.
- For stubborn marks, use a fresh cotton swab with alcohol and gently rub.
Straight-to-the-point tip: Never pour alcohol directly onto the drum. Always apply to the cloth or swab first.
5. Clean Edges And Small Areas
- Use cotton swabs for corners or edges where dust collects.
- Turn the drum slowly to check for more marks.
6. Let The Drum Dry
- Wait 5–10 minutes for any alcohol to evaporate.
- Do not use heat to speed up drying.
7. Reassemble And Test
- Carefully put the drum and toner back into the printer.
- Close the cover and plug the printer back in.
- Print a test page to check the result.
Practical insight: If you still see lines or marks after cleaning, repeat the process. Some stubborn toner may need a second try.
Cleaning Different Printer Drum Types
Not all printers are the same. Here’s how to adjust for the most common types.
Laser Printers
Most laser printers have a separate drum unit. The process above works well for these. Popular brands like Brother, Canon, and HP all use similar methods.
Drum Built Into Toner Cartridge
Some printers (like many HP and Canon models) combine the drum and toner into one cartridge. You can still clean the drum, but be extra careful not to spill toner.
Color Laser Printers
Color printers have separate drums for each color (cyan, magenta, yellow, black). Clean each drum separately, and be careful not to mix up the cartridges.
Multifunction Copiers
Large office copiers may have larger, more complex drum units. Always follow the manufacturer’s manual. Some drums are not meant to be cleaned by users and should be replaced by a technician.
Non-obvious insight: For color printers, cleaning only one drum may not solve all issues. Check each color drum for marks.
How To Clean Printer Drum: Brand-specific Tips
Every brand has its own design. Here are tips for some of the most popular brands.
Brother Printers
- Brother drums are often separate from the toner.
- After removing the drum and toner, clean as described.
- Brother models have a small corona wire that can also get dirty. Slide the green tab on the drum unit back and forth several times to clean this wire.
Hp Printers
- Many HP models combine drum and toner.
- You may need to replace the whole cartridge if the drum is damaged.
- For standalone drums, handle gently and avoid strong cleaning chemicals.
Canon Printers
- Similar to HP, some drums are inside the toner cartridge.
- Use gentle cleaning, and do not expose the drum to direct sunlight.
Samsung Printers
- Drums are usually separate.
- Follow the same steps, and always use a clean, soft cloth.
Xerox And Ricoh
- Some drums are user-serviceable; others are not.
- Check the manual before removing or cleaning.
Practical insight: Always check your printer’s warranty before cleaning the drum yourself. Some brands void the warranty if you open certain parts.
Table: Drum And Toner Cartridge Types By Brand
Here’s a quick reference for common brands and their drum types.
| Brand | Drum Location | User-Cleanable? | Special Notes |
|---|---|---|---|
| Brother | Separate from toner | Yes | Clean corona wire too |
| HP | Often built into toner | Sometimes | May need to replace cartridge |
| Canon | Often built into toner | Sometimes | Keep out of sunlight |
| Samsung | Separate | Yes | Use soft cloth only |
| Xerox | Separate | Varies | Check manual |

Credit: www.reddit.com
Common Mistakes To Avoid
Cleaning a printer drum is simple if you avoid these errors:
- Using the wrong cloth: Paper towels or rough cloths scratch the drum.
- Touching the drum surface: Fingerprints can cause permanent print defects.
- Using too much liquid: Excess alcohol or water can short out parts or leave marks.
- Forgetting to clean the corona wire (especially on Brother printers).
- Rushing the process: Not letting the drum dry can cause smudges.
- Not checking for warranty information: Some cleaning steps can void coverage.
- Ignoring deep scratches: If the drum is badly scratched, cleaning won’t help—it must be replaced.
Non-obvious insight: Sometimes dirty prints are caused by something other than the drum—like a dirty fuser or rollers. If cleaning the drum does not help, check these parts too.
Table: Print Quality Problems And Solutions
If you see a problem on your printed page, this guide will help you know if cleaning the drum will solve it.
| Problem | Possible Cause | Cleaning the Drum Will Help? |
|---|---|---|
| Vertical lines | Dirt or toner on drum | Yes |
| Repeating spots | Drum or roller marks | Yes |
| Faded areas | Dirty drum or empty toner | Yes (if drum) |
| Smudged prints | Wet drum or fuser issue | Maybe |
| All black pages | Drum ground problem | No (needs repair) |
| Blank pages | No toner or electrical issue | No |
Credit: blog.123ink.ca
How Often Should You Clean Your Printer Drum?
How often you need to clean depends on how much you print and your environment.
- Heavy office use: Every 1–2 months
- Home/occasional use: Every 3–6 months
- After replacing toner: Always check for spills or dust
- If in dusty areas: Clean more often
Straight-to-the-point advice: It is better to clean a little too often than not enough. Regular cleaning extends the life of your drum and gives you better prints.
How To Store And Handle Printer Drums
The drum is sensitive to light, heat, and scratches. Here are best practices:
- Store drums in a cool, dark place when not in use.
- Keep in original packaging or a clean box.
- Do not touch the surface—always hold by the ends or edges.
- Avoid direct sunlight—light can permanently damage the drum’s coating.
Calm expert tip: If you must move a drum, wrap it in a clean cloth to prevent dust or scratches.

Credit: www.youtube.com
Preventing Future Drum Problems
Keeping your drum clean is easier than fixing problems later. Here’s how to prevent issues:
- Keep your workspace clean and dust-free.
- Use high-quality paper—cheap paper can create more dust.
- Replace toner and drums when the printer tells you to.
- Print a cleaning page if your printer has this feature (often found in the settings menu).
- Check for firmware updates—some printers have cleaning cycles built in.
- Do not reuse old or damaged drums—this can damage the printer.
Non-obvious insight: Many people do not know that using cheap, unofficial toner cartridges can leak more powder, making drum cleaning much harder.
Table: Cost Comparison – Cleaning Vs. Replacing Printer Drum
Is it worth cleaning, or should you just buy a new drum? Here’s a cost comparison.
| Option | Average Cost | When to Choose |
|---|---|---|
| Cleaning Drum | $0 (if DIY) to $20 (if serviced) | Minor marks, regular maintenance |
| Replacing Drum | $50–$150 (brand/model varies) | Deep scratches, old drum, not improved by cleaning |
| Professional Service | $80–$200 | Complex printers, warranty concerns |
Straight-to-the-point advice: Always try cleaning first if the drum is not physically damaged. Replacement is best for old or scratched drums.
What To Do If Cleaning Doesn’t Work
Sometimes, cleaning the drum does not fix your print quality problems. Here’s what to do next:
- Check other parts: The fuser, rollers, or toner cartridge may also be dirty or damaged.
- Try a new drum: If cleaning does not help and you see scratches, replacement is needed.
- Consult the manual: Some printers have special cleaning cycles.
- Contact support: Especially if your printer is under warranty.
Practical insight: It’s common to mistake fuser or roller problems for drum issues. If you’ve cleaned the drum and the problem remains, look at these other parts.
Environmental And Safety Considerations
Cleaning a printer drum is safe, but keep these tips in mind:
- Avoid inhaling toner dust—it can irritate your lungs.
- Dispose of waste properly—toner and drums should not go in regular trash.
- Recycle old drums—most manufacturers offer recycling programs.
- Use gloves if you have sensitive skin.
For more safety and environmental tips, see the EPA’s guidelines on printer maintenance and recycling.
Frequently Asked Questions
How Do I Know If My Printer Drum Needs Cleaning Or Replacement?
If you see lines, spots, or faded areas on your prints, first try cleaning the drum. If cleaning does not help or you see deep scratches, it is time to replace the drum.
Can I Use Water Instead Of Isopropyl Alcohol To Clean The Drum?
No. Water can leave streaks or cause damage. Isopropyl alcohol dries quickly and does not harm the drum surface.
How Long Does It Take To Clean A Printer Drum?
Most cleanings take about 10–20 minutes, including drying time. Larger office printers may take longer.
Is It Safe To Clean The Printer Drum Myself, Or Should I Get Professional Help?
It is safe to clean the drum yourself if you follow instructions and use the right tools. If you are unsure or have a very expensive printer, professional cleaning is a good choice.
Will Cleaning The Drum Improve Print Quality Right Away?
Yes, if the drum was dirty. You should see better prints immediately after cleaning. If there is no improvement, the drum may be damaged or another part needs attention.
Cleaning your printer drum is a simple way to keep your prints looking sharp and your printer working longer. With a little care and the right steps, you can fix many common print quality problems yourself. Regular cleaning is a smart habit—your printer (and wallet) will thank you.