Clay pots have been part of human life for thousands of years. You see them in gardens, kitchens, and even as decorations. Their natural look and ability to keep water cool make them special. But if you own clay pots, you know they get dirty easily. Stains, moss, and mineral deposits can make them look old and dull. Cleaning them is not just about appearance. Dirty clay pots can hide pests, spread disease to plants, and weaken over time. Many people don’t realize that how you clean them can help your pots last longer, keep your plants healthy, and even make your home look better.
Some people think cleaning clay pots is easy—just scrub and rinse. But if you want to do it right, you need to know more. Clay is porous, so it absorbs water, minerals, and sometimes chemicals. Using the wrong cleaning method can damage the pot or leave behind chemicals that hurt your plants.
In this guide, you’ll learn everything from basic cleaning to deep stain removal, how to sanitize, and even how to keep your pots looking good for years. You’ll also see common mistakes to avoid, and get answers to questions most people never ask.
Let’s dive in and discover how to clean clay pots the right way.
Why Clay Pots Need Special Care
Clay pots are different from plastic or metal containers. Their porous surface absorbs water, salts, and even bacteria. Over time, these build up and can damage both the pot and anything you put inside. When you understand why clay pots need care, you’ll see why regular cleaning is more than just a chore.
Porosity And Mineral Buildup
Clay pots “breathe. ” This quality is great for plants, as it allows air and moisture to move in and out. But it also means water and fertilizer can leave white rings or crusty deposits. If you live in a place with hard water, you’ll notice these mineral stains even more.
Mold, Algae, And Pests
Moisture can make clay pots a home for mold and algae. These look like green or black patches, and can spread to your plants’ roots. Sometimes, tiny pests hide in the cracks and multiply if you don’t clean the pot.
Old Soil And Disease
When you reuse a pot, leftover soil can hold diseases. Many plant problems start with dirty containers. Cleaning is not just about looks—it’s about plant health.
Types Of Clay Pots And Their Challenges
Not all clay pots are the same. Some are unglazed, others are painted, and some have special finishes. Each type needs its own cleaning approach.
| Type of Clay Pot | Porosity | Cleaning Difficulty | Common Problems |
|---|---|---|---|
| Unglazed Terracotta | High | Moderate | Staining, algae, mineral rings |
| Glazed Clay Pots | Low (outside) | Easy | Surface dirt, chips |
| Painted Clay Pots | Medium | Varies | Paint peeling, fading |
| Antique/Decorative Pots | Varies | High | Delicate surface, cracks |
Unglazed terracotta is the most common and the most challenging. It absorbs everything—water, minerals, even odors. Glazed pots are easier to clean, but you still need to be careful with chips. Painted pots can lose their color if you scrub too hard. Old or antique pots are often fragile, so gentle cleaning is a must.
Supplies You Need Before Cleaning
Before you start, gather your supplies. This helps you avoid mistakes and makes the process smoother. Here’s a list of what you may need, depending on the type of cleaning:
- Soft-bristle brush – For scrubbing dirt and stains without scratching.
- Stiff-bristle brush – Good for tough mineral deposits.
- Old toothbrush – Perfect for small crevices and detailed work.
- White vinegar – Excellent for dissolving mineral stains.
- Baking soda – Safe abrasive for scrubbing.
- Mild dish soap – Removes grease and organic dirt.
- Bleach (optional) – For sanitizing, use carefully.
- Large bucket/tub – For soaking pots.
- Sponge or cloth – For wiping and drying.
- Rubber gloves – Protect your hands from chemicals.
- Warm water – Helps dissolve dirt and stains.
- Sandpaper (fine grit) – For stubborn residue, used gently.
- Plastic scraper – Removes thick crusts without damage.
Most of these supplies are safe, cheap, and easy to find. For painted or antique pots, avoid harsh chemicals or stiff brushes.
How To Clean Clay Pots: Step-by-step Methods
Let’s get into the heart of the process. There are three main levels of cleaning: basic cleaning, deep cleaning, and sanitizing. Each level works for different problems.
Basic Cleaning For Everyday Dirt
This method removes surface dirt and prepares pots for deeper cleaning if needed.
- Empty the pot: Remove any plants and as much soil as possible. Knock the pot gently to loosen dry soil.
- Brush off loose dirt: Use a dry soft-bristle brush to remove dust, cobwebs, and loose soil. This step prevents mud from forming when you add water.
- Soak the pot: Fill a large bucket with warm water. Submerge the pot and let it soak for 15–30 minutes. Soaking softens dirt and makes scrubbing easier.
- Scrub the pot: With a soft brush or sponge, scrub the inside and outside. Use an old toothbrush for the rim and drainage holes.
- Rinse well: Wash away all loosened dirt with clean water.
- Dry completely: Leave the pot to air-dry in the sun. Clay must dry fully before use to prevent mold.
Tip: If you only need to remove dust, a quick wipe with a damp cloth is enough.
Deep Cleaning For Stains And Mineral Deposits
If your pot has white rings, algae, or stubborn stains, try this deeper method.
- Repeat basic cleaning steps: Remove as much dirt as possible first.
- Vinegar soak: Mix one part white vinegar with three parts warm water. Soak the pot for 30–60 minutes. Vinegar dissolves mineral stains safely.
- Scrub with baking soda: Sprinkle baking soda on a damp sponge or brush. Scrub stained areas gently. The fizzing helps lift stains.
- Tackle tough spots: Use a stiff brush or fine sandpaper for thick deposits, but be gentle to avoid scratching.
- Rinse very well: Remove all traces of vinegar and baking soda. These can affect plant health if left behind.
- Dry thoroughly: Let the pot dry in sunlight. Sun helps kill mold and bacteria.
Insight: Sometimes, stains are deep inside the clay. These may fade with repeated cleanings, but some old stains never disappear completely. This is part of the pot’s character.
Sanitizing To Remove Pathogens
When reusing pots, especially after disease, it’s smart to sanitize them. Sanitizing kills fungi, bacteria, and pests.
- Clean the pot first: Dirt and organic matter block sanitizers. Always clean before sanitizing.
- Prepare a bleach solution: Mix one part household bleach with nine parts water. (Stronger solutions can damage clay.)
- Soak the pot: Place the pot in the bleach solution for 10–15 minutes. Make sure the pot is fully covered.
- Scrub again if needed: Use a brush to get into cracks.
- Rinse multiple times: Bleach can harm plants if not removed. Rinse the pot several times with clean water.
- Air-dry in sunlight: Sunlight helps bleach evaporate and adds extra disinfection.
Caution: Never mix bleach with vinegar or other cleaners. Always work in a well-ventilated area.
Cleaning Painted And Decorative Clay Pots
Painted or decorative pots need gentle cleaning.
- Use only mild soap and water, never harsh chemicals.
- Avoid soaking for too long, as water can loosen paint.
- Use a soft cloth or sponge, not a stiff brush.
- Test a small area first to check for fading.
- Dry quickly with a towel to prevent water spots.
For very old or valuable pots, consult a restoration expert.
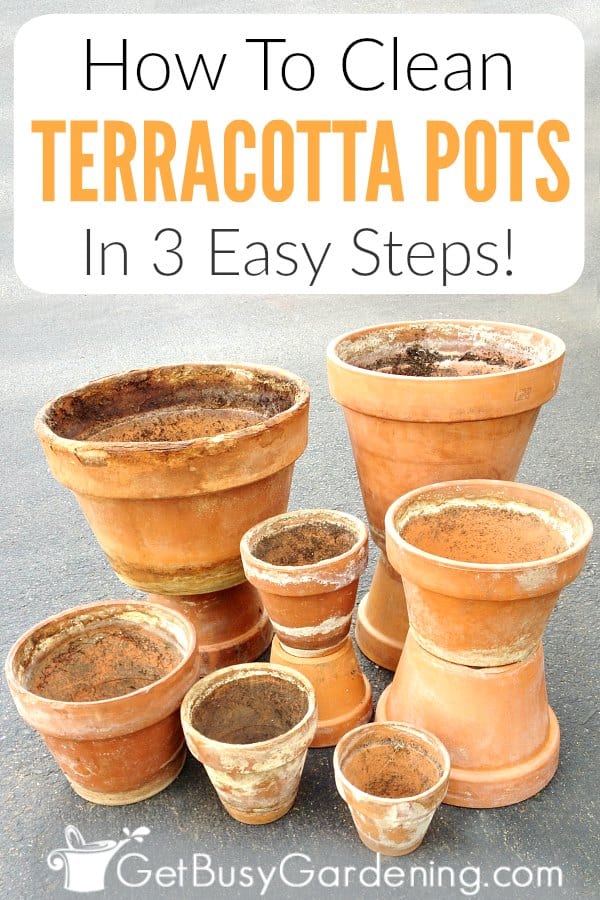
Credit: getbusygardening.com
Removing Specific Stains From Clay Pots
Different stains need different treatments. Here’s how to handle the most common problems.
White Mineral Deposits
These chalky rings come from hard water or fertilizer.
- Soak in vinegar solution (1: 3 vinegar to water) for 30–60 minutes.
- Scrub with baking soda.
- Rinse well.
Green Algae Or Moss
- Scrub with a stiff brush under running water.
- Soak in vinegar solution if stains persist.
- Sun-dry—UV light kills algae spores.
Black Mold Or Mildew
- Wash with soapy water first.
- Soak in a bleach solution (1: 9 ratio) for 10–15 minutes.
- Rinse thoroughly and dry in sunlight.
Rust Stains
- Rub with baking soda paste (3 parts baking soda, 1 part water).
- For old stains, use fine sandpaper gently.
- Rinse and dry.
Non-obvious tip: For deep or colored stains, try making a paste with hydrogen peroxide and baking soda. Apply, let sit for an hour, then scrub and rinse.
Drying And Storing Clay Pots
After cleaning, drying is critical. Clay absorbs water and stays damp inside long after the outside feels dry. If you rush, you risk mold and cracks.
- Air-dry in sun: The best way is to leave pots in full sun for a day or two. Sunlight dries and sanitizes.
- Stand pots upside-down: This lets water drain out of the base.
- Check for dampness: Before storing or refilling, make sure the pot is completely dry inside and out.
- Store in a dry place: Wet storage areas promote mold. Raise pots on a shelf if possible.
Non-obvious insight: Don’t stack wet clay pots. The trapped moisture can create a musty smell and weaken the pots.
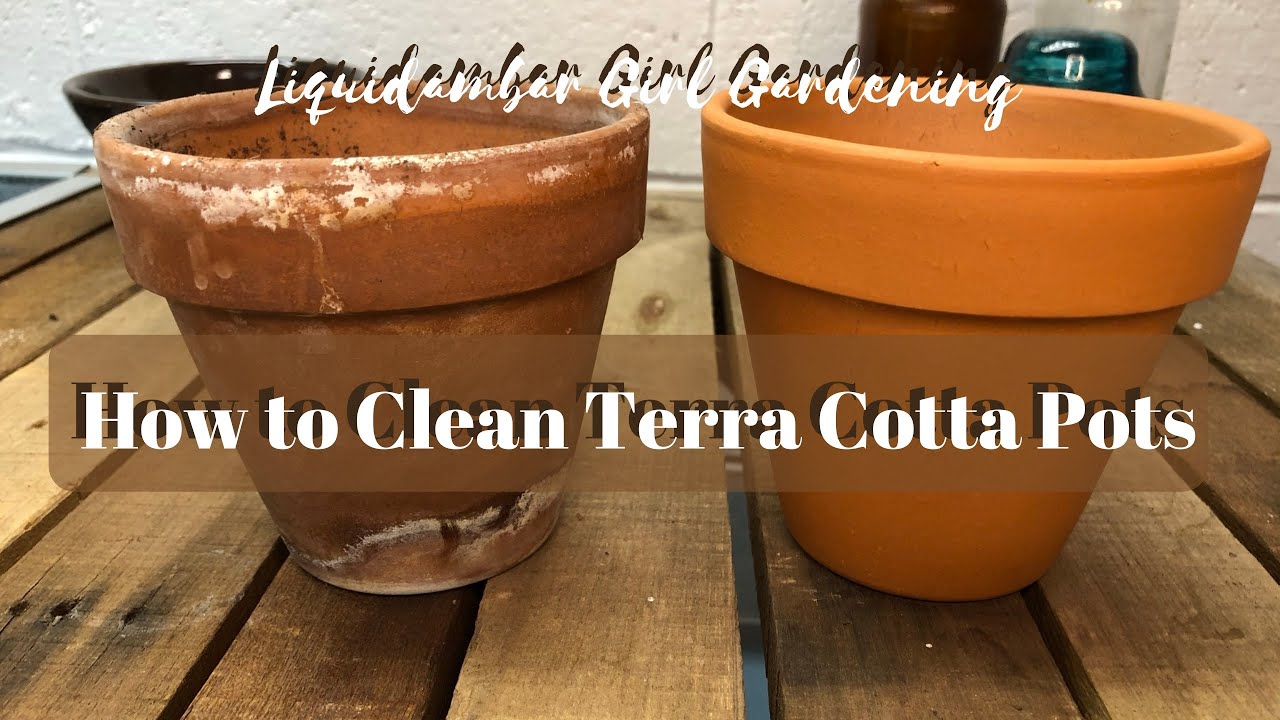
Credit: www.youtube.com
Preventing Future Stains And Buildup
It’s easier to prevent stains than to remove them. Here’s how you can keep your clay pots looking new:
- Use filtered water: Hard water leaves more mineral rings.
- Seal the pot: Apply a breathable clay sealer inside the pot (never outside) to slow down absorption. This keeps stains from setting in.
- Avoid overwatering: Too much water encourages algae and mineral stains.
- Clean regularly: A quick rinse every few months prevents buildup.
- Use saucers: These catch drips and prevent water stains on surfaces.
- Rotate pots: Moving pots occasionally keeps one side from collecting algae in shaded areas.
Practical tip: If you’re storing pots for winter, clean and dry them first. Storing dirty or wet pots can lead to cracks from freezing water.
Common Mistakes To Avoid
Even experienced gardeners make mistakes with clay pots. Avoid these to keep your pots healthy:
- Using harsh chemicals: Strong cleaners can weaken clay or leave residues harmful to plants.
- Skipping the rinse: Not rinsing bleach or vinegar can damage plant roots later.
- Scrubbing too hard: Over-scrubbing can scratch or wear away the surface, especially on painted or antique pots.
- Storing wet pots: This is a top cause of mold and mildew.
- Cleaning only the outside: The inside matters more for plant health.
- Ignoring drainage holes: These often hide dirt and pests—use a toothbrush here.
How Clay Pot Cleaning Helps Plant Health
Clean clay pots do more than look nice—they help your plants thrive. Here’s why:
- Reduces disease risk: Old soil and algae can harbor root rot and fungus.
- Improves drainage: Unclogged pots let roots breathe and prevent waterlogging.
- Promotes healthy roots: Clean surfaces reduce the chance of pests attacking roots.
- Prevents chemical buildup: Removing fertilizer residue stops plant “burn.”
A study by the University of Florida found that disinfecting pots between uses can reduce plant disease by up to 70%. This shows the value of proper cleaning for serious gardeners.
Comparing Clay Pot Cleaning Methods
Which cleaning method is best? It depends on your pot’s condition and what you want to remove. Here’s a quick comparison:
| Cleaning Method | Best For | Time Needed | Plant Safety |
|---|---|---|---|
| Basic Cleaning (Water & Soap) | Surface dirt, regular maintenance | 15–30 min | Very safe |
| Vinegar Soak | Mineral stains, algae | 30–60 min | Safe with good rinsing |
| Bleach Soak | Sanitizing, disease removal | 10–15 min | Safe with thorough rinsing |
| Baking Soda Scrub | Stubborn stains | 5–10 min | Very safe |
Choose the mildest method that solves your problem. Always rinse and dry well, no matter which method you use.
Eco-friendly Ways To Clean Clay Pots
If you want to avoid chemicals, there are natural ways to clean clay pots:
- Lemon juice: Works like vinegar to dissolve minerals.
- Hydrogen peroxide: Disinfects without harming the environment. Use a 3% solution.
- Hot water and sun: For light cleaning, soaking in hot water and drying in the sun can be enough.
- Essential oils: Tea tree oil is a natural mold killer—add a few drops to your cleaning water.
These methods are safe for both you and your plants, but always test a small area first.
How Often Should You Clean Clay Pots?
Frequency depends on use. Here’s a guide:
- After every plant: Clean and sanitize before reusing for a new plant.
- Every season: Wash pots at the end of the growing season, especially before winter storage.
- When you see stains: Clean as soon as you notice white rings, algae, or moss.
Pro tip: If you grow food or herbs in clay pots, sanitize them at least once a year.
Reviving Old Or Neglected Clay Pots
Sometimes you find an old pot in the shed, or inherit a family heirloom. Old pots can be brought back to life with special care:
- Check for cracks: Tap gently with a spoon; a clear ring means it’s strong. A dull thud suggests cracks.
- Clean gently: Start with the mildest methods—avoid harsh scrubbing.
- Soak longer: Old stains may need several soakings.
- Seal the inside: After drying, a thin coat of food-safe mineral oil can strengthen the pot.
- Repair chips: Use clay repair kits for valuable or decorative pots.
Reviving an old pot takes time, but the result is worth it.
When To Replace A Clay Pot
Not all pots can be saved. Replace your clay pot if:
- It has a large crack that leaks water.
- The rim is broken and can’t support plants.
- The pot feels soft or crumbly when touched.
- Mold or algae return after multiple cleanings.
Sometimes, a broken pot can be reused in the garden as a decorative piece or for pot shards (drainage).
Cleaning Clay Pots For Different Uses
Clay pots are used for more than just plants. Some people use them for cooking, storing food, or as water coolers. Cleaning rules change for these uses:
- For cooking: Never use bleach or chemical cleaners. Only use baking soda, vinegar, or lemon juice. Rinse thoroughly.
- For water storage: Avoid soap. Use boiling water and sun-drying for best results.
- For art/crafts: Clean only the surface—don’t soak, as it weakens glue or paint.
Extra tip: Never reuse a pot that held chemicals or pesticides for food or water.
Frequently Asked Questions
How Do I Remove Stubborn White Stains From My Clay Pot?
White stains are usually mineral deposits from hard water or fertilizer. Soak the pot in a mixture of one part white vinegar to three parts water for up to an hour. Then scrub with baking soda and a brush. Rinse well and dry in the sun.
Can I Put My Clay Pots In The Dishwasher To Clean Them?
It’s not recommended. The heat and detergent in dishwashers can crack or weaken clay pots, especially unglazed ones. Always clean clay pots by hand using the methods described above.
Is It Safe To Reuse A Pot That Had A Diseased Plant?
Yes, but you must sanitize the pot first. Clean off all soil, then soak the pot in a solution of one part bleach to nine parts water for 10–15 minutes. Rinse several times and dry in sunlight before replanting.
How Can I Prevent Algae From Growing On My Clay Pots?
Algae loves moisture and shade. To prevent it, avoid overwatering, place pots in sunny spots, clean pots regularly, and use a breathable clay sealer inside the pot. Sun-drying after cleaning also helps.
What Should I Do If My Clay Pot Develops A Crack While Cleaning?
If the crack is small, you can try to repair it with waterproof glue or a clay repair kit. For large cracks, it’s safer to replace the pot or use it for decorative purposes only. Cracked pots can leak and harm plants.
:max_bytes(150000):strip_icc()/clay-cooker-cleaning-and-storage-1805819-v3-052e9c76fbb44a85b572ce79c8067cb7.png)
Credit: www.thespruceeats.com
Final Thoughts
Cleaning clay pots is about more than just looks. It protects your plants, keeps your garden healthy, and helps your pots last longer. Whether you use simple tools or natural cleaners, regular care makes a big difference. Take time to clean, dry, and store your clay pots the right way. You’ll enjoy beautiful, healthy plants and pots that last for years. For more on clay pot maintenance, visit the Wikipedia page on flowerpots.
With the right methods, even old or stained clay pots can be revived. Remember: a little care now saves trouble later. Happy gardening!