Sanding cabinets is a key step in refinishing or repainting, but the process leaves behind a fine dust that can ruin your final results if not properly cleaned. Many people overlook this stage, thinking a quick wipe is enough. However, proper cleaning after sanding is what separates a flawless, professional finish from a rough, amateur look.
This guide will show you exactly how to clean cabinets after sanding, including expert tips and often-missed details that make a real difference. By the end, you’ll know how to prepare your cabinets for painting or staining, avoid common mistakes, and achieve a surface that’s truly ready for a perfect finish.
Why Cleaning Cabinets After Sanding Matters
After you sand cabinets, you create a layer of fine wood dust and particles. If you paint or stain over this dust, the finish becomes uneven, rough, and may even peel or bubble. The dust can also block paint or stain from sticking to the wood, leading to chipping and poor durability.
Dust is sneaky—it hides in corners, grooves, and hardware. Even a small amount left behind can ruin hours of hard work. That’s why professional painters and woodworkers spend extra time on this step. Proper cleaning is not just about looks; it’s about protecting your investment and ensuring your cabinets stay beautiful for years.
Tools And Supplies Needed
Having the right tools makes cleaning after sanding much easier and more effective. Here’s what you should gather before you start:
- Vacuum cleaner with a soft brush attachment
- Tack cloth (sticky cloth that picks up fine dust)
- Microfiber cloths
- Mild soap or wood cleaner
- Buckets for water
- Spray bottle
- Soft paintbrush
- Protective gloves (optional)
- Compressed air (optional, for detailed work)
- Painter’s tape (for protecting areas you don’t want wet)
You don’t need every item for every job, but having these on hand gives you options for different types of cabinets and dust levels.
Preparing Your Workspace
Before you begin cleaning, set up your workspace to avoid spreading dust and to make the process smoother.
- Open windows or use fans for ventilation.
- Lay down drop cloths or old sheets to catch any falling dust.
- Remove any items from inside or on top of the cabinets.
- If possible, remove cabinet doors and hardware—this allows you to clean every surface and makes painting or staining easier.
This preparation step prevents dust from moving to other areas and keeps your home cleaner.
Step-by-step Cleaning Process
Cleaning cabinets after sanding is more than just wiping the surface. Each step builds on the last for a truly clean finish.
1. Remove Loose Dust With A Vacuum
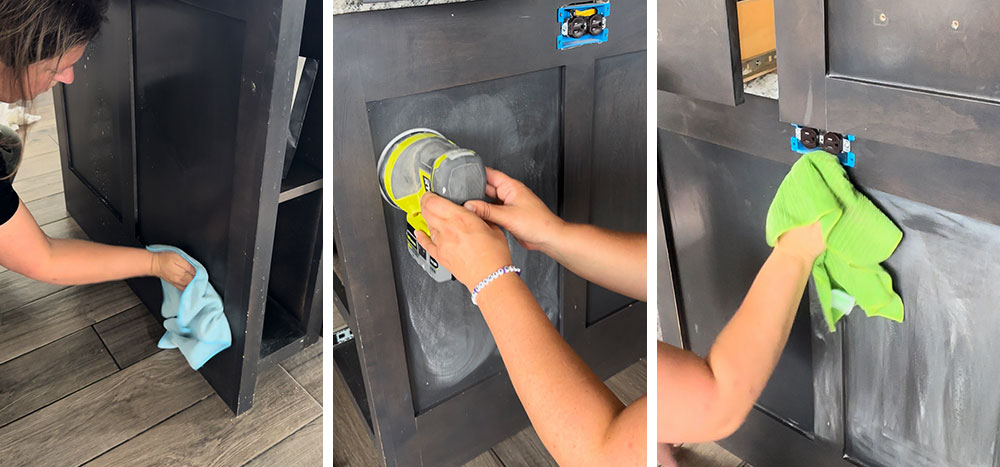
Start with a vacuum cleaner using a soft brush attachment. Gently move the vacuum over all cabinet surfaces, including edges, corners, and grooves. The brush helps lift dust without scratching the wood.
Don’t rush this step—go slowly and make several passes. Pay special attention to the inside corners where dust collects.
2. Use A Dry Microfiber Cloth
After vacuuming, take a dry microfiber cloth and wipe down all surfaces. Microfiber grabs dust that the vacuum may miss. Fold the cloth several times and use a clean section as it gets dirty.
For detailed areas or carvings, a soft paintbrush can loosen dust trapped in crevices.
3. Wipe With A Damp Cloth
Now, lightly dampen a clean microfiber cloth with water or a mix of water and mild soap. Wring out excess moisture—the cloth should be damp, not wet.
Wipe every surface, including the edges and inside the cabinet frame. This step picks up any fine dust left behind.
Important: Too much water can damage wood, especially if it seeps into seams. Always check your cloth and wring it out well.
4. Use A Tack Cloth
A tack cloth is a sticky, resin-coated cloth that attracts and holds fine dust. Lightly wipe all surfaces with the tack cloth, moving in one direction. Don’t press too hard, as that can leave sticky residue.
Tack cloths are especially good for flat panels and large surfaces. Replace the cloth when it gets dirty.
5. Detail Cleaning
For corners, grooves, and difficult spots, use a soft paintbrush or compressed air to remove any stubborn dust. Some people also use cotton swabs for tight spaces.
If your cabinets have a lot of detailed work, spend extra time here. Even tiny dust particles can show through a new finish.
6. Final Inspection
Inspect the cabinets under a bright light or sunlight. Run your hand over the surface—if it feels gritty, repeat the cleaning process. It should feel completely smooth to the touch.
If you find dust after your first pass, don’t worry. Repeat the tack cloth and vacuum steps as needed.
7. Let Cabinets Dry Completely
Before moving to painting or staining, make sure all surfaces are completely dry. Even a little moisture can cause paint to bubble or wood to swell.
Air dry for at least 30–60 minutes, or use a fan for quicker drying.
Credit: www.reddit.com
Cleaning Inside Corners And Detailed Areas
Cabinet designs often have grooves, raised panels, or carved details. These areas trap more dust than flat panels, and are often missed by beginners.
Use a combination of tools:
- Soft paintbrush to loosen dust
- Vacuum with a crevice tool
- Cotton swabs for very tight spots
- Compressed air to blow out hidden dust
Move slowly and check your work with a flashlight. This extra effort pays off with a smoother, more professional finish.
Should You Use Water Or Not?
Many people worry about using water on wood cabinets. The answer depends on your cabinet material and finish.
- For solid wood: Use a barely damp cloth, avoid soaking the surface.
- For veneered or engineered wood: Use as little water as possible.
- For laminate cabinets: Water is less risky, but still avoid oversaturating.
Always test in a hidden spot first. If you see swelling, discoloration, or raised grain, switch to a dry cleaning method.

Credit: www.paintedbykaylapayne.com
Comparing Cleaning Methods: What Works Best?
Different cleaning methods have their strengths and weaknesses. Here’s a simple comparison:
| Method | Effectiveness | Best For | Potential Issues |
|---|---|---|---|
| Vacuum with Brush | High | Loose dust, large areas | May miss fine particles |
| Microfiber Cloth | High | Flat panels, light dust | Can push dust into grooves |
| Tack Cloth | Very High | Final dust removal | Can leave residue if overused |
| Compressed Air | Medium | Detailed areas | May blow dust elsewhere |
| Damp Cloth | High | Fine dust, sticky residue | Risk of water damage |
The most effective routine is to combine several methods: vacuum first, wipe with a dry cloth, then finish with tack cloth.
Cleaning After Different Types Of Sanding
The way you clean depends on the sanding method used.
Hand Sanding
Hand sanding creates less dust, but the particles are often heavier and fall onto surfaces. Focus on dry wiping and vacuuming.
Power Sanding
Random orbital sanders and other power tools create a fine dust that floats and settles everywhere. Use a vacuum with a HEPA filter, and expect to spend more time with microfiber and tack cloths.
Wet Sanding
Rare for wood cabinets, but sometimes used for very smooth finishes. Clean up water and slurry with absorbent towels, then follow with dry cleaning steps.
Comparing Sanding Dust Types
| Sanding Method | Dust Type | Best Cleaning Tool |
|---|---|---|
| Hand Sanding | Coarse, heavier dust | Vacuum, dry cloth |
| Power Sanding | Fine, airborne dust | HEPA vacuum, tack cloth |
| Wet Sanding | Slurry (dust + water) | Absorbent towels, dry cloth |
The finer the dust, the more important it is to use microfiber and tack cloths.
Cleaning Cabinet Hardware And Hinges
Dust settles on hardware, hinges, and screws. If you leave these dirty, dust can transfer back to your clean wood.
- Remove hardware before sanding if possible.
- Clean hardware separately with soap and water, then dry thoroughly.
- For fixed hinges, use a small brush and vacuum.
After cleaning, store hardware in labeled bags until it’s time to reinstall.
What To Do With Sanding Dust
Don’t just sweep sanding dust into the air or trash. Fine wood dust can be harmful if inhaled, especially for children or pets.
- Collect dust in a sealed bag and dispose of it with household waste.
- Wipe all surrounding surfaces, including floors and walls, to remove stray dust.
- Wash your cleaning cloths separately from other laundry.
If you sanded old cabinets, check if the finish contains lead or other hazardous materials. In that case, follow local disposal guidelines and wear a mask.
Credit: www.kilz.com
Common Mistakes To Avoid
Many people make errors that lead to poor results. Watch out for these:
- Rushing the process: Skipping steps or moving too fast leaves dust behind.
- Using too much water: Can raise the grain or damage wood.
- Not removing hardware: Leaves dust in cracks and crevices.
- Skipping tack cloth: Fine dust is invisible but ruins finishes.
- Not checking under good light: Dust is hard to see in dim conditions.
- Reusing dirty cloths: Spreads dust rather than removing it.
- Forgetting to clean the room: Dust settles on nearby surfaces and can return to the cabinets.
Taking your time here saves hours of frustration later.
When To Sand And Clean Again
Sometimes, your first sanding and cleaning aren’t enough. Here’s when you should repeat:
- After the first coat of primer or paint, if the wood feels rough.
- If you see uneven surfaces or feel bumps.
- If cabinets have old, thick finishes.
Sand lightly, then repeat the full cleaning process before adding another coat.
How Professionals Get A Dust-free Finish
Professional painters and cabinet makers use extra steps for a perfect result:
- They may use a HEPA vacuum after every sanding stage.
- They often set up a dedicated dust-free room or use plastic sheeting to separate the work area.
- Some use air purifiers to remove airborne dust.
- They clean not just the cabinets, but also the floor, walls, and nearby surfaces before painting.
These details are why professional jobs look and last better.
How Long Does Cleaning Take?
The time needed depends on cabinet size, detail level, and dust amount.
- Small kitchen (8–10 cabinets): 30–60 minutes.
- Medium kitchen (15–20 cabinets): 1–2 hours.
- Large kitchen or full wall units: 2–3 hours.
Detailed cabinets or heavy sanding add time. Rushing leads to mistakes, so plan accordingly.
How To Tell If Cabinets Are Truly Clean
Don’t rely only on sight—dust is hard to see, especially on light-colored wood. Instead:
- Run your hand over the surface; it should feel silky smooth.
- Shine a flashlight at a low angle to highlight dust or rough spots.
- Use painter’s tape and press on the surface, then peel off. If dust sticks to the tape, keep cleaning.
These checks are more reliable than just looking.
Preparing For The Next Step: Painting Or Staining
After your cabinets are clean and dry, you’re ready to move on. But don’t skip final prep:
- Mask off walls and floors with painter’s tape.
- Double-check all hardware is removed or protected.
- Choose a high-quality primer or finish for best results.
If you want your paint or stain to stick, this cleaning step is critical.
How Clean Cabinets Affect Final Results
Studies show that even a small amount of dust can reduce paint adhesion by up to 50%. That means your hard work could peel or chip much sooner.
Clean cabinets lead to:
- Smoother, more even paint or stain
- Longer-lasting finish
- Fewer touch-ups or repairs later
It’s the most important “invisible” step in cabinet refinishing.
Special Tips For Beginners
Many first-timers miss these details:
- Always use a fresh cloth for each stage (vacuum, dry wipe, damp wipe, tack cloth).
- Clean from top to bottom—dust falls downward.
- Wear gloves if you have sensitive skin or are using strong cleaners.
- If you see raised wood fibers after damp wiping, let the cabinets dry, then sand lightly and clean again.
- Work in small sections if you have a lot of cabinets, so dust doesn’t resettle.
These small habits make a big difference in your results.
Eco-friendly Cleaning Options
If you want to avoid chemical cleaners:
- Use plain water with a little white vinegar for a natural clean (test on a hidden spot first).
- Choose reusable microfiber cloths instead of disposable wipes.
- Sweep up dust with a damp mop for floors instead of sweeping dry.
Eco cleaning is safer for families and the planet, with no loss in effectiveness.
Comparing Cleaning Results: Before And After
To see the difference, here’s what to expect:
| Before Cleaning | After Cleaning |
|---|---|
| Surface feels gritty | Surface feels smooth |
| Paint looks uneven or bumpy | Paint is even and flat |
| Dust visible in corners | All areas dust-free |
| Finish chips or peels easily | Finish lasts longer |
Don’t underestimate the “after” effect—your work and investment will show.
When To Call A Professional
If you have a very large kitchen, delicate antique cabinets, or health concerns about old finishes (like lead paint), hiring a pro makes sense. They have the equipment and experience to guarantee a flawless, safe result.
Professionals also know how to handle specialty woods and finishes, which may react differently to cleaning.
For DIYers, careful cleaning is enough for most modern cabinets.
Additional Resources
If you want to learn more about safe sanding and cabinet refinishing, the U.S. Environmental Protection Agency has guidelines on lead paint and dust safety. You can find detailed information at EPA Lead Safety.
Frequently Asked Questions
How Soon After Sanding Should I Clean Cabinets?
Clean as soon as you finish sanding, before dust has a chance to settle or spread to other areas. If you wait, dust can become harder to remove and may settle into cracks.
Can I Use Household Cleaners Instead Of Wood Cleaner?
Yes, but make sure the cleaner is not too harsh. Avoid ammonia or bleach, which can damage wood or leave residues. Mild dish soap and water work well for most cabinets.
What If I See White Haze After Cleaning?
A white haze usually means there is still dust or soap residue. Wipe again with a clean, damp microfiber cloth, then finish with a tack cloth. Let dry and check under bright light.
Is It Safe To Use An Air Compressor To Blow Off Dust?
It’s safe if used carefully, but blowing dust can spread it to other areas. Always vacuum after using compressed air, and wear a mask to avoid breathing dust.
Do I Need To Clean Between Every Sanding Step?
Yes, for the best results. Cleaning after each sanding stage removes loose particles and lets you spot any areas that need more attention. It also ensures each new finish layer sticks well.
—
Getting your cabinets perfectly clean after sanding is the secret to a finish you’ll be proud of. It takes extra time and care, but the results—smooth, durable, and beautiful cabinets—are worth the effort. Whether you’re a beginner or a seasoned DIYer, following these steps will set your project up for lasting success.