Changing the color of your hardwood floor is one of the most dramatic ways to refresh a room. Whether you want a lighter, airier look or a bold, dark tone, refinishing and recoloring hardwood can transform your home. Many homeowners believe this is a job only for professionals, but with patience, the right tools, and clear instructions, you can achieve impressive results yourself.
This guide will walk you through every step, share insider tips, and help you avoid common mistakes.
Why Change Your Hardwood Floor Color?
Home trends evolve, and so do personal tastes. Maybe your once-fashionable honey oak floors now feel dated, or dark walnut no longer matches your modern decor. Changing the color can:
- Increase home value by updating the look
- Allow you to match new furniture or paint schemes
- Hide minor imperfections and scratches
- Give a sense of a completely new floor without the cost of replacement
However, changing your floor’s color is not just about aesthetics. New stains can sometimes add a layer of protection or help hide future wear.
Can Every Hardwood Floor Be Recolored?
Before you begin, it’s important to know if your floor is a good candidate for color change. Not all hardwoods respond the same way to sanding and staining.
Solid Vs. Engineered Hardwood
Solid hardwood can usually be sanded and refinished multiple times. Engineered hardwood, with its thin veneer, often allows just one or two sanding sessions before the wood layer is too thin.
Pre-finished Vs. Site-finished Flooring
Pre-finished floors have a durable factory-applied coating. These require extra sanding to remove. Site-finished floors, which were stained and sealed in place, are easier to refinish.
Wood Species
Some woods, like oak and maple, take stain well. Others, such as cherry or pine, can have unpredictable results. Exotic woods may not accept stain evenly. Always test on a small hidden area before committing.
Credit: www.idealhardwoodflooring.com
Planning Your Color Change
Preparation is key. Rushing or skipping steps can lead to uneven color, visible scratches, or even damage to your floor.
Choosing Your New Color
Visit flooring showrooms, browse online galleries, or bring home stain samples. Consider:
- Room size (dark colors can shrink a space visually)
- Natural light (lighter colors reflect, dark colors absorb)
- Existing furniture and wall colors
Popular options include:
- Classic natural oak for a timeless look
- Gray stains for a modern, cool appearance
- Deep espresso for dramatic contrast
Tools And Materials Needed
Changing hardwood floor color is labor-intensive but does not require expensive equipment. You can rent most tools at home improvement stores.
Essential tools:
- Drum sander (for large areas)
- Edge sander or detail sander (for corners and edges)
- Shop vacuum
- Brushes, foam applicators, or rags for stain application
- Protective gear (mask, goggles, gloves)
Materials:
- Sandpaper (coarse, medium, and fine grits)
- Wood stain of your chosen color
- Wood filler (if needed)
- Polyurethane or your preferred finish (water or oil-based)
- Painters tape and plastic sheeting
Cost Expectations
DIY refinishing and coloring usually costs between $1. 50 and $4. 00 per square foot for materials and rentals. Professional services often range from $4 to $8 per square foot. Factors such as wood type, condition, and room complexity affect final cost.
Preparing The Space
A well-prepared area leads to a smoother process and better results.
Remove All Furniture
Clear out everything, including rugs and drapes. Remove baseboards or quarter round if you want stain to reach edges cleanly.
Check For Nails And Repairs
Walk across the floor. Hammer down any protruding nails. Fill gaps and cracks with wood filler that matches your floor’s color.
Protect Adjacent Areas
Use plastic sheeting to block doorways and vents. Sanding produces fine dust that can spread far.
Remove Old Finish
A strong finish must be sanded off completely for new stain to absorb evenly.
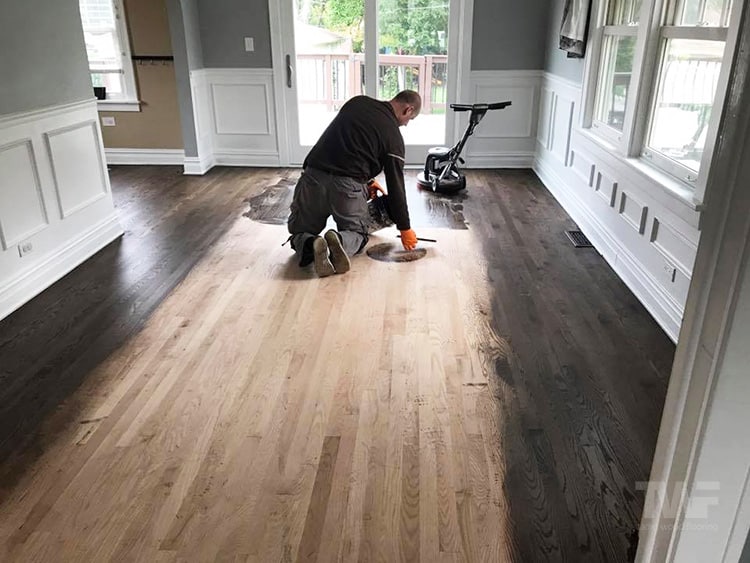
Sanding: The Critical Step
Sanding removes the old finish and exposes fresh wood, ready to accept new color. This step determines the quality of your final result.
Sanding Process
- Start with coarse grit (36-40) to remove finish and scratches.
- Move to medium grit (60-80) to smooth out roughness.
- Finish with fine grit (100-120) for a silky surface.
Always sand in the direction of the wood grain. Overlap each pass slightly. Change sandpaper often to avoid swirl marks.
Edge And Detail Sanding
Large sanders cannot reach corners or edges. Use an edge sander or detail tool for these areas. If you skip this, the perimeter of your room may not absorb stain evenly.
Cleaning Up Dust
Vacuum thoroughly, then wipe the floor with a damp cloth. Even tiny dust particles can cause roughness in the finish.
Non-obvious insight: Many beginners miss dust on walls, baseboards, and windowsills. Wipe these too, or dust will settle back onto your wet finish.
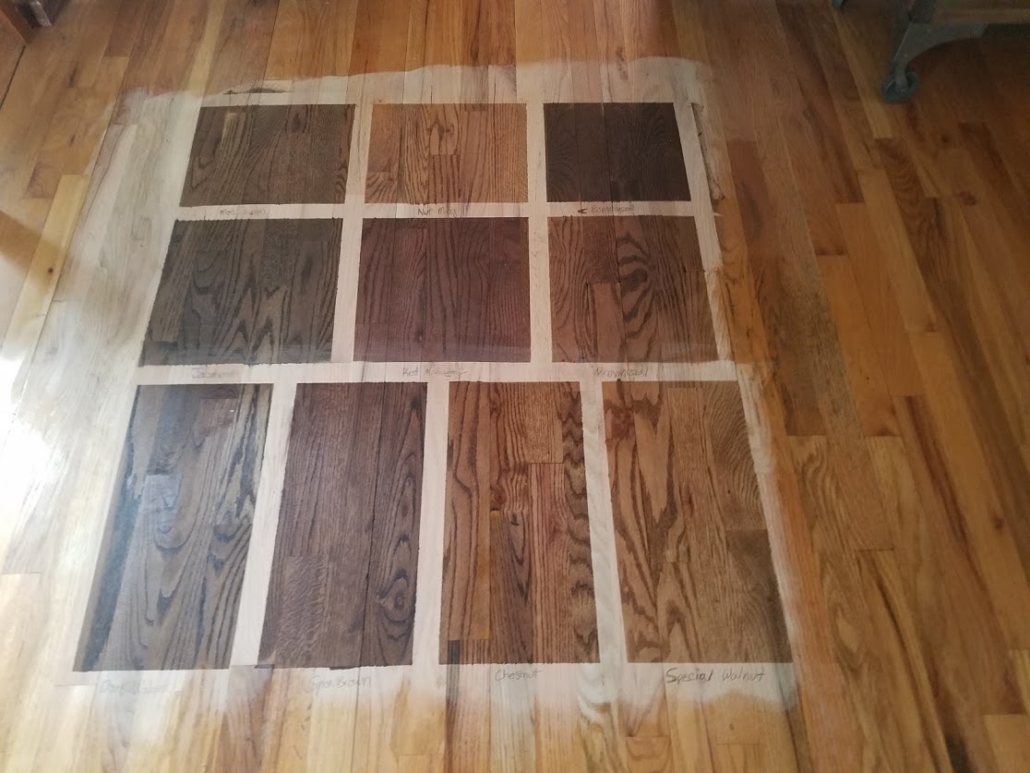
Testing Stains: Avoiding Surprises
Wood is unpredictable. The same stain can look different on various species, ages, or even boards. Always test before full application.
How To Test
- Use stain samples on a small, hidden area or an extra plank.
- Wait for stain to dry fully before deciding; wet stain is darker.
- Test with the same finish (oil or water-based) you will use, as this can change color.
Expert tip: Do not trust the color on the can. Lighting in your home will affect the look.
Credit: napervillehardwood.com
Applying The Stain
This is where your floor’s transformation happens. Take your time for an even, professional look.
Staining Methods
You can use brushes, foam applicators, or clean cotton rags. Work in small sections, following the wood grain.
Steps:
- Stir stain well before and during use.
- Apply a thin, even coat.
- Let the stain sit (usually 5-15 minutes) depending on the depth of color you want.
- Wipe off excess with a clean rag, moving in the direction of the grain.
- Allow to dry per manufacturer’s instructions (usually 8-24 hours).
Tips For Even Color
- Keep a “wet edge” so you don’t see lap marks.
- Work quickly but carefully; uneven application will show.
- Blend sections to avoid lines.
Non-obvious insight: Humidity and temperature affect drying time and color. If possible, control indoor climate for consistent results.
Sealing And Finishing
After the stain has dried fully, you must seal the wood to protect it from wear, moisture, and stains.
Choosing A Finish
There are two main types:
- Oil-based polyurethane: Durable, warm look, but strong odor and longer drying time.
- Water-based polyurethane: Clear, fast-drying, less odor, but sometimes less durable.
Some people use wax or other specialty finishes, but these require more maintenance.
Application Process
- Lightly sand the stained floor with fine sandpaper (220 grit) to knock down raised grain.
- Clean thoroughly to remove all dust.
- Apply the first coat of finish with a brush or roller, following the grain.
- Allow to dry completely (follow product instructions).
- Apply 1-2 more coats, sanding lightly between each.
Curing Time
Most finishes are dry to the touch in a few hours but require several days to cure fully. Avoid moving heavy furniture or rugs back until the floor is fully cured (usually 7 days).
Common Mistakes And How To Avoid Them
Changing hardwood floor color is rewarding, but mistakes can be costly. Here are pitfalls to watch out for.
1. Skipping Sanding Steps
Rushing through grits or skipping them leads to visible scratches and uneven stain.
2. Not Removing All Dust
Dust under stain or finish creates a gritty feel and dull spots.
3. Uneven Stain Application
Stopping halfway or letting stain dry before wiping leads to blotchy results.
4. Wrong Finish For The Wood Type
Some finishes interact poorly with certain woods. Always check compatibility.
5. Replacing Furniture Too Soon
Moving items back before the finish cures can cause dents and marks.
6. Ignoring Safety
Sanding and finishing create fumes and dust. Always ventilate well and use protective gear.
Special Cases: Going Lighter Or Darker
Changing a floor from light to dark is straightforward. Going from dark to light is much harder.
Lightening A Dark Floor
- Requires more aggressive sanding to remove old pigment.
- Some stains may penetrate deep into the grain and never fully disappear.
- Consider using a wood bleach (oxalic acid) to lighten stubborn areas, but follow instructions carefully.
Darkening A Light Floor
- Easier; most wood will accept dark stain well after sanding.
- May need two coats for very deep colors, but do not over-apply—this can leave a sticky surface.
Gray And Whitewashed Looks
- Trending in many homes, but these colors are less forgiving.
- Some woods (like red oak) have natural pink or orange tones that show through pale stains.
- Consider using a wood conditioner before staining to help with even absorption.
Dealing With Borders, Patterns, And Inlays
If your floor has special patterns or inlays, take extra care:
- Sanding over borders may blur sharp lines.
- Stain can bleed across different wood types, leading to inconsistent color.
- Test stains on each type of wood in your floor to avoid surprises.
Caring For Your Newly Colored Floor
Proper care extends the life and beauty of your recolored floor.
Cleaning
- Use a soft broom or vacuum for dust.
- Clean spills quickly with a damp (not wet) cloth.
- Avoid harsh cleaners that can strip the finish.
Maintenance
- Place felt pads under furniture.
- Use rugs in high-traffic areas.
- Recoat with polyurethane every few years for heavy-use areas.
Protecting From Sunlight
Direct sunlight can fade your new color. Use curtains or UV-blocking window film where possible.
Professional Vs. Diy: When To Hire An Expert
Some floors are best left to professionals:
- Very thin or damaged hardwood
- Complex inlays or patterns
- Large, open spaces where even color is critical
A pro can also use specialized stains and finishes not available to the public. If you want a perfect, long-lasting result and are unsure of your skill, consider at least getting a consultation.
Comparing Floor Stains And Finishes
To help you choose, here’s a comparison of popular stain and finish types:
| Stain Type | Color Range | Dry Time | Difficulty | Durability |
|---|---|---|---|---|
| Oil-based | Rich, deep colors | 8-24 hours | Moderate | High |
| Water-based | Light to medium | 2-4 hours | Easy | Medium |
| Gel stain | Uniform, intense | 4-8 hours | Challenging | High |
Popular Hardwood Floor Colors And Their Effects
Here’s how common colors can change the look and feel of your space:
| Color | Room Effect | Best For |
|---|---|---|
| Natural Oak | Bright, open | Small rooms, classic style |
| Espresso/Dark Walnut | Elegant, dramatic | Large rooms, modern decor |
| Gray | Cool, contemporary | Lofts, urban homes |
| Whitewashed | Airy, coastal | Beach houses, Scandinavian style |
Real-world Example: Transforming A 1980s Oak Floor
Let’s say you have a 300 sq. Ft. living room with yellowed oak floors. You want a modern gray finish.
Process:
- Remove all furniture and prep the room.
- Sand the floor with three grits, taking extra time on deep stains.
- Test three gray stains; choose the one that looks best in your lighting.
- Apply the stain in small sections, wiping excess quickly.
- Seal with three coats of water-based polyurethane for fast drying.
- Wait one week before placing furniture.
Result:
A brighter, more contemporary space at a fraction of the cost of new flooring. Neighbors are often surprised the floor is not new!
Environmental And Health Considerations
Some finishes and stains emit volatile organic compounds (VOCs). These can cause headaches or respiratory irritation.
- Choose low-VOC or water-based products for safer indoor air.
- Wear a respirator and ventilate well when sanding or finishing.
- Dispose of rags and waste properly; oil-soaked rags can self-ignite.
If you have pets or children, keep them out of the work area until the floor has cured completely.
When Not To Change Floor Color
Sometimes, the best choice is not to change the color:
- Antique or rare woods can lose value if altered.
- Very thin floors risk damage from sanding.
- If you plan to sell soon, neutral tones appeal to most buyers.
Credit: www.seattletimes.com
Essential Tips For Success
- Always test stains and finishes before full application.
- Take your time—rushing leads to mistakes.
- Use the right protective gear.
- Never skip prep or cleaning steps.
- Follow all manufacturer instructions closely.
Additional Resources
For more in-depth technical information and safety guidelines, visit the National Wood Flooring Association.
Frequently Asked Questions
How Long Does It Take To Change Hardwood Floor Color?
The entire process typically takes 3-7 days, depending on room size, drying times, and number of finish coats. Plan for longer if humidity is high or if your floors need repairs.
Can I Change The Color Without Sanding?
It’s possible to use certain color-restoration kits that don’t require full sanding, but results are often less dramatic and less durable. For a true color change, sanding is strongly recommended.
Is It Better To Use Oil-based Or Water-based Finishes?
Oil-based finishes are more durable and give a warm glow, but they take longer to dry and have stronger odors. Water-based finishes dry fast, are low-odor, and keep the wood’s natural color, but may need more frequent recoating in heavy-traffic areas.
Will Changing The Floor Color Damage The Wood?
If you follow the correct process and do not oversand, your hardwood floor will not be damaged. However, sanding too deeply can thin the wood, especially with engineered floors.
How Soon Can I Walk On The Floor After Finishing?
Most finishes allow light foot traffic after 24 hours, but avoid heavy use, shoes, or moving furniture for at least 72 hours. Wait 7 days before placing rugs or heavy items.
Changing your hardwood floor color can seem like a big project, but with careful preparation and the right steps, you can achieve professional-looking results. It’s a satisfying way to update your home and fall in love with your space all over again.