Building your own plywood garage cabinets is one of the smartest ways to organize your tools, sports equipment, and other household items. If you’re tired of messy shelves and cluttered workspaces, making custom cabinets gives you control over the size, style, and layout—without the high cost of store-bought systems. Even if you’re not a professional woodworker, with the right plan and a bit of patience, you can create strong and attractive storage solutions that will last for years.
This guide walks you through every step: from planning and measuring, choosing the right plywood, cutting and assembly, to mounting and finishing. You’ll learn how to avoid common mistakes, how to save money without sacrificing quality, and what small details make your cabinets stand out. Along the way, you’ll find practical tips and clear examples. By the end, you’ll be confident to build plywood garage cabinets that fit your space and needs perfectly.
Why Choose Plywood For Garage Cabinets?
Plywood is a favorite material for garage cabinets because of its strength, affordability, and flexibility. But there’s more to this choice than just the price tag.
First, plywood is made from layers of wood glued together. This makes it less likely to warp or split compared to solid wood, especially in places where temperature and humidity change, like a garage. Good plywood, like birch or oak, can hold heavy tools without bending.
Second, plywood is easy to cut and work with. You can use simple tools, and the smooth surface takes paint or stain well. Many people are surprised to learn that plywood cabinets can look as good as expensive hardwood ones if finished properly.
Another benefit is size. Plywood comes in large sheets, usually 4 feet by 8 feet, which makes it easy to build big cabinets with fewer joints. Fewer joints mean stronger cabinets and faster building.
Finally, using plywood lets you customize every part: height, depth, number of shelves, and door style. You don’t have to settle for what’s in the store—you can build exactly what your garage needs.
Planning Your Plywood Garage Cabinets
Before you pick up a saw, planning is essential. Good planning saves time, money, and frustration later.
Measuring Your Space
Start by measuring the wall where you want to install the cabinets. Write down:
- The width, from one end to the other
- The height, from floor to ceiling (or to your desired cabinet height)
- The depth you can use without blocking doors or cars
Don’t guess. Use a tape measure and double-check. Garages often have uneven floors or odd corners, so check for obstacles like outlets, pipes, or windows.
Deciding On Cabinet Types
Think about what you need to store. For example:
- Tall cabinets for brooms, ladders, or garden tools
- Base cabinets for power tools and heavy items
- Wall cabinets for paints, oil, or smaller tools
Sketch a rough layout. Even a simple drawing helps you see how much plywood you’ll need and what hardware to buy.
Budgeting And Material List
Building your own cabinets can save money, but costs add up if you’re not careful. Make a list:
- How many cabinets do you want?
- What size for each?
- How many shelves inside?
- Do you want doors or open shelves?
From your list, you can calculate how many sheets of plywood you’ll need. Remember, a standard 4×8-foot sheet covers 32 square feet. Add 10-15% extra for mistakes or changes.

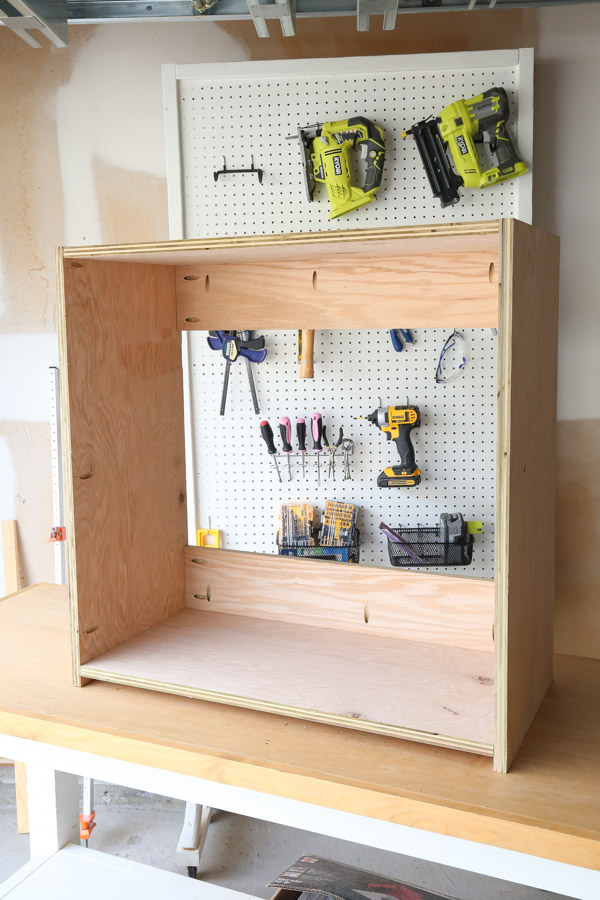
Credit: homewiththedaniels.com
Choosing The Right Plywood And Hardware
Not all plywood is equal. Garage cabinets need to be strong and resist moisture.
Plywood Grades
Plywood comes in different grades:
- A-grade: Smooth and ready for paint or stain. Few knots or defects.
- B or C-grade: Some knots, but still strong.
- CDX: Used for construction, rougher, not great for cabinets.
For garage cabinets, most people use 3/4-inch (19mm) A or B-grade plywood. It’s strong enough for heavy loads and smooth enough for a nice finish.
Plywood Types
- Birch plywood: Very strong, smooth, and takes paint or stain well.
- Maple plywood: Hard and durable, a bit more expensive.
- Pine plywood: Cheaper, but softer and can dent.
- Oak plywood: Strong and attractive, but heavier.
Most home improvement stores sell these types. For cabinets, avoid MDF (medium-density fiberboard) or particle board—they’re cheaper but don’t hold screws as well and can swell if they get wet.
Hardware Essentials
You’ll also need:
- Screws: 1-1/4″ or 1-1/2″ wood screws for assembly
- Hinges: For cabinet doors (choose based on door style)
- Handles or pulls: For opening doors
- Shelf pins or supports: If you want adjustable shelves
- Wall mounting brackets or French cleats: For hanging wall cabinets
Quality hardware makes cabinets last longer. Cheap screws can strip or break, and weak hinges won’t hold heavy doors.
Tools You Need For Building Cabinets
You don’t need a full workshop, but a few key tools make the job easier and safer.
- Circular saw or table saw: For cutting plywood sheets
- Drill/driver: For screws and hardware
- Measuring tape and pencil: For marking cuts
- Square: For straight corners
- Clamps: To hold pieces while assembling
- Jigsaw: For cutting openings or curves (optional)
- Level: To make sure cabinets are straight
A table saw makes straight, clean cuts, but a circular saw with a guide works fine for most people. If you don’t own these tools, many hardware stores offer rental options.
Cutting Plywood: Techniques And Tips
Cutting plywood is one area where beginners make mistakes, but a few tips can help.
Marking And Measuring
Lay the plywood sheet flat. Use a tape measure and a straight edge (or a long level) to draw your lines. Mark all your pieces before cutting to avoid waste.
Making Clean Cuts
Plywood can splinter at the edges. To reduce this:
- Use a sharp blade made for plywood (fine-tooth).
- Cut with the good side down if using a circular saw, or good side up on a table saw.
- Place blue painter’s tape along the cut line to help prevent splinters.
Support the plywood fully as you cut. Sawhorses or a large worktable work well. Don’t cut on the floor—it’s hard to keep lines straight and you could damage the blade.
Common Mistakes To Avoid
- Rushing cuts. Take your time to measure and cut accurately.
- Cutting all pieces at once. Cut the first set, check the fit, then continue. Small errors can get bigger if you make them on every piece.
- Forgetting about blade width (kerf). The saw blade removes about 1/8″ per cut—factor this in or your pieces may be short.
Cabinet Construction: Step-by-step Guide
Now comes the fun part: building your cabinets. Here’s a step-by-step method for sturdy, professional-looking garage cabinets.
1. Building The Box (carcass)
The main cabinet box is called the carcass. Most garage cabinets are simple rectangles.
- Cut two side panels, a top, a bottom, and a back panel (optional for extra strength).
- Drill pilot holes in the top and bottom to avoid splitting the wood.
- Use wood glue and screws to join the sides to the top and bottom. Clamps help hold everything in place.
- Check for square corners using a carpenter’s square before tightening screws.
If you want a back panel, cut a piece of 1/4″ plywood to fit and nail or screw it on. The back adds strength and helps the cabinet stay square.
2. Adding Shelves
Decide if you want fixed or adjustable shelves.
- For fixed shelves, screw them directly into the sides.
- For adjustable shelves, drill holes every 2 inches along the inside of the cabinet and use shelf pins.
Don’t make shelves too long or they’ll sag. For most garages, a shelf longer than 36″ may need a center support.
3. Building And Installing Doors
Garage cabinet doors can be simple or fancy. Most use flat plywood panels.
- Measure the opening and cut doors about 1/8″ smaller on all sides for clearance.
- Sand the edges smooth.
- Attach hinges to the door, then to the cabinet. Adjust so doors are straight and even.
- Add handles or pulls.
If you want open shelves, skip the doors for easier access.
4. Edge Banding (optional)
The edges of plywood show the layers. Some people like this look; others cover it with edge banding (thin strips of wood or plastic).
- Apply edge banding with iron-on glue or wood glue.
- Trim with a sharp knife and sand smooth.
Edge banding gives a finished look and prevents splinters.
5. Assembly Order
For best results, build boxes first, then attach shelves, then add doors and hardware. This order makes everything easier to adjust.
Mounting And Installing Your Cabinets
How you mount your cabinets depends on their size and location.
Wall Cabinets
Wall cabinets must be attached to wall studs for safety.
- Use a stud finder to locate studs.
- Drill mounting holes in the top and bottom of the cabinet back.
- Lift the cabinet into place (get help—plywood is heavy).
- Drive long screws through the cabinet into the studs.
A French cleat is a smart way to hang wall cabinets. It’s a two-piece strip: one on the wall, one on the cabinet, cut at an angle. This method spreads the weight and makes hanging easier.
Base Cabinets
Base cabinets usually sit on the floor. You can make a simple platform (toe kick) 3-4″ high, or set the cabinet directly on the floor.
- Level the base cabinet before attaching to the wall.
- Screw through the back into wall studs.
For extra stability, screw multiple cabinets together side by side.
Tall Cabinets
Tall cabinets need to be anchored at the top and bottom. Secure to both the wall and the floor if possible.
Data Comparison: Wall Mount Methods
Here’s a quick look at different ways to mount wall cabinets:
| Mounting Method | Strength | Difficulty | When to Use |
|---|---|---|---|
| Direct to Studs | Very strong | Easy | Most cabinets |
| French Cleat | Very strong | Medium | Heavy or wide cabinets |
| Drywall Anchors | Weak | Easy | Never for heavy loads |
Always use studs or a cleat for heavy garage cabinets.
Finishing Your Cabinets: Paint, Stain, Or Seal
A good finish protects your cabinets from moisture, dust, and spills. It also makes them look better.
Preparing The Surface
- Sand all surfaces with 120- to 180-grit sandpaper.
- Wipe off dust with a damp cloth.
- Fill any screw holes or gaps with wood filler, then sand again.
Painting
- Apply a primer suitable for plywood.
- Use a brush, roller, or sprayer for the top coat.
- For garages, choose a semi-gloss or gloss paint—it’s easier to clean.
Staining
If you want a wood look, use a stain and then a protective clear coat.
- Apply stain with a rag or brush, following the wood grain.
- Wipe off excess.
- Let dry, then apply 2-3 coats of clear polyurethane.
Sealing
For raw plywood or open shelves, use a water-based polyurethane. It’s fast-drying and resists spills.
Finish Comparison Table
Here’s a look at the pros and cons of different finishes:
| Finish Type | Appearance | Durability | Maintenance |
|---|---|---|---|
| Paint (Gloss) | Modern, clean | Very good | Easy to wipe clean |
| Stain + Polyurethane | Natural wood | Excellent | Easy to repair scratches |
| Clear Polyurethane | Natural, light wood | Good | Wipe clean |
Choose a finish that fits your style and garage use.
Customizing Your Cabinets For Maximum Function
One big advantage of building your own cabinets is customization. Here are some ideas to make your garage storage even better:
- Add drawers for small tools or hardware.
- Install pegboard inside doors for hanging screwdrivers or wrenches.
- Include pull-out trays for easy access to heavy items.
- Build adjustable shelves to change space as your needs change.
- Use heavy-duty casters to make mobile cabinets.
Think about your workflow. Place cabinets and shelves where you use items most. For example, put tool storage near your workbench and gardening supplies near the door.
Common Mistakes And How To Avoid Them
Even careful builders make mistakes. Here are some to watch for:
- Not measuring correctly: Always measure twice before cutting.
- Skipping the back panel: The back adds strength and keeps the cabinet square.
- Using cheap hardware: Weak screws or hinges can fail quickly.
- Mounting to drywall only: Cabinets must be anchored to studs or solid wood.
- Ignoring ventilation: In damp garages, air needs to move. Leave small gaps or use vented panels.
A non-obvious tip: Label every piece as you cut it. “Left side,” “top,” “bottom”—this saves confusion during assembly.
Another insight: Build one cabinet first as a “test.” Learn from any mistakes, then build the rest faster and better.
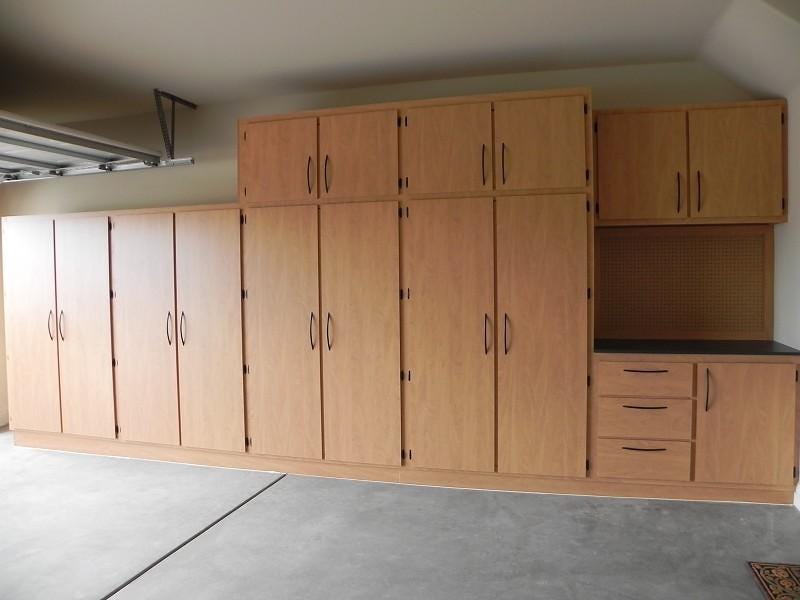
Credit: angelamariemade.com
Estimated Time And Cost Breakdown
How long and how much will this take? Here’s a rough guide for a basic garage cabinet (36″ wide x 72″ high x 18″ deep):
- Cutting plywood: 1-2 hours
- Assembling carcass: 1 hour
- Adding shelves and doors: 1 hour
- Sanding and finishing: 2-4 hours (includes drying time)
- Mounting: 1 hour
Total time for one cabinet: 6-9 hours. For a full wall, plan a weekend.
Cost estimate (per cabinet):
- 2 sheets of 3/4″ plywood: $60-$100
- Hardware (hinges, handles, screws): $30-$50
- Paint or stain: $15-$30
- Miscellaneous (wood filler, sandpaper, etc. ): $10
Total: $115-$190 per cabinet, depending on wood quality and finish.
For comparison, store-bought garage cabinets of similar size often cost $250-$400 each—and may not fit your space as well.
Safety Tips For Building And Installing Cabinets
Safety should never be an afterthought.
- Always wear safety glasses when cutting or drilling.
- Use hearing protection with loud tools.
- Lift plywood sheets with a helper if possible—they are heavy and awkward.
- Clamp boards before cutting to prevent movement.
- Keep your work area clean to avoid trips and falls.
- If painting, work in a well-ventilated area and wear a mask.
Take your time. Rushing is the biggest cause of accidents and mistakes.
Credit: medium.com
When To Call A Professional
Most people can build plywood garage cabinets with basic tools and patience. But if you run into these situations, consider help:
- Uneven walls or floors: Custom fitting can be tricky.
- Very large cabinets: Heavy units need safe mounting.
- Electrical or plumbing obstacles: It’s safer to hire a pro if you’re not sure.
A professional carpenter can build and install cabinets faster but at a higher cost.
Maintenance And Care Tips
Good cabinets last a long time, but a little care goes a long way.
- Wipe up spills quickly to prevent stains.
- Check screws and hinges every few months; tighten if needed.
- Repaint or touch up chips in the finish.
- Keep shelves organized to avoid overloading.
Garage cabinets take more abuse than kitchen ones, so regular checks keep them safe and useful.
Useful Resources For Garage Cabinet Builders
Want to learn more or see examples? The Family Handyman website is a reliable source for woodworking plans, videos, and tips. You can find detailed guides at Family Handyman.
Local hardware stores may offer cutting services if you don’t have the tools. Some even run weekend workshops for beginners.
Frequently Asked Questions
How Thick Should Plywood Be For Garage Cabinets?
For most garage cabinets, 3/4-inch plywood is best. It offers enough strength for heavy items and resists sagging. Thinner plywood may save money but won’t hold up as well over time.
Can I Build Garage Cabinets Without Expensive Tools?
Yes. A circular saw with a straight edge, a drill/driver, and a few hand tools are enough for most projects. Renting a table saw or using store cutting services can help with straight cuts.
What Is The Best Finish For Garage Cabinets?
A semi-gloss paint or a polyurethane clear coat are both good choices. Paint is easy to clean and covers imperfections. Polyurethane protects the wood and gives a natural look.
How Do I Prevent My Cabinets From Sagging?
Keep shelves under 36 inches wide, use 3/4-inch plywood, and add a center support for extra-long shelves. Make sure cabinets are screwed into studs or use a French cleat for wall cabinets.
Are Plywood Cabinets Better Than Metal Garage Cabinets?
Each has pros and cons. Plywood cabinets are easy to customize, repair, and generally cost less. Metal cabinets are more durable in damp environments but are harder to modify and often more expensive. Choose based on your garage’s needs and your budget.
Building your own plywood garage cabinets may take time, but the rewards are worth it. You get storage that fits your space, quality that lasts, and the pride of a job well done. With careful planning and the guidance above, even a beginner can create cabinets that transform a cluttered garage into an organized, efficient workspace.