Building your own bedroom vanity is a rewarding project. You get a personal, beautiful space to get ready each day. You can also design it for your exact needs, whether you want lots of drawers, a special place for jewelry, or just a simple table and mirror.
Many store-bought vanities are expensive or do not fit your style and space. Building your own can save money, add personal touch, and give you a sense of achievement.
A homemade bedroom vanity can fit small corners or big rooms. You can choose the materials, colors, and even the mirror style. But to get a vanity that works well, you need to plan carefully. Many beginners jump in, buy supplies, and end up with a wobbly table or a piece that does not fit their room.
This guide will show every step, from planning and choosing materials to building, painting, and adding final touches.
You do not need to be a master woodworker to make a great vanity. With some patience, simple tools, and clear instructions, anyone can do it. Along the way, you will learn practical tips and avoid mistakes that cause frustration.
By the end, you will have a beautiful, sturdy vanity that you can be proud of every day.
Planning Your Vanity
Before you start building, planning is essential. Good planning saves time, money, and prevents common mistakes.
Define Your Needs And Style
First, think about how you will use your vanity. Ask yourself:
- Do you need a lot of storage for makeup and jewelry?
- Do you want a big mirror or a small one?
- How much space do you have in your bedroom?
- Do you prefer a modern, classic, or rustic look?
Write down your main needs. Look at photos online for inspiration. Save pictures that match your taste.
Measure Your Space
Use a tape measure to find out exactly how much room you have for your vanity. Measure the width, depth, and height. Remember to leave space for a chair and enough room to move around.
A common vanity size is about 30-36 inches wide, 18-20 inches deep, and 29-31 inches tall. You can adjust these numbers to fit your space.
Tip: Mark the vanity outline on the floor with painter’s tape to see how it fits.
Sketch A Simple Design
Draw your vanity idea on paper. It does not need to be perfect art. Show the table top, legs, storage, and mirror. Add rough sizes.
This helps you decide how much wood, hardware, and other materials to buy.
Set A Budget
Building a vanity can cost $80 to $400, depending on materials and tools. Make a list of what you already have (like a drill or sandpaper) and what you need to buy.
Plan for:
- Wood or ready-made tabletop
- Legs or base
- Mirror
- Drawer hardware
- Paint or stain
- Lighting (optional)
- Fasteners (screws, brackets, glue)
Check prices online or at your local hardware store before starting.
Choosing Materials
Your material choice affects the look, cost, and how long your vanity will last.
Wood Choices
Most homemade vanities use wood. Here’s a comparison of common options:
| Type of Wood | Look | Strength | Cost | Best For |
|---|---|---|---|---|
| Pine | Light, smooth | Medium | Low | Painted vanities |
| Oak | Grainy, classic | High | Medium/High | Stained vanities |
| Plywood | Varies | Good | Low/Medium | Budget builds, drawer sides |
| MDF | Very smooth | Medium | Low | Painted finishes |
| Poplar | Light color | Medium | Medium | Painted/stained, easy to work |
Tip: If you want a wood grain look, choose oak or poplar. For painting, pine or MDF is best.
Mirror
Decide if you want a:
- Freestanding mirror (sits on top)
- Wall-mounted mirror (hung above the vanity)
- Built-in mirror (attached to the vanity)
Mirrors come in many shapes: round, square, oval, or rectangle.
Non-obvious insight: Frameless mirrors look modern and are easier to clean, but framed mirrors can match your vanity style and feel more classic.
Hardware And Accessories
You will need drawer pulls, knobs, or handles if you add storage. Choose hardware that matches your room’s color scheme—brushed nickel, black, brass, or crystal.
Decide if you want extra features like:
- Built-in lighting (LED strip or bulb fixtures)
- Power outlets for hairdryers or chargers
- Jewelry trays or makeup organizers
These can be added now or later.
Paint, Stain, Or Finish
Pick your finish early. If you want a painted look, buy primer and paint. For a wood look, buy wood stain and a clear topcoat. Water-based finishes are easier for beginners.
Beginner mistake to avoid: Do not skip primer if painting raw wood or MDF, or your finish may peel.
Credit: www.youtube.com
Tools You’ll Need
You do not need fancy tools for most vanities. Here are the basics:
- Drill (with bits)
- Screwdriver (manual or powered)
- Saw (circular saw, handsaw, or miter saw)
- Sandpaper (120 and 220 grit)
- Measuring tape and pencil
- Level
- Clamps (for holding wood steady)
- Wood glue
- Paintbrush and/or small roller
If you add drawers or build a frame, a pocket hole jig can make strong, invisible joints, but it’s optional.
Pro tip: Many hardware stores will cut large boards to size for free or a small fee. This saves time and helps if you do not own a saw.
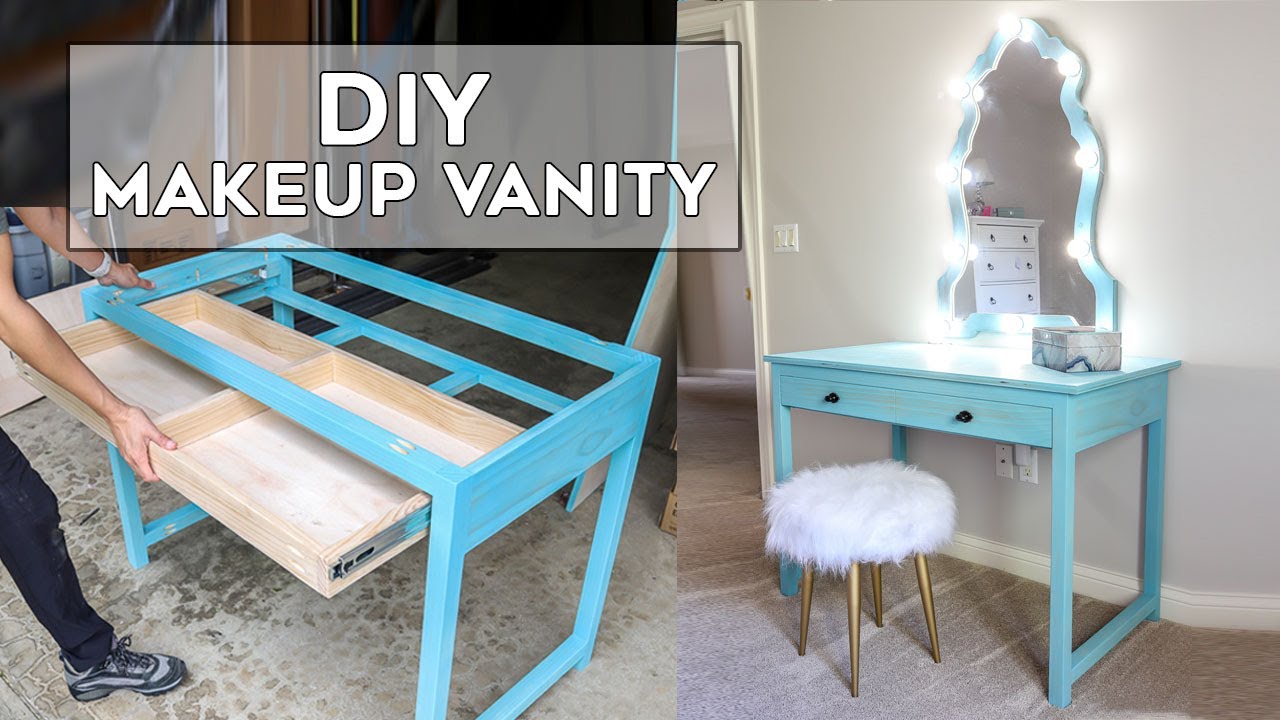
Step-by-step Building Process
Now let’s get to the main part: building your bedroom vanity. The following steps cover a basic table-style vanity with one or two drawers, but you can adjust for your own design.
1. Cut The Wood
Using your sketch and measurements, cut:
- Tabletop: Usually 30-36 inches wide, 18-20 inches deep
- Legs: 4 pieces, 29-31 inches tall
- Drawer fronts and sides (if you add drawers)
- Support pieces or braces for underneath
Mark each piece with a pencil as you go.
2. Sand All Surfaces
Sand every part with 120-grit sandpaper, then finish with 220-grit for a smooth feel. Sanding removes splinters and makes painting or staining easier.
Non-obvious insight: Sand the edges of the tabletop with a slight round motion to avoid sharp corners that can chip or hurt.
3. Assemble The Frame
Lay the tabletop upside-down. Attach the legs to each corner using brackets, screws, or wood glue. If you want extra strength, add corner blocks or metal brackets.
If your vanity has an apron (the frame under the tabletop), attach it now. This helps the vanity stay sturdy.
Check with a level to make sure it sits flat.
4. Add Drawers (optional)
If you want drawers:
- Build a simple box from plywood or solid wood (front, back, two sides, bottom).
- Attach drawer slides to the inside of the frame and the drawer box.
- Install the drawer and test for smooth opening.
- Attach the drawer front and hardware.
Tip: Pre-made drawer slides are easier for beginners and make drawers feel smooth.
5. Attach The Mirror
Depending on your design:
- For a wall-mounted mirror, hang it at eye level above the vanity using wall anchors.
- For an attached mirror, use mirror clips or brackets at the back of the vanity.
- For a freestanding mirror, simply place it on top.
Beginner mistake to avoid: Make sure your mirror is secure and will not tip forward or fall.
6. Paint, Stain, Or Finish
Wipe dust from all surfaces. Prime if painting. Paint or stain in thin, even coats. Let each coat dry fully before adding another.
- For paint: Use two coats of primer, two coats of color.
- For stain: Apply with a clean cloth, wipe off excess, then add a clear finish.
Let the finish cure for 24-48 hours before heavy use.
Tip: Paint or stain before final assembly if you want sharp lines and less mess.
7. Add Hardware And Accessories
Attach drawer pulls, knobs, or handles. Install any organizers, trays, or custom inserts. Add felt pads to the legs to protect your floor.
If you want, install a small LED strip under the mirror for lighting. Plug-in lights are easiest.
8. Set Up Your Vanity
Move your vanity into place. Add a comfortable chair or stool. Arrange your makeup, jewelry, or hair tools in the drawers or on top. Place a small tray for perfume or rings.
Pro tip: Use small baskets or divided trays inside drawers to keep things organized.
Customization Ideas
One of the joys of building your own vanity is making it unique. Here are ways to personalize your project:
Color And Finish
Choose colors that match your room. Soft pastels for a calm look, dark stains for a classic feel, or bold colors for a fun statement.
Tip: Try a two-tone look—paint the base and stain the top for contrast.
Decorative Details
Add trim, molding, or stenciled designs to the edges. Attach wallpaper or fabric to the drawer fronts for a special touch.
Built-in Lighting
Attach a lighted mirror or add a small lamp. Some people install LED strips under the tabletop or around the mirror for a Hollywood-style glow.
Power Outlets
If you use hair tools, consider adding a power strip on the side or inside a drawer. Make sure to follow safety rules and use a surge protector.
Mirror Shape And Style
Use a vintage mirror for an antique look or a frameless mirror for modern style.
Common Mistakes And How To Avoid Them
Building a vanity is simple if you plan well. But many beginners make mistakes that cause problems.
1. Ignoring Measurements
Always measure your space and materials twice. Many vanities do not fit because of wrong measurements.
2. Weak Joints
Using only glue or nails makes a weak vanity. Always use screws or metal brackets where possible.
3. Uneven Legs
If your vanity wobbles, check if all legs are the same length. Sand or adjust as needed.
4. Skipping Sanding
Rough surfaces make paint look bad and can cause splinters. Sand every piece, even if you plan to paint.
5. Rushing The Finish
Let paint or stain dry fully between coats. Rushing leads to sticky surfaces and smudges.
6. Heavy Items On Weak Tops
Thin plywood may sag if you place a heavy mirror on top. Use strong wood at least 3/4 inch thick for the tabletop.
Extra insight: If you are unsure about a step, practice on a scrap piece of wood first.
Safety Tips
Building furniture is safe if you take precautions:
- Wear goggles when cutting or drilling.
- Wear a mask if sanding or painting.
- Work in a well-ventilated area.
- Keep tools away from children and pets.
- Unplug power tools when not in use.
Follow all instructions on paints, stains, and adhesives. Some fumes can be harmful—open windows for airflow.
Sample Budget Breakdown
Here’s a realistic budget for a simple DIY bedroom vanity:
| Item | Estimated Cost (USD) |
|---|---|
| Wood (top, legs, supports) | $50 – $120 |
| Mirror | $20 – $80 |
| Hardware (knobs, slides, brackets) | $15 – $40 |
| Paint or Stain | $10 – $35 |
| Lighting (optional) | $15 – $50 |
| Chair or stool (optional) | $30 – $100 |
| Misc. (screws, sandpaper, glue) | $10 – $25 |
| Total | $150 – $450 |
Note: You can save money by using leftover wood, repurposed mirrors, or buying secondhand chairs.
Maintenance Tips
A homemade vanity can last for many years with simple care:
- Wipe the surface with a damp cloth weekly.
- Avoid harsh cleaners on painted or stained wood.
- Tighten screws or brackets if the vanity feels loose.
- Check for scratches or chips—touch up paint or finish as needed.
- Use coasters under perfumes or lotions to prevent stains.
Non-obvious insight: Place felt pads under tabletop items (like mirrors or trays) to avoid scratching the surface.
Sustainability And Eco-friendly Options
You can build a vanity that is better for the planet:
- Use reclaimed wood or old furniture parts.
- Choose water-based paints and stains, which have less smell and are safer.
- Buy local materials to reduce shipping impact.
- Donate or recycle old vanities instead of throwing them away.
Some people even build vanities from old desks or dressers, cutting costs and waste.
Troubleshooting: Fixing Common Problems
If you run into trouble, don’t worry. Here’s how to fix some common issues:
- Wobbly vanity: Check all screws and brackets. Add corner braces if needed.
- Sticky drawers: Rub a candle or bar of soap on the slides for smoother movement.
- Paint drips or bubbles: Sand the area lightly and repaint.
- Loose hardware: Remove, add a small piece of toothpick with glue in the hole, then reinstall.
Pro tip: Take photos of each step. If you need help, you can show someone exactly what you did.
Real-world Example
Maria, a beginner DIYer, built a vanity for her small bedroom. She used plywood for the top, bought four ready-made table legs, and reused an old mirror. She painted the whole piece in soft white and added a gold-framed mirror.
The project took her two weekends and cost $135. Now, she has a stylish, custom vanity that fits perfectly in her space and stores all her makeup.
Key lesson: Start simple and use available materials. You do not need expensive supplies to get a great result.

Credit: www.amorybrown.co.uk
When To Buy Instead Of Build
Building a vanity is fun, but sometimes buying makes sense:
- If you have no tools or workspace
- If you need a vanity right away
- If you want a complex design (like curved edges or lots of drawers)
Still, building is usually cheaper, more personal, and lets you choose exactly what you want.
For more inspiration and advanced tips, check out Family Handyman.
Frequently Asked Questions
What Is The Best Wood For A Bedroom Vanity?
The best wood depends on your budget and finish. Pine is affordable and easy to paint. Oak is strong and good for staining. Poplar is also a good choice for beginners.
How Much Does It Cost To Build A Bedroom Vanity?
Most DIY vanities cost between $150 and $450. Price varies by wood type, mirror, hardware, and if you add extras like lighting or a chair.
Can I Build A Vanity Without Power Tools?
Yes. You can use a handsaw, screwdriver, and sandpaper. Many hardware stores will cut wood to size for you. Power tools make the job faster but are not required.
How Do I Make My Vanity Look Professional?
Sand carefully, use primer, and apply thin, even coats of paint or stain. Add stylish hardware and use a level to keep everything straight.
What Size Should My Vanity Be?
A typical vanity is 30-36 inches wide, 18-20 inches deep, and 29-31 inches tall. Adjust these measurements to fit your space and comfort.
Building a bedroom vanity lets you create a special place just for you. With careful planning, the right materials, and a little patience, you can build a piece that adds beauty, value, and joy to your everyday routine. Enjoy the process and be proud of what you create!
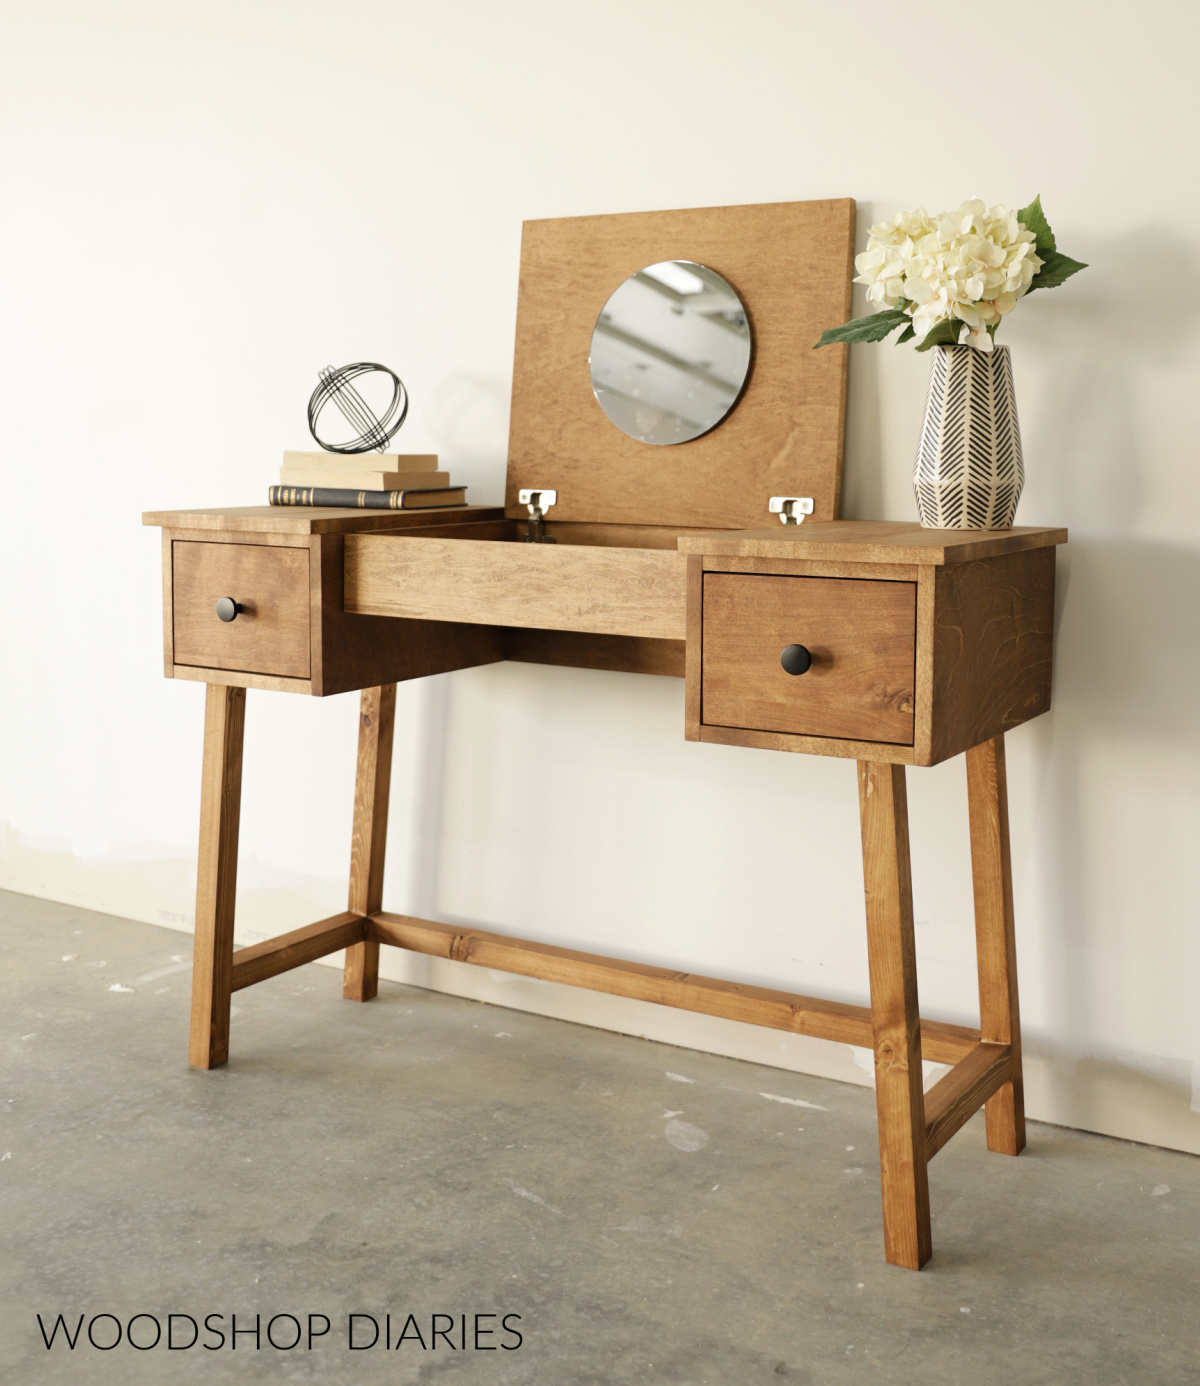
Credit: www.woodshopdiaries.com