Building a linen closet can transform your home’s organization and add lasting value. Many homes, especially older ones, don’t have a dedicated space for towels, sheets, or cleaning supplies. You might have piles of linens stacked in random cabinets, wasting time searching for what you need.
Designing and building your own linen closet gives you control over every detail—size, style, and storage features. Even better, it’s a project you can tackle with basic tools and thoughtful planning.
This guide explains every step of building a linen closet, from choosing the best location to adding the final touches. You’ll learn how to make a closet that fits your space and needs, whether you want something simple or more custom.
Along the way, you’ll discover pro tips and avoid common mistakes that beginners usually make. Ready to upgrade your home’s storage and enjoy a more organized life? Let’s get started.
Why Build A Linen Closet?
A linen closet is more than a place to hide towels. It offers real benefits for your daily life and home value. First, it helps you organize items like bedding, towels, and toiletries. You’ll know exactly where to find clean sheets or guest towels. Second, a dedicated linen closet protects fabrics from dust and sunlight, keeping them fresh longer. Third, it can make your home more appealing if you ever decide to sell, as buyers notice smart storage.
Many people don’t realize how much time they lose searching for linens. A well-designed closet can save you minutes every week—hours over a year. Plus, when everything is in its place, laundry day and cleaning up for guests become much less stressful.
Planning Your Linen Closet
Before you pick up a hammer, you need a clear plan. This stage is crucial for a smooth project and a result you’ll be proud of.
Choose The Best Location
The first decision is where your linen closet will go. The best spots are close to bedrooms, bathrooms, or laundry rooms. If you have a hallway with unused space or a large bathroom with an empty wall, those are ideal. Sometimes, you can repurpose part of a wide hallway or convert a small bedroom closet. Measure the available area to make sure you have enough depth (at least 14 inches, ideally 24 inches) for shelving and door swing.
Decide On Size And Style
Think about what you want to store. Do you need space for family-sized bedding sets, thick towels, or cleaning tools like a vacuum? A standard linen closet is usually 24–36 inches wide and 24 inches deep, but you can adjust for your home.
For style, you can go with open shelving, doors that match other closets, or even sliding doors if space is tight.
Set Your Budget
Costs can vary widely. For a simple reach-in closet, materials may run from $250–$600. If you need to build walls or add electrical work, the price goes up. Make a list of what you’ll need: framing lumber, drywall, paint, shelving, hardware, and doors. Don’t forget tools if you don’t own them already.
Gather Inspiration
Look at home design websites, Pinterest, or even local showrooms. Save images of closet layouts, shelving types, and door styles you like. This helps you make decisions faster and avoid changing plans mid-project.
Check Local Codes
In most cases, building a closet doesn’t require a permit, but if you’re changing walls, adding lights, or affecting ventilation, check your city’s rules. Safety always comes first.
Tools And Materials You’ll Need
Having the right tools and materials makes the job easier and produces better results. Here’s a handy list to help you prepare:
Essential Tools
- Measuring tape (at least 25 feet)
- Level (2–4 feet long)
- Stud finder
- Pencil and chalk line
- Circular saw or handsaw
- Drill and bits
- Hammer
- Screwdriver set
- Utility knife
- Pry bar
- Framing square
- Safety gear (gloves, goggles, mask)
Materials
- 2×4 lumber (for framing walls and door opening)
- Drywall sheets
- Drywall screws
- Joint compound and tape
- Primer and paint
- Shelving boards (MDF, plywood, or solid wood)
- Shelf supports or brackets
- Closet door (bi-fold, sliding, or standard)
- Door hardware (hinges, knobs, latches)
- Baseboards and trim
Optional Extras
- Lighting fixture (if adding a closet light)
- Adjustable shelf tracks
- Moisture barrier (if building near bathrooms)
- Caulk for sealing gaps
Buying better-quality materials for shelves and trim pays off in durability and looks. For example, solid wood shelving is less likely to sag than MDF if you store heavy items.
Designing Your Linen Closet
Many people skip the design stage and regret it later. Good design is about more than looks—it’s about how your closet works for you every day.
Create A Simple Sketch
Draw your closet on paper, including wall placement, shelving, and the door. Mark the measurements: height, width, and depth. Don’t forget to sketch the inside—this helps you plan shelf spacing and see if everything fits.
Plan Shelf Layout
Standard shelf spacing is 12–15 inches apart. For towels and sheets, 15 inches is best. For small items like washcloths or toiletries, you can add a shorter shelf at the top or bottom. Plan for 4–6 shelves in a typical closet.
Consider Ventilation
Linens need air flow to stay fresh. Leave a small gap (about 2 inches) between the shelves and the back wall. If your closet is in a humid area, you might add a louvered door or a small vent.
Think About Lighting
A dark closet is hard to use. If possible, add a battery-powered LED light or ask an electrician to install a wired light. Make sure the light can’t be blocked by shelves.
Door Options
The door type affects how much space you need in front of the closet. Here’s a quick comparison:
| Door Type | Space Needed | Best Use |
|---|---|---|
| Standard Swing | Full door width | Large rooms |
| Bi-fold | Half door width | Medium/small rooms |
| Sliding | Minimal | Very tight spaces |
| Open (no door) | None | Modern look, easy access |
Sliding or bi-fold doors work well in hallways or bathrooms with limited space.
Credit: www.diyinprogress.com
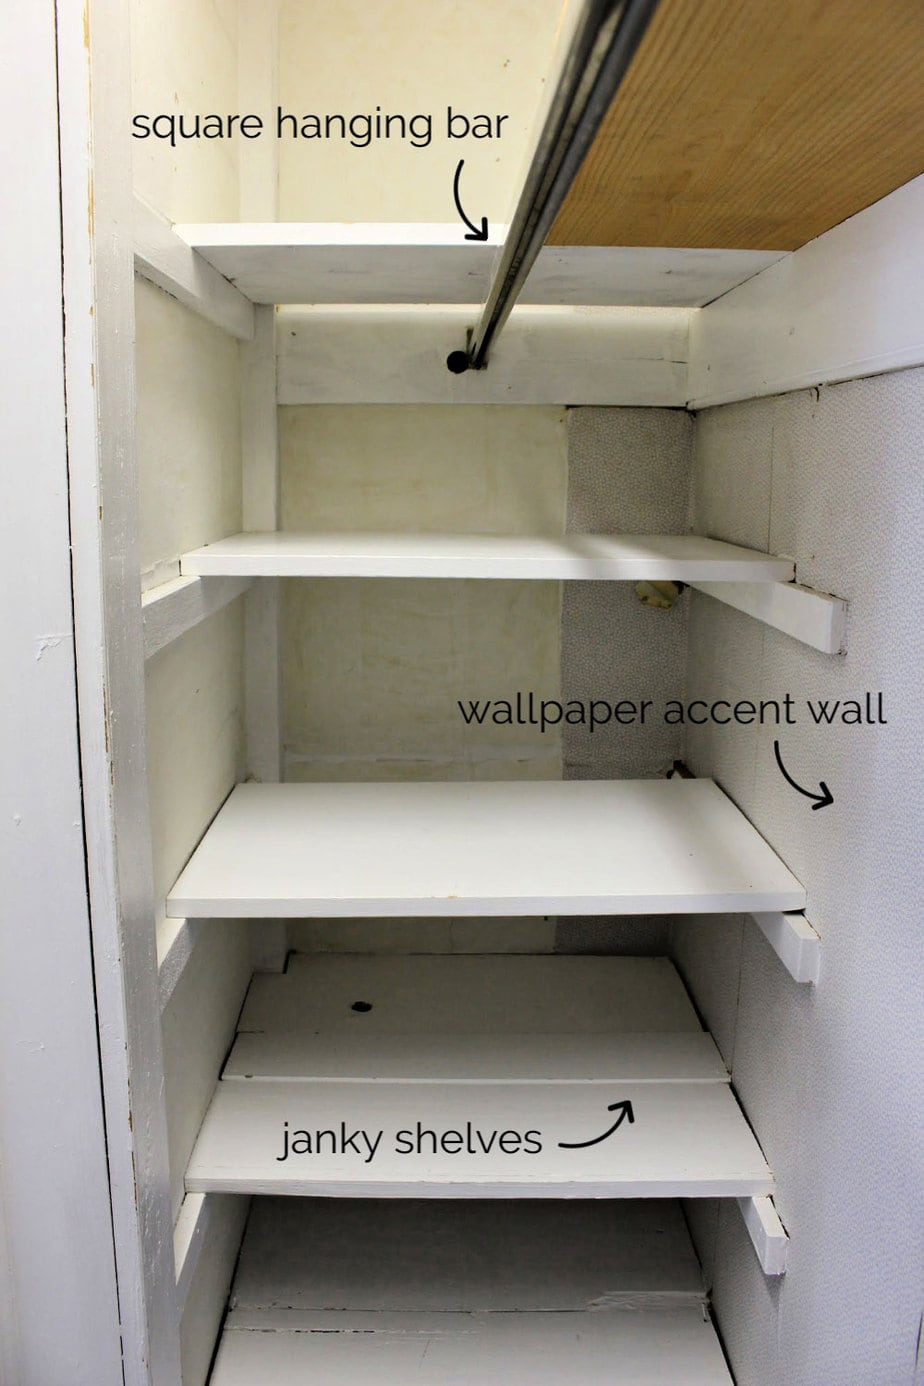
Measuring And Marking Your Space
Accurate measurements are key for a professional finish. Even small mistakes can lead to crooked shelves or doors that don’t close.
Mark The Layout
- Find the studs: Use a stud finder to mark where existing wall studs are. You’ll attach framing to these for strength.
- Outline your closet: Use a measuring tape and chalk line to mark the outside edges of your new closet on the floor, ceiling, and walls.
- Plan shelf heights: On the inside wall, lightly mark the height for each shelf. This makes installation much faster and avoids guesswork.
Check For Obstacles
Open the wall (if needed) to check for electrical wires, plumbing, or heating ducts. Move the closet or hire a pro if you find obstacles you can’t move.
Framing The Linen Closet
Building the frame is like making the skeleton of your closet. If you’re adding a closet to an open space or building new walls, follow these steps.
Build The Side Walls
- Cut your 2x4s: Measure and cut top and bottom plates (horizontal pieces) and studs (vertical pieces).
- Assemble wall frames: Lay them flat, attach studs every 16 inches, then nail or screw them together.
- Lift into place: Attach the bottom plate to the floor (use construction adhesive and screws), and the top plate to ceiling joists.
- Secure to existing walls: Use long screws to attach the new frame to the wall studs you marked earlier.
Frame The Door Opening
- Measure your door size, adding 2 inches to height and width for the frame.
- Add a header (horizontal piece above the door) for support.
- Install jack studs (short vertical pieces) under the header.
Double-check For Square
Use a framing square and level to make sure everything is straight. A crooked frame causes problems later with drywall and doors.
Installing Drywall And Finishing Walls
Once the frame is up, the next step is to enclose the closet.
Hang Drywall
- Measure and cut drywall sheets to fit the walls and ceiling of your closet.
- Screw drywall to the studs, spacing screws about 12 inches apart.
- Cut out openings for the door and any lights.
Tape And Mud The Joints
- Cover seams with drywall tape.
- Apply joint compound (mud) in thin layers, smoothing with a drywall knife.
- Let each layer dry, then sand lightly.
- Repeat until seams are smooth and invisible.
Prime And Paint
- Wipe off dust and apply a coat of primer.
- Paint the inside with a light, washable color—white or pale gray works well and reflects light.
- Paint shelves and trim before installing for the cleanest finish.
Installing Shelves And Supports
Strong shelves are the heart of a good linen closet. Here’s how to make them last:
Choose Your Shelf Material
- Solid wood: Strong and durable, best for heavy items.
- Plywood: Affordable and stable, easy to paint.
- MDF: Smooth and cheap, but sags with heavy loads.
- Wire shelving: Good airflow, but small items may tip.
Cut And Finish Shelves
- Cut shelves to match your closet width, minus a small gap (1/8 inch) for easy fitting.
- Sand edges smooth.
- Paint or seal before installing to protect from moisture.
Install Shelf Supports
There are two main options:
- Fixed wooden cleats: Attach strips of wood to the wall to hold each shelf. Very strong and simple.
- Adjustable shelf tracks: Metal tracks let you move shelves up or down later. Great for changing needs.
Use a level to keep supports straight. Secure with long screws into wall studs for maximum strength.
Place The Shelves
Set each shelf on its supports. If using wood, nail or screw shelves to the cleats to stop them shifting. For wire shelving, follow the manufacturer’s instructions.
Test The Strength
Before loading up, press down on each shelf with your hand. Shelves shouldn’t bow or move. If they do, add more supports.
Credit: jaimecostiglio.com
Installing The Closet Door
The right door makes your closet look finished and keeps dust out.
Fit The Door
- Attach hinges to the frame (for swing doors) or install the track (for sliding/bi-fold).
- Hang the door and check for smooth opening and closing.
- Adjust as needed for a perfect fit.
Add Hardware
Install knobs, pulls, or latches. For bi-fold or sliding doors, follow the package instructions carefully.
Install Trim And Baseboards
Finish the edges where the closet meets the wall. Use baseboards at the floor and casing around the door for a neat look. Caulk gaps and touch up paint for a pro finish.
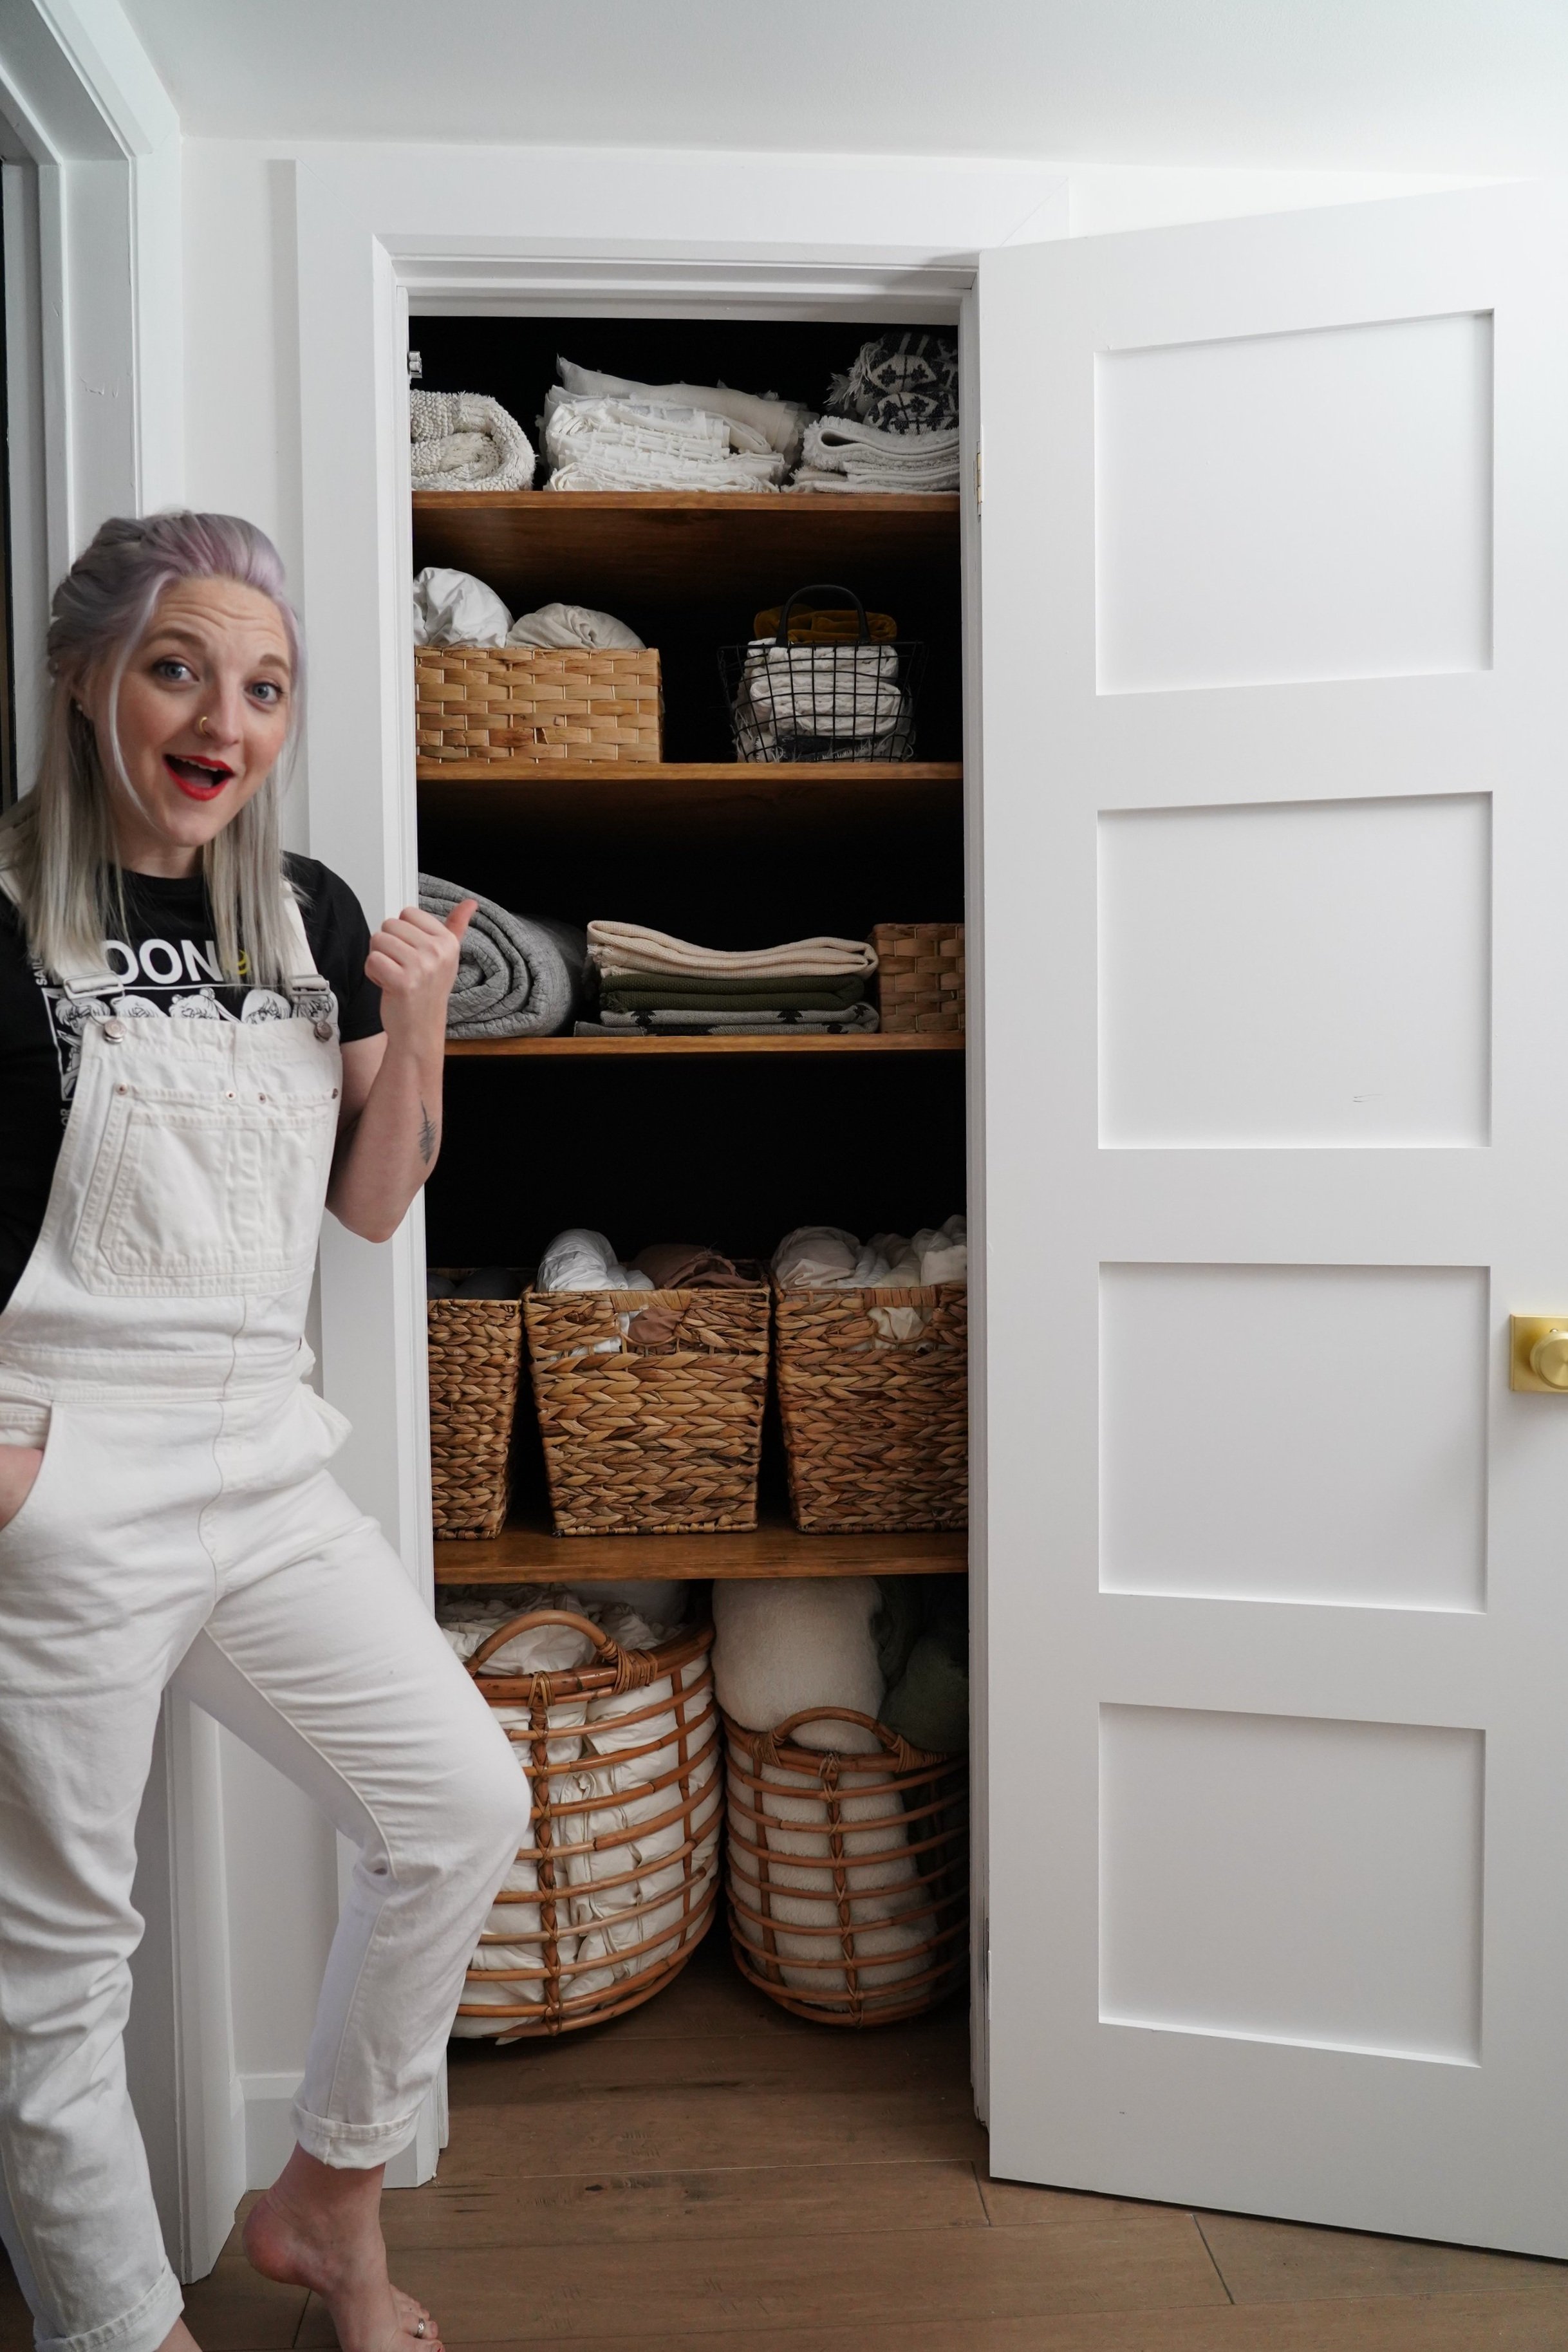
Organizing And Stocking Your New Linen Closet
A great closet is only as good as what’s inside. Here are tips to keep your linens organized and fresh.
Sort And Store By Category
Keep similar items together:
- Top shelf: Extra pillows, blankets
- Middle shelves: Sheets, pillowcases
- Lower shelves: Towels, washcloths
- Bottom: Cleaning supplies or baskets
Use Storage Helpers
Add bins, baskets, or labeled boxes for small items. Shelf dividers can keep stacks from falling over.
Fold Linens Neatly
Fold towels and sheets the same way every time for tidy stacks. Use the “hotel fold” for towels to save space.
Leave Room For Airflow
Don’t overfill shelves. A little space between stacks prevents musty smells.
Add A Fresh Scent
Tuck a sachet of lavender or a dryer sheet on each shelf for a pleasant smell.
Rotate Stock
Put newer linens at the back so you use old ones first. This keeps everything in good condition.
Common Mistakes To Avoid
Many first-time builders make avoidable errors. Here are mistakes to watch for:
- Skipping the plan: Not measuring or sketching first leads to wasted materials and poor results.
- Using weak shelving: MDF or thin plywood sags quickly under towels and sheets.
- Not fastening to studs: Shelves attached only to drywall will pull out over time.
- No ventilation: Sealed closets can develop mold or musty smells, especially near bathrooms.
- Poor lighting: A dark closet is frustrating—add a light if possible.
- Door clearance problems: Make sure doors can open fully without hitting walls or furniture.
- Improper shelf spacing: Shelves too close together make it hard to pull out linens.
- Overloading: Don’t stuff the closet full; linens need to breathe.
Linen Closet Ideas For Different Spaces
Your home’s layout may affect the best approach to building a linen closet. Here are a few ideas:
Hallway Linen Closet
Perfect for homes with wide halls. Build between two wall studs for a shallow but useful closet. Use sliding or bi-fold doors to save space.
Bathroom Linen Closet
If you have a large bathroom, use an empty wall or corner. Moisture is a concern, so use moisture-resistant paint and leave space for ventilation.
Bedroom Linen Closet
Convert a small bedroom closet into a dedicated linen area. Add more shelves and remove clothing rods.
Built-in Alcove
If you have a deep wall nook, turn it into open shelves for linens. This looks great and is easy to access.
Freestanding Linen Cabinet
If you can’t build into the wall, use a tall cabinet or armoire. Add adjustable shelves inside for custom storage.

Credit: nilds.gov.ng
Cost Comparison: Diy Vs. Hiring A Pro
Should you build it yourself or hire a contractor? Here’s a quick comparison:
| Option | Average Cost | Pros | Cons |
|---|---|---|---|
| DIY | $250–$600 | Save money, custom design, learn skills | Time-consuming, tools needed, risk of mistakes |
| Hire a Pro | $800–$2,500 | Expert finish, quick, no heavy lifting | More expensive, less control over design |
Most homeowners with basic DIY skills can build a simple linen closet. If you want a custom look or need to move plumbing/electric, a pro is worth the extra cost.
Maintenance Tips For A Long-lasting Linen Closet
Building the closet is only the first step. Good maintenance keeps it looking and working well for years.
Regular Cleaning
Wipe shelves with a damp cloth every few months. Remove everything once a year to deep clean and check for damage or pests.
Watch For Moisture
Check for signs of mold or mildew, especially in bathrooms. Run a dehumidifier or leave the door open sometimes if needed.
Tighten Hardware
Doors, shelves, and hardware can loosen over time. Tighten screws and adjust hinges every six months.
Refresh Paint
Touch up scuffs or chips with leftover paint. A quick coat every few years keeps the closet looking new.
Replace Shelf Liners
If you use liners or mats, replace them if they get dirty or worn out.
Non-obvious Insights For A Better Linen Closet
- Stagger shelf depths: Make lower shelves deeper (16–18 inches) for bulkier items, and upper shelves shallower (12 inches) for lighter things. This makes reaching easier and prevents items from getting lost in the back.
- Add a pull-out shelf or basket: One sliding shelf or basket helps you reach items in the back without removing the whole stack. It’s a small upgrade with big benefits.
- Install a mini drying rack: A fold-down rack inside the door is perfect for drying washcloths or airing damp towels.
- Label the shelves: Simple adhesive labels or tags help everyone in the house put things back in the right spot—especially helpful for kids or guests.
- Consider lighting with a motion sensor: No more fumbling for switches; the light turns on automatically when you open the door.
Frequently Asked Questions
How Deep Should A Linen Closet Be?
A standard linen closet should be at least 14 inches deep to hold towels and folded sheets. For best results, aim for 18–24 inches deep. This gives you enough space for bulky items without wasting room.
What Is The Best Material For Linen Closet Shelves?
Solid wood or high-quality plywood is best for strength and durability. If you use MDF, choose a thick board and support it well to prevent sagging. Wire shelving allows for good airflow but isn’t ideal for small items.
Do I Need Ventilation In My Linen Closet?
Yes, ventilation prevents musty smells and mold. Leave small gaps behind shelves or use a louvered door. In humid areas (like bathrooms), this is especially important.
Can I Build A Linen Closet In A Small Space?
Absolutely. Even a narrow hallway or unused corner can fit a linen closet. Use sliding or bi-fold doors, and install adjustable shelves to maximize storage. Shallow closets can still store plenty if you organize well.
Should I Hire A Professional Or Build It Myself?
If you’re comfortable with basic tools and have time, DIY is a great option and saves money. Hire a professional if you need to move electrical, plumbing, or want a high-end finish. For more tips, check resources like This Old House.
Building a linen closet is a rewarding project that adds real value and convenience to your home. With careful planning, the right materials, and a bit of effort, you’ll enjoy organized linens and a clutter-free space for years to come.