Applying a metallic epoxy floor can completely change the look and feel of any space. People often see these floors in showrooms, garages, restaurants, and even modern homes. The shiny, deep, and three-dimensional effect makes metallic epoxy a popular choice for those who want something unique and durable. But while the finished product looks stunning, the process to achieve it is very detailed. Missing even one step can affect the quality and longevity of your floor.
This guide will take you through the complete process of applying a metallic epoxy floor. It’s designed for people who want to do it themselves, as well as those simply curious about the process. You’ll discover the tools, materials, safety tips, step-by-step instructions, and expert insights that many beginners miss. By the end, you’ll know exactly how to plan, prepare, and apply a metallic epoxy floor that lasts for years.
What Is Metallic Epoxy Flooring?
Metallic epoxy flooring is a multi-layered coating system that uses a blend of clear epoxy and metallic pigments. When applied, these pigments create swirling patterns and a deep, glass-like finish that can mimic marble, moon craters, or even flowing water. Each floor is unique because the pigments never settle the same way twice.
Unlike regular epoxy, the metallic type is all about the visual effect. It’s both decorative and functional, offering high durability, chemical resistance, and easy maintenance. These features make metallic epoxy popular in high-traffic areas, garages, retail spaces, and even kitchens.
Why Choose Metallic Epoxy Floors?
People choose metallic epoxy for several reasons:
- Aesthetics: The visual impact is immediate. You can choose from many color combinations and effects.
- Strength: The floor resists scratches, impacts, and chemicals.
- Longevity: With proper care, metallic epoxy floors can last more than 10 years.
- Easy cleaning: The seamless surface means dirt and spills wipe away easily.
- Customization: You can match your floor to your brand, home style, or favorite colors.
Many business owners use metallic epoxy to impress customers and make spaces memorable. Homeowners love it for its wow factor and minimal maintenance needs.
Tools And Materials Needed
Getting the right tools and materials is the first important step. Using cheap or wrong products can lead to peeling, bubbling, or poor shine.
Essential Tools
- Concrete grinder or floor sander
- Vacuum (preferably HEPA filter)
- Paint roller frames and covers (3/8” nap recommended)
- Paintbrushes (for edges and corners)
- Notched squeegee
- Spiked shoes (to walk on wet epoxy)
- Mixing drills with paddle attachment
- Plastic mixing buckets (graduated for measuring)
- Trowel or magic trowel (for spreading)
- Painter’s tape and plastic sheeting
- Measuring cups for hardener and resin
Materials
- Epoxy primer (usually clear)
- 100% solids epoxy resin
- Metallic pigments (powdered, available in many colors)
- Epoxy topcoat (clear, UV-stable for best results)
- Concrete patch or crack filler (for repairs)
- Degreaser or concrete cleaner
Safety Gear
- Nitrile gloves
- Safety glasses
- Respirator (organic vapor cartridge)
- Protective clothing (coveralls or old clothes)
Helpful Extras
- Plastic sheeting (to protect walls and baseboards)
- Scrapers (for removing old paint or glue)
- Moisture meter (to check for damp concrete)
- Digital thermometer (epoxy is sensitive to temperature)
How To Prepare The Concrete Surface
Proper surface preparation is the secret behind a long-lasting metallic epoxy floor. Skipping or rushing this step is the number one reason for failures like peeling or bubbles.
Step 1: Clear And Clean
Remove all furniture and objects from the area. Sweep away loose dirt, then vacuum thoroughly. Use a degreaser to remove oil stains or grease spots—these can stop epoxy from sticking.
Step 2: Repair Cracks And Holes
Examine the floor for cracks, chips, or holes. Use a quality concrete patch or epoxy filler to repair these areas. Allow the patch to cure as per the manufacturer’s instructions.
Step 3: Grind Or Sand The Surface
Epoxy needs a rough surface to stick well. Use a concrete grinder or floor sander with diamond pads (30-60 grit). This step removes old coatings and opens the pores of the concrete.
- Pro tip: If you see smooth, shiny spots after grinding, go over them again. These are called “latency” and can cause epoxy to lift.
Step 4: Vacuum And Clean Again
After grinding, vacuum up all dust. Even small particles can create bumps under the epoxy. Wipe the floor with a damp cloth or mop, then let it dry completely.
Step 5: Test For Moisture
Epoxy does not bond well to damp concrete. Tape a square of plastic to the floor and leave it for 24 hours. If you see moisture under the plastic, wait for the floor to dry or fix the moisture problem before moving on.
Step 6: Mask Off Edges
Use painter’s tape and plastic sheeting to protect walls, baseboards, and doorways. Epoxy is hard to clean off once it cures.
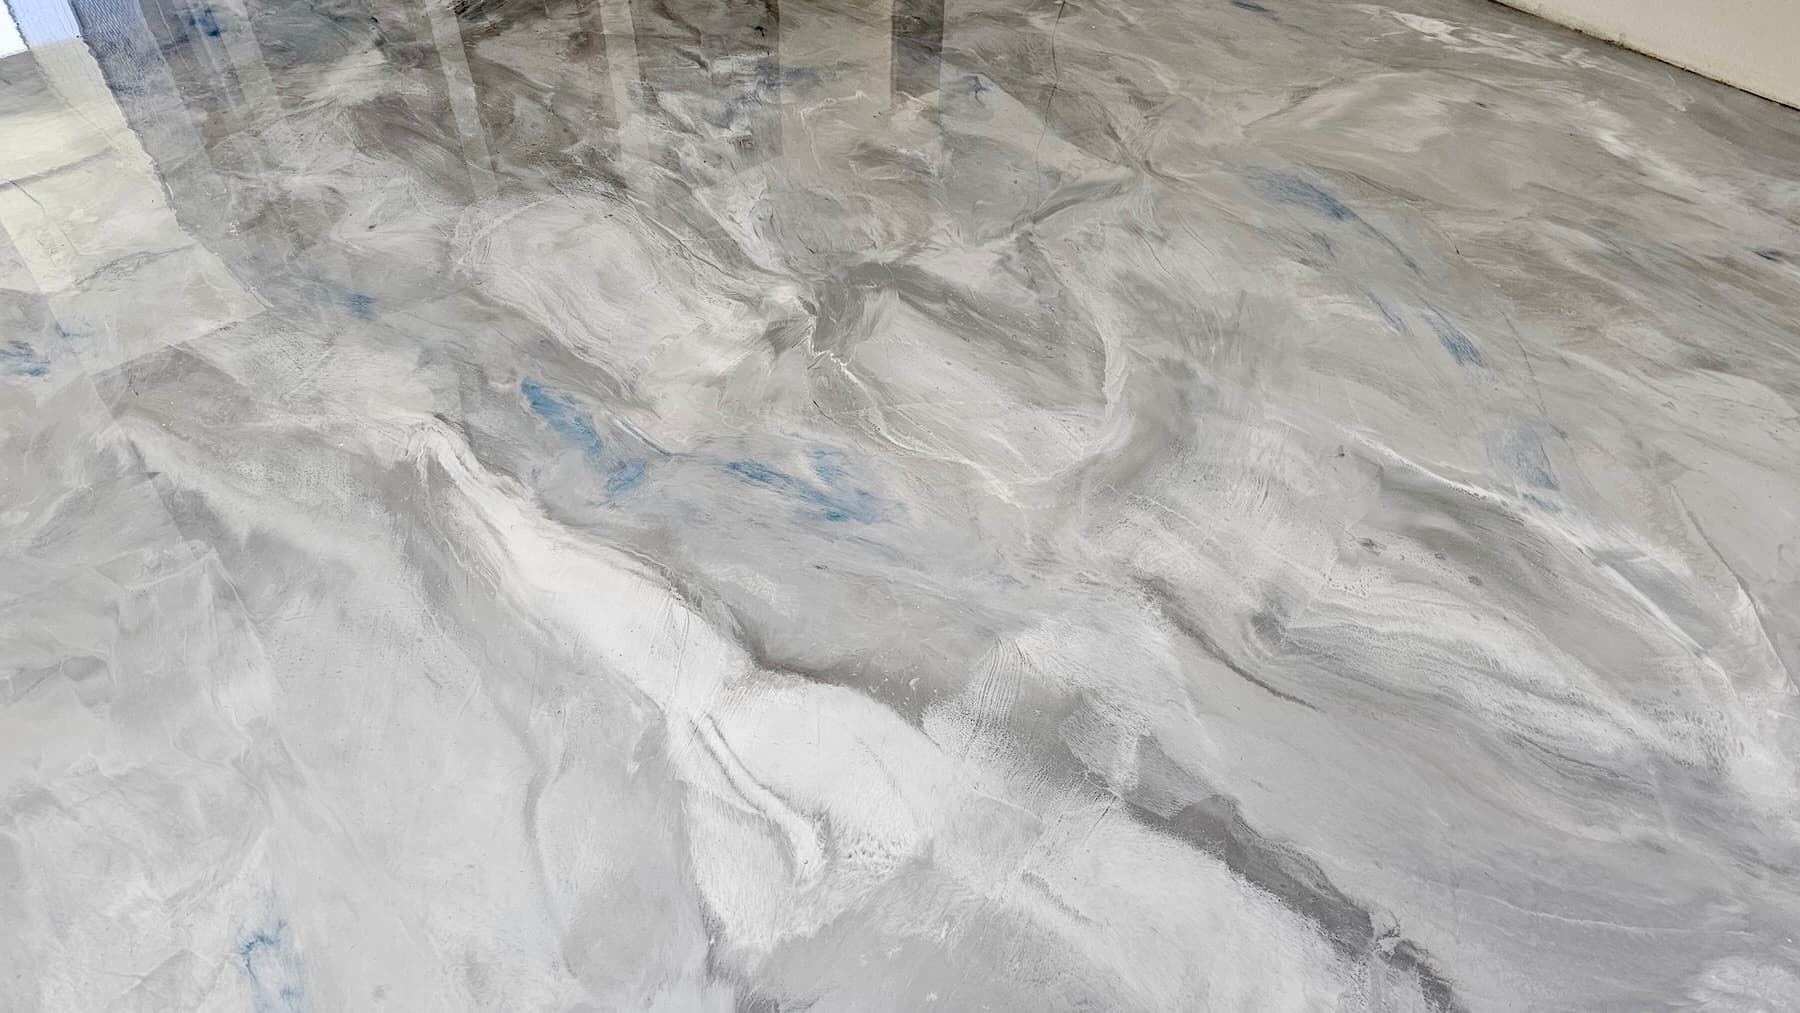
Credit: stonecoatcountertops.com
Choosing Your Metallic Epoxy System
Not all metallic epoxy kits are the same. Some are single-step, while others need a primer, base, and topcoat. Here’s how to pick the right one:
- 100% solids epoxy offers the best durability and shine.
- UV-stable topcoats stop yellowing in sunlight.
- Multiple color options allow for custom effects.
- Low-odor or low-VOC formulas are better for indoor spaces.
Pro insight: Always buy 10-20% more epoxy than you think you need. Epoxy can seep into rough concrete or cracks, and running out mid-job can ruin the finish.
Mixing And Coloring The Epoxy
The beauty of a metallic epoxy floor comes from the way you mix and add the pigment. Here’s how to do it right.
Step 1: Read Instructions
Each brand has different mix ratios. Usually, it’s a 2-part resin to 1-part hardener, but always check your kit.
Step 2: Measure Carefully
Pour the exact amount of resin and hardener into a clean bucket. If you mix too little, you may not finish the floor in time; too much, and it may cure before you spread it.
Step 3: Mix Thoroughly
Use a drill with a paddle attachment to blend the two parts for at least 2–3 minutes. Scrape the sides and bottom to avoid unmixed spots.
Step 4: Add Metallic Pigment
Slowly pour in the metallic pigment powder. Most systems use 4–8 ounces per gallon of epoxy, but you can add more for a stronger effect. Stir until the pigment is fully dissolved and the color is even.
- Insider tip: Mixing two or three different colors in separate buckets lets you create multi-tone swirls and more dramatic effects.

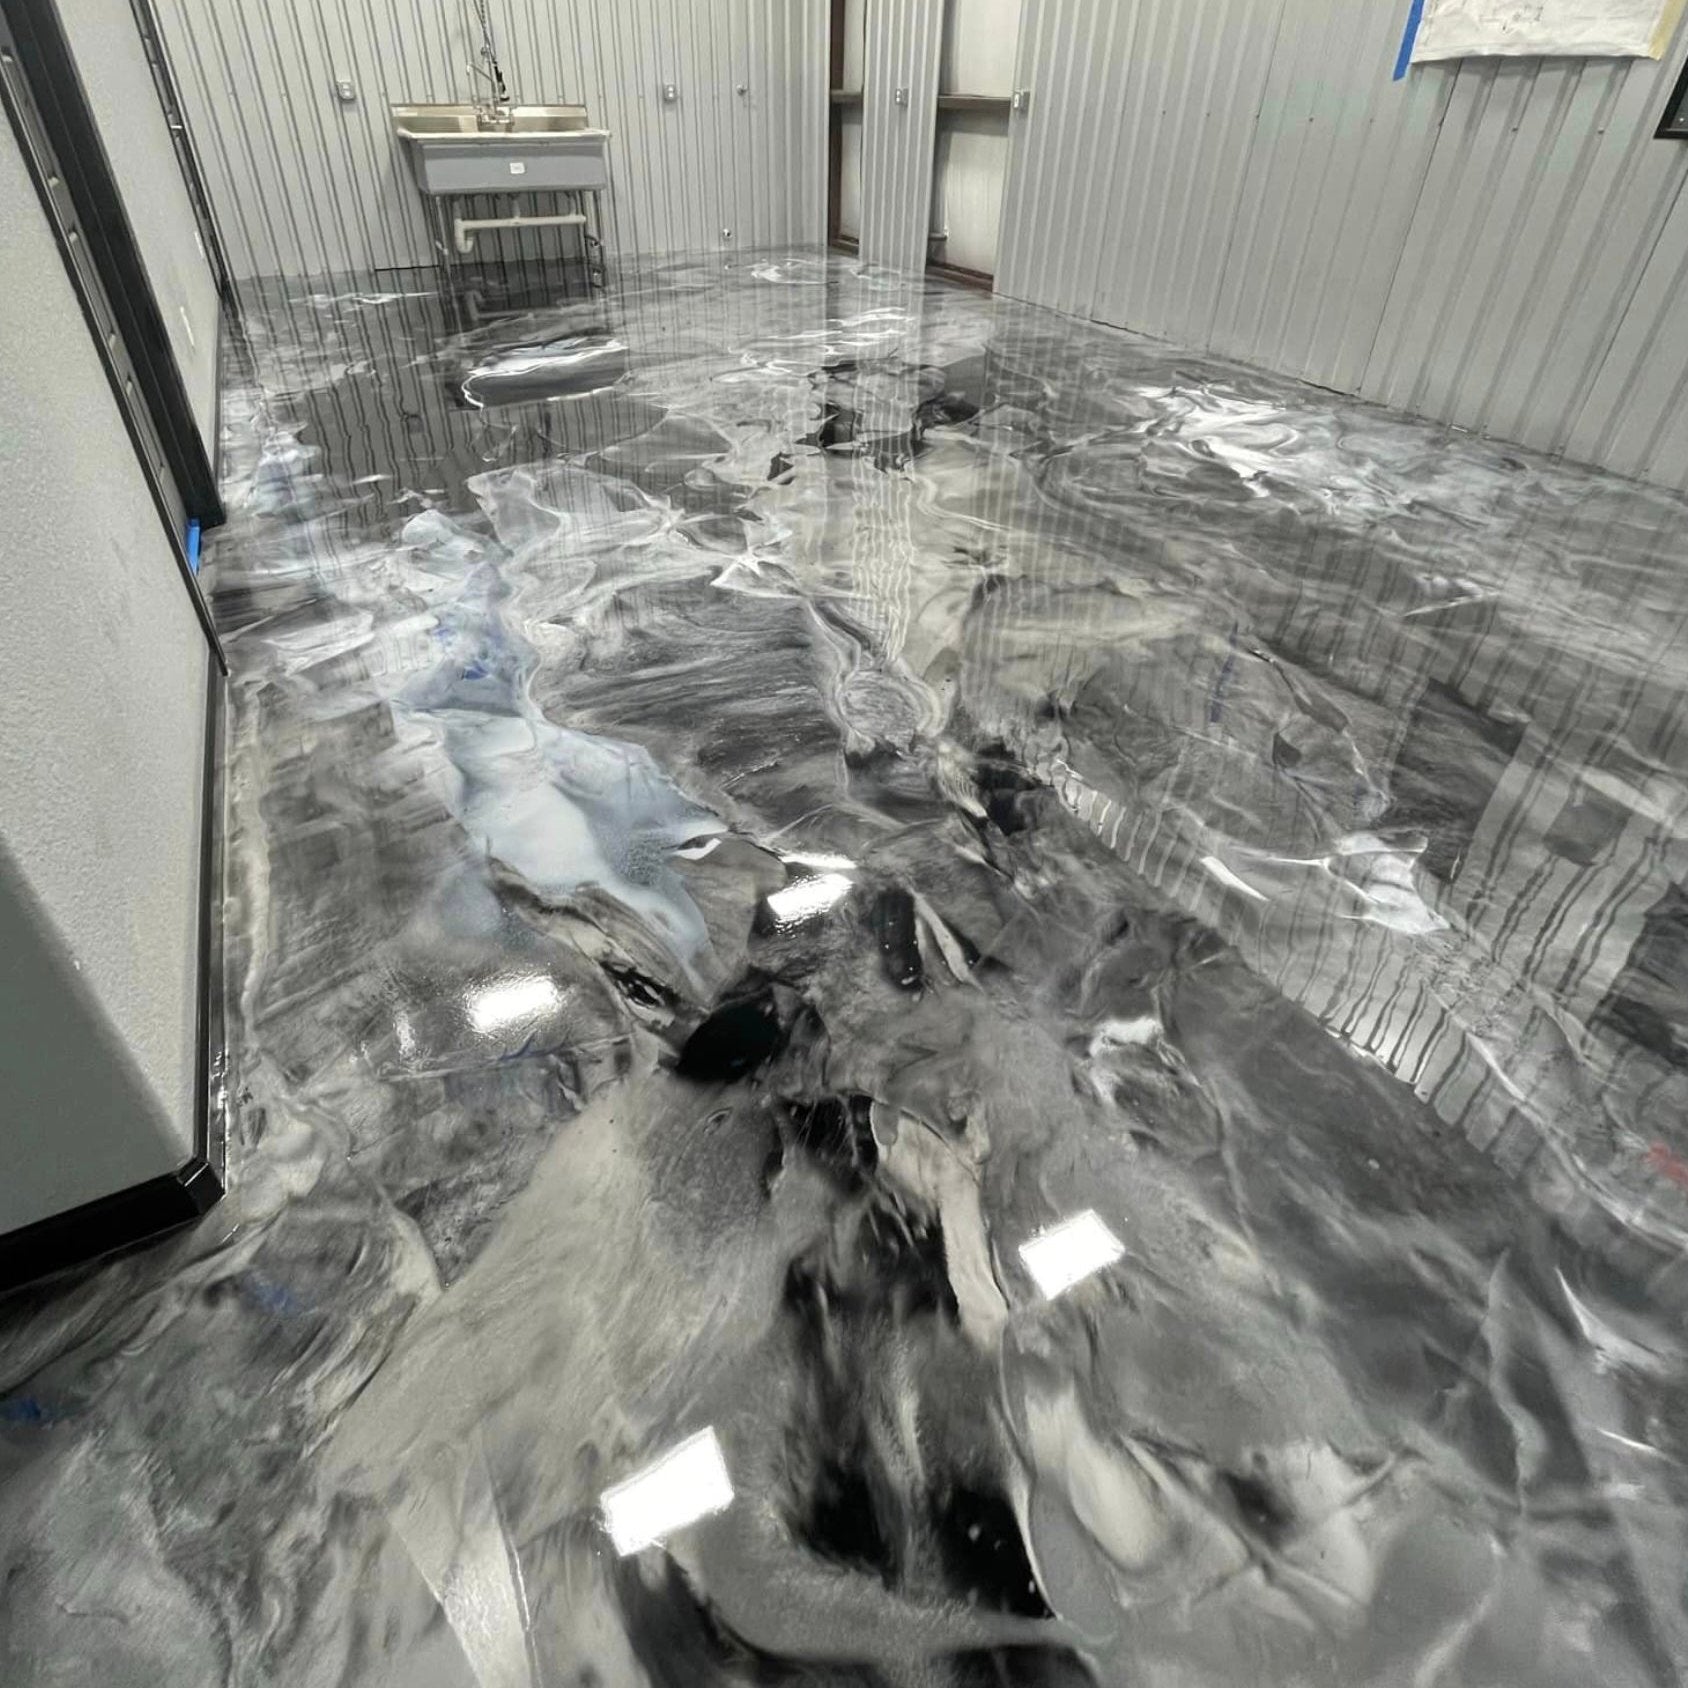
Credit: www.youtube.com
Applying The Epoxy Primer
A primer helps the metallic epoxy stick to the concrete and prevents bubbles.
Step 1: Pour And Roll
Pour the mixed primer onto the floor in ribbons. Use a paint roller to spread a thin, even coat over the entire surface. Work quickly—the primer sets fast.
Step 2: Edges And Corners
Use a paintbrush to cut in around the walls and tight spots the roller can’t reach.
Step 3: Wait And Check
Let the primer cure for the time listed in your kit’s instructions (usually 4–8 hours). The floor should feel dry but slightly tacky.
- Expert warning: If you wait too long and the primer gets fully hard, your metallic layer may not bond well. If this happens, lightly sand the primer before adding the next coat.
Pouring And Spreading The Metallic Epoxy
This is where the magic happens. The way you pour and move the epoxy will decide your floor’s final look.
Step 1: Start With Edges
Pour a small amount of colored epoxy around the room’s edges. Use a paintbrush to spread it against the walls and in corners.
Step 2: Pour In Ribbons
Pour the rest of the mixed epoxy onto the floor in winding ribbons or puddles. If you have two or more colors, pour them in separate lines or areas.
Step 3: Spread With Squeegee Or Trowel
Use a notched squeegee or magic trowel to spread the epoxy across the floor. Push and pull the material gently to cover every inch. The notches help set the right thickness (usually 40–50 mils).
Step 4: Create Effects
Drag a paint roller, brush, or even a piece of plastic through the epoxy to swirl the colors. You can also tilt the squeegee or blow air gently to move the pigments and create marbled effects.
- Non-obvious insight: The floor will look different as the epoxy self-levels. Colors may blend more than you expect, so don’t over-mix or you’ll lose the “cloud” look.
Step 5: Remove Bubbles
Roll a spiked roller over the wet epoxy to pop any air bubbles that rise. Do this gently—you don’t want to disturb the pattern.
Step 6: Let It Set
The metallic layer usually takes 12–24 hours to cure. Keep the room dust-free and avoid touching the surface during this time.
Applying The Topcoat
The clear topcoat is what gives the floor its glass-like shine and protects the color from scratches and stains.
Step 1: Mix And Pour
Prepare the topcoat as per the instructions. Pour it onto the floor in ribbons, just like the other layers.
Step 2: Spread Evenly
Use a clean roller or squeegee to spread the topcoat. Aim for a thin, even layer. Overlapping strokes help prevent streaks.
Step 3: Let It Cure
Most topcoats cure in 12–24 hours. Do not walk on the floor or move furniture in until it’s fully hard.
- Pro tip: For extra protection in garages or commercial spaces, apply a second topcoat after the first one has dried.
Curing And Aftercare
Letting the floor cure properly is just as important as the application.
- Light foot traffic is usually allowed after 24 hours.
- Heavy furniture can be moved in after 72 hours.
- Full chemical resistance is reached in 7 days.
Avoid cleaning with harsh chemicals. A mild soap and water is enough to keep your floor shining. Place felt pads under heavy furniture to avoid scratches.
Credit: stonecoatcountertops.com
Common Mistakes And How To Avoid Them
Even professionals can make mistakes with metallic epoxy. Here are the most frequent errors and how to avoid them:
- Not prepping the surface: Skipping grinding or not cleaning well enough leads to peeling.
- Mixing wrong ratios: Too much or too little hardener can cause sticky spots or weak floors.
- Rushing between coats: Applying the next layer too soon or too late affects adhesion.
- Ignoring temperature: Epoxy should be applied between 60–80°F. Too cold, and it won’t cure; too hot, and it sets too fast.
- Using wrong tools: Cheap rollers and brushes can shed fibers, leaving bumps in the finish.
- Working alone: Epoxy cures fast. Having one or two helpers makes the process smoother.
- Non-obvious insight: Always check the humidity. High humidity can cause “blushing,” a cloudy or milky look on the surface. Use a dehumidifier in damp climates.
Metallic Epoxy Floor Vs. Other Flooring Options
How does metallic epoxy compare to other popular choices? Here’s a quick look:
| Floor Type | Durability | Maintenance | Visual Appeal | Cost per sq.ft. |
|---|---|---|---|---|
| Metallic Epoxy | High | Low | Custom, unique | $7–$15 |
| Polished Concrete | High | Low | Sleek, industrial | $4–$10 |
| LVT (Luxury Vinyl Tile) | Medium | Low | Wood/stone look | $2–$7 |
| Ceramic Tile | Medium | Medium | Varied | $5–$12 |
Metallic epoxy is more expensive than basic flooring but offers unmatched customization and long-term savings on maintenance.
Color And Design Ideas
You can create endless effects with metallic epoxy. Some popular styles include:
- Cloud effect: Swirl two or three colors for a cloudy or smoky look.
- Veins or rivers: Drag a stick or brush through wet epoxy to create marble-like veins.
- Solid shimmer: Use one color for a bold, uniform metallic shine.
- Galaxy effect: Blend black, blue, and silver pigments for a cosmic look.
Pro insight: If you’re unsure, try a small test board first. Metallic epoxy always looks different when applied on a large area.
Cost And Time Estimates
It’s smart to plan your budget and schedule before starting.
Cost Breakdown (per 500 Sq.ft.)
| Item | Estimated Cost |
|---|---|
| Epoxy kit (primer, base, topcoat) | $700–$1,200 |
| Metallic pigments | $150–$300 |
| Tools and supplies | $300–$600 |
| Protective gear | $50–$100 |
| Total | $1,200–$2,200 |
Time Breakdown
- Surface preparation: 4–8 hours
- Priming: 2–3 hours (plus drying time)
- Metallic epoxy application: 4–6 hours
- Topcoat application: 2–3 hours
- Curing: 2–7 days (before full use)
When To Hire A Professional
DIY metallic epoxy flooring is possible, but not for everyone. You should consider hiring a pro if:
- Your concrete is badly damaged or uneven
- The space is over 1,000 sq.ft.
- You want a very complex design (like company logos or 3D effects)
- You don’t have access to grinders or safety gear
- You don’t have help—epoxy sets fast
Non-obvious insight: Many professionals use two or three people for a single floor—one mixes, one pours, one spreads and swirls. This teamwork prevents mistakes and helps maintain quality.
Maintenance And Long-term Care
A metallic epoxy floor is easy to keep looking new, but a few tips will extend its life:
- Sweep or vacuum regularly to remove grit that can scratch the surface.
- Mop with a damp mop and mild soap—avoid acidic or abrasive cleaners.
- Wipe spills quickly, especially chemicals or oils.
- Recoat every 5–7 years if the surface loses its shine or gets scratched.
- Avoid dragging heavy objects—use furniture pads or lift instead.
If you notice dull spots, you can buff them with a soft pad and reapply a thin topcoat.
Safety And Environmental Tips
Epoxy resins are safe when handled correctly, but precautions are important.
- Always work in a well-ventilated area. Fumes can be strong, especially when mixing.
- Wear a respirator to avoid breathing in vapors.
- Use gloves and goggles to protect skin and eyes from splashes.
- Keep pets and children away from the area until the floor is fully cured.
Most modern epoxies have low VOC (volatile organic compounds), but always check the safety data sheet for your product. Dispose of unused resin and hardener according to local rules.
If you want to learn more about epoxy chemistry and safety, check the Epoxy Wikipedia page.
Frequently Asked Questions
How Long Does A Metallic Epoxy Floor Last?
With proper preparation and care, a metallic epoxy floor can last 10–20 years in homes and 7–12 years in high-traffic commercial spaces. The key is regular maintenance and recoating when needed.
Can I Apply Metallic Epoxy Over Old Tiles Or Wood?
It’s not recommended. Epoxy bonds best to bare, clean concrete. Old tiles and wood can move, flex, or have hidden moisture, which causes the epoxy to lift or crack. Remove old flooring and prepare the concrete for best results.
Is Metallic Epoxy Slippery When Wet?
The standard finish is smooth and can be slippery if wet or oily. To improve safety, you can add anti-slip aggregates or use a satin topcoat. This is important in kitchens, garages, or public spaces.
How Do I Fix Bubbles Or Blisters In My Floor?
Bubbles usually come from trapped air or moisture. To fix them, sand the affected area after the floor cures, clean away dust, and reapply a thin layer of epoxy topcoat. Always check for moisture before starting.
Can I Do Metallic Epoxy Flooring By Myself?
Yes, but it requires patience, the right tools, and careful following of each step. Beginners often underestimate the importance of surface prep and timing. If you’re unsure, start with a small area or get help from someone with experience.
Applying a metallic epoxy floor is a rewarding project that gives any space a bold, modern look. With the right preparation, tools, and knowledge, you can achieve a result that not only looks amazing but lasts for years. Take your time with each stage, don’t skip the details, and your floor will shine with beauty and strength.