Every kitchen relies on clean water and efficient fixtures, but few people think about the kitchen faucet aerator—that small screen hidden at the tip of the faucet. If you own a Delta pull-down kitchen faucet, you might not know that a dirty aerator can cause low water pressure, spraying, or even water that tastes odd. Cleaning this little piece can solve many common problems and make your faucet perform like new. This guide will show you, step by step, how to clean a Delta pull-down kitchen faucet aerator, why it matters, and how to avoid common mistakes that many homeowners make.
Let’s walk through everything you need to know, even if you’ve never repaired a faucet before. You’ll learn what an aerator does, how to take it out without tools, the best cleaning methods, and how to put it back together without leaks.
We’ll also cover what to do if your aerator is stuck, how to spot early warning signs, and ways to keep your faucet running smoothly for years.
What Is A Faucet Aerator And Why Does It Matter?
A faucet aerator is a small mesh screen or disk at the tip of your kitchen faucet. For Delta pull-down faucets, the aerator is often inside the spray head, not visible until you remove the head.
The aerator serves several important functions:
- Mixes air with water to reduce splashing and save water.
- Filters debris like sand, rust, or scale from your pipes.
- Improves water pressure by controlling flow.
If the aerator gets clogged with mineral deposits or dirt, you might notice:
- Low water pressure
- Uneven spray patterns
- Water spraying sideways or in strange directions
- Odd tastes or odors
A clogged aerator wastes water and energy, so cleaning it is essential for both performance and efficiency.
Signs Your Delta Pull-down Faucet Aerator Needs Cleaning
Many people don’t realize their faucet’s problems come from a dirty aerator. Here are the top signs it’s time to clean yours:
- Sudden drop in water pressure – If water flows slower than usual, the aerator may be blocked.
- Water spraying unevenly – Instead of a smooth stream, water splashes or sprays sideways.
- Visible dirt or buildup – Look for white or green crust around the faucet tip.
- Strange tastes or smells – Mineral buildup can cause water to taste metallic or musty.
- Noisy faucet operation – Whistling or “chattering” sounds can mean the aerator is blocked.
- Regular maintenance schedule – Even without problems, cleaning every 3-6 months prevents buildup.
Noticing any of these? Cleaning your aerator is a quick fix that solves most issues.
Tools And Supplies You’ll Need
Cleaning a Delta pull-down faucet aerator is simple, but having the right tools makes the job easier. Here’s what you’ll need:
- Soft cloth or towel (to protect sink and faucet)
- Small bowl (for soaking parts)
- White vinegar (for dissolving mineral deposits)
- Old toothbrush (for scrubbing)
- Needle-nose pliers or Delta aerator key (optional, only if aerator is stuck)
- Paperclip or safety pin (for small debris)
- Plumber’s tape (optional, if you remove spray head)
- Bucket (to catch drips)
Pro tip: Many Delta pull-down faucets have a “cache” aerator—meaning it’s hidden inside the spray head. You won’t need special wrenches for most models, but always check your faucet’s manual.
How To Remove The Aerator From A Delta Pull-down Faucet
Delta pull-down faucets often use a different aerator than standard faucets. Here’s how to access it:
- Turn off the water (optional for basic cleaning, but safer if you remove the whole spray head).
- Pull down the spray head so you can work easily.
- Unscrew the spray head from the hose. Most Delta pull-down heads twist off counterclockwise. Place a towel in the sink to catch drips.
- Look inside the spray head. The aerator is usually a small disk or screen inside.
- Tap the spray head gently in your palm. The aerator may fall out. If not, use a paperclip to gently pry it loose.
- If it’s stuck, try soaking the spray head tip in vinegar for 10 minutes, then try again.
Warning: Never force the aerator out with metal tools, as this can damage the spray head or aerator.
Aerator Removal Comparison: Standard Vs. Delta Pull-down
Here’s a quick look at how Delta’s pull-down faucet design differs from standard faucets:
| Feature | Standard Faucet | Delta Pull-Down Faucet |
|---|---|---|
| Aerator Location | Tip of faucet spout | Inside spray head |
| Removal Tool Needed | Often, adjustable wrench | Usually none (sometimes Delta key) |
| Common Issues | Stuck threads, leaks | Hidden aerator, hard to access |
Knowing your faucet type helps you avoid mistakes and unnecessary force.
Cleaning The Aerator: Step-by-step Guide
Cleaning a Delta aerator is easy once you have it out. Here’s the process:
- Rinse loose debris. Hold the aerator under running water to remove sand or dirt.
- Soak in vinegar. Place the aerator in a small bowl of white vinegar. Soak for 30 minutes to dissolve calcium and lime scale.
- Scrub gently. Use an old toothbrush to clean both sides of the screen and any plastic or rubber parts.
- Remove stubborn debris. If holes are still blocked, gently poke them with a paperclip or safety pin.
- Rinse thoroughly. After cleaning, rinse the aerator with clean water to remove any vinegar or loosened debris.
- Dry completely. Let the aerator air-dry for a few minutes before reinstalling.
Insider tip: If you have hard water, add a pinch of baking soda to the vinegar for extra cleaning power.
Cleaning Spray Head And Hose
While the aerator soaks, take a few minutes to clean the spray head:
- Fill a bowl with vinegar.
- Submerge just the spray face, not the hose or handle.
- Scrub spray holes with a toothbrush.
- Rinse and dry.
This keeps your whole faucet clear and working well.
Reassembling And Reinstalling The Aerator
Once your aerator is clean and dry, it’s time to put everything back together.
- Insert the aerator back into the spray head, making sure it sits flat and snug.
- Screw the spray head back onto the hose. Hand-tighten only; over-tightening can damage gaskets.
- Turn on the water and test for leaks.
- Check the spray pattern. Water should flow smoothly, with no sideways sprays or weak spots.
If you notice leaks: Try loosening and re-tightening the spray head, or check if the rubber gasket is out of place.
If water pressure is still low: There may be debris in the hose or supply lines. Repeat the cleaning, or flush the lines.
Troubleshooting Common Aerator Problems
Even with careful cleaning, you might run into issues. Here’s how to solve the most common problems:
1. Aerator Is Stuck
Sometimes, mineral buildup “glues” the aerator in place.
- Soak the faucet tip or spray head in vinegar for 30 minutes.
- Try gently twisting with a rubber jar opener.
- Never use excessive force; you could break the faucet.
2. Aerator Falls Out After Cleaning
This usually means it’s not seated properly.
- Check the orientation of the aerator disk.
- Make sure all rubber gaskets are in place.
- Re-insert and gently press until it clicks or feels secure.
3. Still Low Water Pressure
If cleaning the aerator doesn’t solve the issue:
- Check the supply lines for kinks or blockages.
- Make sure shutoff valves under the sink are fully open.
- Test the faucet without the aerator—if pressure is normal, the aerator needs more cleaning.
4. Leaks Around Spray Head
Leaks often come from misplaced gaskets or loose threads.
- Inspect all rubber washers and gaskets.
- Apply plumber’s tape to threads if needed.
- Hand-tighten only; do not over-tighten.
5. Strange Noises
Whistling or vibrating sounds usually mean debris is still present.
- Remove and re-clean the aerator.
- Flush the lines by running water without the aerator for 30 seconds.
How Often Should You Clean Your Aerator?
Regular cleaning keeps your Delta pull-down faucet in top shape. Most experts recommend:
- Every 3-6 months for average homes
- Every 1-2 months if you have hard water or older pipes
- After plumbing work—pipes may release extra debris
If you notice sudden changes in water pressure, clean the aerator immediately.
Credit: www.ebay.com
Preventing Aerator Buildup: Pro Tips
Keeping your aerator clean is easier than fixing problems after they start. Here are some practical tips:
- Install a water filter if you have hard water. This reduces scale and mineral deposits.
- Wipe the faucet tip regularly to prevent visible buildup.
- Flush the faucet after plumbing repairs or water outages; open the faucet fully for 1-2 minutes before reinstalling the aerator.
- Use only gentle cleaners. Avoid harsh chemicals that can damage rubber gaskets or plastic parts.
- Check for leaks after every cleaning to catch issues early.
Advanced insight: Many people forget that cleaning only the visible side of the aerator isn’t enough. Mineral deposits can build up on both sides, so always remove the disk for a full clean.
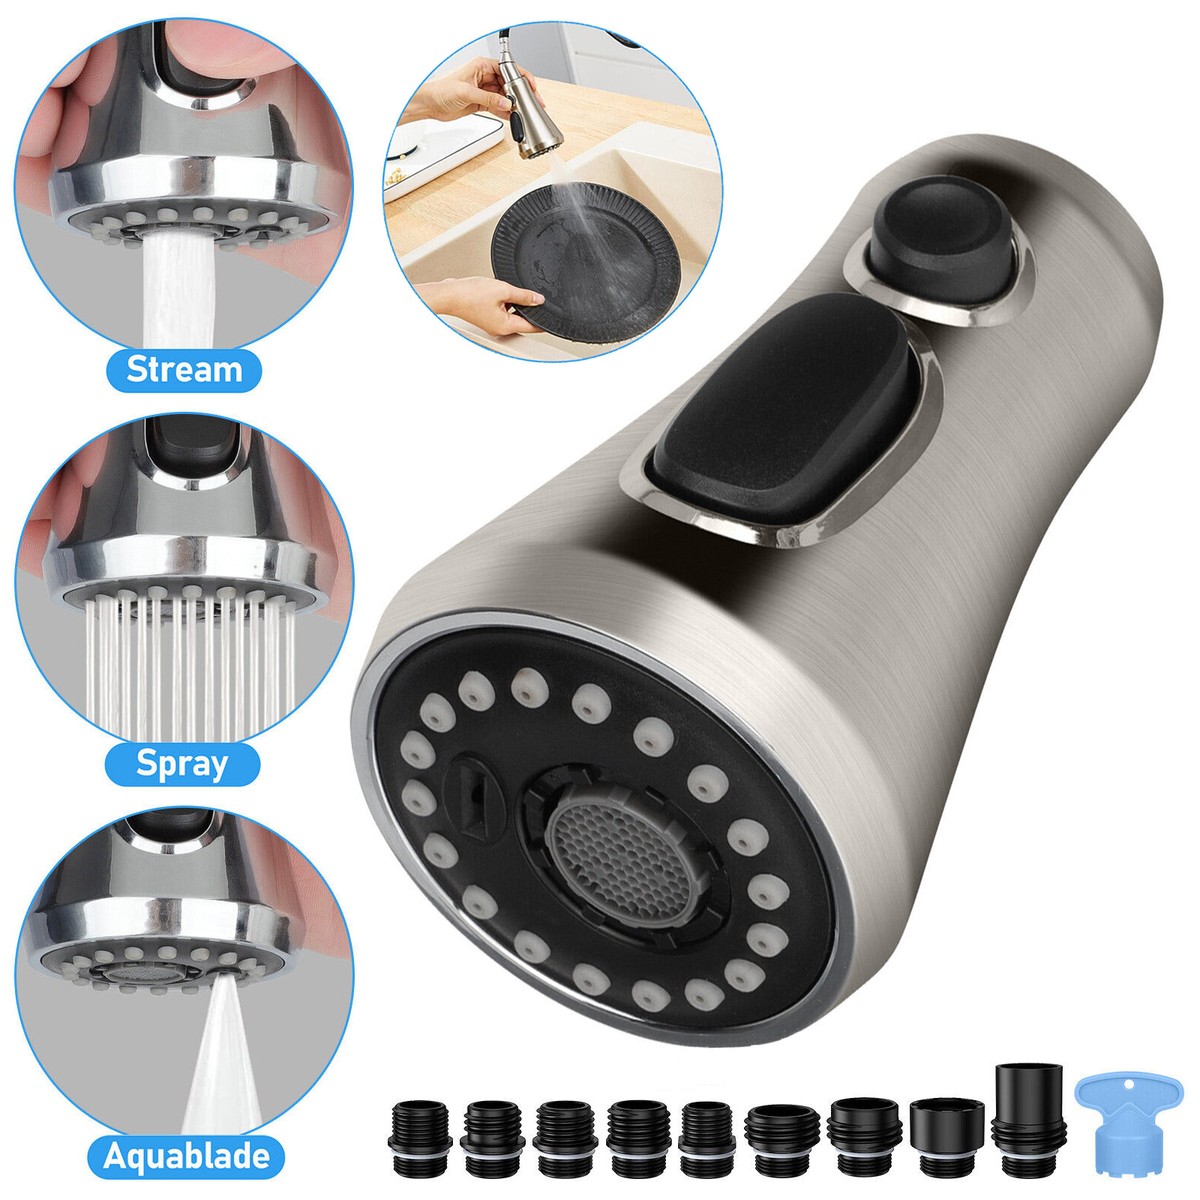
Understanding Delta Aerator Types
Delta makes several types of aerators for pull-down faucets. Knowing your type helps you buy replacements or use the right tool.
Common Delta Aerator Types
- Cache (hidden) aerator – Sits inside the spray head, not visible from outside.
- Threaded aerator – Screws onto the outside of the spout. Less common for pull-down models.
- Integrated spray/aerator – Aerator is part of a single spray cartridge.
Fact: Most new Delta pull-down faucets use cache or integrated aerators. Check your manual for the exact type.
Aerator Sizes
Delta aerators come in several sizes (usually 0. 5 to 2. 2 gallons per minute). If you need a replacement, take the old one to the hardware store for a match.
When To Replace The Aerator Instead Of Cleaning
Most aerators can be cleaned many times, but sometimes replacement is best.
Replace your aerator if:
- It’s cracked or broken
- Rubber gaskets are missing or damaged
- Severe mineral buildup won’t dissolve
- Spray pattern remains bad after cleaning
Aerators are inexpensive—usually $5 to $15—and available at hardware stores or from Delta directly.
Mistakes To Avoid When Cleaning Your Delta Aerator
Some homeowners make simple mistakes that can damage their faucet or make problems worse. Avoid these:
- Using metal tools – This can scratch or deform the aerator or spray head.
- Skipping the gasket check – Missing or misaligned gaskets lead to leaks.
- Forcing parts – If it doesn’t come apart easily, soak it in vinegar instead of applying more force.
- Using harsh chemicals – Bleach or limescale removers can damage rubber and plastic.
- Reassembling wet – Moisture can cause leaks or mold; dry all parts first.
Bonus tip: Always keep a towel in the sink to catch small parts. Aerators are easy to drop down the drain!
Comparing Different Cleaning Methods
Homeowners often ask if there’s a “best” cleaning solution for aerators. Here’s how popular methods compare:
| Method | Effectiveness | Time Needed | Safety |
|---|---|---|---|
| White vinegar soak | Very high | 30-60 minutes | Safe for all parts |
| Baking soda paste | Moderate | 15-30 minutes | Safe |
| Chemical limescale remover | High | 10-20 minutes | Not safe for rubber/plastic |
| Scrubbing only | Low | 10-15 minutes | Safe, but less effective |
Vinegar soaking is the safest and most effective method for most Delta aerators.
The Impact Of Hard Water On Your Delta Faucet
Hard water—water with high mineral content—causes most aerator problems. Homes with hard water see faster buildup and more frequent clogs.
- US Geological Survey says about 85% of US homes have hard water.
- Signs of hard water: White spots on faucets, soap scum, frequent aerator clogs.
Solution: Consider a whole-house or under-sink water filter. Over time, this reduces the need for frequent aerator cleaning and extends your faucet’s life.
For more about water hardness, see the Wikipedia page on hard water.
How A Clean Aerator Saves Money
It’s not just about looks. A clean aerator helps:
- Reduce water waste – Clogged aerators can increase flow by 30%, wasting gallons per day.
- Lower energy bills – Efficient water flow means less hot water waste.
- Prevent expensive repairs – Neglected aerators can lead to leaks or broken faucet parts.
Fact: EPA studies show that cleaning or replacing faucet aerators is one of the cheapest ways to save water at home.
When To Call A Plumber
Most aerator cleaning is DIY-friendly, but sometimes you need expert help:
- Aerator is corroded and fused in place
- Leaking continues after gasket replacement
- Multiple faucets have low pressure (may be a supply issue)
- You see rust or black debris in the water
Don’t risk damaging your faucet—call a plumber if you’re stuck.

Credit: www.youtube.com
Step-by-step Summary: Clean Your Delta Pull-down Faucet Aerator
Here’s a quick recap for busy readers:
- Pull down and unscrew the spray head.
- Remove the aerator disk or screen.
- Soak in white vinegar for 30 minutes.
- Scrub with a toothbrush; clear holes with a paperclip.
- Rinse and dry all parts.
- Reassemble and test for smooth water flow.
- Repeat every 3-6 months or as needed.
Frequently Asked Questions
How Do I Know If My Delta Pull-down Faucet Uses A Cache (hidden) Aerator?
Most modern Delta pull-down faucets use cache aerators, which are hidden inside the spray head. If you don’t see a metal ring or screen at the tip, yours is likely cache. Check your faucet’s manual or the Delta website for your specific model.
Can I Clean The Aerator Without Removing The Spray Head?
For a thorough cleaning, you should remove the spray head and aerator. Simply soaking or scrubbing the outside will not remove mineral buildup inside the disk. However, if you can’t remove it, regular soaking in vinegar may help reduce surface buildup.
What If I Lose A Gasket Or Small Part During Cleaning?
If you lose a gasket or small plastic piece, your faucet may leak or spray oddly after reassembly. Delta sells replacement parts online, or you can find generic gaskets at hardware stores. Always assemble over a towel to catch small pieces.
How Long Should I Soak The Aerator In Vinegar?
A 30-minute soak in white vinegar is usually enough for light to moderate buildup. For heavy limescale, soak up to 2 hours. Rinse well after soaking to avoid vinegar taste in your water.
Is It Safe To Use Bleach Or Harsh Cleaners On The Aerator?
No. Bleach and strong chemical descalers can damage plastic and rubber parts, causing leaks or failures. Stick to white vinegar and gentle scrubbing for best results.
A clean aerator is the secret to a powerful, efficient kitchen faucet. With the right tools and a little care, your Delta pull-down faucet will work perfectly for years—saving water, energy, and money while making your kitchen a more pleasant place to cook and clean.
Credit: www.youtube.com