Baking can feel like magic—until you realize you’re missing a key tool. A recipe calls for a springform pan. You check your cupboards and… nothing. Panic? Not needed. There are smart, effective ways to bake cakes, cheesecakes, and tortes without a springform pan.
Whether you’re a home baker, a kitchen beginner, or just want to avoid buying a single-use pan, knowing springform pan substitutes can save your dessert and your day.
Understanding the alternatives is more than just grabbing any round pan. Texture, release, and presentation all matter, especially for delicate treats. In this guide, you’ll learn the best springform pan substitutes, how to use them, and tips for perfect results—even when you don’t have the “right” equipment.
You’ll also see helpful comparison tables, get answers to common questions, and discover a few tricks even experienced bakers sometimes miss.
What Is A Springform Pan And Why Is It Special?
Before exploring substitutes, let’s quickly look at what makes a springform pan unique. It’s a round baking pan with removable sides, held in place by a latch or “spring.” When you open the latch, the sides lift off, letting you remove delicate desserts without flipping or damaging them. This is why cheesecake, torte, and layered mousse cakes often call for a springform pan.
Key advantages:
- Easy release for fragile desserts
- Neat edges and professional look
- Works for both baked and no-bake recipes
Why do you need a substitute? Maybe you bake only once in a while. Maybe your pan broke. Or maybe you just want to avoid extra clutter in your kitchen. Whatever the reason, the right substitute can give great results—if you know what to choose.
Essential Qualities To Look For In A Substitute
Not every baking pan is a good stand-in for a springform. Here’s what your substitute needs:
- Removable or accessible base: To avoid damaging the dessert
- Leak resistance: Especially for batters or water baths
- Size similarity: So baking times and textures stay close to the original recipe
- Safe for oven use: Some no-bake options also work, but most substitutes should handle heat
A good substitute will let you remove the cake easily, hold batters without leaking, and fit your recipe’s size. Now, let’s get into the top options.
:max_bytes(150000):strip_icc()/springform-pan-0622-1-14fe56ac83af4df09ba0269fde5f93a4.jpg)
Credit: www.marthastewart.com
Top Springform Pan Substitutes And How To Use Them
1. Traditional Cake Pan
A round cake pan is the first thing most bakers reach for. It’s sturdy and comes in many sizes. But cake pans have fixed sides, so removal is trickier.
How to use:
- Line the bottom and sides with parchment paper. Leave extra hanging over the edges for easy lifting.
- Cool the dessert completely before removing. For delicate cakes, freeze for 1-2 hours first.
- Run a thin knife around the edge to loosen.
- Lift out gently using the parchment “handles.”
Best for: Cheesecakes, mousse cakes, tortes.
Word of caution: Thick batters work best. Very thin or runny fillings may leak if the pan isn’t perfectly sealed.
2. Removable Bottom Pan
These pans, often called push pans, have a loose base that fits into a metal ring. They’re popular for tarts, but work for many springform recipes.
How to use:
- Line the bottom with parchment if you want easier removal.
- Place the pan on a baking sheet to catch leaks.
- After baking, push up the base to release the dessert.
Advantages:
- Similar function as springform with fewer moving parts
- Less likely to jam or warp
Limitation: Some pans may leak, especially with watery batters. Always use a tray underneath.
3. Pie Pan
A pie pan is a common kitchen staple. The slanted sides make it easy to scoop slices. It’s not a perfect substitute, but works for many recipes.
How to use:
- Choose a deep-dish pan for thicker cakes.
- Line with parchment if possible.
- Let dessert cool fully before slicing.
- Serve directly from the pan, or carefully invert onto a plate.
Best for: Dense or baked cheesecakes, crumb crusts.
Tip: Presentation may not be as neat as with a springform, but taste is unaffected.
4. Disposable Aluminum Pans
You’ll find foil pans in most grocery stores. They’re cheap, widely available, and you don’t need to worry about cleanup.
How to use:
- Support the pan on a sturdy baking sheet.
- Grease or line with parchment for easier removal.
- Cool completely before peeling off the foil.
Best for: Potlucks, bake sales, giving away desserts.
Note: Aluminum is thin and bends easily. Handle with care to avoid spills.
5. Silicone Cake Pan
Silicone bakeware is flexible and nonstick, so desserts pop right out. These pans come in round, square, and novelty shapes.
How to use:
- Place the silicone pan on a solid baking sheet before filling (for support).
- Bake as usual.
- Cool, then peel the pan away from the cake.
Advantages:
- No need for extra greasing
- Resists sticking and breaking
Downsides: May not brown as evenly as metal pans. Some silicone pans have a slight odor the first few uses.
6. Glass Baking Dish
A glass dish (like Pyrex) is a great backup. It’s sturdy, widely owned, and works for both baked and no-bake desserts.
How to use:
- Grease or line with parchment.
- Let dessert cool fully in the dish.
- Slice and serve directly, or use a spatula to lift pieces.
Best for: Cheesecakes, custards, refrigerated desserts.
Tip: Glass heats slowly, so baking times may be longer. Check for doneness with a toothpick or skewer.
7. Tart Pan With Removable Bottom
Tart pans are usually shorter than springform pans, but the removable bottom is ideal for easy release.
How to use:
- Grease and line as needed.
- Place on a sheet tray to catch leaks.
- Push up from the bottom to release the dessert after cooling.
Best for: Thin cheesecakes, tarts, flans.
Limitation: Sides are often lower, so adjust your recipe’s volume if needed.
8. Casserole Dish
A casserole dish (ceramic or glass) is deep and sturdy. It’s not round, but works well for home baking.
How to use:
- Grease or line with parchment paper.
- Pour in the batter.
- Cool before slicing and serving from the dish.
Best for: Dense desserts, baked cheesecakes, layered bars.
Tip: If you want to remove the entire dessert, freeze it first for easier lifting.
9. Muffin Or Cupcake Pan
For mini versions of springform desserts, a muffin tin is perfect. You get individual servings with less mess.
How to use:
- Line with paper or silicone liners.
- Fill each cup with batter.
- Bake and cool, then lift out by the liner.
Best for: Mini cheesecakes, mousse cups, tarts.
Bonus: Great for parties and portion control.
10. Sheet Pan With Diy Foil Walls
If you don’t have a round pan at all, use a sheet pan with a homemade mold.
How to use:
- Shape heavy-duty foil into a circle (or square) with high edges.
- Place on a parchment-lined sheet pan.
- Fill and bake as usual.
- Peel away foil after cooling.
Best for: Creative shapes, emergency fixes.
Limitations: Stability can be an issue. Use several layers of foil for extra strength.
11. Cast Iron Skillet
A cast iron skillet is not just for frying. It heats evenly and gives your dessert a rustic look.
How to use:
- Grease the pan well.
- Pour in batter and bake as directed.
- Cool, then cut and serve from the skillet.
Best for: Rustic cheesecakes, brownies, deep-dish desserts.
Tip: Skillets are heavy, so be careful moving them in and out of the oven.
12. Loaf Pan
A loaf pan is rectangular, but works for many springform recipes—especially if you don’t mind a different shape.
How to use:
- Grease or line with parchment.
- Pour in the batter, bake, and cool.
- Lift out using the parchment, or invert onto a plate.
Best for: Cheesecake bars, ice cream cakes, layered desserts.
Tip: Baking time may change due to pan depth.
13. Pressure Cooker Insert
Believe it or not, the insert pan from a pressure cooker can work in the oven (if oven-safe). It’s deep and round, like a springform.
How to use:
- Grease or line with parchment.
- Fill and bake as usual.
- Cool, then use a knife to loosen the sides.
Best for: Deep cheesecakes, thick cakes.
Caution: Not all inserts are oven-safe. Check before using.
14. Soufflé Dish Or Ramekins
Soufflé dishes and ramekins are great for small, individual desserts or deep, shareable cakes.
How to use:
- Grease or line with parchment.
- Fill with batter and bake.
- Serve directly from the dish.
Best for: Single-serve cheesecakes, mousse, custards.
Tip: For larger soufflé dishes, adjust bake time.
15. Diy Parchment Collar In A Regular Pan
Don’t have anything special? Use a parchment paper collar in a regular cake pan.
How to use:
- Cut a strip of parchment to line the sides, extending above the pan.
- Add a parchment circle to the bottom.
- Fill with batter, bake, and let cool.
- Lift the cake out using the collar.
Best for: Tall cakes, delicate desserts, sticky batters.
Bonus: Parchment prevents sticking and helps with smooth edges.
—
Let’s compare the most popular substitutes:
| Substitute | Best For | Ease of Removal | Leak Resistance |
|---|---|---|---|
| Traditional Cake Pan | Cheesecakes, tortes | Moderate | Good |
| Removable Bottom Pan | Tarts, cakes | Easy | Fair |
| Pie Pan | Dense cakes | Difficult | Good |
| Disposable Aluminum Pan | Potlucks | Easy (peel off) | Good |
| Silicone Pan | Sticky desserts | Very easy | Good |
How To Choose The Best Substitute For Your Recipe
With so many options, how do you pick the right one? Here’s a quick decision guide:
Consider The Dessert Type
- Cheesecake: Needs gentle removal. Try a removable bottom pan, lined cake pan, or silicone pan.
- Mousse/No-Bake Cakes: Nonstick or lined pans are best. Avoid pans that need flipping.
- Dense Cakes/Bars: Sturdy enough for almost any pan. Pie pans, loaf pans, or casserole dishes work well.
- Mini Desserts: Use muffin tins or ramekins.
Match Pan Size
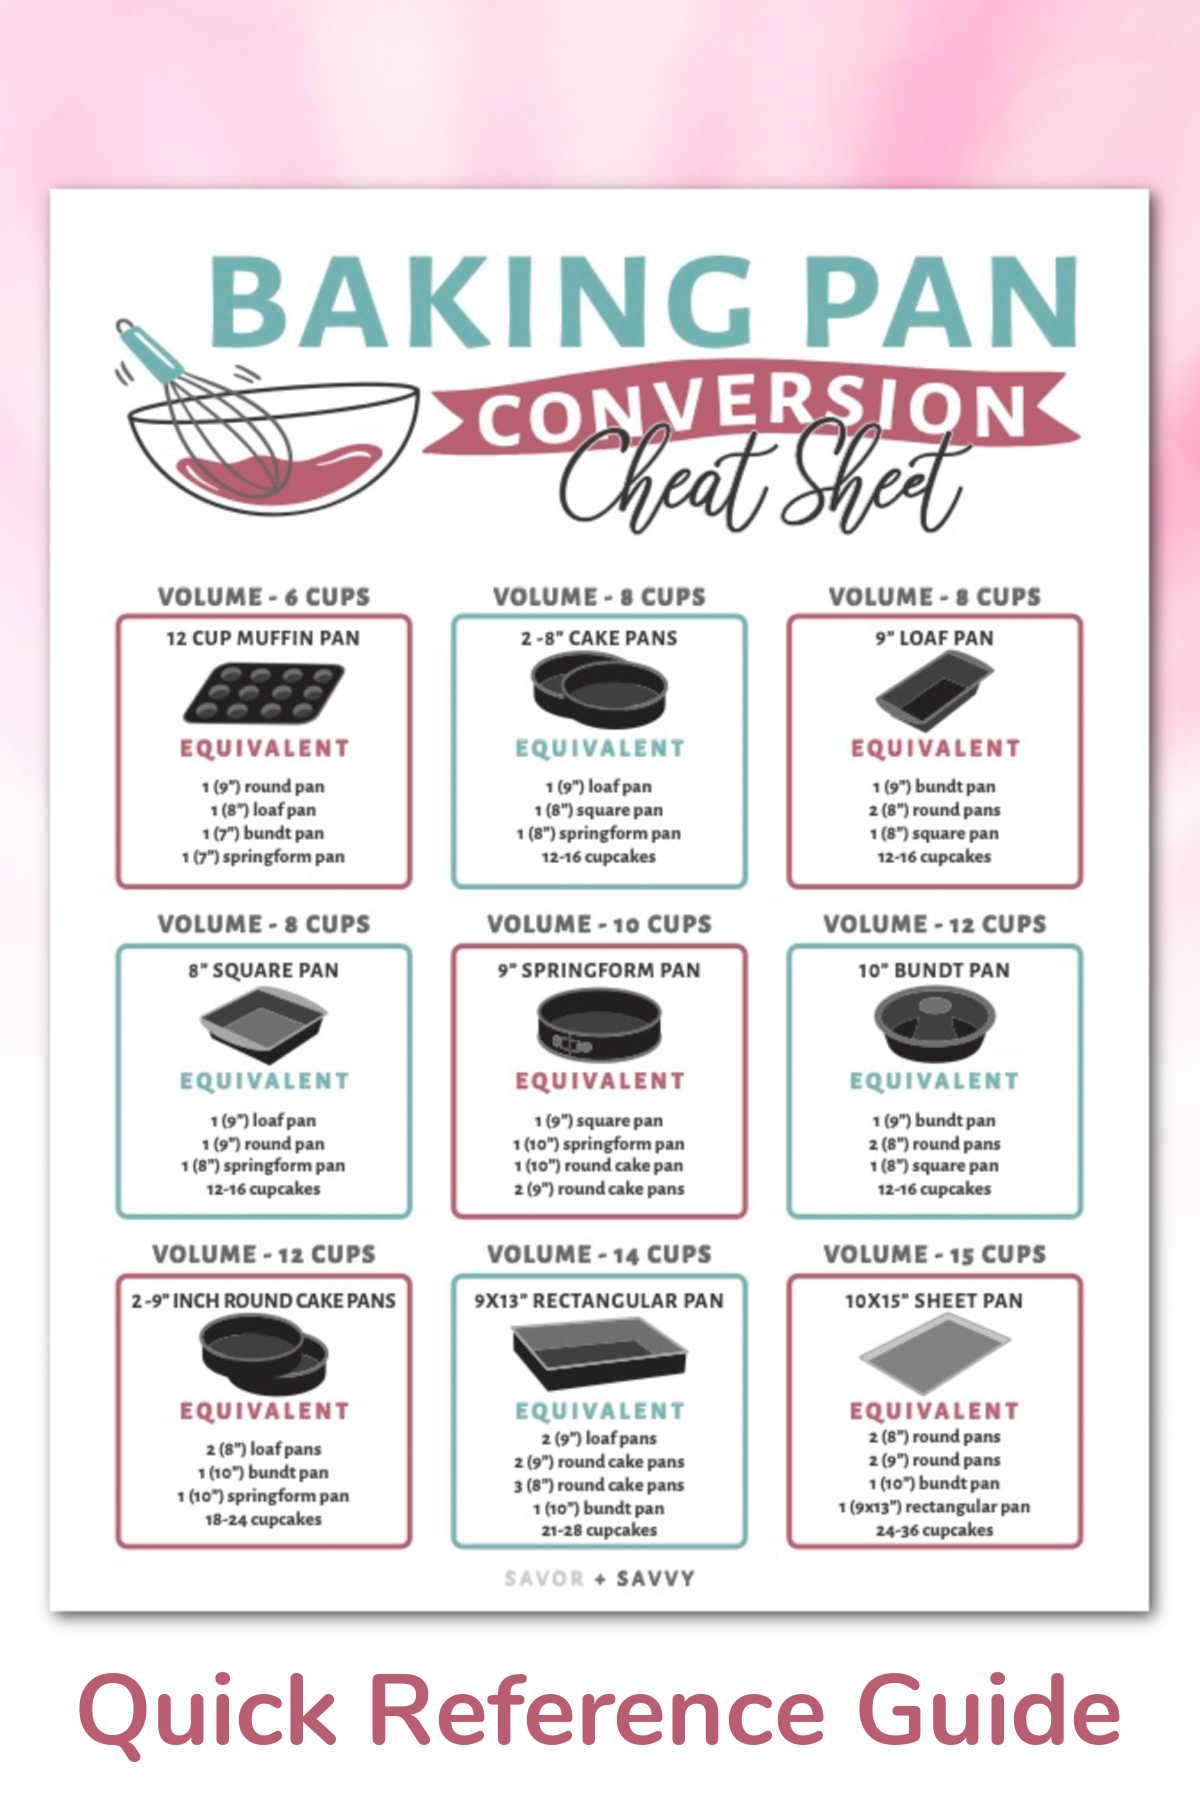
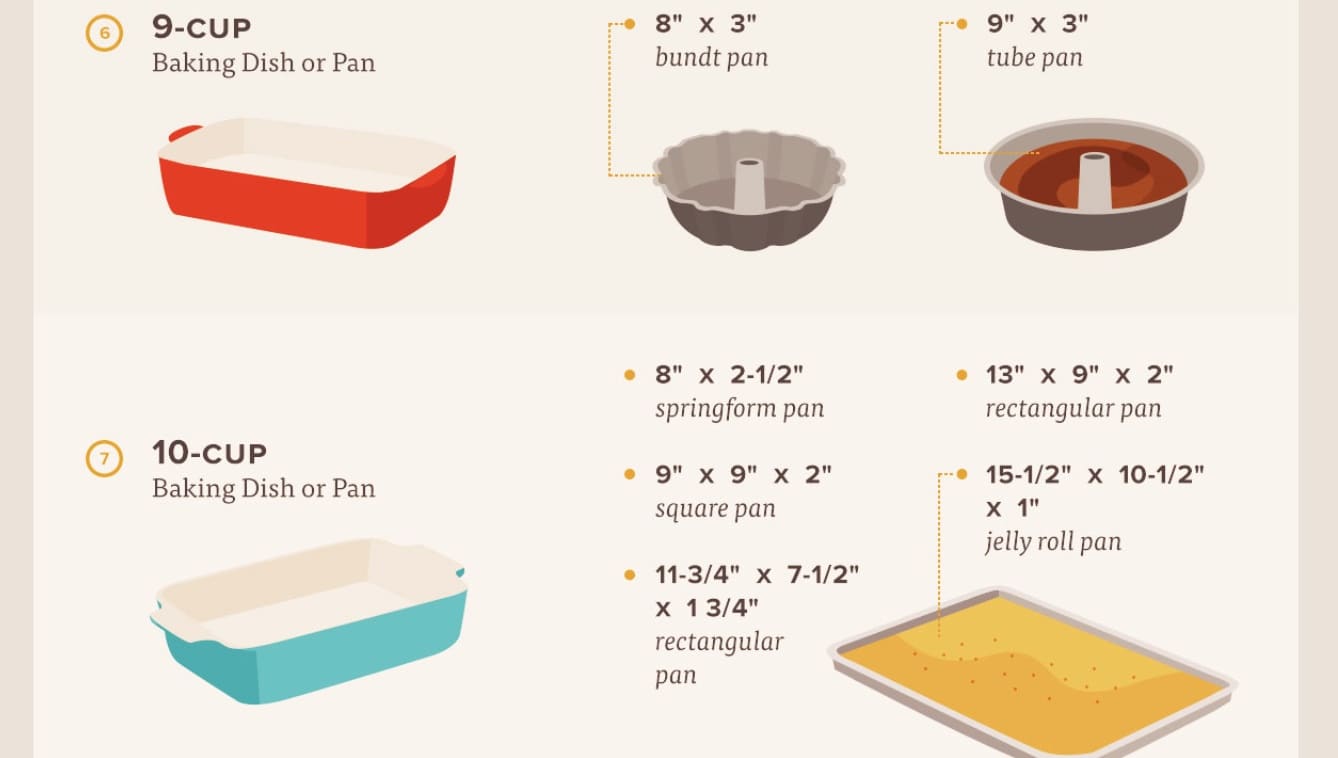
Most springform pans are 8 or 9 inches in diameter. If your substitute is a different size, adjust the baking time:
- Smaller pan: Increase bake time, lower oven temperature slightly.
- Larger pan: Decrease bake time.
Leak Potential
If your recipe uses a water bath (bain-marie), choose a pan with minimal seams, or wrap the outside with heavy-duty foil.
Presentation
If you want a perfect look for a special event, a removable bottom or silicone pan is ideal. For family dinners, a pie or casserole dish is just fine.
—
Here’s a handy pan size comparison:
| Common Springform Size | Closest Substitute Size | Volume (Approx.) |
|---|---|---|
| 9-inch round (2.5” deep) | 9-inch cake pan | 10 cups |
| 8-inch round (2.5” deep) | 8-inch pie pan | 8 cups |
| 9×5-inch loaf pan | 8-inch square pan | 8 cups |
Step-by-step: Using A Cake Pan As A Springform Substitute
Let’s walk through a practical example using a regular cake pan for cheesecake:
- Cut parchment paper: Line the bottom and sides, leaving a 2-inch overhang.
- Prepare your crust and filling: As you would for a springform pan.
- Pour and bake: Fill the lined pan and bake as directed.
- Cool completely: Chill in the fridge for several hours (or overnight).
- Loosen the edges: Run a thin knife around the sides.
- Lift out: Gently pull up on the parchment to remove the cake.
- Peel off the paper: Place on a serving plate and enjoy.
Non-obvious tip: Freezing the cheesecake for 30–60 minutes before removal makes it firmer and easier to lift without cracking.
Common Mistakes When Using Substitutes
Even experienced bakers make errors when switching pans. Avoid these common mistakes:
- Forgetting to line the pan: This makes removal much harder.
- Ignoring pan size differences: If your pan is deeper or shallower, adjust bake time and check for doneness.
- Overfilling: Most substitutes have different capacities—fill only 3/4 full to prevent spills.
- Skipping a leak test: If you’re unsure, add a little water to the empty pan and see if it leaks before using batter.
Advanced Tips For Perfect Desserts Without A Springform Pan
Here are some expert-level tricks you won’t find in most guides:
- Double up pans: If you’re worried about leaks, place your substitute pan inside a slightly larger pan. This creates a “barrier” and protects your oven.
- Use acetate sheets: For mousse or layered cakes, line the sides with clear acetate for a professional look and easy release.
- Invert with confidence: For sturdy cakes, invert onto a plate lined with parchment, then flip again onto a serving dish for a smooth top.
Another overlooked trick: For no-bake recipes, you can often assemble the dessert in a pan lined with plastic wrap or parchment, then lift out the entire cake once chilled.
When Not To Substitute
Sometimes, a springform pan is the only smart choice—especially for very runny batters, multi-layered tortes, or when you need a flawless, tall edge. For most home baking, though, these situations are rare. If you bake cheesecakes or similar desserts only once or twice a year, a substitute works just fine with careful prep.
Caring For Your Substitute Pans
Using a pan for a job it wasn’t designed for? Protect it:
- Grease well: Even “nonstick” pans can stick with sticky batters.
- Avoid metal knives: When removing desserts, use plastic or silicone tools to avoid scratching.
- Hand wash if unsure: Disposable and nonstick pans last longer with gentle cleaning.
Environmental And Cost Considerations
Buying a springform pan for one recipe can feel wasteful. Substitutes use tools you likely already own. Disposable pans are convenient but create more trash. Silicone pans are reusable and eco-friendly, but more expensive up front.
If you bake often, investing in a quality springform pan pays off. For casual bakers, substitutes are practical and save space.
Here’s a quick look at cost and sustainability:
| Substitute | Average Price (USD) | Reusable? | Eco Impact |
|---|---|---|---|
| Traditional Cake Pan | $10–$20 | Yes | Low |
| Disposable Aluminum Pan | $0.50–$1 each | No | Higher |
| Silicone Pan | $15–$25 | Yes | Very low |
| Pie Pan | $8–$15 | Yes | Low |
For more about sustainable baking tools, see this bakeware guide.
Credit: www.raindanceaz.com
Real-world Examples
Let’s look at two classic recipes and how substitutes work in practice.
Cheesecake In A Cake Pan
A 9-inch springform is standard for New York cheesecake. If you use a 9-inch cake pan:
- Line with parchment (bottom and sides).
- Bake as usual.
- Cool, freeze briefly, then lift out.
Result: The cake will have smooth sides and a sturdy base. Slices as neatly as springform, with a little extra care.
Mousse Cake In A Silicone Pan
Mousse cakes are fragile and can stick. Silicone pans make removal simple:
- No need to line the pan.
- Chill the mousse overnight.
- Peel away the pan for a clean, glossy finish.
Result: Professional-looking dessert, no breakage.
Frequently Asked Questions
What’s The Main Purpose Of A Springform Pan?
A springform pan lets you remove cakes and desserts with soft or delicate sides—like cheesecake—without flipping or damaging them. The removable sides and base make for easy release.
Can I Use A Regular Cake Pan For Cheesecake?
Yes, you can use a regular cake pan. For best results, line it with parchment paper (bottom and sides) and let the cheesecake chill completely before lifting it out. Freezing for 30–60 minutes helps prevent cracking.
Which Substitute Is Best For No-bake Desserts?
For no-bake desserts, silicone pans or regular pans lined with plastic wrap or parchment work best. This helps you lift out the dessert cleanly once it’s set.
How Do I Prevent Leaks With A Substitute Pan?
Wrap the outside of the pan with heavy-duty foil, especially if baking in a water bath. Avoid pans with seams or removable bottoms for very runny batters, or use a lined solid pan as a backup.
Is It Worth Buying A Springform Pan?
If you bake cheesecakes, tortes, or layered mousse cakes often, investing in a springform pan can make baking easier and results more attractive. For occasional bakers, using substitutes with careful prep is usually enough.
Baking is about creativity, not just following rules. With these springform pan substitutes, you can enjoy delicious desserts—no special equipment required. Whether you use a cake pan, silicone mold, or something else, careful preparation and a few smart tricks will give you results to be proud of, every time.
Credit: www.finedininglovers.com