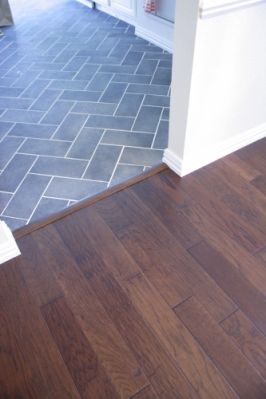
When you walk from one room to another, the change in flooring can make a big difference in how your home feels. A smooth, well-designed transition from tile to wood floor can make spaces feel connected, open, and beautiful. But making this transition look seamless is not always simple.
If done poorly, it can cause tripping hazards, ugly gaps, and even damage your floors. Whether you are renovating your whole house or just one room, understanding how to transition tile to wood floor is an essential skill for a polished, professional look.
People choose to mix tile and wood for many reasons. Tile works well in kitchens and bathrooms because it is water-resistant and easy to clean. Wood brings warmth and comfort to living rooms and bedrooms. But where these two materials meet, the right transition is key.
In this article, you will learn everything you need to know to master this task. You’ll discover the tools, techniques, and products that make transitions look flawless. You will also see common mistakes, practical tips, and expert advice that go beyond the basics.
Understanding The Importance Of Proper Transitions
A tile to wood floor transition is more than just a line between two materials. It has a practical purpose as well as an aesthetic one. Proper transitions help prevent tripping, protect the edges of both floors, and hide any height differences. They also help both floors last longer by reducing wear at the edges. If you skip the right transition, you can end up with chipped tiles, warped wood, or unsightly gaps.
For example, if you have a tile kitchen and a wood living room, the transition area will get a lot of foot traffic. Without a good transition, the edge of the wood can splinter or the tile can crack. Over time, this leads to costly repairs.
A well-planned transition does more than look nice—it keeps your floors safe and strong.
Choosing The Best Transition Method
There is no one-size-fits-all answer for tile to wood transitions. The right method depends on the height, thickness, and style of your floors. Here are the most popular ways to join tile and wood:
- Transition Strips – These are pre-made pieces (often metal, wood, or vinyl) designed to cover the gap and create a smooth slope.
- T-Molding – A T-shaped strip that fits between floors of similar height.
- Reducer Strips – Used when one floor is higher than the other, these create a gentle slope between surfaces.
- Butt Joint – Placing tile and wood right next to each other with only a small gap, usually filled with caulk or grout.
- Custom Inlays – Using stone, metal, or wood pieces for a decorative transition.
Each approach has advantages and disadvantages. Let’s compare some of them:
| Transition Type | Best For | Pros | Cons |
|---|---|---|---|
| Transition Strip | Height differences, durability | Easy to install, covers gaps | May not match all décor |
| T-Molding | Even height floors | Seamless look, many finishes | Needs precise installation |
| Reducer Strip | Uneven floors | Prevents tripping, neat finish | Visible slope, not fully seamless |
| Butt Joint | Minimalist look | No extra materials, modern style | Risk of cracking, needs perfect edges |
| Custom Inlay | Design statement | Unique, tailored to space | More expensive, skilled labor |
Pro tip: Think about cleaning, moisture, and daily traffic when picking your method. A metal strip is easy to clean in a kitchen, while T-molding may be better for bedrooms or hallways.
Planning Your Tile To Wood Floor Transition
Success starts with good planning. Rushing the process can cause problems later. Here’s how to prepare:
Measure Carefully
Start by measuring the length of the area where tile meets wood. Also, check the height of both floors with a level or ruler. Write down these numbers. Even a small height difference can affect your choice of transition.
Choose Materials That Work Together
Some transition strips only work with certain types of floors. For example, thick hardwood may need a different strip than thin laminate. Bring a sample of your tile and wood to the store if you’re not sure.
Think About The Direction
The way the boards or tiles are laid will affect the look. For example, running wood boards parallel to the tiles can make the transition look smoother. If the tile edge is uneven (like a stone floor), you may need a flexible strip or a custom inlay.
Gather Tools And Supplies
You will need:
- A tape measure
- Saw (miter or hand saw for trimming strips)
- Drill and screws (for metal/wood strips)
- Construction adhesive (for glue-down strips)
- Caulk or grout (for butt joints)
- Level
- Safety gear (gloves, goggles)
Beginner tip: Buy a little extra transition material. Mistakes happen, and having backup strips can save you a trip to the store.
Installing A Transition Strip
Transition strips are one of the most popular solutions. They come in many colors, widths, and finishes. Here’s how to install them:
1. Measure And Cut The Strip
Lay the strip over the gap where tile meets wood. Mark the length with a pencil. Use a saw to cut the strip to size. For curved edges, flexible vinyl strips work best and can be trimmed with scissors.
2. Prepare The Area
Clean both floors so there’s no dust or debris. This helps the strip stick better and ensures a smooth finish.
3. Attach The Strip
Some strips snap into a track you screw to the floor. Others glue down directly. Read the manufacturer’s instructions. If using screws, drill small pilot holes to avoid splitting wood or tile.
4. Check For Level
Before securing the strip, place a level across it. The top should sit slightly above both floors but not create a bump. Adjust as needed.
5. Secure The Strip
Glue or screw the strip in place. Press down firmly if using adhesive. Wipe away any excess glue.
6. Let It Set
If using adhesive, let it cure for the recommended time before walking on it—usually 12-24 hours.
Non-obvious insight: For high-traffic areas, metal or solid wood strips last longer than plastic. They also resist scratches better.
Creating A Butt Joint
A butt joint is a simple, modern way to transition from tile to wood without extra strips. It works best when both floors are the same height and meet in a straight line.
Step-by-step:
- Lay the tile and wood so the edges meet, with a gap of 1/8 inch (3mm) for expansion.
- Fill the gap with flexible caulk (for wood) or sanded grout (for tile).
- Smooth the filler with a wet finger or a caulk tool.
- Let it cure for 24 hours before cleaning or heavy use.
Expert tip: Use a color-matched caulk for a nearly invisible seam. This method looks great in open-plan spaces.
Installing T-molding For Same-height Floors
T-molding is a favorite for joining tile and wood at the same height. It’s shaped like a “T” and fits into a small gap between the two floors.
Steps:
- Cut a gap of about 1 inch (2.5cm) between tile and wood.
- Measure and cut the T-molding to fit.
- Insert the vertical part of the T into the gap.
- Tap gently with a rubber mallet until secure.
Some T-molding comes with a track you screw to the subfloor first. Others simply snap in place.
Non-obvious insight: T-molding allows each floor to expand and contract naturally, reducing the risk of warping.
Using Reducer Strips For Uneven Floors
When your tile is higher or lower than your wood floor, a reducer strip provides a smooth slope. This helps prevent tripping and protects both floor edges.
How To Install:
- Measure the gap and the height difference.
- Choose a reducer that matches the height and finish of your floors.
- Cut to length.
- Secure with adhesive or screws, depending on the product.
Reducer strips are often used at doorways or between rooms with different flooring levels.
Beginner mistake to avoid: Do not force a flat strip over a height difference. This can cause the strip to break or pop up.
Custom Inlays For A Unique Look
If you want your transition to stand out, custom inlays are an artistic option. You can use stone, metal, or contrasting wood pieces to make a border or pattern where the floors meet.
How To Create:
- Plan your design. Sketch the pattern and measure the space.
- Cut the inlay material to fit the gap.
- Install the inlay with construction adhesive.
- Fill any small gaps with color-matched caulk or grout.
- Seal the inlay if needed.
Custom inlays are more work, but they create a high-end look. This is a great choice if you want to make a bold statement between two rooms.
Addressing Expansion And Contraction
Both tile and wood floors change size with temperature and humidity. Tile expands less, while wood can swell or shrink. This movement can cause cracks or gaps if not managed properly.
Best practices:
- Always leave a small expansion gap (about 1/8 inch) between tile and wood.
- Fill the gap with flexible caulk, not hard grout, to allow for movement.
- Avoid rigid strips that press tightly against both floors.
Real-world example: In climates with big seasonal changes, wood floors can move a lot. A flexible transition joint prevents damage and makes repairs easier if something goes wrong.
Matching Colors And Styles
A good transition should blend with both the tile and the wood. Here’s how to choose the right look:
- Neutral colors like silver, beige, or brown work with most floors.
- For a modern look, match the strip to your tile.
- For a classic look, choose a wood strip that matches your wood floor.
- For bold style, use a contrasting color or a custom inlay.
If you are unsure, bring samples to the store or ask a flooring expert for advice.
Transition Placement: Where Should The Break Be?
The line where tile meets wood matters. Here are common placement options:
- Doorways – The transition is hidden under the door when closed. This is the most common choice.
- Open Plan Spaces – The line can run in the middle of the room or at a change in function (for example, kitchen to dining).
- Curved or Angled Lines – Adds visual interest but needs flexible strips or custom work.
Pro tip: For open spaces, line up the transition with natural boundaries, like the edge of a kitchen island or the start of a hallway.
Dealing With Uneven Subfloors
A perfect transition depends on a flat base. If your subfloor is uneven, fix it before installing tile or wood.
How to solve:
- Fill low spots with floor-leveling compound.
- Sand down high spots.
- Lay a straightedge across the area to check for gaps or bumps.
Fixing the subfloor before you start saves time and headaches later.
Common Mistakes And How To Avoid Them
Transitioning from tile to wood is not hard, but some mistakes can cause big problems:
- Skipping the expansion gap – This leads to buckling wood or cracked tile.
- Choosing the wrong strip – A strip that is too thick or thin looks bad and may not last.
- Poor cutting – Uneven cuts make the transition look sloppy.
- Not securing the strip – Loose strips can pop up and trip people.
- Ignoring cleaning – Dust and debris can prevent glue from sticking.
Experience-based advice: Take your time measuring and cutting. Double-check before gluing or screwing anything down.
Tools And Materials Comparison
Choosing quality tools and materials makes the job easier and the results last longer. Here is a quick comparison of common transition materials:
| Material | Durability | Best Uses | Cost |
|---|---|---|---|
| Metal | High | Kitchens, entryways | $$ |
| Wood | Medium | Living rooms, bedrooms | $$$ |
| Vinyl | Medium | Bathrooms, basements | $ |
| Stone | Very High | Luxury or custom designs | $$$$ |
Budget tip: Vinyl and laminate strips are affordable and easy to install, but may wear out faster in busy areas.
Step-by-step Example: Transition In A Kitchen-dining Room
Let’s walk through a real-life scenario. Suppose you are transitioning from tile in the kitchen to wood in the dining room.
- Measure the doorway. The gap is 36 inches long, and the tile is 1/8 inch higher than the wood.
- Choose a reducer strip in a wood finish to match the dining room floor.
- Clean both floor edges with a vacuum and damp cloth.
- Cut the reducer strip to 36 inches.
- Dry-fit the strip to make sure it sits flush.
- Apply construction adhesive to the bottom of the strip.
- Press the strip into place and hold for 30 seconds.
- Wipe away extra glue.
- Wait 24 hours before heavy foot traffic.
Extra insight: In kitchens, water spills are common. Pick a strip material that resists water damage, like metal or vinyl.
Maintenance Tips For Long-lasting Transitions
Once your transition is in place, a little care keeps it looking new:
- Sweep or vacuum regularly to remove dirt and grit.
- Clean with a damp cloth—avoid soaking wood strips.
- Check for loose strips every few months and re-glue or screw as needed.
- Re-apply caulk or grout if you notice cracks or gaps.
Long-term insight: If you install a quality transition and maintain it, it can last as long as your floors—sometimes 15-20 years or more.

Credit: easiklip.com
When To Call A Professional
Some transitions are easy for DIYers, but others need professional help:
- Curved or angled transitions
- Large height differences
- Floors with complex patterns or borders
- Historic homes (to preserve original materials)
If you are unsure, ask a flooring contractor for an estimate. A good pro can handle tricky details and guarantee a safe, beautiful finish.
Case Study: Mistake Vs. Success
Mistake: A homeowner tried to join tile to wood with no expansion gap and used hard grout. After one winter, the wood floor buckled and the grout cracked.
Success: Another homeowner used a flexible caulk in the same situation. Five years later, both floors still look perfect, and the transition is almost invisible.
This shows why following best practices matters—small details make a big difference.
Credit: sandiegomarbletile.com
Environmental And Health Considerations
Flooring transitions can affect air quality and allergies. Many adhesives and caulks have strong fumes. Choose low-VOC or water-based products when possible. This is especially important in homes with children or pets.
Health tip: Always ventilate the area during installation and wear safety gear.
Cost Breakdown
How much should you budget for a tile to wood transition? Here’s a rough guide:
- Transition strips: $15–$50 for materials per doorway or gap
- Tools: $20–$100 (if you don’t already have them)
- Professional labor: $100–$300 per transition (more for custom work)
DIY saves money, but mistakes can be costly. If the area is highly visible, consider investing in the best materials you can afford.

Credit: www.oceansidepaintingnj.com
Real-world Examples And Trends
Modern design often uses open-plan spaces, which means transitions are more visible than ever. Some new homes use ultra-thin metal strips in a matching color for a minimalist look. Others use wide wood inlays with geometric patterns to create a “feature line” between rooms.
Trend tip: Matte finishes and neutral colors are popular for a clean, timeless look. Bold metals like brass or black are in style for industrial or modern homes.
Troubleshooting: What To Do If Something Goes Wrong
If your transition strip lifts or the gap cracks, don’t panic. Here’s how to fix common issues:
- Loose strip: Remove and clean both floor edges. Re-apply adhesive or use longer screws.
- Cracked grout: Remove old grout with a knife and refill with flexible caulk.
- Gap too wide: Add a small wood or metal inlay to close the space.
- Height difference too big: Install an extra layer of underlayment under the lower floor or use a taller reducer strip.
Fix problems early to prevent damage and keep your floors safe.
Summary And Key Takeaways
Transitioning from tile to wood floor is one of those details that separates amateur work from a professional finish. The process involves careful planning, choosing the right materials, and following best practices. Whether you use a transition strip, T-molding, reducer, or a custom inlay, focus on safety, style, and durability.
Always allow for expansion, maintain your transition, and fix problems quickly. The result is a beautiful, long-lasting connection between rooms that adds value and comfort to your home.
For more technical information on flooring transitions, see this helpful guide from the Family Handyman.
Frequently Asked Questions
What Is The Best Way To Transition From Tile To Wood Floor?
The best way depends on your floors’ height and style. For even floors, T-molding or a butt joint works well. For uneven floors, use a reducer strip. Always consider foot traffic, moisture, and your home’s design.
Should I Use Caulk Or Grout Between Tile And Wood?
Use flexible caulk for wood to tile transitions. It allows for movement and prevents cracks. Grout is rigid and can crack if the wood expands or contracts.
How Much Gap Should I Leave Between Tile And Wood?
Leave a 1/8 inch (about 3mm) gap for expansion. Fill this gap with caulk or a transition strip to protect both floors.
Can I Install A Transition Strip Myself?
Yes, most homeowners can install transition strips with basic tools. Measure carefully, follow instructions, and take your time for best results.
What If My Tile Is Higher Than My Wood Floor?
Use a reducer strip to create a smooth slope. This prevents tripping and keeps both floor edges safe from damage.
With the right approach, your tile to wood floor transition can be both beautiful and practical. Take your time, follow expert tips, and your home will look and feel more connected than ever.