As an Amazon Associate I earn from qualifying purchases.
Sewing your own rocking chair cushion brings comfort, personal style, and a sense of achievement to your home. Many store-bought cushions either don’t fit right, lack quality, or don’t match your décor. By learning how to sew a rocking chair cushion, you can solve these problems and create something truly unique.
The process is easier than you might think—even if you’re not an expert with a sewing machine. With the right steps, anyone can make a cushion that fits perfectly, looks great, and lasts for years. This guide will help you from start to finish, with simple explanations, practical tips, and useful insights most beginners miss.
Understanding Your Rocking Chair
Before you start, take a close look at your rocking chair. Not all chairs are the same. Some have a flat seat, others are curved. The backrest can be tall or short. Measuring your chair correctly is the first step toward a great cushion.
Use a tape measure to get the width, depth, and curve of the seat and backrest. Always double-check your numbers. Even a small mistake can make the cushion look odd or feel uncomfortable.
Write your measurements down. Consider the thickness you want (2 inches is common for comfort, but you can choose more or less). If your chair has arms, notice how much space they leave for the cushion.
Sometimes, older or handmade rocking chairs are not exactly symmetrical. Measure both sides if you can, and if there is a difference, use the larger number. This prevents the cushion from being too small.
Example: Measuring A Standard Rocking Chair
- Seat width: 18 inches (side to side)
- Seat depth: 16 inches (front to back)
- Backrest width: 17 inches
- Backrest height: 20 inches
- Desired cushion thickness: 2 inches
If your chair is an antique or has a unique shape, use a large sheet of paper or cardboard to trace the seat and back. This becomes your pattern for cutting fabric and foam.
For extra accuracy, press the paper into any grooves or curves as you trace. Mark where the back slats or spindles are, so you can position ties later. Beginners often skip this, but it makes the final fit much better.
If you want both a seat and a back cushion, repeat this process for each part. Sometimes the backrest is much narrower at the top than at the bottom, so check both ends before you cut anything.
Choosing Materials
The right materials are key for comfort, durability, and style. Here’s what you need to think about:
Fabric
- Durability: Choose a strong fabric like canvas, upholstery fabric, or outdoor fabric. These can handle daily use.
- Easy to clean: Spills happen. Look for machine-washable or spot-clean fabrics.
- Color and pattern: Pick something that matches your room but also hides stains and wear.
Not all fabrics are created equal. Outdoor fabrics often have a water-resistant coating, which is great for sunrooms or porches. Upholstery fabric usually has a tighter weave, which resists pilling and tearing. If you have pets or small children, darker colors or patterned fabrics hide marks and pet hair better.
Cushion Filling
- Foam: High-density foam keeps its shape and gives good support. Look for foam labeled Medium or Firm for seats.
- Batting: This soft layer wraps around the foam to make the cushion look full and smooth.
- Polyester fiberfill: Used for extra softness, especially in back cushions.
If you want a softer cushion, add a thin layer of memory foam on top of high-density foam. For a firmer feel, stick to just the high-density foam. Batting is not just for looks—it also helps the cover fit snugly and prevents the fabric from wrinkling.
Other Supplies
- Thread: Use a heavy-duty polyester thread to prevent breakage.
- Sewing machine: A basic machine with a straight stitch is enough.
- Zipper or Velcro: For removable covers (optional but recommended).
- Ties or straps: To keep the cushion from sliding.
- Scissors, pins, measuring tape, marking pen, hand sewing needle.
If you plan to wash the cover often, buy an extra zipper—sometimes the first one breaks after a few washes. For outdoor chairs, use UV-resistant thread and fabric to prevent fading.
Cost Comparison
Here’s how different fabric and foam options compare in price and durability:
| Material | Average Cost (per yard) | Durability (1-5) | Ease of Cleaning |
|---|---|---|---|
| Cotton Canvas | $10–$15 | 4 | Machine Washable |
| Upholstery Fabric | $15–$30 | 5 | Spot Clean |
| Outdoor Fabric | $12–$25 | 5 | Wipe Clean |
| Standard Foam (2”) | $20–$40 (per seat) | 4 | N/A |
Tip: Don’t use thin quilting cotton or slippery fabrics for your first project—they are hard to sew and won’t last.
You’ll also need a good quality seam ripper. Mistakes happen, and a seam ripper helps you quickly undo stitches without damaging the fabric.
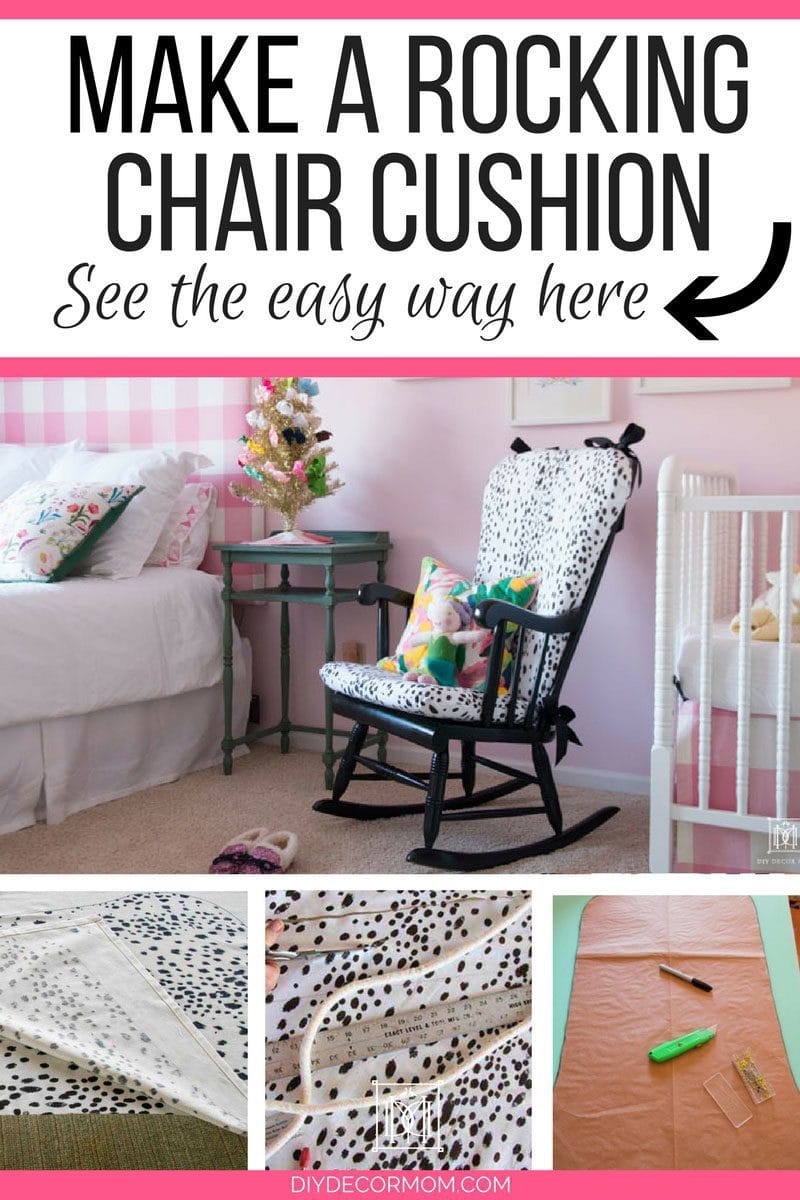
Credit: www.diydecormom.com
Making A Cushion Pattern
A cushion pattern is your blueprint. It ensures your fabric pieces fit the chair and each other.
Steps:
- Trace the Seat and Back: Use large paper or cardboard. Lay it over the seat and back. Press around the edges with a pen to mark the shape.
- Add Seam Allowance: Draw a second line ½ inch outside your traced line. This extra space is for your seam.
- Cut Out the Pattern: Label each piece clearly—Seat Top, Seat Bottom, Back Top, Back Bottom.
If your seat is very thick (over 2 inches), you may want to cut side strips of fabric instead of just sewing top and bottom together. These side strips, called boxing, make the cushion more structured and professional-looking.
Non-obvious Insight: For curved seats, cut small slits in the edge of your paper pattern. This helps the fabric bend smoothly when you sew.
If making boxed cushions, measure the depth of the foam and add seam allowance to the side strips as well. Use a flexible ruler to measure along the curve for accuracy.
Cutting The Fabric And Foam
Now, you’ll cut the fabric and foam using your patterns.
- Lay out the fabric: Place the pattern on the wrong side of the fabric. Pin it in place.
- Cut two pieces for each cushion: One for the top, one for the bottom.
- Cut the foam: Use a sharp bread knife or electric carving knife. Cut just inside your traced line so the foam fits snug inside the cover.
- Cut the batting: If using, cut it about 1 inch wider than the foam. This wraps around the edges.
Take your time with this step. Uneven cuts in the foam will show through the cover. Use long, smooth strokes with the knife for clean edges. If you need to trim the foam, do it in small pieces rather than trying to cut a large chunk at once.
Tip: Mark the fabric pieces as “top” and “bottom” with chalk to avoid confusion.
For patterned fabric, check the direction before cutting. If your design has a clear up and down, make sure all pieces match. This avoids mistakes that stand out later.
Sewing The Cushion Cover
Sewing is where your cushion takes shape. Work slowly and check each step.
Step-by-step Instructions
- Sew Ties or Straps First: Cut strips of fabric about 16 inches long and 1.5 inches wide. Fold in half lengthwise, sew along one side, turn right-side out, and press flat. Sew them to the corners of the cushion tops. This keeps the cushion on the chair.
- Join Fabric Pieces: Place the top and bottom pieces right sides together. Pin around the edges.
- Sew Around the Edges: Use a ½ inch seam allowance. Leave a 10–12 inch opening at the back for inserting the foam.
- Clip Curves and Corners: Make small cuts in the seam allowance around curves and corners. Don’t cut the stitches. This helps the cushion lie flat.
- Turn Right Side Out: Pull the cover through the opening.
- Add Batting and Foam: Wrap the foam in batting. Insert into the cover, working gently so you don’t tear the fabric or batting.
- Close the Opening: For a removable cover, add a zipper or sew Velcro into the opening. For a permanent cushion, use a hand needle and invisible stitch to close.
If you are adding boxing (side strips), sew the strips to the top piece first, then attach to the bottom piece. Pin at the corners and ease the fabric around any curves. Beginners often find boxing challenging, but it gives a very polished finish.
Practical Example: If you want piping (decorative edge), sew it to the top fabric before joining the top and bottom pieces. This adds a professional look.
If you want a softer edge, add a small amount of fiberfill along the seam before sewing. This creates a rounded, plush look at the cushion’s edges.
Adding Finishing Touches
The details make your cushion look and feel high-quality.
Piping Or Welt Cord
- Makes the edge look neat and fancy.
- Buy pre-made piping or make your own by wrapping fabric around a cord.
- Sew piping between the top and bottom pieces before you stitch them together.
If you make your own piping, cut fabric strips on the bias (diagonal to the weave). This helps the piping bend smoothly around curves. Use a zipper foot on your machine to sew close to the cord.
Removable Covers
- Use a zipper or Velcro in the back or one side.
- Removable covers are easier to clean and replace.
Hidden zippers look neat, but can be tricky to sew. Practice on scrap fabric first. If you use Velcro, stitch it down securely—it can pull off if not sewn well.
Ties And Non-slip Options
- Sew ties or fabric straps to the back corners.
- For extra grip, add a strip of non-slip shelf liner to the bottom of the cushion.
You can also add snaps or buttons to the ties for a decorative touch. For very slippery chairs, sew a patch of rubberized fabric to the underside.
Decorative Buttons (tufting)
- Sew fabric-covered buttons through the cushion for a tufted look.
- Use a long needle and strong thread to sew through the cushion, pulling the button snug.
If you want deep tufts, use extra-strong upholstery thread and tie knots tightly. For a modern look, skip the buttons and simply use stitches to create shallow dimples.
Common Mistakes And How To Avoid Them
Even experienced sewers make errors. Here’s how to prevent the most common ones:
- Wrong measurements: Measure twice, cut once. Double-check before cutting expensive fabric.
- Skipping seam allowance: Always add ½ inch to your pattern.
- Cutting foam too big or small: Cut the foam slightly smaller than your fabric—about ¼ inch on each edge. This makes it easier to insert and prevents bulging seams.
- Forgetting to pre-wash fabric: Wash and dry your fabric before cutting. This prevents shrinking later.
- Not clipping curves: Cutting small slits in seam allowance helps the cushion lie smooth, especially with curved seats.
Extra tip: Test your stitches on a scrap of your fabric. Some thick fabrics need a longer stitch length or a stronger needle.
If your first cushion isn’t perfect, don’t worry—small mistakes often disappear once the cushion is in use.
Caring For Your Cushion
A well-made cushion lasts years if you care for it properly.
- Vacuum regularly: Keeps dust and crumbs away.
- Spot clean stains: Use mild detergent and a damp cloth.
- Wash removable covers: Check fabric instructions for washing and drying.
- Rotate the cushion: Helps prevent uneven wear.
- Store indoors: If your chair is outside, store the cushion inside when not in use.
For tough stains, remove the cover as soon as possible and soak it in cold water before washing. Avoid harsh chemicals, which can damage both fabric and foam.
If your cushion gets wet, dry it thoroughly before putting it back on the chair. Moist foam can become moldy or smell bad over time.
Personalizing Your Cushion
Making your own rocking chair cushion is a chance to show your style.
- Choose bold colors or patterns for a statement.
- Add embroidery or applique for a custom touch.
- Use matching or contrasting piping for extra flair.
- Mix fabrics (for example, solid color on top, pattern on bottom).
Try stenciling a simple design on plain fabric for a personal touch. For a child’s room, use themed fabric or add felt shapes. You can also sew on small pockets to hold a book, glasses, or remote.
Non-obvious Insight: If you sew a set of cushions, label each one with a small tag so you can remember which fits which chair.
Troubleshooting Problems
Sometimes things don’t go as planned. Here’s how to fix common issues:
The Cushion Is Too Loose
- Add a layer of batting or fiberfill to fill extra space.
- Wash the cover in hot water (if safe) to shrink it.
You can also add a small tuck or dart to the cover if it’s much too loose. This is faster than remaking the entire cover.
Foam Won’t Fit
- Trim the foam corners at an angle.
- Roll the foam tightly, insert it, then let it expand.
If the foam is too thick, shave off thin layers until it slides in smoothly.
Seams Pucker Or Look Uneven
- Use a slightly longer stitch length.
- Press seams with an iron after sewing.
If you see wrinkles, check your thread tension and try sewing with a walking foot, which helps thick layers feed evenly.
Ties Pull Loose
- Reinforce ties with extra stitching.
- Use a zigzag stitch for more strength.
If the ties break, replace them with wider strips or ribbon for better durability.

Credit: saudimadad.com
Safety Tips
- Keep scissors and pins out of reach of children.
- Always unplug your sewing machine before maintenance.
- Use a thimble when hand sewing thick fabric.
Wear safety glasses if you use an electric knife for foam. Always cut away from your body and work on a stable surface.
Comparing Ready-made Vs. Homemade Cushions
Is it worth making your own cushion? Let’s compare:
| Feature | Ready-Made Cushion | Homemade Cushion |
|---|---|---|
| Fit | Standard sizes only | Custom fit |
| Fabric Choice | Limited | Unlimited |
| Cost | $30–$120 | $25–$60 |
| Durability | Varies | Usually higher (if quality materials used) |
| Personal Style | Generic | Unique |
Insight: Many people find homemade cushions last longer and are more comfortable, especially if you spend time choosing the right foam.
Making your own cushion can be a family activity too. Involve kids in choosing fabric, or let them draw on plain covers with fabric markers for a unique look.
Credit: www.diydecormom.com
How Long Does It Take?
For a first cushion, set aside a weekend or two afternoons. After your first project, you can make a new cushion in 2–3 hours.
Pro tip: Gather all your supplies before you start. This saves time and avoids frustration.
If you plan to make a matching set, cut all your pieces at once. This keeps your sizes consistent and speeds up the process.
Remember, it’s normal to go slower the first time. The more you practice, the faster and neater your results will be.
Where To Find Supplies
- Fabric Stores: Offer many options and advice.
- Online: Sites like Joann, Fabric.com, or Amazon.
- Upholstery Shops: Good for high-density foam.
- Craft Stores: Great for batting, fiberfill, and tools.
Ask store staff for help if you’re not sure about materials. Many shops let you buy foam cut to size, which saves time and effort.
Check for sales, especially at the end of the season, to save money on fabric and foam. You can also find good deals on remnants (leftover pieces) for small projects.
For more information on sewing techniques, the Wikipedia page on sewing is a helpful resource.
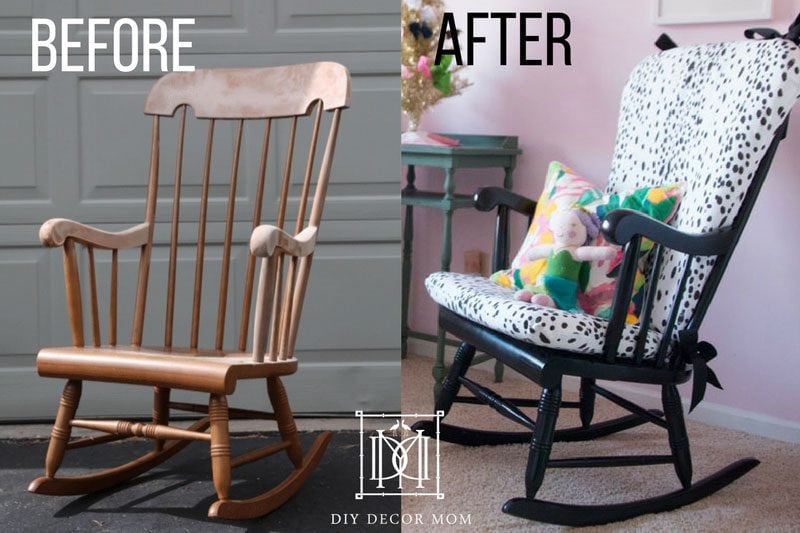
Real-life Example: Transforming A Family Heirloom
Maria had an old wooden rocking chair from her grandmother. The seat was uncomfortable, and the style didn’t match her living room. She measured the chair, chose a bright blue upholstery fabric, and used a thick, firm foam. She added piping in a contrasting color and made a removable cover with a zipper.
After a weekend of careful work, the chair looked new and felt comfortable. Friends asked where she bought it, not knowing it was a DIY project. Maria’s story shows how a homemade cushion can bring new life to old furniture and make it truly yours.
Maria’s biggest lesson was to take her time measuring and cutting. She made a small mistake with the foam at first—cutting it too short—but was able to fix it by wrapping extra batting around the foam. Now, her family uses the chair every day, and she feels proud every time she sees it.
Frequently Asked Questions
How Thick Should A Rocking Chair Cushion Be?
Most rocking chair cushions are 2 to 3 inches thick. This gives good comfort for long sitting. If your chair is used for short periods, 1.5 inches may be enough. For more support, choose 3 inches, but check that it does not raise your seat too high.
What Type Of Foam Is Best For A Cushion?
Choose high-density foam labeled “Medium” or “Firm” for seat cushions. This foam keeps its shape and supports your weight. For the backrest, softer foam or polyester fiberfill is fine. Avoid cheap or very soft foam, which flattens quickly.
If you want a “memory foam” feel, layer a thin piece of memory foam on top of regular foam.
Can I Make The Cushion Cover Removable For Washing?
Yes, and it’s a smart idea. Sew a zipper or Velcro into one side or the back of the cover. This lets you remove and wash the cover easily. Always check the fabric’s washing instructions before cleaning.
For frequent washing, pre-shrink your fabric and use color-safe detergent.
How Do I Keep The Cushion From Sliding Off The Chair?
Sew fabric ties or straps to the back corners of the cushion and tie them around the chair slats. For extra grip, add a strip of non-slip shelf liner to the bottom of the cushion. This is especially helpful for wooden or painted chairs.
You can also use gripper pads or double-sided tape under the cushion for extra hold.
Do I Need A Sewing Machine, Or Can I Sew By Hand?
A sewing machine makes the job faster and neater, but you can sew by hand using a strong needle and heavy-duty thread. Use small, tight stitches for strength. Hand sewing takes more time, especially for thicker fabrics.
If you hand sew, a backstitch is the strongest. For zippers, use extra stitches to prevent gaps.
Sewing your own rocking chair cushion is a rewarding project. You’ll have a comfortable, stylish seat that fits perfectly and reflects your taste. With careful planning, the right materials, and these step-by-step instructions, you can create a cushion that lasts for years. Whether for a family heirloom or a new rocking chair, your handmade cushion will make every rocking moment better.
