Replacing interlocking ceiling tiles may seem like a big job, but with the right guidance, anyone can do it. Whether you want to update an old ceiling, fix water damage, or give a room a fresh look, learning how to replace interlocking ceiling tiles is a valuable skill.
These tiles are popular in offices, basements, schools, and homes because they are affordable, easy to install, and good at hiding wires or pipes. But over time, some tiles might crack, stain, or sag, and knowing how to swap them out saves time and money.
In this guide, you’ll discover every step needed to remove old tiles and install new ones—without the stress. You’ll find out which tools you need, how to choose new tiles, and what to watch out for if you want the best results.
Even if you’re a beginner, you’ll finish with the confidence to tackle this project yourself and keep your ceiling looking sharp for years. Let’s break down the process, step by step, and cover the small details that often get missed.
Understanding Interlocking Ceiling Tiles
Before you start, it helps to know what interlocking ceiling tiles are and why they’re different from other ceiling types. Interlocking ceiling tiles connect to each other with a tongue-and-groove or overlapping edge. This design keeps the surface smooth and hides the seams.
You’ll find interlocking tiles in several materials:
- Mineral fiber: Common, affordable, good for sound control.
- PVC (plastic): Water-resistant, easy to clean, lightweight.
- Metal: Strong, decorative, popular in old buildings.
- Gypsum: Durable, heavier, often used for fire resistance.
Interlocking tiles are not the same as drop ceiling panels. Drop ceilings use a metal grid. Interlocking tiles are usually attached directly to a ceiling or to wooden strips (called furring strips). Always check which system you have before buying new tiles.
Tools And Materials You Need
Having the right tools makes the job smoother and safer. Here’s what you’ll need for most interlocking tile projects:
- Replacement tiles (enough to cover damaged areas)
- Measuring tape
- Utility knife (sharp blade)
- Putty knife or pry bar (for removal)
- Step ladder or sturdy platform
- Pencil or marker
- Protective gloves and safety glasses
- Dust mask (especially for mineral fiber tiles)
- Adhesive (if tiles are glued up)
- Finishing nails or staples (if used in your installation)
- Hammer or staple gun
Depending on your ceiling, you might also need:
- Stud finder (to locate furring strips)
- Caulk or filler (for gaps)
- Paint (to touch up edges)
- Vacuum (to clean dust)
Pro tip: Always buy a few extra tiles in case of mistakes or future repairs. Tiles can change color over time, so matching new ones to old ones can be tricky.
Credit: homeandawaywithlisa.com
Inspecting And Preparing The Work Area
Start by carefully inspecting your ceiling. Look for damaged tiles, water stains, sagging, or mold. If you see mold, clean and dry the area before replacing tiles. Fix any leaks first; otherwise, new tiles will get ruined.
- Clear the room: Move furniture away and cover anything you can’t move.
- Protect the floor: Lay down drop cloths or old sheets.
- Turn off the power: If there are ceiling lights, turn off electricity at the breaker.
- Ventilate: Open windows if working with old or moldy tiles.
Preparation is often overlooked, but it makes the job safer and prevents mess. Take photos of the ceiling before you start, especially if you need to match patterns or colors.
Removing Old Or Damaged Interlocking Tiles
This step takes patience, especially if the tiles are old or tightly fitted. Here’s how to do it safely:
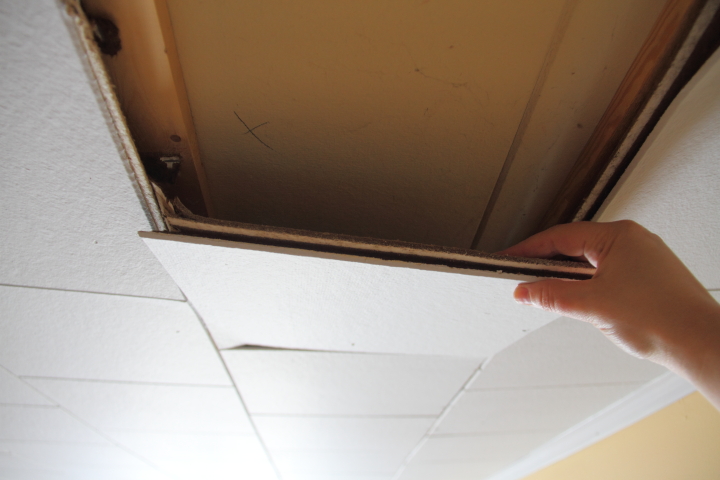
- Start at a corner or edge. Use a putty knife to gently loosen the first tile.
- Work slowly: Slide the knife under the edge, prying up a little at a time. Don’t force it—tiles can break or splinters can fall.
- Check for nails or glue: Some tiles are nailed, some glued, and some just clicked in. Remove nails with the hammer’s claw or a pry bar.
- Remove one tile at a time: Once the first tile is out, the rest are easier to slide out.
- Watch for wires or pipes: Be careful not to damage anything hidden above the tiles.
Tip: If a tile is stuck, score around the edge with a utility knife. For glued tiles, a heat gun (on low) can soften the adhesive.
Dispose of old tiles safely. Some older mineral tiles may contain asbestos. If your tiles are very old (before 1980), check local rules or have them tested before removing.
Measuring And Fitting New Tiles
Getting the right fit is key. Don’t assume all tiles are exactly the same size, especially in older buildings.
- Measure each opening: Use a tape measure to check length and width.
- Lay out new tiles on the floor: Arrange the tiles in the same pattern as your ceiling.
- Trim as needed: Use a sharp utility knife and a straight edge to cut tiles to size. Always cut on a safe surface.
Pay attention to how tiles interlock. Some have a “tongue” and “groove” side; others have overlapping lips. Match the new tiles with the existing pattern.
If you need to cut holes for lights or vents, mark the spot, then cut carefully with a utility knife or hole saw. Test the fit before installing.
Choosing The Right Replacement Tiles
Not all interlocking tiles are created equal. When buying new tiles, consider:
- Material: Choose tiles that match your old ones for color, thickness, and style.
- Fire rating: Some buildings require tiles with a certain fire resistance.
- Moisture resistance: For basements, bathrooms, or kitchens, pick PVC or treated tiles.
- Sound control: Mineral fiber tiles are better at absorbing noise.
- Pattern and color: Even “white” tiles vary by brand. Take a sample to the store if possible.
Here’s a comparison of common tile materials and where they work best:
| Material | Durability | Moisture Resistance | Best Use |
|---|---|---|---|
| Mineral Fiber | Medium | Low | Offices, living rooms |
| PVC | High | High | Bathrooms, basements |
| Metal | Very High | High | Kitchens, commercial |
| Gypsum | High | Medium | Fire-prone areas |
If you can’t find an exact match, choose tiles that are as close as possible in thickness and edge style. Installing mismatched tiles can lead to gaps or uneven surfaces.

Credit: www.youtube.com
Installing New Interlocking Ceiling Tiles
Now comes the most satisfying part: putting the new tiles in place. Every type of interlocking tile is a little different, but most follow these steps:
- Start at the same corner where you removed the first tile.
- Check direction: Make sure each tile’s tongue and groove line up with the existing pattern.
- Slide or snap tiles into place. For overlapping tiles, tuck the edge under the previous tile, then press the rest flat.
- Secure the tile: If your ceiling uses glue, apply adhesive to the back (follow the manufacturer’s instructions). For nailed or stapled tiles, use finishing nails or staples at the edges.
- Check alignment: Each tile should sit flat and tight against the next. Use gentle pressure to avoid breaking the tile.
- Repeat with the rest of the tiles, working row by row.
For the last row, tiles may need to be trimmed to fit. Measure carefully and cut slowly.
If you’re replacing just a few tiles, make sure the new ones blend in. Sometimes, painting the ceiling after installing new tiles helps make old and new tiles look the same.
Dealing With Special Cases: Lights, Vents, And Odd Shapes
Ceilings are rarely perfect. You’ll often need to work around obstacles like lights, air vents, or pipes. Here’s how to handle them:
- Lights: Measure the fixture’s position. Cut a hole in the tile slightly smaller than the light base. Test fit before installing.
- Vents: Remove the vent cover. Cut an opening in the tile to match. Reinstall the vent cover after the tile is secure.
- Irregular shapes: For corners or edges, make a paper template first. Trace the shape onto your tile, then cut.
Pro tip: Always cut openings a bit smaller at first. You can always trim more, but you can’t add material back.
If you have to fit tiles around pipes or wires, cut a notch in the tile, then install it so the cut is hidden as much as possible.
Finishing Touches: Seams, Painting, And Clean Up
After installing the tiles, check all seams and edges. If you see small gaps, fill them with caulk or paintable filler. For best results:
- Wipe away extra filler before it dries.
- Touch up paint if needed. Use ceiling paint that matches your tiles.
- Clean up dust and debris with a vacuum or broom.
For stubborn stains or fingerprints on PVC tiles, use a soft cloth and mild cleaner.
It’s a good idea to inspect your work from different angles. Sometimes, uneven tiles or gaps are more visible from one side of the room.
Common Mistakes To Avoid
Even experienced DIYers sometimes slip up. Here are the mistakes to watch out for:
- Not matching tile type: Always check the thickness and edge style.
- Skipping prep work: Failing to fix leaks or mold first will ruin new tiles.
- Cutting tiles too small: Measure twice, cut once. Tiles that are too small will leave gaps.
- Forcing tiles: If a tile won’t fit, check for nails or debris rather than pushing harder.
- Wrong adhesive: Use the glue recommended for your tile type; otherwise, tiles might fall.
- Ignoring fire codes: Some buildings require fire-rated tiles—especially in multifamily homes.
- Not supporting yourself safely: Always use a sturdy ladder or platform. Never stand on furniture.
One insight beginners often miss: interlocking tiles can expand and contract with humidity. Leave a tiny gap (about 1/16 inch) at the edges for expansion, especially with PVC or fiber tiles.
Maintenance Tips For Interlocking Ceiling Tiles
Once you have your new tiles in place, you’ll want to keep them looking good. Here’s how:
- Dust regularly: Use a microfiber cloth or duster.
- Spot clean stains: For mineral fiber tiles, dab gently with a damp cloth. For PVC, mild soap works well.
- Check for leaks: Inspect ceilings after storms or plumbing issues.
- Replace stained tiles quickly: Stains often mean moisture problems. Fix the source and swap out affected tiles.
- Paint older tiles: If tiles look yellowed but are solid, repaint with ceiling paint for a fresh look.
Inspect your ceiling every few months. Small repairs are easier and cheaper than waiting until problems get worse.
Cost Breakdown: Diy Vs Professional Replacement
Many people wonder if they should replace interlocking ceiling tiles themselves or hire a pro. Here’s a side-by-side look at the typical costs:
| Factor | DIY | Professional |
|---|---|---|
| Materials (per 100 sq ft) | $70 – $200 | $70 – $200 |
| Labor | $0 | $300 – $600 |
| Tools | $25 – $50 (if needed) | Included |
| Total Estimate | $95 – $250 | $370 – $850 |
DIY saves money, especially for small jobs. Professionals are worth it if you have a large area, complicated shapes, or ceilings higher than 9 feet. For safety, always call a pro if you suspect asbestos or electrical hazards.
Environmental And Health Considerations
Not all ceiling tiles are safe to remove, especially in older buildings. Some tiles made before the 1980s may contain asbestos, a dangerous material if disturbed. If you suspect this, don’t remove tiles yourself. Hire an expert to test and, if needed, remove them safely.
Modern tiles are usually safe, but always wear gloves, a dust mask, and safety glasses. Some mineral tiles can be dusty or irritate skin.
For those interested in eco-friendly options, recycled PVC or mineral fiber tiles are now available. These use less energy to produce and can be recycled again at the end of their life.
When To Call A Professional
Most homeowners can replace a few interlocking ceiling tiles themselves. But call a pro if:
- The ceiling is very high or hard to reach.
- There’s mold, asbestos, or heavy water damage.
- You need to replace a large area (over 200 sq ft).
- The tiles are part of a fire-rated system (in apartments or commercial buildings).
Professionals have the tools and training for safe, fast work. They can also dispose of hazardous materials correctly. You can find more information on safe asbestos removal at the EPA website.

Credit: diy.stackexchange.com
Frequently Asked Questions
How Do I Know If My Ceiling Tiles Contain Asbestos?
If your tiles were installed before 1980 and look like mineral fiber, they could contain asbestos. Don’t disturb them. Have a sample tested by a certified lab. Never sand, drill, or break old tiles unless you’re sure they are safe.
Can I Paint Interlocking Ceiling Tiles?
Yes, most interlocking tiles can be painted. Use ceiling paint and a roller for best results. Make sure tiles are clean and dry first. For PVC tiles, use a paint that sticks to plastic. Test on a small area before painting the whole ceiling.
How Do I Match New Tiles With Old Ones?
Take a sample tile to the store or measure the exact size, thickness, and edge type. If you can’t find a match, buy plain white tiles and paint the whole ceiling. Sometimes, manufacturers have discontinued patterns, so matching exactly can be hard.
What’s The Best Way To Cut Ceiling Tiles?
Use a sharp utility knife and a metal straightedge. Score the tile several times rather than cutting through in one pass. For round holes, a hole saw or a compass cutter works well. Always cut on a safe, flat surface.
Are Interlocking Ceiling Tiles Good For Soundproofing?
Mineral fiber tiles help absorb sound, making rooms quieter. For better soundproofing, look for tiles labeled “acoustic” or add a layer of insulation above the tiles. PVC and metal tiles are less effective for noise control.
Replacing interlocking ceiling tiles is a project that gives instant results. With careful planning, the right tools, and attention to detail, you can bring new life to any room. Remember, patience and preparation are your best friends. If you ever feel unsure, don’t hesitate to ask for expert advice.
Your ceiling—and your peace of mind—will thank you.