Installing a lock on a bedroom door can feel like a big task, especially if you have never used a drill or screwdriver before. But with the right tools, clear steps, and some patience, you can add privacy and security to any room in your house. Whether you want to keep your siblings out, create a private workspace, or simply upgrade your old doorknob, learning how to install a lock is a valuable skill. Many people think they need to call a professional, but most standard locks are designed for easy installation by homeowners. This guide will walk you through every detail, from choosing the best lock to troubleshooting common problems, so you can finish the job confidently—even if you’re a beginner.
Why Install A Lock On A Bedroom Door?
Privacy is important for everyone. Whether you share your home with family, roommates, or guests, you may want a space that you can truly call your own. Installing a bedroom door lock helps you:
- Protect personal items: Keep valuables safe from curious hands.
- Improve privacy: Enjoy peace and quiet when you need it.
- Feel more secure: Especially in shared living situations.
Some people also install locks for safety reasons, such as keeping children out of rooms with dangerous items.
Types Of Bedroom Door Locks
Before you buy a lock, it’s important to know your options. Not all locks are the same. The type you choose affects how much privacy and security you get.
| Lock Type | Best For | Key Feature | Security Level |
|---|---|---|---|
| Passage Knob | Closets, halls | No locking | Low |
| Privacy Knob/Lever | Bedrooms, bathrooms | Push-button/turn lock | Medium |
| Keyed Entry Knob | High-security rooms | Requires key | High |
| Deadbolt | Extra security | Separate bolt | Very High |
Privacy Locks
These are the most common for bedrooms. They usually have a small button or turn piece inside. You can lock the door from the inside but unlock it from the outside with a small tool if needed.
Keyed Entry Locks
These offer more security. You need a key to unlock from the outside. They are best if you want to keep others out completely, but there’s a risk of losing the key.
Deadbolts
Deadbolts are harder to break open than knob locks. They are good for extra security but need more space on the door and frame.
Smart Locks
Some people choose smart locks that use codes or apps. These are more expensive and require batteries.
Non-obvious insight: Not all bedroom doors are thick enough for deadbolts or smart locks. Always check your door’s thickness before buying.
Tools And Materials You Need
Having the right tools makes the job smoother and safer. Here’s what you’ll usually need:
- New lock set (with all parts included)
- Screwdriver (usually Phillips head)
- Drill (with bits sized for your lock)
- Chisel (for the latch plate)
- Tape measure
- Pencil or marker
- Hammer
- Utility knife
- Wood screws (often included)
- Masking tape (optional, for marking)
- Level (optional, but helps alignment)
- Safety glasses
Tip: Most lock kits include a paper template for marking holes. Don’t throw it away!
Choosing The Right Lock For Your Bedroom Door
Selecting the best lock depends on your needs, door type, and budget. Here’s a comparison of popular options:
| Lock Model | Installation Ease | Cost Range (USD) | Can Be Unlocked from Outside? |
|---|---|---|---|
| Schlage Privacy Knob | Easy | $15–$30 | Yes, with tool |
| Kwikset Keyed Entry | Moderate | $25–$45 | With key only |
| Defiant Deadbolt | Challenging | $20–$40 | With key only |
| August Smart Lock | Moderate | $120–$250 | Yes, via app |
Common mistake: Many buyers forget to check if the lock fits their door’s hole size (called the “bore”). Standard is 2 1/8 inches.
Measuring And Preparing Your Door
Before you drill or screw anything, you must measure your door. This step prevents costly mistakes.
1. Check Door Thickness
Most interior doors are 1 3/8 inches thick. Some older or custom doors may differ. Most locks fit doors between 1 3/8 and 1 3/4 inches.
2. Measure The Backset
The backset is the distance from the edge of the door to the center of the doorknob hole. Common backsets are 2 3/8 inches or 2 3/4 inches. Your lock set should include hardware for both.
3. Mark The Height
Standard knob height is about 36 inches from the floor. Use a tape measure and mark the spot with a pencil.
4. Mark The Latch Position
Wrap the template around the edge of the door. Mark where the latch will go. Use masking tape to keep the template in place if needed.
Non-obvious insight: If you are replacing an existing lock, check if the old holes line up with your new lock. Some modern locks need slightly different positions.
Removing The Old Lock (if Needed)
If your door already has a knob or lock, you need to remove it first.
- Unscrew the inside knob or lever. Most have two screws on the inside plate.
- Pull both sides off. The knob should slide out.
- Remove the latch plate screws on the edge of the door.
- Pull out the latch.
Tip: Keep all old screws and parts until you finish installing the new lock. You may need them if something doesn’t fit.
Drilling Holes For A New Lock
If your door does not have a hole for a knob or latch, you need to drill one. This is the most challenging part for beginners.
Tools And Safety
- Use a hole saw bit (usually 2 1/8 inch) for the knob hole.
- Use a spade bit or smaller hole saw for the latch hole (usually 1 inch).
- Always wear safety glasses.
Steps
- Attach the template to your door at the marked height.
- Mark the center of the knob hole and latch hole using a pencil.
- Drill the knob hole from one side until the center bit pokes through.
- Finish drilling from the other side. This prevents splintering.
- Drill the latch hole on the edge.
- Clean up any rough edges with a utility knife.
Practical example: If you don’t have a hole saw, many hardware stores rent them for a small fee.
Chiseling The Latch Plate
Most latches have a rectangular plate that must sit flush with the door edge.
- Insert the latch into the hole and trace around the plate with a pencil.
- Remove the latch.
- Score the outline with a utility knife to prevent wood splintering.
- Use a chisel and hammer to gently remove wood until the plate fits flush.
Common mistake: Chiseling too deep makes the latch plate loose. Go slowly and test the fit often.
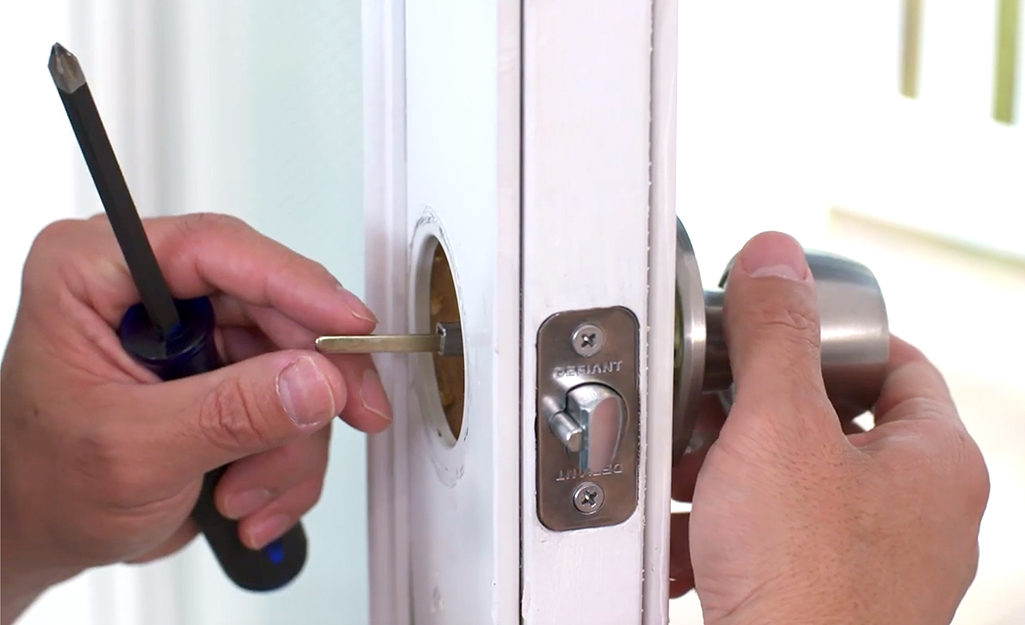
Installing The New Lock Set
Now, you’re ready for the main event: putting in your new lock.
Step 1: Insert The Latch
- Slide the latch into the edge hole.
- The angled part should face the door jamb (the frame).
- Secure with screws.
Step 2: Install Exterior And Interior Knobs
- Slide the exterior knob (the one with the key or hole) through the large hole so it connects with the latch.
- Attach the interior knob on the other side, lining up the posts.
- Insert screws and tighten.
Step 3: Test The Lock
- Turn the knob or lever to make sure the latch moves smoothly.
- Lock and unlock to test the mechanism.
Tip: If the screws won’t tighten, the holes may be stripped. Use slightly larger screws or fill holes with wooden toothpicks and glue.
Installing The Strike Plate
The strike plate is the metal piece on the door frame that the latch slides into.
- Close the door to see where the latch hits the frame.
- Mark the spot.
- Place the strike plate and trace the outline.
- Chisel out a shallow area so the strike plate sits flush.
- Drill pilot holes for the screws.
- Attach the strike plate.
Advanced tip: For extra strength, use 3-inch screws to anchor the strike plate into the wall stud.
Finishing Touches
- Tighten all screws again after testing the door.
- Clean up sawdust or wood chips.
- If your lock has a key, test it several times.
- If using a smart lock, follow the manufacturer’s setup instructions.
Another insight: Lubricate the latch with a small amount of graphite or lock lubricant for smoother operation.
Troubleshooting Common Problems
Even careful installers run into issues. Here’s how to solve them:
Door Won’t Close Or Latch
- The latch might be misaligned. Loosen the strike plate and adjust its position.
- Door or frame may be warped. Sand the edge gently.
Lock Feels Loose
- Screws may be too short or holes stripped. Use longer screws or wood filler.
Key Won’t Turn
- Check if the lock is upside down.
- Try lubricating the lock.
- Make sure the key is correct.
Can’t Insert Screws
- Wood inside the hole may be blocking the way. Clean it out with a screwdriver.
Lock Is Stiff
- Spray graphite inside the lock.
- Check for misalignment.
Pro tip: Always keep a spare key in a safe place, especially for keyed locks.
Credit: www.homedepot.com
Safety And Security Considerations
Bedroom locks are mainly for privacy, not serious security. However, some people need higher security. Here are some things to think about:
- Fire safety: Avoid locks that can’t be opened from the inside in case of emergency.
- Child safety: Choose privacy locks that can be unlocked from outside with a small tool.
- Strength: Interior doors are often hollow and easy to break. For valuables, consider a safe instead.
External resource: For more information on lock types and standards, see Wikipedia.
Upgrading To A Keyed Or Smart Lock
If you want to upgrade to a keyed lock or smart lock, there are a few more steps.
Keyed Locks
- Follow the same steps as a privacy lock, but keep track of your keys.
- Record the key code (often on a tag) in case you need replacements.
Smart Locks
- Some smart locks fit over existing deadbolts or knobs.
- You may need to install batteries and connect to Wi-Fi or Bluetooth.
- Set up your lock with the app, and test all features.
Non-obvious insight: Not all smart locks fit every door. Check your door’s measurements and compatibility before buying.
Maintenance Tips For Bedroom Locks
Keeping your lock working well is simple but important:
- Lubricate the lock every six months with graphite.
- Tighten screws if the knob feels loose.
- Clean the keyhole with compressed air if keys become hard to insert.
- Check alignment if the door becomes hard to close.
- Replace batteries in smart locks as recommended.
Advanced tip: If your lock becomes sticky, avoid using oil-based lubricants. They attract dust.
Cost, Time, And Skill Level
Installing a standard bedroom lock is easier than most people think.
- Cost: $15 to $50 for most privacy or keyed locks. Smart locks can cost $100 or more.
- Time: 30 minutes for a simple replacement, 1 to 2 hours if drilling new holes.
- Skill level: Beginner to intermediate. Basic tools and patience required.
When To Call A Professional
- If your door is solid metal or very old.
- If you need to cut a new hole and don’t have a drill.
- If you want a high-security lock installed.
Real-world Examples
Example 1: Upgrading From A Knob To A Privacy Lock
Sarah lives with three roommates. She wants a lock for her bedroom, but her door only has a simple passage knob. She buys a privacy lock set, uses the template, and drills a new latch hole. With a screwdriver and careful measuring, she installs the lock in under an hour.
Now, she can relax knowing her room is private.
Example 2: Adding A Keyed Lock For Extra Security
James stores important documents in his bedroom. He installs a keyed entry knob, following all the steps above. He keeps a spare key in his car. The new lock gives him peace of mind.
Example 3: Installing A Smart Lock
Alex wants to control his lock from his phone. He chooses a smart lock that fits over his existing deadbolt. After installing the device and connecting it to his home Wi-Fi, he can now let friends in even when he’s not home.
Visual Guide For Installation
Seeing the process can make it easier. Here’s a basic workflow:
- Prepare tools and read instructions.
- Measure and mark your door.
- Drill holes (if needed).
- Chisel for latch and strike plate.
- Install latch, knobs, and strike plate.
- Test lock and make adjustments.
- Clean up and maintain your new lock.
Taking pictures as you go can help if you need to reinstall parts.

Credit: www.windowrepairmagician.co.uk
Mistakes To Avoid
- Skipping measurements: Always double-check before drilling.
- Using the wrong lock type: Not all locks fit every door.
- Over-tightening screws: This can crack the door.
- Losing keys: Keep spares in a secure place.
- Ignoring door alignment: If the door is not level, the lock may jam.
Pro insight: If you are renting, check with your landlord before installing a new lock. Some leases do not allow it, or you may need to provide a spare key.
Frequently Asked Questions
How Do I Know If My Door Can Take A New Lock?
Most modern interior doors are designed for standard lock sizes. Measure the door’s thickness and the diameter of any existing holes. If your door is very thin, old, or made of metal, you may need special hardware.
Can I Install A Lock Without Drilling New Holes?
If your door already has a knob or handle, you can often replace it with a privacy or keyed lock with no new drilling. If the size or position is different, minor adjustments may be needed.
What If I Lose The Key To My Bedroom Lock?
Many keyed bedroom locks can be unlocked by a locksmith. Some also have a universal unlock feature for emergencies. Always keep a spare key outside the room, but in a safe place.
Is It Safe To Put A Deadbolt On A Bedroom Door?
Deadbolts offer more security but can be a fire hazard if not installed properly. Always choose a deadbolt that can be unlocked from the inside without a key to ensure safety during emergencies.
How Can I Make My Bedroom Lock Stronger?
Use longer screws (at least 3 inches) for the strike plate, lubricate the lock regularly, and check for loose parts. For very high security, consider a solid core door or adding a second lock.
Installing a lock on a bedroom door is a project almost anyone can do. With careful planning, the right tools, and attention to detail, you can enjoy more privacy and peace of mind. Take your time, follow each step, and don’t be afraid to ask for help if you need it.
Your personal space is worth it.

Credit: www.youtube.com