Installing a Wright door closer can make a big difference in your daily life. If your door slams shut, stays open, or is hard to close, a good door closer can solve these problems. Many homes and businesses trust Wright door closers because they are reliable and easy to adjust. But even a simple device like this can be tricky to install if you have never done it before. Getting each step right is important for safety, performance, and long-term use.
This guide will show you, step by step, how to install a Wright door closer. You don’t need to be a professional, but you do need to pay attention to detail. You will learn what tools and materials you need, how to prepare your door, and how to make the adjustments for smooth operation.
Along the way, you will find tips to avoid common mistakes and answers to questions that often confuse beginners.
Whether you are installing a new closer or replacing an old one, this article will help you finish the job confidently. Let’s get started with everything you need to know.
Understanding Wright Door Closers
Before you pick up your tools, it helps to know what a Wright door closer is and why it matters. A door closer is a mechanical device that controls the speed and force of a door closing. This ensures that the door closes smoothly, quietly, and fully every time.
Wright door closers are popular in both homes and commercial buildings. They are often used on storm doors and screen doors, but you might also find them on light interior doors. Their design helps prevent doors from slamming, reduces wear, and helps with energy efficiency by keeping doors properly shut.
There are two main types of Wright door closers:
- Standard door closers: These attach at the top of the door and frame and use a spring and piston to control motion.
- Heavy-duty models: These are designed for larger or more frequently used doors, offering more control and strength.
The model you choose will depend on your door’s weight and how often it is used. If you’re not sure, check the instructions or visit the Wright Products website for recommendations.
Tools And Materials Needed
Gather all your tools and materials before you start. This makes the process smoother and helps you avoid interruptions. Most Wright door closers come with a hardware kit, but you will need some basic tools.
You will need:
- Phillips screwdriver
- Flathead screwdriver
- Power drill (with bits)
- Pencil or marker
- Tape measure
- Step ladder (if your door is tall)
- Safety glasses
- The Wright door closer (with included screws and brackets)
If you are replacing an old closer, you might also need:
- Pliers
- Putty knife or scraper (to remove old hardware)
- Wood filler (if there are extra holes to patch)
Pro tip: Always check the package contents before starting. Sometimes, small parts are missing or fall out during shipping.
Credit: www.homedepot.com
Choosing The Right Location
Correct placement is critical for a Wright door closer to work well. Most closers are installed at the top of the door, on the pull side (the side you pull the door towards you to open). Some models can be installed on the push side if needed, but always follow the manufacturer’s template.
Key considerations for location:
- The closer should be mounted where the arm can move freely without hitting anything.
- Avoid placing it too close to hinges or at the very edge of the door.
- Use the template provided with your closer for perfect alignment.
If your door has decorative glass or molding, you may need to adjust the position slightly. Make sure the surface is flat and strong enough to hold screws.
Preparing The Door And Frame
A little preparation goes a long way. Start by cleaning the area where you will install the closer. Remove any dust, dirt, or old paint. If you are replacing an old door closer, remove all old hardware and fill any extra holes with wood filler.
Let it dry and sand smooth.
Next, close the door and check that it swings freely. If the door rubs or sticks, fix these problems first. A door closer can’t do its job if the door is warped or out of alignment.
Important tip: Measure twice before you mark or drill. Mistakes here can make installation much harder.
Marking And Drilling Holes
Use the paper template included with your Wright door closer. Tape it to the door and frame as shown in the instructions.
- Mark the screw holes with a pencil or marker.
- Double-check the placement for level and alignment.
- Remove the template and get ready to drill.
Set your drill bit to the size recommended in the instructions. Drill holes slowly and carefully to avoid splintering wood or damaging metal frames.
If your door is metal, wear safety glasses and go slowly. Use a center punch to make a small dent at each hole before drilling; this helps keep the drill bit from slipping.
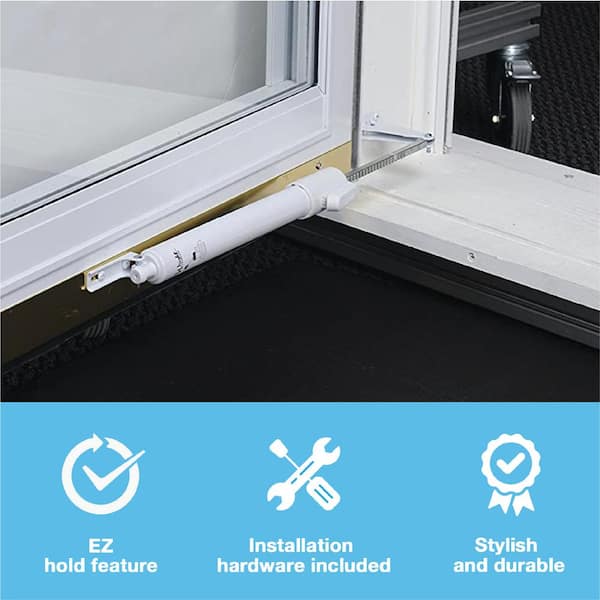
Installing The Door Bracket
The door bracket connects the closer body to the door. Line up the bracket with the holes you drilled and attach it using the screws provided. Tighten the screws firmly, but don’t overtighten—this can strip the screw holes or crack the wood.
If you are installing on a metal door, use the self-tapping screws provided, or buy new ones if needed. For heavy doors, consider using longer screws for extra support.

Credit: www.youtube.com
Attaching The Door Closer Body
Now, attach the main body of the Wright door closer to the bracket. Most models use a pin or screw to connect the arm to the bracket.
- Slide the arm onto the bracket pin.
- Secure with the retaining clip or screw.
Make sure the closer is facing the correct direction (check the instructions for left-hand or right-hand swing). The cylinder should be parallel to the door edge.
Installing The Jamb Bracket
The jamb bracket attaches to the door frame and holds the other end of the closer arm. Use the template to mark the spot on the frame, then drill the holes.
- Attach the jamb bracket with screws.
- Make sure it is level and secure.
Some doors have narrow frames. If there’s not enough room for the bracket, you may need an optional spacer or different hardware.

Credit: www.amazon.com
Connecting The Arm To The Jamb Bracket
Extend the door closer arm and connect it to the jamb bracket. Most models use a sliding arm with a pin that fits into the bracket.
- Adjust the arm length if needed, so it fits smoothly.
- Insert the pin and secure it with the provided clip.
The arm should move freely but without wobbling. If it binds or feels loose, double-check the alignment.
Adjusting The Closing Speed
One of the best features of a Wright door closer is the adjustable closing speed. This keeps your door from slamming or closing too slowly.
Look for the adjustment screw on the end of the closer cylinder. Use a screwdriver to turn the screw:
- Turn clockwise to slow the closing speed.
- Turn counterclockwise to make the door close faster.
Make small adjustments, then test the door. It should close smoothly and latch without slamming. If you have a storm door, make sure air pressure is not slowing the door too much.
Non-obvious insight: Many people adjust the speed screw too quickly or too much at once. Always make small turns—one quarter turn at a time—and test after each adjustment.
Testing The Door Closer
With everything installed, open and close the door several times. Watch for:
- Smooth, steady motion
- Full closure and latching
- No sticking or binding
If the door does not close fully, check the alignment of the brackets and arm. If it slams, slow the speed adjustment. If it closes too slowly, speed it up.
Expert tip: Weather can affect door operation. If it’s very cold or hot, you may need to adjust the closer seasonally.
Fine-tuning The Operation
After a few days of use, you may need to fine-tune the door closer. This is normal as the springs and seals settle.
Common adjustments:
- If the door does not latch, make the last part of the closing cycle a bit faster.
- If the door is hard to open, loosen the mounting screws slightly and realign the closer.
For storm doors, check the air pressure vent. If the door is hard to close, open the vent slightly to let air escape faster.
Non-obvious insight: Some doors have weather stripping that makes closing harder. Adjust the closer to work with this extra resistance, or trim the weather strip if needed.
Replacing An Old Wright Door Closer
If you’re upgrading or replacing a broken closer, the process is mostly the same. Remove the old closer and brackets, fill any extra holes, and follow the steps above.
Things to watch for:
- Old screw holes may be worn. Use wood filler and move the new closer slightly if needed.
- Check the door for damage, especially if the old closer failed suddenly.
Data point: On average, a quality Wright door closer lasts 5-8 years with regular use. Heavy doors or high-traffic areas may need closer replacement sooner.
Comparing Wright Door Closers To Other Brands
If you are still choosing a closer, it helps to compare Wright to other common brands. Here’s a quick look:
| Brand | Price Range | Best For | Adjustable Speed | Warranty |
|---|---|---|---|---|
| Wright | $15-$40 | Storm & screen doors | Yes | 1-5 years |
| Ideal Security | $12-$35 | Light doors | Some models | 1-2 years |
| Prime-Line | $10-$30 | Utility doors | No | 1 year |
| National Hardware | $18-$45 | Heavy doors | Yes | 5 years |
Wright stands out for its easy installation and good price. Most models let you adjust the speed, which is important for safety and comfort.
Common Mistakes To Avoid
It’s easy to make small errors when installing a door closer. Here are the most common mistakes and how to avoid them:
- Wrong placement: Using the wrong template holes or mounting on the wrong side of the door.
- Overtightening screws: This can strip wood or crack frames. Always use the correct force.
- Skipping alignment checks: A crooked closer will never work smoothly.
- Ignoring weather conditions: Changes in humidity or temperature can affect operation.
- Forgetting to test after each step: Always test before moving to the next stage.
Pro tip: If the instructions seem unclear, check the Wright Products website for video guides or call their support line.
When To Call A Professional
Most people can install a Wright door closer with basic tools and patience. But sometimes, you might need help.
Call a pro if:
- Your door is unusually heavy or commercial grade.
- The frame is damaged or very old.
- You are not comfortable with drilling or using power tools.
Professional installation usually takes less than 30 minutes and costs $50-$100, depending on your area.
Maintenance Tips For Long Life
A well-installed door closer can last for years, but regular care helps.
- Check screws and brackets every 3-6 months. Tighten any that have loosened.
- Lubricate moving parts with a light oil every year.
- Clean dust and dirt from the closer body and arm.
- Adjust speed as needed with the change of seasons.
Real-world tip: If you hear squeaking or grinding, add a drop of oil to the arm joint.
Troubleshooting Common Problems
If your Wright door closer is not working as expected, try these fixes:
| Problem | Possible Cause | Solution |
|---|---|---|
| Door slams shut | Speed set too high | Turn adjustment screw clockwise |
| Door won’t close fully | Misaligned brackets | Realign and retighten |
| Closer leaks oil | Damaged seal | Replace closer |
| Arm binds | Obstruction or bent arm | Clear path or replace arm |
| Door is hard to open | Closer set too strong | Loosen adjustment |
Always check the instructions for your specific model. Some older Wright closers may have unique adjustments.
Energy Efficiency And Safety Benefits
A properly installed Wright door closer does more than just close the door. It also helps keep your home or office comfortable and safe.
- Energy savings: By keeping doors closed, you reduce drafts and keep heating or cooling inside. This can lower energy bills.
- Child and pet safety: A controlled door means fewer pinched fingers or slamming accidents.
- Security: Doors that close and latch automatically are less likely to be left open by mistake.
Fact: According to the U.S. Department of Energy, properly sealed and closed doors can save up to 10% on heating and cooling costs annually.
Comparing Standard And Heavy-duty Wright Door Closers
Some doors need more strength. Here is a quick comparison:
| Feature | Standard Model | Heavy-Duty Model |
|---|---|---|
| Max Door Weight | Up to 50 lbs | Up to 100 lbs |
| Speed Adjustment | Yes | Yes |
| Best For | Screen/Storm Doors | Entry/Utility Doors |
| Price | $15-$25 | $30-$40 |
Choose the model that matches your door’s weight and usage. Using a light-duty closer on a heavy door can cause early failure.
Practical Examples And Use Cases
Imagine you have a busy family with kids running in and out all day. Without a door closer, the door might be left open, letting bugs or cold air inside. With a Wright door closer, the door closes gently every time, saving energy and reducing noise.
Another example: In a small business, the main entrance door gets used hundreds of times a day. A heavy-duty Wright closer ensures the door always closes and latches, helping with security and heating costs.
Extra insight: In areas with strong wind, adjust the closer so the door closes firmly enough to latch, but not so strong that it’s hard for children or elderly to use.
Where To Find More Information
If you need more help or want to see installation videos, visit the official Wright Products site. The manufacturer’s guides and customer support can answer specific questions or help with unique door types.
For building codes and safety standards, the International Code Council is a reliable resource.
Frequently Asked Questions
How Do I Know Which Wright Door Closer Model To Buy?
Check your door’s weight and how often it is used. Lighter doors (like storm or screen doors) usually need a standard model. Heavier or high-traffic doors need a heavy-duty closer. The product packaging or Wright’s website has size guides to help you choose.
Can I Install A Wright Door Closer On A Metal Door?
Yes, you can. Use the self-tapping screws included, or buy new ones if needed. Drill slowly and wear safety glasses to avoid metal shavings. Make sure the surface is clean and flat for a secure fit.
Why Is My Door Closer Making Noise?
Squeaking or grinding usually means the arm needs lubrication. Add a drop of light oil to the moving parts. If the noise continues, check for loose screws or debris in the mechanism.
How Often Should I Adjust My Door Closer?
Check the door closer every few months, or if you notice the door slamming or not closing fully. Weather changes can affect how it works. Small adjustments to the speed screw usually fix most issues.
What Should I Do If The Door Closer Leaks Oil?
If you see oil leaking from the closer, the internal seal is likely broken. This cannot be repaired; you need to replace the door closer with a new one.
—
With these steps and tips, installing a Wright door closer is a project you can handle with confidence. Careful preparation, the right tools, and attention to detail will ensure your door works smoothly for years. If you ever feel stuck, don’t hesitate to get help from a professional or visit the Wright Products website for extra support.
A properly installed closer makes your home safer, quieter, and more comfortable every day.