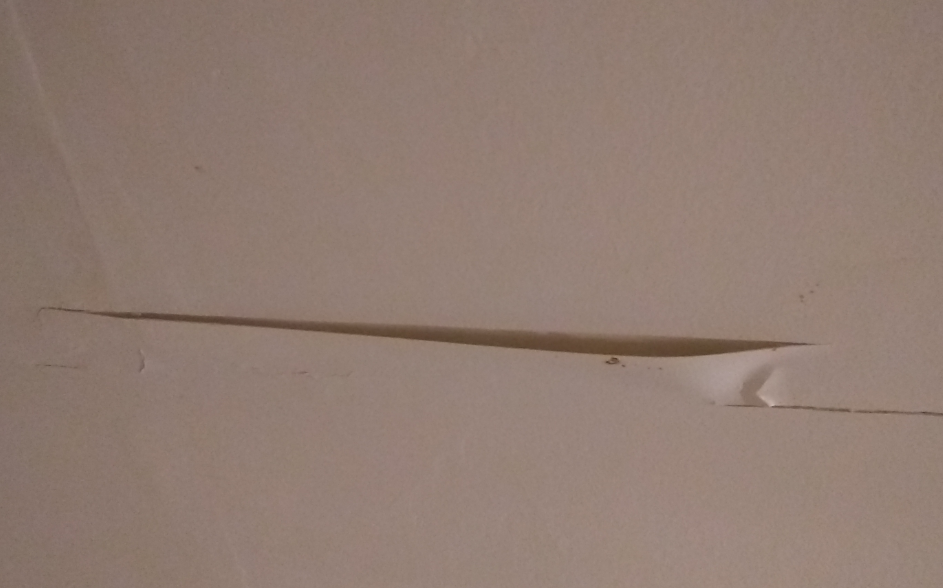
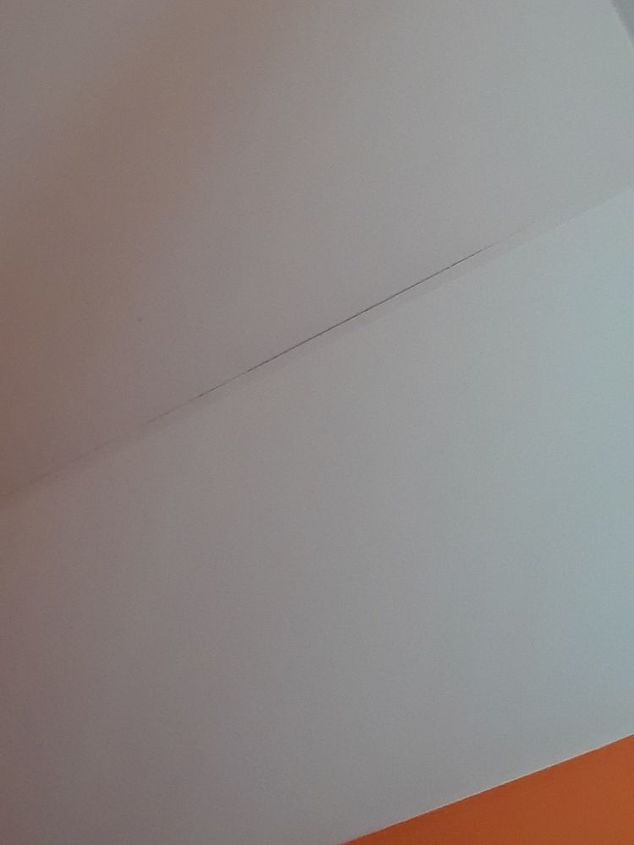
When you notice cracks, bubbles, or sagging drywall tape on your ceiling, it’s easy to feel frustrated or overwhelmed. But the truth is, loose drywall tape is a common ceiling issue—and it’s one that almost any homeowner can fix with the right steps. Whether you want to improve the look of a room or prevent bigger repairs later, learning to repair loose drywall tape is a practical skill that saves money and stress. This guide walks you through everything you need to know, from identifying the problem to making your ceiling look flawless again.
Understanding Loose Drywall Tape
Before you start repairing, it’s important to know why drywall tape comes loose in the first place. Drywall tape is used to cover seams between sheets of drywall. Over time, tape can peel, bubble, or crack due to several reasons:
- Moisture: Water leaks from roofs, bathrooms, or pipes can loosen the tape.
- Poor installation: Not enough joint compound or improper taping technique causes early failure.
- Structural movement: Houses settle, which can stress the seams.
- Age: Old tape simply wears out.
Knowing the cause helps you fix the current problem—and prevent future ones. For example, if moisture is the reason, you must fix the leak before repairing the tape.
Tools And Materials You’ll Need
Gathering the right tools and materials before you start will save you time and frustration. Here’s a list of what you’ll need to repair loose drywall tape on a ceiling:
- Utility knife (sharp blade)
- 6-inch and 12-inch drywall knives (for spreading joint compound)
- Drywall tape (paper tape or fiberglass mesh)
- Joint compound (pre-mixed is easiest for most people)
- Sandpaper (120-150 grit) or a sanding sponge
- Putty knife
- Drop cloths (to protect floors and furniture)
- Step ladder (for ceiling access)
- Painter’s tape
- Vacuum or dust mask
- Primer and ceiling paint
- Sponge and clean water
- Screwdriver (if you need to remove fixtures)
Some people use fiberglass mesh tape while others prefer paper tape. Each has pros and cons, which we’ll compare below.
Drywall Tape Comparison
Choosing the right tape depends on your project and skill level. Here’s a quick comparison:
| Type | Strength | Ease of Use | Best For |
|---|---|---|---|
| Paper Tape | High | Medium | Ceilings, corners |
| Fiberglass Mesh Tape | Medium | Easy | Flat seams, quick repairs |
Paper tape is stronger and resists cracking but needs skill to avoid bubbles. Mesh tape is easier for beginners but may crack if not covered with enough compound.
Step-by-step Guide To Repair Loose Drywall Tape
Let’s break down the process into clear, manageable steps. Don’t rush—taking your time leads to a better finish.
1. Prepare The Area
First, clear the work space. Move furniture or cover it with drop cloths. Lay a drop cloth on the floor to catch dust and debris. Remove nearby light fixtures or ceiling fans if possible. Use painter’s tape to protect walls or moldings where the ceiling meets the wall.
Turn off any fans or air vents to keep dust from spreading. Always wear a dust mask and goggles for safety.
2. Remove The Loose Tape
Use your utility knife or putty knife to carefully cut away the loose drywall tape. Try not to damage the drywall paper underneath. If you find any areas where the tape is still well-attached, you can leave it. Only remove what is clearly loose, bubbled, or peeling.
After removing the tape, scrape off any loose or flaking joint compound. The goal is to get a smooth, solid surface for your repair.
Non-obvious insight: If you find the drywall itself is soft or crumbly (not just the tape), you may have a moisture problem or deeper damage. Fix leaks or replace damaged drywall before continuing.
3. Sand And Clean The Surface
Use 120-150 grit sandpaper or a sanding sponge to smooth the area where you removed the tape. Feather the edges so the surface blends with the surrounding ceiling. Wipe away dust with a damp sponge or vacuum. Let the surface dry completely before moving on.
Tip: Sanding ceilings creates a lot of dust. Use a pole sander for large areas and keep your mouth and eyes protected.
4. Apply The First Coat Of Joint Compound
Using your 6-inch drywall knife, spread a thin, even layer of joint compound over the seam. The compound should extend a few inches beyond the original tape area to help blend the repair.
Apply just enough compound to hold the new tape—not too thick. You want to avoid creating lumps or ridges.
5. Apply New Drywall Tape
While the compound is still wet, press the new drywall tape (paper or mesh) into the center of the seam. Use the knife to gently embed the tape, pressing out any air bubbles or excess compound from underneath.
If you’re using paper tape, make sure it’s completely flat with no folds or wrinkles. With mesh tape, press firmly so the compound comes through the holes in the mesh.
Pro tip: For ceilings, paper tape is often better because it’s less likely to sag over time.
6. Apply Additional Coats Of Compound
After the first coat dries (check the product instructions, usually 12–24 hours), lightly sand the area to remove any ridges or bumps. Then, apply a second, slightly wider coat of joint compound using the 12-inch knife. Feather the edges so the new compound blends into the ceiling.
Let this coat dry, sand it lightly, and repeat with a third, even wider coat if needed. Three thin coats usually create a smooth, invisible repair.
Common mistake: Don’t rush the drying. If you sand or coat too soon, you’ll get cracks or a rough finish.
7. Sand For A Smooth Finish
Once the final coat dries, sand the area until it’s perfectly smooth and flush with the rest of the ceiling. Run your hand over the seam—if you feel any bumps, sand them down.
Non-obvious insight: Use a bright light held at a sharp angle to the surface. This “rakes” the light across the repair and highlights imperfections you can’t see straight on.
8. Clean The Area
Vacuum up dust, then wipe the ceiling with a damp sponge to remove any remaining powder. Let the area dry fully.
9. Prime And Paint
Apply a coat of stain-blocking primer to the repaired area. This prevents the new joint compound from absorbing paint differently than the rest of the ceiling, which could cause uneven color or texture.
When the primer is dry, paint the ceiling with matching ceiling paint. For best results, use a roller for the main area and a brush for edges or corners.
10. Final Inspection
Step back and check your work from different angles, especially with strong light. The repair should blend in completely. If you notice any lines or rough spots, spot sand and touch up as needed.
Troubleshooting Common Problems
Even with careful work, you might run into some challenges. Here’s how to handle the most common ones:
Bubbles Under The Tape
If you see bubbles in the tape after it dries, it usually means the tape wasn’t embedded properly or the compound was too dry. To fix this, cut out the bubbled area with a utility knife, reapply compound, and retape.
Cracks Reappearing
Cracks that return after repair often mean there’s ongoing movement in the structure or not enough compound under the tape. Make sure to fill the seam completely, and consider using flexible caulk for small cracks in areas with a lot of movement.
Uneven Surface
If the repaired area is higher or lower than the rest of the ceiling, sand it down gently and add a thin layer of compound to even things out. Take your time with sanding—being gentle is better than trying to fix it all at once.
Paint Doesn’t Match
If the repaired spot looks shinier or a different shade, it’s probably a primer issue. Use a high-quality primer and allow it to dry fully before painting again.
Credit: www.southingtonpainting.com
Preventing Loose Drywall Tape In The Future
A good repair is only half the battle. Preventing future problems is just as important. Here’s what you can do:
- Control moisture: Fix leaks fast and use exhaust fans in bathrooms and kitchens.
- Allow for settling: Use flexible caulk in areas where cracks reappear due to movement.
- Proper installation: Always embed tape in wet compound, and apply multiple thin coats.
- Use quality materials: Cheap tape or compound is more likely to fail.
- Seal the ceiling: Prime and paint the entire ceiling, not just the repair, for a more consistent finish.
Cost And Time Estimate
Most homeowners can repair loose drywall tape on a ceiling in a weekend. Here’s a quick estimate of what you’ll need:
| Item | Typical Cost | Notes |
|---|---|---|
| Joint Compound (1 gal.) | $8–$15 | Enough for multiple repairs |
| Drywall Tape (roll) | $3–$7 | Paper or mesh |
| Sandpaper/Sponge | $3–$5 | Reusable for several projects |
| Primer & Paint | $20–$40 | May already have at home |
| Misc. Tools | $10–$30 | Knives, ladder, drop cloths |
Time: Most repairs (drying time included) take 2–3 days because you need to let each coat dry. Actual working time is about 3–4 hours.
Advanced Tips For A Professional Finish
If you want your ceiling repair to be truly invisible, try these advanced tips:
- Use a wide knife: The wider your final coat, the less visible the seam.
- Wet sanding: Instead of dry sanding, use a damp sponge for the final sanding to reduce dust and make a smoother surface.
- Tint your primer: Ask the paint store to tint your primer to match your ceiling paint. This helps hide the repair even more.
- Feather out compound: Each layer should be wider than the last. This creates a gentle transition that hides the seam.
- Check the lighting: Look at the ceiling repair in both daylight and artificial light. Shadows can reveal flaws you missed.
When To Call A Professional
Most loose drywall tape repairs are DIY-friendly. However, call a professional if:
- The ceiling is very high or hard to reach
- The damaged area is larger than 10 square feet
- There’s evidence of ongoing water leaks or mold
- The drywall itself is soft, sagging, or falling
- You have health concerns with dust or working overhead
A pro will have the tools and experience to handle big or complex repairs, and can ensure the problem doesn’t come back.
Common Mistakes Beginners Make
Repairing loose drywall tape can seem simple, but here are mistakes to avoid:
- Not removing all the loose tape: Leaving even a small loose section can cause the problem to return.
- Skipping primer: Paint won’t stick or match if you don’t prime first.
- Applying compound too thick: Thick layers crack and take much longer to dry.
- Rushing the drying process: Patience leads to a better finish.
- Using the wrong tape: Mesh tape is easy but not always strong enough for ceilings.
- Not blending the repair: If you don’t feather your final coat, the repair will show.
- Ignoring the cause: Moisture or movement issues must be fixed or repairs won’t last.
Real-world Example
Imagine you notice a 3-foot-long bubble in the ceiling tape above your shower. You scrape away the loose tape, discover a small area of mold, and realize a bathroom fan isn’t working. Fixing the fan and cleaning the mold before you retape the seam means your repair will last much longer than just patching the tape.
Credit: www.hometalk.com
Comparing Diy Vs. Hiring A Contractor
Should you do it yourself or hire a pro? Let’s compare:
| Factor | DIY | Contractor |
|---|---|---|
| Cost | $40–$80 (materials) | $150–$500 (labor + materials) |
| Time | 2–3 days (drying time) | 1–2 days (faster with crew) |
| Finish Quality | Good with care | Excellent, seamless |
| Convenience | Messy, takes effort | Easy, no work for you |
DIY is best for small repairs. Large, visible, or high ceiling jobs are often worth hiring out.
Safety Precautions
Repairing ceilings involves working overhead and creating dust. Here’s how to protect yourself:
- Always wear safety goggles and a dust mask
- Use a sturdy ladder and never overreach
- Work with a partner if possible, especially for high ceilings
- Keep the area well-ventilated
- Clean up dust thoroughly to protect pets and children

Credit: eppconcrete.com
Useful Resources
If you want to see video demonstrations or learn more about drywall finishing techniques, the United States Gypsum Association provides detailed guides and best practices. You can find more at the Gypsum Association.
Frequently Asked Questions
How Do I Know If My Drywall Tape Is Loose Or Just Needs Paint?
Loose drywall tape looks bubbled, peeling, or cracked. If you press on it and it moves, or you see a ridge, it needs repair. If it’s just dirty or faded, paint alone may be enough.
Can I Use Caulk Instead Of Drywall Tape For Small Cracks?
Caulk can work for small cracks in corners or where walls meet ceilings, especially in areas with movement. But for long seams or wide cracks, drywall tape is stronger and lasts longer.
What’s The Best Way To Match My Ceiling Paint After A Repair?
Take a small paint chip (or use leftover paint) to a paint store for color matching. Use a primer first, then paint the whole ceiling for a perfect match if possible. Sometimes, just painting the repaired area will show a difference.
Why Does My Drywall Tape Keep Coming Loose In The Same Spot?
This often means there’s a structural or moisture problem. Check for leaks, poor ventilation, or movement in the ceiling. Fix the underlying cause before repairing the tape, or the problem will return.
Is It Okay To Use Only One Coat Of Joint Compound?
One coat is rarely enough to hide the tape and blend the repair. Use at least two coats, sanding in between, for a smooth finish. Three thin coats are best for most ceiling repairs.
Repairing loose drywall tape on your ceiling is a practical, cost-effective DIY project. With a little time and attention to detail, you can restore your ceiling to like-new condition and prevent future problems. Take your time, follow the steps, and you’ll have a smooth ceiling—and the satisfaction of a job well done.