
Running a water line to your fridge under the floor might sound difficult, but with the right steps and careful planning, it’s a project many homeowners can handle. If you want ice and chilled water from your refrigerator, you’ll need a reliable, leak-free connection.
This guide will walk you through every detail, from choosing the right tubing to connecting everything safely—saving you money and giving you peace of mind.
Understanding The Basics Of Fridge Water Lines
Before you grab your tools, it’s important to know why running a water line under the floor is different from running it along the wall. When the water line runs under the floor, it is less visible and less likely to get bumped or damaged. However, it also means you have to think about the building’s structure, possible leaks, and future repairs.
Key considerations:
- Distance from water source: The longer the run, the more planning you need.
- Floor type: Wood, tile, and concrete all require different approaches.
- Plumbing codes: Always check your local regulations.
- Tubing materials: Some tubing lasts longer and resists freezing better than others.
A small leak under the floor can cause big problems over time, so this is a job where doing it right matters.
Tools And Materials You Will Need
Having the right tools and materials will make the job much easier and safer. Here’s what you’ll need:
- Flexible water line tubing (PEX, copper, or braided stainless steel)
- Drill with long wood or masonry bits (for concrete)
- Tube cutter (if using copper or PEX)
- Push-to-connect fittings or compression fittings
- Pipe insulation (to protect from temperature changes)
- Water shut-off valve (add if not already present)
- Wrenches (adjustable and pipe wrenches)
- Plumber’s tape (Teflon tape)
- Fish tape or wire coat hanger (to pull tubing)
- Pencil and measuring tape
- Bucket and towels (for spills)
- Flashlight
Pro tip: Always buy a few extra feet of tubing and fittings—mistakes and miscalculations are common, especially for first-timers.
Choosing The Right Tubing For Your Water Line
Not all water line tubing is the same. The material you choose affects installation ease, durability, and long-term safety.
| Material | Pros | Cons | Best For |
|---|---|---|---|
| PEX | Flexible, easy to install, resists freezing | Needs special fittings, UV sensitive | Most modern homes |
| Copper | Durable, bacteria-resistant, lasts decades | Harder to bend, expensive, needs soldering or compression fittings | High-end or old homes |
| Braided stainless steel | Very flexible, easy to connect, resists kinks | Shorter lengths, more expensive, not for long runs | Short, exposed runs |
| Plastic (polyethylene) | Cheap, easy to cut | Can become brittle, less durable | Temporary solutions |
PEX is the most popular choice for under-floor fridge water lines. It’s flexible, resists freezing, and works well with push-to-connect fittings. Copper is a solid choice if you want maximum longevity, but it’s harder to work with, especially for beginners.
Planning Your Route: Where And How To Run The Line
Planning is the most critical step. Rushing this part often leads to leaks and future headaches.
Steps For Planning
- Locate the nearest cold water pipe. This is usually under the kitchen sink or in the basement.
- Measure the total distance from the water source to the back of the fridge.
- Map out the path. Avoid sharp bends, potential nail/screw zones, and electrical wires.
- Decide where to drill: You’ll usually need to drill through the cabinet wall and floor.
- Check for obstacles: Use a stud finder and check under the floor for pipes or wiring.
- Plan for a shut-off valve: Place it where you can easily reach it.
Beginner insight: Many people forget that refrigerators are moved during cleaning or repairs. Leave enough extra tubing (a “service loop”) behind the fridge so it can be pulled out without straining the connection.
Turning Off The Water And Preparing The Work Area
Before drilling or cutting, you must shut off the water to avoid flooding. Find your cold water supply valve—usually under the kitchen sink or in the basement—and turn it off. Open the nearest faucet to relieve pressure.
Clear the area: Move the fridge away from the wall. Remove anything under the sink or in the path. Lay down old towels to catch drips. Have a bucket ready for any remaining water in the pipes.
Safety tip: Always wear safety goggles when drilling and cutting.
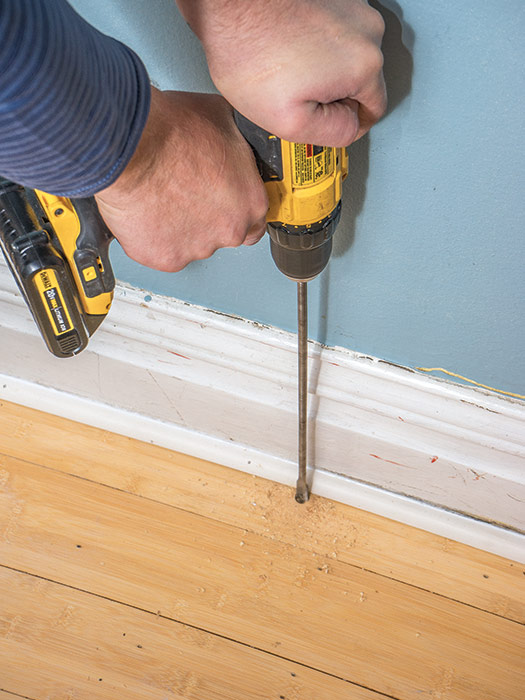
Drilling The Holes In Cabinets And Floor
Drilling is often the most nervous part for beginners, but it’s straightforward if you go slow and steady.
Drilling Through Cabinets
- Mark the spot on the cabinet wall where the tubing will enter.
- Drill a hole slightly larger than the tubing (usually 3/8” to 1/2”).
- Sand the hole’s edges to prevent the tubing from getting cut.
Drilling Through The Floor
- Double-check for wires or pipes using a stud finder or by peeking from below.
- Mark the spot and drill straight down through wood or tile. If you have concrete, use a masonry bit.
- For thick floors, drill a small pilot hole first.
Pro insight: Insert a short length of plastic grommet or split tubing in the hole. This prevents friction from damaging the line over years of movement and vibration.
Feeding The Tubing Under The Floor
Now comes the part where you actually run the tubing.
Steps To Feed The Tubing
- Push or pull: If you can access the basement or crawlspace, push the tubing down through the hole. If not, use fish tape or a straightened wire hanger to pull it from below.
- Route carefully: Keep the tubing away from hot water pipes and electrical wires. Secure with plastic clamps every 3-4 feet.
- Insulate: Slide foam pipe insulation around the tubing, especially if running through cold areas. This reduces the risk of freezing and sweating.
Common mistake: Don’t pull the tubing too tight. Leave a gentle curve—tight bends can kink the line and restrict water flow.
Connecting To The Water Supply
You’re halfway there. Now, you need to connect your new tubing to the cold water supply.
Installing A Saddle Valve (not Recommended)
Many old guides suggest using a saddle valve—a clamp-on valve that pierces the pipe. These are easy but often leak over time and are no longer code-approved in many areas.
Installing An Add-a-tee Or Push-to-connect Valve (best Practice)
A better solution is an add-a-tee valve or a push-to-connect valve. These are reliable and code-approved.
How To Install:
- Shut off main water if needed.
- Disconnect the cold water line under the sink.
- Attach the add-a-tee or push-to-connect valve according to instructions.
- Wrap threads with plumber’s tape to prevent leaks.
- Connect the fridge tubing to the new valve using a compression or push fitting.
- Tighten with a wrench—do not overtighten.
Expert tip: Push-to-connect fittings are the easiest and most reliable for beginners. They simply snap on and seal without tools.
Credit: www.finehomebuilding.com
Pulling The Line Up To The Fridge
Once the tubing is under the floor, you need to get it up behind the fridge.
- Drill a hole in the floor directly behind or beside the fridge location.
- Feed the tubing up and leave a service loop.
- Secure the tubing so it won’t get pinched when you move the fridge.
Extra advice: Some people add a wall plate or grommet at the exit for a cleaner look and extra protection.
Connecting To The Refrigerator
Connecting to the fridge is usually the easiest part.
Steps To Connect
- Locate the water inlet at the back of the fridge.
- Cut tubing to length with a tube cutter—always cut clean and straight.
- Slide on the compression nut and ferrule (if needed).
- Insert tubing into the fridge fitting.
- Tighten the connection with a wrench, being careful not to overtighten.
Beginner insight: If your fridge uses a quick-connect fitting, just push the tubing in until it clicks. If you have any doubt, check the manual for your fridge model.
Testing For Leaks And Flushing The Line
Before you slide the fridge back in place, you must check for leaks.
- Turn on the water supply slowly.
- Check every connection—especially under the sink and behind the fridge.
- Look for drips or wet spots for at least five minutes.
- Flush the line: Run water through the fridge for several minutes (or fill a few pitchers of water). This clears out any debris and air.
Advanced tip: Place dry paper towels under each connection for the first day. Even small leaks will show up as wet spots.
Insulation And Protection For Under-floor Water Lines
Under-floor lines are more at risk from cold, pests, and accidental damage. Taking time to protect your new water line is a smart investment.
- Wrap insulation around the tubing, especially in basements or crawlspaces.
- Secure the tubing with plastic clamps, not metal (metal can damage soft tubing over time).
- Label the line near the valve and fridge, so future homeowners or plumbers know what it is.
- Keep the route clear of storage boxes and tools.
Overlooked detail: Make sure the insulation covers the line all the way to the fridge and not just in the basement. Gaps in insulation can lead to condensation and mold.
Comparing Installation Methods: Wall Vs. Under-floor Vs. Overhead
Each installation route has pros and cons. Here’s a comparison to help you decide if under-floor is best for you.
| Method | Pros | Cons | Best Use Case |
|---|---|---|---|
| Under-Floor | Hidden, protected, less visible | Harder to repair leaks, needs access below | Basements, first-floor kitchens |
| Wall Surface | Easy access, simple install, easy to repair | Visible, can be bumped, less attractive | Short runs, renters, when appearance is less important |
| Overhead (Ceiling) | Hidden, good for finished basements | Trickier to install, risk of drips above living space | Finished ceilings, long runs across rooms |
Common Mistakes And How To Avoid Them
Many DIYers make small errors that lead to leaks, wasted money, or repairs later. Here’s how to avoid them:
- Using the wrong tubing: Choose PEX or copper for under-floor runs. Don’t use thin plastic tubing for long, hidden runs.
- Skipping insulation: Uninsulated lines can freeze, sweat, or attract pests.
- Tight bends: Sharp turns can kink the line or restrict water flow.
- Too little slack: Without a service loop, moving the fridge can break the connection.
- Improper fittings: Cheap or poorly installed fittings are the #1 cause of leaks.
- Forgetting a shut-off valve: Always install a valve within easy reach.
- Not flushing the line: Old pipe debris and plastic shavings can ruin your fridge’s filter or valve.
- Ignoring building codes: Some areas have strict rules for plumbing. Check before you drill.
Non-obvious insight: Even small leaks under the floor may go unnoticed for months, causing mold or wood rot. Regularly check the area for musty smells or soft spots in the floor.

Credit: www.reddit.com
Cost Breakdown: Diy Vs. Hiring A Professional
Running a water line yourself can save money, but sometimes hiring a plumber is worth the cost.
| Expense Type | DIY Cost (Approx.) | Professional Cost (Approx.) |
|---|---|---|
| Materials | $30 – $80 | Included in total fee |
| Labor | $0 | $150 – $400 |
| Time | 2-4 hours | 1-2 hours |
| Potential Repairs | Varies | Often covered |
Note: If you aren’t comfortable drilling or have a complex floor, hiring a plumber prevents expensive mistakes.
Maintenance Tips For Your New Water Line
A well-installed water line can last for decades. Here’s how to keep it working perfectly:
- Check for leaks every few months, especially after moving the fridge.
- Replace the fridge filter on schedule—usually every 6 months.
- Inspect insulation yearly and replace if damaged.
- Turn off the water if you’ll be away for a long time to prevent unnoticed leaks.
- Listen for noise: Hissing or banging can mean a loose connection.
Advanced insight: If your water pressure is very high, consider installing a pressure-reducing valve. High pressure can damage fridge valves and tubing.

Credit: www.reddit.com
When To Call A Plumber
DIY is rewarding, but some situations call for a pro:
- Your water pipes are old or corroded.
- You can’t access the area under your floor easily.
- You need to run the line through concrete or complicated structures.
- You see signs of leaks or water damage after installation.
Pro tip: Always choose a licensed, insured plumber for major work. A small upfront cost can save thousands in repairs.
Environmental And Health Considerations
Clean, fresh water is important for your family’s health.
- Lead-free tubing: Always use certified, lead-free materials.
- Regular filter changes: Dirty filters can harbor bacteria.
- Avoid old plastic tubing: Some can leach chemicals over time.
- Flush new lines: Always flush before first use.
Non-obvious insight: Some refrigerator water dispensers can grow mold if not used often. Run water weekly, even if you don’t need ice or chilled water.
Troubleshooting Common Problems
Even a perfect installation can have problems later. Here’s how to fix common issues:
- Low water flow: Check for kinks, clogged filters, or closed valves.
- Leaking connections: Tighten fittings or replace faulty parts.
- No ice production: Ensure the line isn’t frozen and the valve is fully open.
- Cloudy water: Flush the line longer or replace the filter.
If problems persist, consult your fridge’s manual or call a service technician.
Safety And Building Code Considerations
Every city and state has different plumbing codes. Many require:
- Accessible shut-off valves
- Lead-free materials
- Proper insulation in cold climates
- No use of saddle valves
Check with your local building department before starting. Doing it right keeps your family safe and protects your home’s value. For more detailed information on plumbing codes, visit the official EPA website.
Frequently Asked Questions
How Long Does It Take To Run A Fridge Water Line Under The Floor?
Most DIYers finish in 2 to 4 hours, depending on the length of the run and floor type. Concrete or long routes can take longer.
What Kind Of Tubing Is Best For Under-floor Fridge Water Lines?
PEX tubing is the top choice for most homes. It’s flexible, durable, and resists freezing. Copper is best for very long-term durability but is harder to install.
How Do I Know If My Water Line Is Leaking Under The Floor?
Look for musty odors, soft spots, or mold near the route. Put dry paper towels under connections to spot leaks early. A sudden spike in your water bill can also be a warning.
Can I Install A Fridge Water Line Without Turning Off The Main Water Supply?
In many cases, yes—if you have a shut-off valve on your cold water line. For major changes, it’s safest to turn off the main supply.
Are Saddle Valves Safe For Fridge Water Lines?
No, saddle valves are not recommended. They are prone to leaks and are banned in many areas. Use a push-to-connect or add-a-tee valve for a safer, code-approved connection.
Running a water line to your fridge under the floor takes planning, patience, and careful work. But the reward is cold, clean water and ice at your fingertips—and the confidence that you did the job right. With the steps above, you can enjoy years of worry-free service from your new water line.