Bringing a new baby home is a joyful experience, but it also brings new challenges—especially when it comes to creating a safe, organized space for diaper changes. Many parents choose to use a changing pad on top of a dresser to save space and keep everything within reach. But how do you attach a changing pad to a dresser securely, so your baby stays safe and you feel confident during every diaper change?
If you’re setting up your nursery or updating your baby’s room, you need clear, step-by-step instructions. This guide explains everything you need to know, from choosing the right changing pad and dresser, to methods for securing the pad, and even tips for keeping the area tidy and safe.
You’ll also learn common mistakes parents make, what to avoid, and practical tips that are often missed.
By the end, you’ll be able to set up your baby’s changing station with peace of mind, knowing you’ve made it as safe, stable, and convenient as possible.
Why Attach A Changing Pad To A Dresser?
Many parents ask, “Why not just place the pad on the dresser and be careful? ” The answer is safety. Babies move—sometimes unexpectedly. A changing pad that slides or tips is a serious risk. Attaching the pad reduces accidents and makes diaper changes easier.
Besides safety, securing the changing pad helps with organization. You’ll know the pad stays in place even if you bump it, and the area looks tidy. It’s one less thing to worry about when you’re in a hurry or dealing with a messy diaper.
Choosing The Right Changing Pad And Dresser
Before you attach anything, you need the right equipment. Not every changing pad or dresser will work together. A poor fit can make the setup unstable or unsafe. Here’s what to consider:
Changing Pad Features That Matter
- Size and Fit: Measure your dresser’s top surface. The changing pad should fit completely on the dresser without overhanging edges.
- Non-Skid Bottom: Some pads have a rubber or textured bottom to help prevent sliding.
- Safety Straps: Look for pads with built-in safety straps for extra security.
- Waterproof Cover: This makes cleaning up accidents much easier.
- Firmness: The pad should be firm enough to support your baby but not too hard.
Dresser Considerations
- Flat, Sturdy Surface: The top must be flat—avoid slanted or curved surfaces.
- Height: Standard dresser height is around 34-36 inches. This reduces back strain during changes.
- Surface Area: The dresser should be at least as deep and wide as the changing pad.
- Stability: The dresser shouldn’t wobble. If it rocks or shifts, secure it to the wall with anti-tip straps.
Example: Matching Pad And Dresser Sizes
| Changing Pad Size (inches) | Minimum Dresser Top Size (inches) | Comments |
|---|---|---|
| 32 x 16 | 34 x 18 | Standard fit; leaves space for wipes and creams |
| 34 x 17 | 36 x 19 | Works for larger pads; check dresser stability |
| 30 x 15 | 32 x 17 | Good for compact spaces |
Non-obvious insight: Always check the dresser’s weight limit, especially if it’s vintage or secondhand. Some older dressers may not support the extra pressure of baby and pad.
Methods To Attach A Changing Pad To A Dresser
There are several ways to secure a changing pad. The best method depends on your dresser, pad, and how permanent you want the setup. Here are the most reliable methods:
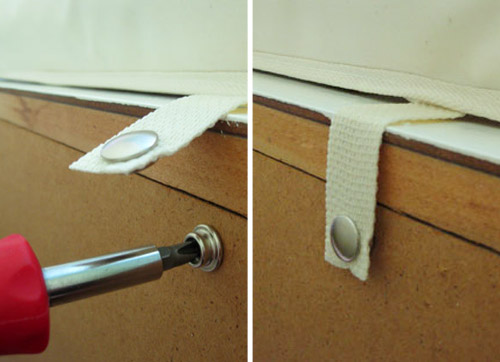
1. Using Built-in Straps
Many changing pads come with safety straps. These can be used to attach the pad to the dresser.
How it works:
- The strap runs underneath the dresser top and buckles the pad in place.
- Some dressers have a gap between the top and frame, allowing the strap to pass through.
Steps:
- Place the pad on the dresser.
- Run the safety strap under the dresser top.
- Secure the strap using the buckle on the pad.
- Pull the strap tight so the pad doesn’t move.
Tip: If there’s no gap under the dresser top, you might need another method.
2. Using Adhesive Strips Or Velcro
Double-sided adhesive strips and industrial Velcro are popular for a semi-permanent solution.
How it works:
- Adhesive sticks to both the dresser and the bottom of the pad.
Steps:
- Clean both surfaces (pad bottom and dresser top) with rubbing alcohol.
- Attach adhesive strips or Velcro to the pad.
- Press the pad firmly onto the dresser.
- Let it cure for a few hours before use.
Pros: No damage to the furniture; pad is easy to remove when needed.
Cons: Adhesive may lose grip over time or with heavy cleaning.
Non-obvious insight: Industrial Velcro is stronger than basic craft Velcro and can handle more movement.
3. Using Non-slip Mats
A non-slip rug pad or mat can be placed under the changing pad.
How it works:
- The mat creates friction, reducing sliding.
Steps:
- Cut the non-slip mat to the size of the changing pad.
- Place the mat on the dresser top.
- Set the pad on top of the mat.
Pros: No sticky residue or screws.
Cons: Not as secure as straps or adhesive. Good as a backup method.
4. Screwing The Pad Base To The Dresser
Some changing pads or trays allow you to screw them into the dresser top for a permanent solution.
How it works:
- Screws or brackets anchor the pad or tray to the furniture.
Steps:
- Check if your pad or tray has pre-drilled holes.
- Mark the position on the dresser top.
- Drill small pilot holes.
- Attach using screws provided.
- Check for stability.
Warning: This will leave holes in your dresser. Only use if you’re sure you won’t remove the pad soon.
5. Using A Separate Changing Tray
A changing tray is a wooden or plastic frame designed to hold the pad. It sits on the dresser and can be attached with brackets or screws.
How it works:
- The tray provides a lip around the pad, keeping it from sliding.
- Some trays have straps or can be screwed to the back of the dresser.
Pros: More stable, less chance of pad slipping.
Cons: Tray takes up more space on the dresser.
Comparison Of Attachment Methods
Here’s a quick look at how different methods compare for security, ease of removal, and furniture damage.
| Method | Security | Removable | Furniture Damage |
|---|---|---|---|
| Built-in Straps | High | Yes | No |
| Adhesive/Velcro | Medium | Yes | No (maybe sticky residue) |
| Non-slip Mat | Low | Yes | No |
| Screws/Brackets | Very High | No | Yes |
| Changing Tray | High | Yes (with screws, no) | Sometimes |
Step-by-step Guide: Attaching A Changing Pad To A Dresser
Let’s walk through a practical example using the most popular methods. This way, you’ll know exactly what to do at each step.
Preparation
- Clear the Dresser Top: Remove all items.
- Clean Surfaces: Wipe the dresser and pad bottom with a damp cloth.
- Gather Tools: Depending on the method, you may need:
- Screwdriver or drill
- Adhesive/Velcro strips
- Non-slip mat
- Measuring tape
- Pencil or marker
Method 1: Using Built-in Straps
- Find the Strap: Check your changing pad for safety straps.
- Position the Pad: Place it centered on the dresser.
- Run the Strap: If possible, feed the strap under the dresser top.
- Secure the Buckle: Fasten and tighten.
- Test Stability: Gently push the pad. It should not slide.
Tip: If the dresser top is solid with no gap, straps may not work. Try adhesive or tray instead.
Method 2: Using Adhesive Strips Or Velcro
- Clean Surfaces: Use rubbing alcohol for better adhesion.
- Apply Strips: Place on the pad’s bottom corners.
- Position Pad: Place carefully—adhesive is strong.
- Press Firmly: Hold for 30 seconds in each spot.
- Wait: Allow adhesive to set for at least 1 hour.
Tip: For heavy-duty Velcro, follow package instructions for best results.
Method 3: Non-slip Mat
- Cut Mat: Match the pad’s size.
- Place Mat: On the dresser, then the pad on top.
- Test: Push the pad gently—should stay in place.
Tip: Combine with adhesive for extra security if needed.
Method 4: Screwing/bracketing
- Read Instructions: Some pads/trays come with hardware.
- Mark Holes: Use a pencil where screws will go.
- Drill Pilot Holes: Make small guide holes.
- Screw In: Attach pad or tray firmly.
- Check Stability: Shake gently—there should be no movement.
Tip: If you want to avoid visible holes, use brackets at the back where they’re less obvious.
Final Check
After attaching, always:
- Shake the pad gently to check for movement.
- Test with your hand before placing the baby.
- Check all fastenings weekly.
Non-obvious insight: Over time, even secure pads can loosen. Regularly check all attachments.
Credit: www.younghouselove.com
Safety Tips For Using A Changing Pad On A Dresser
Safety is more than just attaching the pad. Here are extra steps many parents forget:
- Never leave your baby unattended, even for a second. Accidents happen quickly.
- Keep one hand on your baby during changes.
- Store all supplies within arm’s reach—wipes, diapers, creams.
- Anchor the dresser to the wall with anti-tip brackets. Babies may kick or push, risking tipping.
- Avoid placing heavy items above the dresser (like shelves) that could fall.
- Check pad and straps regularly for wear and tear.
Organizing The Changing Station
A well-organized station saves time and stress. Here’s how to keep everything tidy and within reach.
What To Keep Nearby
- Diapers: Stack or place in a basket.
- Wipes: Box or warmer.
- Creams and lotions: Small tray or caddy.
- Extra clothes: For quick changes.
- Disposable bags: For dirty diapers.
Example: Simple Changing Station Setup
| Item | Best Location | Tip |
|---|---|---|
| Diapers | Top drawer or basket on dresser | Refill daily |
| Wipes | Next to pad, on non-slip tray | Keep lid closed to prevent drying |
| Creams | Small caddy in top drawer | Avoid clutter on dresser top |
| Spare clothes | Second drawer | Fold for easy grabbing |
| Disposable bags | Hanging on side or in drawer | Choose scented for odor control |
Non-obvious insight: Place a nightlight or small lamp nearby for nighttime changes without waking your baby fully.
Mistakes To Avoid When Attaching A Changing Pad
Many parents make the same errors when setting up a changing pad. Avoid these for a safer, easier experience:
- Choosing the wrong pad or dresser size. Always measure first.
- Ignoring pad movement. Even small sliding is risky—secure it.
- Not cleaning before applying adhesive. Dirt or dust reduces grip.
- Using weak Velcro. Only industrial-strength works for changing pads.
- Placing pad near dresser edge. Always center the pad.
- Skipping regular checks. Attachments loosen with use.
- Not anchoring the dresser. A tipping dresser is more dangerous than a loose pad.
- Overloading the dresser top. Too many items crowd the space and create hazards.
- Assuming straps alone are enough. Combine methods for best results.
Customizing For Different Dresser Types
Not all dressers are alike. Here’s how to adapt your method for common dresser types.
Low, Wide Dressers
- Pros: More surface area, easier to organize.
- Cons: May not fit straps under top.
- Tip: Try adhesive or changing tray for best fit.
Tall, Narrow Dressers
- Pros: Saves floor space.
- Cons: Less stable, easier to tip.
- Tip: Always anchor to the wall and use a non-slip mat plus adhesive.
Antique Or Heirloom Dressers
- Pros: Stylish, unique.
- Cons: May have delicate surfaces; avoid screws.
- Tip: Use non-slip mats or strong Velcro; avoid drilling.
Dresser With Drawers Only
- Pros: Drawers offer plenty of storage.
- Cons: Nowhere to secure straps.
- Tip: Use adhesive or a tray.
Non-obvious insight: For renters, avoid permanent damage by skipping screws and using removable adhesives.
Credit: thediyplaybook.com
How To Remove A Changing Pad Later
Your child won’t need a changing station forever. Here’s how to remove the pad without damaging your dresser:
- Adhesive/Velcro: Gently peel off. Use a hair dryer on low heat to soften glue. Remove residue with Goo Gone or rubbing alcohol.
- Screws: Unscrew carefully. Fill holes with wood filler, sand, and touch up with paint or marker.
- Non-slip mat: Just remove—no damage.
- Straps: Unbuckle and slide out.
Tip: Take your time. Rushing can damage wood or finish.
Cleaning And Maintenance
A clean changing area keeps your baby healthy. Here’s what to do:
- Wipe the pad after every use with a baby-safe cleaner or disinfectant.
- Wash pad covers weekly (or more if soiled).
- Clean the dresser top at least once a week.
- Check all attachments every month—look for loose screws, worn Velcro, or slipping pads.
Non-obvious insight: Keep a backup pad cover handy for quick swaps during laundry day.
Alternatives To Attaching A Changing Pad To A Dresser
If you can’t or don’t want to attach a pad, consider these options:
- Free-standing changing table: Designed for stability, usually comes with safety rails.
- Portable changing station: Lightweight and easy to move, but must always be placed on a flat, stable surface.
- Floor changing mat: For quick changes, especially as your baby grows and starts rolling.
Each has pros and cons, but attaching a pad to a dresser is the best mix of convenience and safety for most families.
When To Replace Your Changing Pad Or Setup
Changing pads don’t last forever. Replace your pad if:
- The foam loses shape or becomes uneven.
- The cover is torn, cracked, or can’t be cleaned.
- Straps or attachments break.
- Your child outgrows the pad (usually around age 2).
If you notice the dresser or attachments are damaged, fix or replace them before using again.
Useful Resources
For more guidance on nursery safety, the American Academy of Pediatrics offers detailed advice on furniture safety and changing table use. For more, visit the HealthyChildren.org website.
Frequently Asked Questions
What Is The Safest Way To Attach A Changing Pad To A Dresser?
The safest method combines built-in safety straps with a non-slip mat or industrial Velcro. Straps keep the pad secure, while non-slip mats or Velcro provide extra grip. Always check regularly to ensure everything is tight.
Can I Use A Regular Dresser As A Changing Table?
Yes, as long as the dresser is sturdy, the pad fits fully on top, and you secure the pad using one of the methods described above. Anchor the dresser to the wall to prevent tipping.
Will Attaching A Changing Pad Damage My Dresser?
Some methods, like screws or brackets, leave small holes. Adhesive or Velcro may leave residue, which can usually be cleaned off. Non-slip mats and straps cause no damage. Choose the method that matches your furniture and needs.
How Often Should I Check The Changing Pad Attachments?
Check at least once a week. Pads can loosen with daily use, so regular checks ensure your baby’s safety. Also inspect before each diaper change for any movement.
What If My Changing Pad Keeps Sliding Even After Attaching?
Double up on methods—use both a non-slip mat and adhesive, or add a changing tray. If the dresser’s surface is very slick, lightly roughen it with fine sandpaper under the pad to help adhesives stick better.
A secure changing pad gives you peace of mind and keeps your baby safe. With the right setup and regular care, your nursery will be a safe and comfortable place for every change.

Credit: www.amazon.com