Moisture on your ceiling is more than just an eyesore. It can lead to mold, structural damage, and even health problems. Many homeowners notice stains, bubbling paint, or a musty smell and wonder what to do next. Removing moisture from the ceiling is not just about cleaning—it requires finding the cause, fixing it, and making sure it doesn’t come back.
This guide walks you through every step, from identifying why your ceiling is wet to drying it out and preventing future problems. Whether you’re dealing with a small patch or a major leak, you’ll learn practical solutions that anyone can follow.
Along the way, you’ll see tips most people miss, common mistakes, and when it’s time to call in a professional. By the end, you’ll have the knowledge to tackle ceiling moisture confidently and keep your home dry and healthy.
Why Moisture Accumulates On Ceilings
Before you fix the problem, it’s important to know what causes ceiling moisture. Here are the most common reasons:
- Leaky Roof: Damaged shingles, flashing, or roof valleys let rainwater seep in.
- Plumbing Leaks: Pipes running above the ceiling (especially in bathrooms and kitchens) may drip or burst.
- Condensation: In humid climates, warm indoor air meets a cold ceiling, causing moisture to collect.
- Poor Ventilation: Bathrooms, laundry rooms, or kitchens without good airflow trap humid air.
- Attic Issues: Blocked vents or insufficient insulation can push moisture down into living spaces.
Often, more than one factor is involved. For example, a small roof leak gets worse with poor ventilation. Finding the right cause saves time and money.
How To Identify Moisture On Ceilings
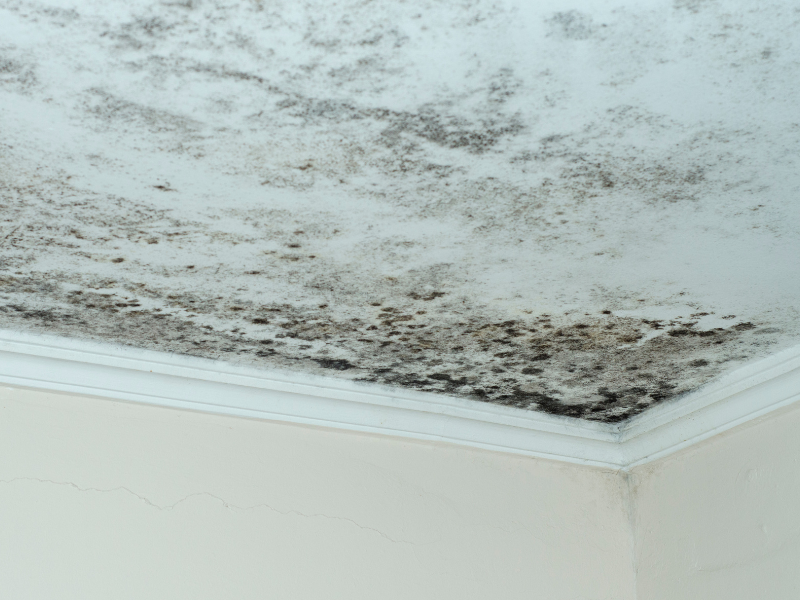
Sometimes, the signs of moisture damage are obvious, but other times, they’re subtle. Here’s how to spot trouble early:
- Stains: Brown, yellow, or dark spots, often in irregular shapes.
- Peeling Paint or Wallpaper: The bond breaks when moisture gets behind surfaces.
- Sagging or Bubbling: The ceiling droops or bubbles form under paint.
- Musty Odor: Persistent, earthy smell that doesn’t go away.
- Visible Mold: Black, green, or white fuzzy spots—especially in corners.
Touching the area might reveal softness or dampness. Use a flashlight to check corners and spots near vents, pipes, or windows.
Tools For Moisture Detection
You don’t have to guess. Several tools make detecting moisture easier:
| Tool | How It Helps | Typical Cost |
|---|---|---|
| Moisture Meter | Measures water content in drywall or wood | $20 – $60 |
| Infrared Thermometer | Spots temperature changes that suggest wet areas | $30 – $100 |
| Flashlight | Shows surface changes and mold growth | $5 – $20 |
A moisture meter is a smart investment if you deal with leaks often or live in a humid area.
Credit: humilogic.com
Immediate Steps To Take When You Spot Moisture
Acting fast is critical. The longer moisture sits, the more damage it causes.
- Stop the Source: If water is dripping, turn off water supply lines or cover roof leaks with a tarp.
- Clear the Area: Move furniture, electronics, and valuables to prevent further damage.
- Contain the Water: Use buckets or towels under drips to catch water.
- Ventilate: Open windows and use fans if safe to do so (avoid using electricity if water is near outlets).
- Document the Damage: Take photos for insurance and tracking progress.
Never poke holes in a sagging ceiling without safety gear—waterlogged ceilings can collapse.
Finding The Source Of Moisture
Solving the problem means finding where the water comes from. Here’s how to track down the cause:
Roof Leaks
- Inspect the attic for wet insulation, dark wood, or water trails.
- Check the roof for missing shingles, cracked flashing, or clogged gutters.
- Rainy weather is the best time to find active leaks.
Plumbing Leaks
- Look for water stains directly below bathrooms or kitchens.
- Listen for dripping or rushing water sounds.
- Check pipe joints, valves, and connections above the ceiling.
Condensation
- Notice if moisture appears after showers, cooking, or laundry.
- Check for cold air leaks near windows, vents, or poorly insulated spots.
- Measure humidity levels—over 60% can cause condensation.
Attic Ventilation Issues
- Feel for warm, damp air in the attic.
- Inspect soffit, ridge, and gable vents for blockages.
- Look for mold or mildew on attic wood.
Hidden Leaks
Sometimes, leaks are out of sight. One non-obvious trick: use colored food dye in toilet tanks or drains above the ceiling. If color appears in the ceiling stain, you’ve found your source.
How To Remove Moisture From The Ceiling: Step-by-step
After finding and fixing the source, it’s time to dry out and repair the ceiling. The process may take a few hours to several days depending on the severity.
1. Prepare The Area
- Protect Floors and Furniture: Cover with plastic sheeting or old towels.
- Turn Off Electricity: If water is near light fixtures or outlets, shut off power at the breaker.
2. Remove Surface Water
- Wipe away standing water with towels or a sponge.
- For bulging or sagging spots, use a screwdriver to gently poke a small hole at the lowest point (wear safety goggles and have a bucket ready).
- Let water drain fully to avoid a sudden collapse.
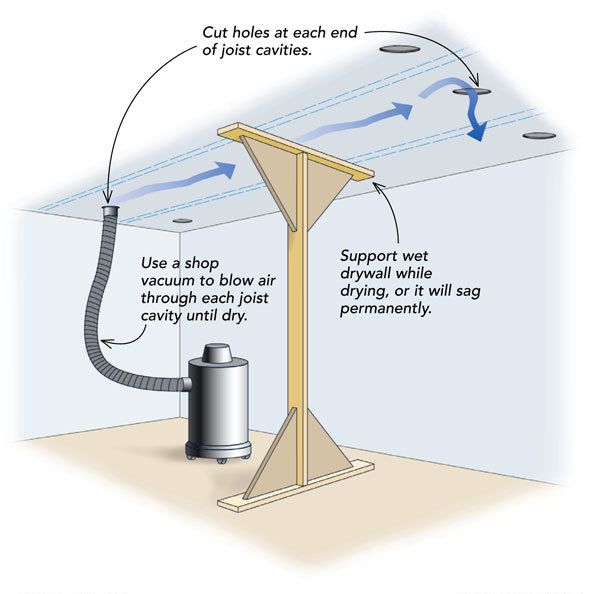
3. Dry The Ceiling Thoroughly
Proper drying is the most important step. Here’s how to do it right:
Airflow And Dehumidifiers
- Open windows and doors to increase ventilation.
- Place fans aimed at the wet area to circulate air.
- Set up a dehumidifier to pull moisture from the air (especially in humid climates).
Heat
- Use a portable heater or the central system to raise the temperature slightly.
- Warm air speeds up evaporation, but don’t overheat, as it can crack paint.
Remove Damaged Material
If the ceiling is very wet, you may need to cut out and remove sections of drywall or plaster. Moldy or crumbling material must be replaced, not just dried.
Check Progress
Use a moisture meter daily. The ceiling should be below 15% moisture content before repairs. Rushing this step is a common beginner mistake—trapped moisture leads to mold and new damage.
4. Clean And Disinfect
- Scrub the area with a mixture of water and mild detergent.
- For mold, use a solution of 1 cup bleach to 1 gallon of water.
- Wear gloves, goggles, and a mask for safety.
Cleaning removes spores and prevents regrowth. Do not paint over mold—this hides the problem but doesn’t solve it.
5. Repair And Repaint
Once the ceiling is dry and clean, you can repair and restore the surface:
Patch Holes And Cracks
- Use joint compound or spackle for small holes and cracks.
- For larger sections, cut a new piece of drywall to fit, screw it in, and tape the seams.
Prime And Paint
- Always use a stain-blocking primer to seal in any remaining discoloration.
- Paint with a high-quality, mold-resistant paint for lasting results.
Texture Matching
If your ceiling is textured, use a matching spray or roller to blend the new area. This step makes repairs nearly invisible.
6. Prevent Future Moisture
A one-time fix isn’t enough if the cause remains. Take these steps to stop moisture from returning:
Improve Ventilation
- Install or upgrade exhaust fans in bathrooms and kitchens.
- Use fans during and after showers or cooking.
- Add attic vents if airflow is poor.
Insulate
- Add insulation above the ceiling to prevent warm air from hitting cold surfaces.
- Seal gaps around pipes, windows, and vents.
Regular Maintenance
- Check roofs, gutters, and pipes twice a year.
- Repair cracked caulk or missing shingles immediately.
- Test humidity levels and use dehumidifiers if needed.
Monitor For Signs
Set a reminder to inspect your ceiling every few months. Early action prevents big repairs.
Comparing Methods To Remove Ceiling Moisture
Different situations call for different drying and repair methods. Here’s a comparison to help you choose:
| Method | Best For | Speed | DIY-Friendly | Cost |
|---|---|---|---|---|
| Fans & Dehumidifiers | Small, recent moisture | 1-3 days | Yes | Low |
| Drywall Removal | Heavy, soaked areas | Several days | Sometimes | Medium-High |
| Professional Drying | Mold, large leaks | 1-5 days | No | High |
| Heat Guns | Small, isolated spots | Hours | Yes (with care) | Low-Medium |
For most homeowners, fans and dehumidifiers are enough for minor moisture. For larger issues, cutting out damaged ceiling or hiring professionals is safest.
Common Mistakes To Avoid
Many people make errors that lead to bigger, costlier problems. Here’s what to watch out for:
- Ignoring the Cause: Drying the ceiling without fixing leaks guarantees the problem returns.
- Rushing Repairs: Painting or patching too soon traps moisture, leading to mold.
- Poor Ventilation: Skipping exhaust fans means moisture keeps building up.
- Using the Wrong Products: Regular paint won’t block stains or mold—always use the right primer and paint.
- Not Wearing Safety Gear: Mold and cleaning products can harm your lungs and skin.
- Assuming All Moisture Is From Rain: Sometimes, pipes or condensation are the real culprits.
Two non-obvious insights:
- Hidden leaks often travel far from the source. Water can move along beams or wires, showing up far from where the problem started.
- Small leaks can cause big mold problems. Even a drip every few hours is enough for mold to grow, especially in warm, dark spaces.
When To Call A Professional
Some moisture problems are too risky for DIY fixes. Here’s when you should get expert help:
- The ceiling is sagging or may collapse.
- There’s visible black mold or a musty smell after cleaning.
- You can’t find the leak’s source.
- Water is near electrical wiring or fixtures.
- The damage covers more than 10 square feet.
Professionals use industrial dryers, mold treatments, and can safely repair structural damage. They also help with insurance claims and documentation.
Cost Of Removing Moisture From Ceilings
The price varies widely based on the cause and severity. Here’s a general range:
| Service | Average Cost | What’s Included |
|---|---|---|
| DIY Fans & Dehumidifiers | $50 – $300 | Equipment rental, basic supplies |
| Minor Ceiling Repair | $150 – $600 | Patching, priming, painting |
| Professional Drying & Mold Removal | $500 – $2,500 | Industrial drying, cleaning, mold treatment |
| Major Ceiling Replacement | $1,000 – $5,000 | Demolition, new materials, labor |
Insurance may cover some costs if the damage is sudden and accidental. Always review your policy and contact your insurer for guidance.
Long-term Prevention Strategies
Keeping your ceiling dry is easier than constant repairs. Here’s how to protect your home year-round:
Control Humidity
- Keep indoor humidity between 30-50%. Use a hygrometer to check.
- Run dehumidifiers in damp seasons or areas.
Maintain Roof And Gutters
- Clean gutters every spring and fall.
- Repair missing or damaged shingles immediately.
- Seal roof penetrations (vents, chimneys) with proper flashing.
Upgrade Bathroom And Kitchen Fans
- Replace weak fans with models rated for your room size.
- Run fans for at least 20 minutes after showering or cooking.
Improve Insulation
- Add insulation to attic floors and ceiling joists.
- Seal attic hatches and recessed lights to stop air leaks.
Inspect Regularly
- Look for stains or soft spots after big storms.
- Test pipe joints and valves above ceilings every six months.
Respond Quickly
- At the first sign of moisture, act—delay means bigger repairs later.
Educate Family Members
- Teach everyone in the home to spot early warning signs and report them.
Credit: www.finehomebuilding.com
Health And Safety Concerns
Moisture in ceilings isn’t just about property—it affects health too. Mold spores can trigger allergies, asthma, and respiratory infections. Children, seniors, and those with weak immune systems are most at risk.
If you see or smell mold, limit time in the area until it’s cleaned. Wear gloves and a mask when cleaning. If symptoms persist, see a doctor and get professional cleaning.
Environmental Impact Of Moisture Damage
Letting moisture go unchecked not only damages your home, but can also increase energy use. Wet insulation is less effective, making heating and cooling more expensive. Fixing leaks and drying ceilings helps the environment by reducing wasted energy and avoiding the need for new materials.

Credit: homewarranty.firstam.com
Useful Resources For Further Learning
If you want to dive deeper into water damage and repair, the Environmental Protection Agency (EPA) offers a detailed mold guide. For more, visit EPA Mold Guide.
Frequently Asked Questions
How Long Does It Take To Dry A Wet Ceiling?
Drying time depends on the amount of water, ventilation, and temperature. Small areas may dry in one to three days with fans and dehumidifiers. Larger or heavily soaked ceilings can take up to a week. Use a moisture meter to check dryness before repairs.
Can I Paint Over A Water-stained Ceiling?
You should only paint after the ceiling is completely dry and cleaned. Use a stain-blocking primer to prevent stains from showing through. Painting over wet or moldy areas will make the problem worse and cause the paint to peel.
Is Ceiling Mold Dangerous?
Some molds can cause health problems, especially for people with allergies or weak immune systems. Even non-toxic mold can trigger breathing issues. If you see black, green, or heavy mold growth, it’s safest to call a professional for removal.
How Do I Know If The Leak Is From The Roof Or Plumbing?
Roof leaks often show up after rain and may be near outside walls. Plumbing leaks can happen anytime, especially below bathrooms or kitchens. Use food dye in drains or toilet tanks above the wet spot—if color appears in the ceiling, it’s a plumbing issue.
Will Insurance Cover Ceiling Water Damage?
Home insurance may cover sudden and accidental leaks (like a burst pipe or storm damage), but not slow leaks or maintenance issues. Take photos, document everything, and contact your insurer as soon as possible for guidance.
Dealing with ceiling moisture takes effort and attention, but with the right steps, you can protect your home and health. Stay alert, act quickly, and don’t be afraid to call for help when needed. Your ceiling—and your peace of mind—will thank you.